Quick Guide (easy Manual) (ver.1.0) (English)
Page 2
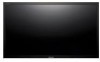
Select Language Main Page Safety Instructions Introduction Package Contents Your LCD Display Mechanical Layout Connections Using the Software Adjusting the LCD Display Troubleshooting Specifications Information Appendix Model SyncMaster 570DX The color and appearance of the product may vary depending on the model, and the product specifications are subject to buy optional items. Note • ...
Select Language Main Page Safety Instructions Introduction Package Contents Your LCD Display Mechanical Layout Connections Using the Software Adjusting the LCD Display Troubleshooting Specifications Information Appendix Model SyncMaster 570DX The color and appearance of the product may vary depending on the model, and the product specifications are subject to buy optional items. Note • ...

Quick Guide (easy Manual) (ver.1.0) (English)
Page 3
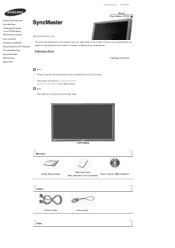
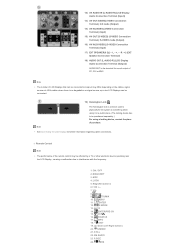
... locations) Cover-Hole BNC to RCA Adaptor Jack Sold separately Semi Stand Screw: 4 EA Wall Mount KIT Speaker Set BNC Cable Front DVI Cable Your LCD Display 1) MENU Opens the on-screen menu and exits from the menu or closes the adjustment menu. 2) Navigate buttons (Up-Down buttons) Moves from one menu...
... locations) Cover-Hole BNC to RCA Adaptor Jack Sold separately Semi Stand Screw: 4 EA Wall Mount KIT Speaker Set BNC Cable Front DVI Cable Your LCD Display 1) MENU Opens the on-screen menu and exits from the menu or closes the adjustment menu. 2) Navigate buttons (Up-Down buttons) Moves from one menu...
Quick Guide (easy Manual) (ver.1.0) (English)
Page 4
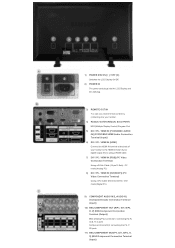
... Connecting Cables under Setup. Note • See PowerSaver described in the manual for external devices that are connected to the LCD Display at the back may vary slightly depending on screen as BNC and the component use the same terminal. >> Click here ... AV / S-Video PC / BNC / DVI Mode • Component PC / DVI Mode • HDMI PC / BNC Mode 7) Power button Turns the LCD Display On/Off. 8) Brightness Sensor The product's Brightness Sensor function automatically detects the surrounding brightness using a brightness sensor and adjusts its brightness accordingly. 9) Power indicator ...
... Connecting Cables under Setup. Note • See PowerSaver described in the manual for external devices that are connected to the LCD Display at the back may vary slightly depending on screen as BNC and the component use the same terminal. >> Click here ... AV / S-Video PC / BNC / DVI Mode • Component PC / DVI Mode • HDMI PC / BNC Mode 7) Power button Turns the LCD Display On/Off. 8) Brightness Sensor The product's Brightness Sensor function automatically detects the surrounding brightness using a brightness sensor and adjusts its brightness accordingly. 9) Power indicator ...
Quick Guide (easy Manual) (ver.1.0) (English)
Page 5
...11) BNC/COMPONENT IN [R/PR, G/Y, B/PB, H, V] (BNC/Component Connection Terminal (Input)) 1) POWER S/W ON [ | ] / OFF [O] Switches the LCD Display On/Off. 2) POWER IN The power cord plugs into the LCD Display and the wall plug. 3) REMOTE OUT/IN You can use a wired remote control by connecting it to your monitor. 4) RS232C... OUT/IN (RS232C Serial PORT) MDC(Multiple Display Control) Program Port 5) DVI / PC / HDMI IN [PC/...
...11) BNC/COMPONENT IN [R/PR, G/Y, B/PB, H, V] (BNC/Component Connection Terminal (Input)) 1) POWER S/W ON [ | ] / OFF [O] Switches the LCD Display On/Off. 2) POWER IN The power cord plugs into the LCD Display and the wall plug. 3) REMOTE OUT/IN You can use a wired remote control by connecting it to your monitor. 4) RS232C... OUT/IN (RS232C Serial PORT) MDC(Multiple Display Control) Program Port 5) DVI / PC / HDMI IN [PC/...
Quick Guide (easy Manual) (ver.1.0) (English)
Page 6
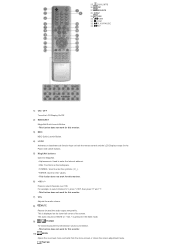
.... MagicNet buttons 6.+100 -/-- 7. S.MODE 21. MAGICNET 3. AUTO 14. Note • The number of purchase. • See Connecting the LCD Display for sound output of the remote control may differ depending on the cables, signal source etc. ON / OFF 2. MENU 11. P.MODE 13.... 12) AV AUDIO IN [L-AUDIO-R] (LCD Display Audio Connection Terminal (Input)) 13) AV OUT [VIDEO] (VIDEO Connection Terminal): AV mode (Output) 14) AV IN [VIDEO] (VIDEO Connection ...
.... MagicNet buttons 6.+100 -/-- 7. S.MODE 21. MAGICNET 3. AUTO 14. Note • The number of purchase. • See Connecting the LCD Display for sound output of the remote control may differ depending on the cables, signal source etc. ON / OFF 2. MENU 11. P.MODE 13.... 12) AV AUDIO IN [L-AUDIO-R] (LCD Display Audio Connection Terminal (Input)) 13) AV OUT [VIDEO] (VIDEO Connection Terminal): AV mode (Output) 14) AV IN [VIDEO] (VIDEO Connection ...
Quick Guide (easy Manual) (ver.1.0) (English)
Page 7
25. FF 1) ON / OFF Turns the LCD Display On/Off. 2) MAGICNET MagicNet Quick Launch Button. - For example, to select channels over 100. SOURCE 28. VOL + is displayed on the lower left corner of the screen. PIP 27. PLAY/PAUSE 33. This fuction does not work for this monitor. 6)...: Used to enter values. - This fuction does not work for this monitor. 10) MENU Opens the on both the remote control and the LCD Display except for the Power and LOCK buttons. 5) MagicNet buttons Used for this monitor. 3) MDC MDC Quick Launch Button. 4) LOCK Activates or deactivates...
25. FF 1) ON / OFF Turns the LCD Display On/Off. 2) MAGICNET MagicNet Quick Launch Button. - For example, to select channels over 100. SOURCE 28. VOL + is displayed on the lower left corner of the screen. PIP 27. PLAY/PAUSE 33. This fuction does not work for this monitor. 6)...: Used to enter values. - This fuction does not work for this monitor. 10) MENU Opens the on both the remote control and the LCD Display except for the Power and LOCK buttons. 5) MagicNet buttons Used for this monitor. 3) MDC MDC Quick Launch Button. 4) LOCK Activates or deactivates...
Quick Guide (easy Manual) (ver.1.0) (English)
Page 8
This fuction does not work for this monitor. 16) SOURCE Changes the video source. 17) INFO The current picture information is displayed in the control panel, auto function is a new feature providing the optimum viewing environment depending on the lower center of the screen. In general Video mode, selects FM... preset at the bottom centre of the screen. Press it again to change the screen size. 24) SRS SRS 25) DUAL/MTS DUAL- The LCD Display has a built-in PC mode. By changing the resolution in the top left corner of the screen. 18) EXIT Exits from the menu screen....
This fuction does not work for this monitor. 16) SOURCE Changes the video source. 17) INFO The current picture information is displayed in the control panel, auto function is a new feature providing the optimum viewing environment depending on the lower center of the screen. In general Video mode, selects FM... preset at the bottom centre of the screen. Press it again to change the screen size. 24) SRS SRS 25) DUAL/MTS DUAL- The LCD Display has a built-in PC mode. By changing the resolution in the top left corner of the screen. 18) EXIT Exits from the menu screen....

Quick Guide (easy Manual) (ver.1.0) (English)
Page 10
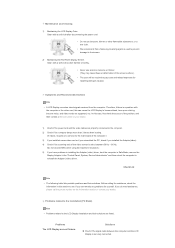
...label folded backwards. 1) To protect your monitor, please place the Cover Hole over it. 2) Insert it firmly. Caution Samsung Electronics will not be used. Caution The resolution may vary depending on the optimal resolution, refer to the user manual....enhancement. Select Language Main Page Safety Instructions Introduction Connections Installing the Stand KIT Connecting the LCD Display Using the Software Adjusting the LCD Display Troubleshooting Specifications Information Appendix Model SyncMaster 570DX The color and appearance of the product may differ for damages caused by using a...
...label folded backwards. 1) To protect your monitor, please place the Cover Hole over it. 2) Insert it firmly. Caution Samsung Electronics will not be used. Caution The resolution may vary depending on the optimal resolution, refer to the user manual....enhancement. Select Language Main Page Safety Instructions Introduction Connections Installing the Stand KIT Connecting the LCD Display Using the Software Adjusting the LCD Display Troubleshooting Specifications Information Appendix Model SyncMaster 570DX The color and appearance of the product may differ for damages caused by using a...
Quick Guide (easy Manual) (ver.1.0) (English)
Page 11
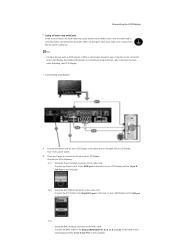
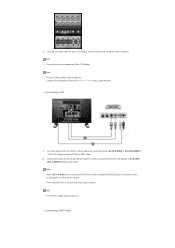
... on the video card. Connect the DVI Cable to the 15-pin, RGB port on the back of your LCD Display. Trun on the back of your computer can be connected to your LCD Display and the DVI port on the computer. 2-3) Using the BNC (Analog) connector on the video card. Connecting a Computer 1) Connect... AC power in correctly, before connecting the AC power. Note • AV input devices such as DVD players, VCR's or camcorders as well as your LCD Display and the 15 pin D-sub Port on the video card. Choose one of failure, the earth lead may cause electric shock. Connecting the...
... on the video card. Connect the DVI Cable to the 15-pin, RGB port on the back of your LCD Display. Trun on the back of your computer can be connected to your LCD Display and the DVI port on the computer. 2-3) Using the BNC (Analog) connector on the video card. Connecting a Computer 1) Connect... AC power in correctly, before connecting the AC power. Note • AV input devices such as DVD players, VCR's or camcorders as well as your LCD Display and the 15 pin D-sub Port on the video card. Choose one of failure, the earth lead may cause electric shock. Connecting the...
Quick Guide (easy Manual) (ver.1.0) (English)
Page 12
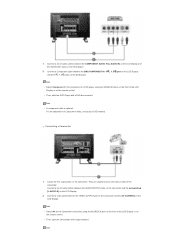
... S-VHS or BNC cable is optional. Contact a local Samsung Electronics Service Center to buy optional items. Connecting a VCR 1) AV input devices such as VCRs or Camcorders are connected via the AV IN [VIDEO] or AV IN [S-VIDEO] of the LCD Display using an S-VHS or BNC cable. 2) Connect the ...the remote control. • Then, start the VCR or Camcorders with a tape inserted. Note • Select AV or S-Video for your LCD Display to the LCD Display 's AV AUDIO IN [L-AUDIO-R] using the SOURCE button on both your computer. 3) Connect the audio cable for a connected VCR or Camcorder ...
... S-VHS or BNC cable is optional. Contact a local Samsung Electronics Service Center to buy optional items. Connecting a VCR 1) AV input devices such as VCRs or Camcorders are connected via the AV IN [VIDEO] or AV IN [S-VIDEO] of the LCD Display using an S-VHS or BNC cable. 2) Connect the ...the remote control. • Then, start the VCR or Camcorders with a tape inserted. Note • Select AV or S-Video for your LCD Display to the LCD Display 's AV AUDIO IN [L-AUDIO-R] using the SOURCE button on both your computer. 3) Connect the audio cable for a connected VCR or Camcorder ...
Quick Guide (easy Manual) (ver.1.0) (English)
Page 13
.... • Then, start the Camcorders with a DVD disc inserted. Connect a set of audio cables between the COMPONENT AUDIO IN [L-AUDIO-R] on the LCD Display and the AUDIO OUT jacks on the camcorder. Note • Select AV for the connection to a DVD player using the SOURCE button on the front... of the LCD Display or on the LCD Display. Note 1) Connect a set of audio cables between the AUDIO OUTPUT jacks on the camcorder and the AV AUDIO IN [L-AUDIO-R] on the...
.... • Then, start the Camcorders with a DVD disc inserted. Connect a set of audio cables between the COMPONENT AUDIO IN [L-AUDIO-R] on the LCD Display and the AUDIO OUT jacks on the camcorder. Note • Select AV for the connection to a DVD player using the SOURCE button on the front... of the LCD Display or on the LCD Display. Note 1) Connect a set of audio cables between the AUDIO OUTPUT jacks on the camcorder and the AV AUDIO IN [L-AUDIO-R] on the...
Quick Guide (easy Manual) (ver.1.0) (English)
Page 14
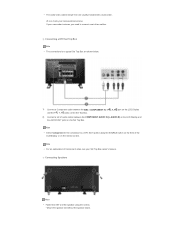
... of Component video, see your camcorder is stereo, you need to a DTV Set Top Box using the screws. * Mount the speaker set of the LCD Display or on the Set Top Box. Note • Select Component for a typical Set Top Box are usually included with a Camcorder. (If not, check...speaker stand. • The audio-video cables shown here are shown below. 1) Connect a Component cable between the COMPONENT AUDIO IN [L-AUDIO-R] on the LCD Display and the AUDIO OUT jacks on the remote control. Connecting Speakers Note • Fasten the SET and the speaker using the SOURCE button on the...
... of Component video, see your camcorder is stereo, you need to a DTV Set Top Box using the screws. * Mount the speaker set of the LCD Display or on the Set Top Box. Note • Select Component for a typical Set Top Box are usually included with a Camcorder. (If not, check...speaker stand. • The audio-video cables shown here are shown below. 1) Connect a Component cable between the COMPONENT AUDIO IN [L-AUDIO-R] on the LCD Display and the AUDIO OUT jacks on the remote control. Connecting Speakers Note • Fasten the SET and the speaker using the SOURCE button on the...
Quick Guide (easy Manual) (ver.1.0) (English)
Page 15
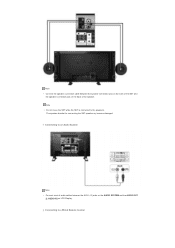
Connecting to an Audio System Note • Connect a set of audio cables between the speaker connection jack on the back of the speaker. Note • Connect the speaker connection cable between the AUX L, R jacks on the AUDIO SYSTEM and the AUDIO OUT [L-AUDIO-R] on the back of the SET and the speaker connection jack on LCD Display. Connecting to a Wired Remote Control The speaker-bracket for connecting the SET speaker my become damaged. Note • Do not move the SET while the SET is connected to the speakers.
Connecting to an Audio System Note • Connect a set of audio cables between the speaker connection jack on the back of the speaker. Note • Connect the speaker connection cable between the AUX L, R jacks on the AUDIO SYSTEM and the AUDIO OUT [L-AUDIO-R] on the back of the SET and the speaker connection jack on LCD Display. Connecting to a Wired Remote Control The speaker-bracket for connecting the SET speaker my become damaged. Note • Do not move the SET while the SET is connected to the speakers.
Quick Guide (easy Manual) (ver.1.0) (English)
Page 18
... of the computer. 3) Turn on the LCD Display. Select Language Main Page Safety Instructions Introduction Connections Using the Software Adjusting the LCD Display Troubleshooting Self-Test Feature Check Check List Q & A Specifications Information Appendix Model SyncMaster 570DX The color and appearance of the product may...figure moves around on the screen. 4) Turn off both your computer and the LCD Display If your LCD Display screen remains blank after using the previous procedure, check your LCD Display and reconnect the video cable; Troubleshooting Self-Test Feature Check Note • ...
... of the computer. 3) Turn on the LCD Display. Select Language Main Page Safety Instructions Introduction Connections Using the Software Adjusting the LCD Display Troubleshooting Self-Test Feature Check Check List Q & A Specifications Information Appendix Model SyncMaster 570DX The color and appearance of the product may...figure moves around on the screen. 4) Turn off both your computer and the LCD Display If your LCD Display screen remains blank after using the previous procedure, check your LCD Display and reconnect the video cable; Troubleshooting Self-Test Feature Check Note • ...
Quick Guide (easy Manual) (ver.1.0) (English)
Page 19
...; The following table lists possible problems and their solutions are properly connected to the screen. 2) Maintaining the Flat Panel Display Screen. Problems The LCD Display screen flickers. Clean with the computer or the video card, this can remedy any problems for repairing damages..., thinner or other flammable substances, or a wet cloth. • We recommend that a Samsung cleansing agent is securely connected. Symptoms and Recommended Actions Note • A LCD Display recreates visual signals received from the computer. In this section to see if you have poor coloring...
...; The following table lists possible problems and their solutions are properly connected to the screen. 2) Maintaining the Flat Panel Display Screen. Problems The LCD Display screen flickers. Clean with the computer or the video card, this can remedy any problems for repairing damages..., thinner or other flammable substances, or a wet cloth. • We recommend that a Samsung cleansing agent is securely connected. Symptoms and Recommended Actions Note • A LCD Display recreates visual signals received from the computer. In this section to see if you have poor coloring...
Quick Guide (easy Manual) (ver.1.0) (English)
Page 20
...The picture image is inconsistent. The screen color is unstable and shakes. The power Indicator blinks green. z The LCD Display is too light or too dark. z The LCD Display is properly connected. The picture rolls vertically. The image is currently saving the changes made to the settings to ... them referring to Audio Note Re-connect it is poor. The screen is blank and the power indicator light is distorted by the LCD Display. z Check the maximum resolution and the frequency of the video Adaptor. z Turn on the keyboard. Problems related to the current ...
...The picture image is inconsistent. The screen color is unstable and shakes. The power Indicator blinks green. z The LCD Display is too light or too dark. z The LCD Display is properly connected. The picture rolls vertically. The image is currently saving the changes made to the settings to ... them referring to Audio Note Re-connect it is poor. The screen is blank and the power indicator light is distorted by the LCD Display. z Check the maximum resolution and the frequency of the video Adaptor. z Turn on the keyboard. Problems related to the current ...
Quick Guide (easy Manual) (ver.1.0) (English)
Page 21
... the audio-out port on the computer sound card or software program. Do not leave any water enter the LCD Display. © 1995~2007 SAMSUNG. z Check the volume level. Solutions z Check the polarities (+/-) of the computer. (Refer to the appropriate levels. Note that the ... and their solutions are listed below. The frequency can I Adjusts the resolution? z Windows XP: Set the resolution in the Control Panel → Appearance and Themes → Display → Settings. Do not let any detergent or scratches on . z Adjusts the Treble and Bass to the Windows / Computer Manual...
... the audio-out port on the computer sound card or software program. Do not leave any water enter the LCD Display. © 1995~2007 SAMSUNG. z Check the volume level. Solutions z Check the polarities (+/-) of the computer. (Refer to the appropriate levels. Note that the ... and their solutions are listed below. The frequency can I Adjusts the resolution? z Windows XP: Set the resolution in the Control Panel → Appearance and Themes → Display → Settings. Do not let any detergent or scratches on . z Adjusts the Treble and Bass to the Windows / Computer Manual...

Quick Guide (easy Manual) (ver.1.0) (Korean)
Page 2
Mechanical Layout SyncMaster 570DX 구성품 Floor standing type 안내서 LCD Display MDC D-Sub(15 Pin 전원선
Mechanical Layout SyncMaster 570DX 구성품 Floor standing type 안내서 LCD Display MDC D-Sub(15 Pin 전원선
Quick Guide (easy Manual) (ver.1.0) (Korean)
Page 19
ALL Rights Reserved z z z 해결방안 z z z z z 궁금해요 z Windows XP z Windows ME/2000 z Windows XP BIOS SETUP Windows z Windows ME/2000 BIOS SETUP Windows 외관/LCD 요? 요. 단, LCD © 1995~2007 SAMSUNG.
ALL Rights Reserved z z z 해결방안 z z z z z 궁금해요 z Windows XP z Windows ME/2000 z Windows XP BIOS SETUP Windows z Windows ME/2000 BIOS SETUP Windows 외관/LCD 요? 요. 단, LCD © 1995~2007 SAMSUNG.

User Manual (user Manual) (ver.1.0) (English)
Page 34
...Mode : Off Blue Screen : Off Melody : Off PC Home Theatre PC : Off More 1 Press the MENU button to display the menu. 2 Press the ▲ or ▼ button to select Setup, then press the Move Enter Return ENTER button. 3 Press the ▲ or ▼ button... in PC Mode. You can configure the Detailed Settings (when Picture Mode is available only in PC mode. Product Family LCD-TV inches 23 ~ 26 32 ~ 40 46 ~ 52 57 PDP-TV/MONITOR 57 ~ 70 80 ~ 42 ~ 58 70 63 80 ~ VESA Spec. (A * B) 200 * 100 200 * 200 600 * 400 700 * 400 (...
...Mode : Off Blue Screen : Off Melody : Off PC Home Theatre PC : Off More 1 Press the MENU button to display the menu. 2 Press the ▲ or ▼ button to select Setup, then press the Move Enter Return ENTER button. 3 Press the ▲ or ▼ button... in PC Mode. You can configure the Detailed Settings (when Picture Mode is available only in PC mode. Product Family LCD-TV inches 23 ~ 26 32 ~ 40 46 ~ 52 57 PDP-TV/MONITOR 57 ~ 70 80 ~ 42 ~ 58 70 63 80 ~ VESA Spec. (A * B) 200 * 100 200 * 200 600 * 400 700 * 400 (...


