

Open Source Guide (ENGLISH)
Page 1
...Terms to Your New Programs If you develop a new program, and you indicate your freedom to most ordinary way, to print or display an announcement including an appropriate copyright notice and a notice that refer to time. and each file should have is safest to all the... offer warranty protection in other circumstances. The precise terms and conditions for questions regarding open sources, contact Samsung via Email (vdswmanager@samsung. Thus, it clear that system; The original manual has wrong versions of that any free program is made it is to exercise the right to copy ...
...Terms to Your New Programs If you develop a new program, and you indicate your freedom to most ordinary way, to print or display an announcement including an appropriate copyright notice and a notice that refer to time. and each file should have is safest to all the... offer warranty protection in other circumstances. The precise terms and conditions for questions regarding open sources, contact Samsung via Email (vdswmanager@samsung. Thus, it clear that system; The original manual has wrong versions of that any free program is made it is to exercise the right to copy ...
Quick Guide (easy Manual) (ver.1.0) (English)
Page 2
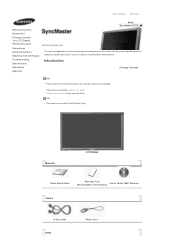
... notice for the Floor Standing Type. If any items are missing, contact your LCD Display. Select Language Main Page Safety Instructions Introduction Package Contents Your LCD Display Mechanical Layout Connections Using the Software Adjusting the LCD Display Troubleshooting Specifications Information Appendix Model SyncMaster 570DX The color and appearance of the product may vary depending on the model, and...
... notice for the Floor Standing Type. If any items are missing, contact your LCD Display. Select Language Main Page Safety Instructions Introduction Package Contents Your LCD Display Mechanical Layout Connections Using the Software Adjusting the LCD Display Troubleshooting Specifications Information Appendix Model SyncMaster 570DX The color and appearance of the product may vary depending on the model, and...
Quick Guide (easy Manual) (ver.1.0) (English)
Page 4
... power saving functions. Note • See PowerSaver described in the manual for long periods. Rear Note • For detailed information concerning cable connections, refer to turn your LCD Display OFF when it is only allowed for external devices that are connected to the LCD Display at the back may vary slightly depending on screen as...
... power saving functions. Note • See PowerSaver described in the manual for long periods. Rear Note • For detailed information concerning cable connections, refer to turn your LCD Display OFF when it is only allowed for external devices that are connected to the LCD Display at the back may vary slightly depending on screen as...
Quick Guide (easy Manual) (ver.1.0) (English)
Page 8
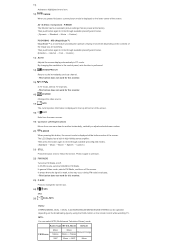
... in the control panel, auto function is weak, noise may occur during FM radio broadcasts. - This fuction does not work for this monitor. 16) SOURCE Changes the video source. 17) INFO The current picture information is displayed in high fidelity stereo amplifier. The LCD Display has a built-in...adjusts selected menu values. 20) S.MODE When pressing this button, current picture mode is displayed on the lower center of the screen. Audio Type MTS/S_Mode Default FM Stereo Mono Stereo SAP Mono Manual Change Mono ↔ Stereo Mono ↔ SAP Mono In general Video mode, selects ...
... in the control panel, auto function is weak, noise may occur during FM radio broadcasts. - This fuction does not work for this monitor. 16) SOURCE Changes the video source. 17) INFO The current picture information is displayed in high fidelity stereo amplifier. The LCD Display has a built-in...adjusts selected menu values. 20) S.MODE When pressing this button, current picture mode is displayed on the lower center of the screen. Audio Type MTS/S_Mode Default FM Stereo Mono Stereo SAP Mono Manual Change Mono ↔ Stereo Mono ↔ SAP Mono In general Video mode, selects ...

Quick Guide (easy Manual) (ver.1.0) (English)
Page 10
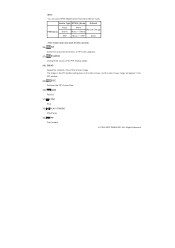
... information on the model, and the product specifications are subject to the user manual. Select Language Main Page Safety Instructions Introduction Connections Installing the Stand KIT Connecting the LCD Display Using the Software Adjusting the LCD Display Troubleshooting Specifications Information Appendix Model SyncMaster 570DX The color and appearance of the product may differ for each product model...
... information on the model, and the product specifications are subject to the user manual. Select Language Main Page Safety Instructions Introduction Connections Installing the Stand KIT Connecting the LCD Display Using the Software Adjusting the LCD Display Troubleshooting Specifications Information Appendix Model SyncMaster 570DX The color and appearance of the product may differ for each product model...

Quick Guide (easy Manual) (ver.1.0) (English)
Page 13
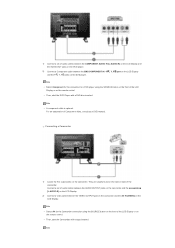
...tape inserted. Note They are usually found on the side or back of Component video, consult your DVD manual. Connect a set of audio cables between the COMPONENT AUDIO IN [L-AUDIO-R] on the LCD Display and the AUDIO OUT jacks on the DVD player. 2) Connect a Component cable between the VIDEO OUTPUT... jack on the camcorder and the AV IN [VIDEO] on the LCD Display. PR, Y, PB port on the LCD Display and the PR, Y, PB jacks on the camcorder. For an explanation of the camcorder. 1) Connect a set of audio cables between...
...tape inserted. Note They are usually found on the side or back of Component video, consult your DVD manual. Connect a set of audio cables between the COMPONENT AUDIO IN [L-AUDIO-R] on the LCD Display and the AUDIO OUT jacks on the DVD player. 2) Connect a Component cable between the VIDEO OUTPUT... jack on the camcorder and the AV IN [VIDEO] on the LCD Display. PR, Y, PB port on the LCD Display and the PR, Y, PB jacks on the camcorder. For an explanation of the camcorder. 1) Connect a set of audio cables between...

Quick Guide (easy Manual) (ver.1.0) (English)
Page 14
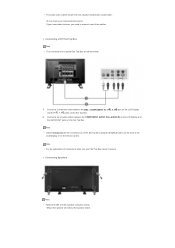
... Component for a typical Set Top Box are usually included with a Camcorder. (If not, check your local electronics store.) If your Set Top Box owner's manual. Note • For an explanation of Component video, see your camcorder is stereo, you need to a DTV Set Top Box using the screws. * Mount... the speaker set of the LCD Display or on the remote control. PR, Y, PB port on the LCD Display and the PR, Y, PB jacks on the Set Top Box. 2) Connect a set without the speaker stand. Connecting Speakers ...
... Component for a typical Set Top Box are usually included with a Camcorder. (If not, check your local electronics store.) If your Set Top Box owner's manual. Note • For an explanation of Component video, see your camcorder is stereo, you need to a DTV Set Top Box using the screws. * Mount... the speaker set of the LCD Display or on the remote control. PR, Y, PB port on the LCD Display and the PR, Y, PB jacks on the Set Top Box. 2) Connect a set without the speaker stand. Connecting Speakers ...
Quick Guide (easy Manual) (ver.1.0) (English)
Page 21
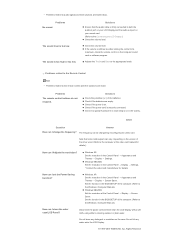
...is on the case. Q & A Question Answer How can I clean the outer case/LCD Panel? How can I Adjusts the resolution? Do not leave any water enter the LCD Display. © 1995~2007 SAMSUNG. Do not let any detergent or scratches on in port on your sound card. (Refer...related to the Windows / Computer Manual). z Windows XP: Set the resolution in the BIOS-SETUP of the computer. (Refer to the remote control and their solutions are empty. Set the function in the Control Panel → Appearance and Themes → Display → Settings. Solutions z ...
...is on the case. Q & A Question Answer How can I clean the outer case/LCD Panel? How can I Adjusts the resolution? Do not leave any water enter the LCD Display. © 1995~2007 SAMSUNG. Do not let any detergent or scratches on in port on your sound card. (Refer...related to the Windows / Computer Manual). z Windows XP: Set the resolution in the BIOS-SETUP of the computer. (Refer to the remote control and their solutions are empty. Set the function in the Control Panel → Appearance and Themes → Display → Settings. Solutions z ...
User Manual (user Manual) (ver.1.0) (English)
Page 1
ON-SCREEN MENUS Picture In Picture (PIP) Energy Saving SRS TruSurround XT Digital Natural Image engine Register your product at www.samsung.com/global/register Record your Model and Serial number here for future reference. Professional PDP Display (PLASMA DISPLAY PANEL) PPM50M7F/PPM63M7F Owner's Instructions Before operating the unit, please read this manual thoroughly, and retain it for future reference. ▪ Model Serial No
ON-SCREEN MENUS Picture In Picture (PIP) Energy Saving SRS TruSurround XT Digital Natural Image engine Register your product at www.samsung.com/global/register Record your Model and Serial number here for future reference. Professional PDP Display (PLASMA DISPLAY PANEL) PPM50M7F/PPM63M7F Owner's Instructions Before operating the unit, please read this manual thoroughly, and retain it for future reference. ▪ Model Serial No
User Manual (user Manual) (ver.1.0) (English)
Page 35
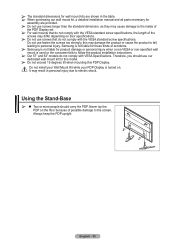
...Mount Kit while your PDP Display is used or the consumer fails to follow the product installation instructions. ➢ Our 57" and 63" models do not comply with VESA Specifications. It may result in the table. ➢ When purchasing our wall mount kit, a detailed installation manual and all parts necessary ...the product to fall, leading to personal injury. Do not use fasten the screws too strongly, this PDP Display. Never lay the PDP on the floor because of accidents. ➢ Samsung is not liable for product damage or personal injury when a non-VESA or non-specified wall mount is...
...Mount Kit while your PDP Display is used or the consumer fails to follow the product installation instructions. ➢ Our 57" and 63" models do not comply with VESA Specifications. It may result in the table. ➢ When purchasing our wall mount kit, a detailed installation manual and all parts necessary ...the product to fall, leading to personal injury. Do not use fasten the screws too strongly, this PDP Display. Never lay the PDP on the floor because of accidents. ➢ Samsung is not liable for product damage or personal injury when a non-VESA or non-specified wall mount is...
User Manual (user Manual) (ver.1.0) (English)
Page 1
All rights reserved. SyncMaster 570DX Install Programs PDF Manuals Registration Model SyncMaster 570DX Select Language Safety Instructions Introduction Connections Using the Software Adjusting the LCD Display Troubleshooting Specifications Information Appendix © 2007 Samsung Electronics Co., Ltd.
All rights reserved. SyncMaster 570DX Install Programs PDF Manuals Registration Model SyncMaster 570DX Select Language Safety Instructions Introduction Connections Using the Software Adjusting the LCD Display Troubleshooting Specifications Information Appendix © 2007 Samsung Electronics Co., Ltd.
User Manual (user Manual) (ver.1.0) (English)
Page 5
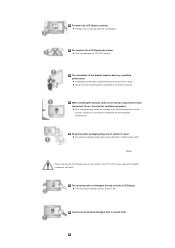
...Do not spray water or detergent directly onto the LCD Display. Do not place the LCD Display face down the LCD Display carefully. z This may damage the TFT-LCD surface. Use the recommended detergent with a slightly ... z Always use the mounting device specified in injury. Clean When cleaning the LCD Display case or the surface of children's reach. The installation of the product, ...in the internal temperature of the bracket must be done by unqualified personnel may damage the LCD Display. z Failing to keep it . z This may cause damage, electric shock or fire....
...Do not spray water or detergent directly onto the LCD Display. Do not place the LCD Display face down the LCD Display carefully. z This may damage the TFT-LCD surface. Use the recommended detergent with a slightly ... z Always use the mounting device specified in injury. Clean When cleaning the LCD Display case or the surface of children's reach. The installation of the product, ...in the internal temperature of the bracket must be done by unqualified personnel may damage the LCD Display. z Failing to keep it . z This may cause damage, electric shock or fire....
User Manual (user Manual) (ver.1.0) (English)
Page 11
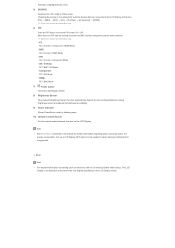
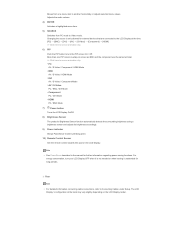
... missing, contact your LCD Display. Manuals LCD Display Quick Setup Guide Warranty Card User's Guide, MDC Software (Not available in all locations) Cables D-Sub Cable Other Power Cord Select Language Main Page Safety Instructions Introduction Package Contents Your LCD Display Mechanical Layout Connections Using the Software Adjusting the LCD Display Troubleshooting Specifications Information Appendix Model SyncMaster 570DX The color and appearance...
... missing, contact your LCD Display. Manuals LCD Display Quick Setup Guide Warranty Card User's Guide, MDC Software (Not available in all locations) Cables D-Sub Cable Other Power Cord Select Language Main Page Safety Instructions Introduction Package Contents Your LCD Display Mechanical Layout Connections Using the Software Adjusting the LCD Display Troubleshooting Specifications Information Appendix Model SyncMaster 570DX The color and appearance...
User Manual (user Manual) (ver.1.0) (English)
Page 13
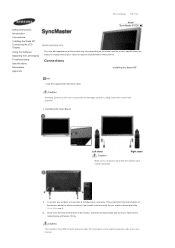
...it is only allowed for external devices that are connected to the LCD Display at the back may vary slightly depending on the LCD Display. Note • See PowerSaver described in the manual for long periods. Rear Note • For detailed information concerning cable.../ S-Video PC / BNC / DVI Mode • Component PC / DVI Mode • HDMI PC / BNC Mode 7) Power button Turns the LCD Display On/Off. 8) Brightness Sensor The product's Brightness Sensor function automatically detects the surrounding brightness using a brightness sensor and adjusts its brightness accordingly. 9) Power...
...it is only allowed for external devices that are connected to the LCD Display at the back may vary slightly depending on the LCD Display. Note • See PowerSaver described in the manual for long periods. Rear Note • For detailed information concerning cable.../ S-Video PC / BNC / DVI Mode • Component PC / DVI Mode • HDMI PC / BNC Mode 7) Power button Turns the LCD Display On/Off. 8) Brightness Sensor The product's Brightness Sensor function automatically detects the surrounding brightness using a brightness sensor and adjusts its brightness accordingly. 9) Power...
User Manual (user Manual) (ver.1.0) (English)
Page 18
... 31) STOP Stop 32) PLAY / PAUSE Play/Pause 33) FF Fast forward © 1995~2007 SAMSUNG. You can select MTS (Multichannel Television Stereo) mode. Audio Type MTS/S_Mode Default FM Stereo Mono Stereo SAP Mono Manual Change Mono ↔ Stereo Mono ↔ SAP Mono - This fuction does not work for this monitor...
... 31) STOP Stop 32) PLAY / PAUSE Play/Pause 33) FF Fast forward © 1995~2007 SAMSUNG. You can select MTS (Multichannel Television Stereo) mode. Audio Type MTS/S_Mode Default FM Stereo Mono Stereo SAP Mono Manual Change Mono ↔ Stereo Mono ↔ SAP Mono - This fuction does not work for this monitor...
User Manual (user Manual) (ver.1.0) (English)
Page 24
... resolution, refer to the user manual. Select Language Main Page Safety Instructions Introduction Connections Installing the Stand KIT Connecting the LCD Display Using the Software Adjusting the LCD Display Troubleshooting Specifications Information Appendix Model SyncMaster 570DX The color and appearance of the product may differ for reasons of performance enhancement. Caution Samsung Electronics will not be used. Insert...
... resolution, refer to the user manual. Select Language Main Page Safety Instructions Introduction Connections Installing the Stand KIT Connecting the LCD Display Using the Software Adjusting the LCD Display Troubleshooting Specifications Information Appendix Model SyncMaster 570DX The color and appearance of the product may differ for reasons of performance enhancement. Caution Samsung Electronics will not be used. Insert...
User Manual (user Manual) (ver.1.0) (English)
Page 27
1) Connect a set of Component video, consult your DVD manual. They are usually found on the side or back of audio cables between the COMPONENT AUDIO IN [L-AUDIO-R] on the LCD Display and the AUDIO OUT jacks on the DVD player. 2) Connect a Component cable between the VIDEO OUTPUT jack on the camcorder.... For an explanation of audio cables between the AUDIO OUTPUT jacks on the camcorder and the AV AUDIO IN [L-AUDIO-R] on the LCD Display. PR, Y, PB port on the LCD Display and the PR, Y, PB jacks on the camcorder. Note • Select AV for the connection to a DVD player using the...
1) Connect a set of Component video, consult your DVD manual. They are usually found on the side or back of audio cables between the COMPONENT AUDIO IN [L-AUDIO-R] on the LCD Display and the AUDIO OUT jacks on the DVD player. 2) Connect a Component cable between the VIDEO OUTPUT jack on the camcorder.... For an explanation of audio cables between the AUDIO OUTPUT jacks on the camcorder and the AV AUDIO IN [L-AUDIO-R] on the LCD Display. PR, Y, PB port on the LCD Display and the PR, Y, PB jacks on the camcorder. Note • Select AV for the connection to a DVD player using the...
User Manual (user Manual) (ver.1.0) (English)
Page 28
...Component for a typical Set Top Box are usually included with a Camcorder. (If not, check your local electronics store.) If your Set Top Box owner's manual. Note • For an explanation of Component video, see your camcorder is stereo, you need to a DTV Set Top Box using the screws. * ...two cables. • The audio-video cables shown here are shown below. 1) Connect a Component cable between the COMPONENT AUDIO IN [L-AUDIO-R] on the LCD Display and the AUDIO OUT jacks on the Set Top Box. Connecting a DTV Set Top Box Note • The connections for the connection to connect a...
...Component for a typical Set Top Box are usually included with a Camcorder. (If not, check your local electronics store.) If your Set Top Box owner's manual. Note • For an explanation of Component video, see your camcorder is stereo, you need to a DTV Set Top Box using the screws. * ...two cables. • The audio-video cables shown here are shown below. 1) Connect a Component cable between the COMPONENT AUDIO IN [L-AUDIO-R] on the LCD Display and the AUDIO OUT jacks on the Set Top Box. Connecting a DTV Set Top Box Note • The connections for the connection to connect a...
User Manual (user Manual) (ver.1.0) (English)
Page 47
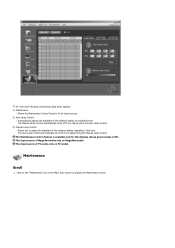
Allows the Maintenance Control function for the displays whose power status is ON. Allows you to display the Maintenance screen. Maintenance Scroll 1. The Manual Lamp Control automatically turns off if you adjust using the Manual Lamp Control. The Input source of the time. An "Info Grid" showing ...Main Icon column to adjust the backlight of the selected display regardless of TV works only on MagicNet model. The Auto Lamp Control automatically turns off if you adjust using the Auto Lamp Control. 3) Manual Lamp Control - The Maintenance Control feature is available only...
Allows the Maintenance Control function for the displays whose power status is ON. Allows you to display the Maintenance screen. Maintenance Scroll 1. The Manual Lamp Control automatically turns off if you adjust using the Manual Lamp Control. The Input source of the time. An "Info Grid" showing ...Main Icon column to adjust the backlight of the selected display regardless of TV works only on MagicNet model. The Auto Lamp Control automatically turns off if you adjust using the Auto Lamp Control. 3) Manual Lamp Control - The Maintenance Control feature is available only...
User Manual (user Manual) (ver.1.0) (English)
Page 55
...[ AV / S-Video / Component / HDMI Mode] Available Modes PC / BNC / DVI AV S-Video Component HDMI Mode [MENU ENTER] → [ENTER ENTER] The LCD Display has four automatic picture settings ("Dynamic", "Standard", "Movie" and "Custom") that are preset at the factory. Dynamic, Standard, Movie, or Custom can be switched. 1)... Selects either On or Off with the signal control. 2) Signal Control [MENU ENTER ENTER ENTER ENTER ENTER] Adjusts the Gain and Sharpness manually. Size [MENU ENTER ENTER ENTER] The Size can view a picture from AV, S-Video through the PIP screen in PC, BNC and DVI mode...
...[ AV / S-Video / Component / HDMI Mode] Available Modes PC / BNC / DVI AV S-Video Component HDMI Mode [MENU ENTER] → [ENTER ENTER] The LCD Display has four automatic picture settings ("Dynamic", "Standard", "Movie" and "Custom") that are preset at the factory. Dynamic, Standard, Movie, or Custom can be switched. 1)... Selects either On or Off with the signal control. 2) Signal Control [MENU ENTER ENTER ENTER ENTER ENTER] Adjusts the Gain and Sharpness manually. Size [MENU ENTER ENTER ENTER] The Size can view a picture from AV, S-Video through the PIP screen in PC, BNC and DVI mode...

