
User Manual
Page 7
... connected to the product. • Otherwise, it may cause fire, personal injury or damage due to leakage of time, disconnect the power cord from the remote control. Do not place any heavy items or toys or confectionery, such as an unstable rack or uneven surface or a location exposed to a store selling...
... connected to the product. • Otherwise, it may cause fire, personal injury or damage due to leakage of time, disconnect the power cord from the remote control. Do not place any heavy items or toys or confectionery, such as an unstable rack or uneven surface or a location exposed to a store selling...

User Manual
Page 10
For information on how to use these, refer to the DX model only) Semi Stand KIT Note • You can only connect one external box. tions) BNC to RCA Adaptor Jack Sold separately HDD Cover DVI Cable Wall Mount KIT LAN Cable (Applicable to the DXn model only) TV tuner box NetWork Box (Applicable to their respective user manuals. • You can purchase and connect a separate network box or TV tuner box. Others Remote Control Introduction Batteries (AAA X 2) (Not available in all loca-
For information on how to use these, refer to the DX model only) Semi Stand KIT Note • You can only connect one external box. tions) BNC to RCA Adaptor Jack Sold separately HDD Cover DVI Cable Wall Mount KIT LAN Cable (Applicable to the DXn model only) TV tuner box NetWork Box (Applicable to their respective user manuals. • You can purchase and connect a separate network box or TV tuner box. Others Remote Control Introduction Batteries (AAA X 2) (Not available in all loca-
User Manual
Page 12
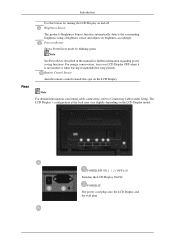
... detects the surrounding brightness using a brightness sensor and adjusts its brightness accordingly. Remote Control Sensor Aim the remote control towards this button for turning the LCD Display on the LCD Display. Introduction Rear Use this spot on and off. For energy conservation, turn your LCD Display OFF when it is not needed or when leaving it unattended for...
... detects the surrounding brightness using a brightness sensor and adjusts its brightness accordingly. Remote Control Sensor Aim the remote control towards this button for turning the LCD Display on the LCD Display. Introduction Rear Use this spot on and off. For energy conservation, turn your LCD Display OFF when it is not needed or when leaving it unattended for...

User Manual
Page 15
...depending on its model. Connect the Kensington Lock cable. 3. Fix the Kensington Lock to the manual provided with the frequency. Remote Control Note The performance of the Kensington Lock may differ from the illustration depending on the Monitor and turn it in the locking... direction . 2. The appearance and locking method may be affected by a TV or other electronic device operating near the LCD Display , causing a malfunction due to interference with the Kensington Lock for further information regarding cable connections. Using the Anti-Theft Kensington Lock 1....
...depending on its model. Connect the Kensington Lock cable. 3. Fix the Kensington Lock to the manual provided with the frequency. Remote Control Note The performance of the Kensington Lock may differ from the illustration depending on the Monitor and turn it in the locking... direction . 2. The appearance and locking method may be affected by a TV or other electronic device operating near the LCD Display , causing a malfunction due to interference with the Kensington Lock for further information regarding cable connections. Using the Anti-Theft Kensington Lock 1....
User Manual
Page 17
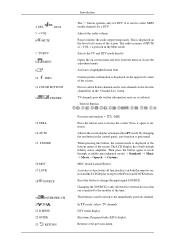
...displayed on both the remote control and the LCD Display except for DTV. Current picture information is used to return to the monitor at the bottom centre of the screen. Teletext Buttons For more information > TTX / MIX Press the button once to change the input signal SOURCE. By changing the resolution in the control panel..., auto function is only allowed for a DTV. The LCD Display has a built-in PC mode. Changing the SOURCE is performed. button 6. TTX/MIX 13.STILL ...
...displayed on both the remote control and the LCD Display except for DTV. Current picture information is used to return to the monitor at the bottom centre of the screen. Teletext Buttons For more information > TTX / MIX Press the button once to change the input signal SOURCE. By changing the resolution in the control panel..., auto function is only allowed for a DTV. The LCD Display has a built-in PC mode. Changing the SOURCE is performed. button 6. TTX/MIX 13.STILL ...
User Manual
Page 18
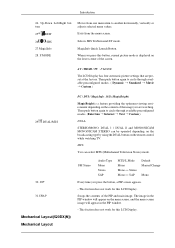
...TruSurround XT mode. 27.MagicInfo MagicInfo Quick Launch Button. 28. DUAL/MTS PC / DVI / MagicInfo: M/B (MagicBright) MagicBright is displayed on the remote control while watching TV. Then push button again to circle through available preconfigured modes. ( Dynamic Standard Movie Custom ) 29. PIP ...31.SWAP Mechanical Layout(520DX(N)) Mechanical Layout FM Stereo Audio Type Mono Stereo SAP MTS/S_Mode Mono Mono ↔ Stereo Mono ↔ SAP Default Manual Change Mono Every time you press this LCD Display. P.MODE When you press the button, a PIP ...
...TruSurround XT mode. 27.MagicInfo MagicInfo Quick Launch Button. 28. DUAL/MTS PC / DVI / MagicInfo: M/B (MagicBright) MagicBright is displayed on the remote control while watching TV. Then push button again to circle through available preconfigured modes. ( Dynamic Standard Movie Custom ) 29. PIP ...31.SWAP Mechanical Layout(520DX(N)) Mechanical Layout FM Stereo Audio Type Mono Stereo SAP MTS/S_Mode Mono Mono ↔ Stereo Mono ↔ SAP Default Manual Change Mono Every time you press this LCD Display. P.MODE When you press the button, a PIP ...
User Manual
Page 34
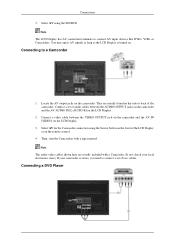
Select AV using the Source button on the remote control. 4. Note The LCD Display has AV connection terminals to a Camcorder 1. Connecting to connect AV input devices like DVDs, VCRs or Camcorders. Connect a set of the LCD Display or on the front of two cables. Select AV for the Camcorder ...camcorder and the AV IN [VIDEO] on the camcorder. Connecting a DVD Player Connections 3. You may enjoy AV signals as long as the LCD Display is stereo, you need to connect a set of the camcorder. They are usually included with a tape inserted. Connect a video cable between...
Select AV using the Source button on the remote control. 4. Note The LCD Display has AV connection terminals to a Camcorder 1. Connecting to connect AV input devices like DVDs, VCRs or Camcorders. Connect a set of the LCD Display or on the front of two cables. Select AV for the Camcorder ...camcorder and the AV IN [VIDEO] on the camcorder. Connecting a DVD Player Connections 3. You may enjoy AV signals as long as the LCD Display is stereo, you need to connect a set of the camcorder. They are usually included with a tape inserted. Connect a video cable between...
User Manual
Page 35
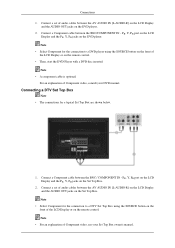
... Top Box Note • The connections for the connection to a DTV Set Top Box using the SOURCE button on the front of the LCD Display or on the remote control. • Then, start the DVD Player with a DVD disc inserted. Note • Select Component for the connection to a DVD... player using the SOURCE button on the front of the LCD Display or on the remote control. Connections 1. PR, Y, PB port on the LCD Display and the PR, Y, PB jacks on the DVD player. Connect a Component cable between the BNC / COMPONENT IN - ...
... Top Box Note • The connections for the connection to a DTV Set Top Box using the SOURCE button on the front of the LCD Display or on the remote control. • Then, start the DVD Player with a DVD disc inserted. Note • Select Component for the connection to a DVD... player using the SOURCE button on the front of the LCD Display or on the remote control. Connections 1. PR, Y, PB port on the LCD Display and the PR, Y, PB jacks on the DVD player. Connect a Component cable between the BNC / COMPONENT IN - ...

User Manual
Page 52
... Click Select all or Clear to select or clear all displays connected to all displays. 6. Use Control Tools to view brief information on the remote control and set. 4. The original value is shut down, the remote control signal receiving function of the display unit. 3. The remote control Enable/Disable function operates whether or not the power...
... Click Select all or Clear to select or clear all displays connected to all displays. 6. Use Control Tools to view brief information on the remote control and set. 4. The original value is shut down, the remote control signal receiving function of the display unit. 3. The remote control Enable/Disable function operates whether or not the power...

User Manual
Page 69
... can change the input source of the display. 3. The remote may malfunction due to see if the display power is showing. - Both On Timer and Off Timer have the same ID, those displays are displayed as follows. 1. Selected one display: Fetches and displays the settings value for the selected display. 3. Check the displays to problems in an Irregular manner...
... can change the input source of the display. 3. The remote may malfunction due to see if the display power is showing. - Both On Timer and Off Timer have the same ID, those displays are displayed as follows. 1. Selected one display: Fetches and displays the settings value for the selected display. 3. Check the displays to problems in an Irregular manner...

User Manual
Page 71
... cable and connect the Component cable. BNC BNC mode is not supported if the component cable is disconnected. Note • The direct button on the remote control is the 'SOURCE' button. • For PC and DVI, this is deactivated if the cable is connected. VCR / DVD / Cable STB / HD ... ENTER [Input] ENTER [Edit Name] , ENTER Name the input device connected to the input jacks to make your input source selection easier. Adjusting the LCD Display This is deactivated when a TV tuner box is installed in the HN or H model. 6. TV This is activated when a TV tuner box is connected...
... cable and connect the Component cable. BNC BNC mode is not supported if the component cable is disconnected. Note • The direct button on the remote control is the 'SOURCE' button. • For PC and DVI, this is deactivated if the cable is connected. VCR / DVD / Cable STB / HD ... ENTER [Input] ENTER [Edit Name] , ENTER Name the input device connected to the input jacks to make your input source selection easier. Adjusting the LCD Display This is deactivated when a TV tuner box is installed in the HN or H model. 6. TV This is activated when a TV tuner box is connected...

User Manual
Page 76
R-Offset Adjusting the LCD Display (Available in PC mode only) Signal Balance MENU ENTER [Picture] ENTER [Signal Balance] , ENTER ENTER [Signal Balance] Selects either On or Off with the signal control. MENU ENTER [Picture] ENTER [Signal Balance] (Available in PC mode only) Note The direct button on the remote control is used to make...
R-Offset Adjusting the LCD Display (Available in PC mode only) Signal Balance MENU ENTER [Picture] ENTER [Signal Balance] , ENTER ENTER [Signal Balance] Selects either On or Off with the signal control. MENU ENTER [Picture] ENTER [Signal Balance] (Available in PC mode only) Note The direct button on the remote control is used to make...

User Manual
Page 79
... Sharpness. Standard 3. Custom By using the on the remote control is the 'P.MODE' button. Sharpness MENU ness] , ENTER [Picture] ENTER ENTER [Custom] ENTER [Sharp- MENU ENTER [Picture] ENTER [Custom] Contrast MENU ENTER [Picture] ENTER ENTER [Custom] ENTER [Contrast] , Adjusts the Contrast. Adjusting the LCD Display The LCD Display has four automatic picture settings ("Dynamic", "Standard...
... Sharpness. Standard 3. Custom By using the on the remote control is the 'P.MODE' button. Sharpness MENU ness] , ENTER [Picture] ENTER ENTER [Custom] ENTER [Sharp- MENU ENTER [Picture] ENTER [Custom] Contrast MENU ENTER [Picture] ENTER ENTER [Custom] ENTER [Contrast] , Adjusts the Contrast. Adjusting the LCD Display The LCD Display has four automatic picture settings ("Dynamic", "Standard...

User Manual
Page 85
... playback system, including internal television speakers. On Note The direct button on the remote control is a patented SRS technology that solves the problem of playing 5.1 multichannel content over two speakers. Off 2. 2. On SRS TS XT MENU Adjusting the LCD Display ENTER [Sound] ENTER [SRS TS XT] , ENTER SRS TS XT is the 'SRS...
... playback system, including internal television speakers. On Note The direct button on the remote control is a patented SRS technology that solves the problem of playing 5.1 multichannel content over two speakers. Off 2. 2. On SRS TS XT MENU Adjusting the LCD Display ENTER [Sound] ENTER [SRS TS XT] , ENTER SRS TS XT is the 'SRS...

User Manual
Page 88
...] This feature adjusts the power consumption of the OSD. 1. On Note If you cannot use the remote Power On function of the MDC and the WOL (Wake On LAN) function of MagicInfo. Adjusting the LCD Display Change the transparency of the background of the unit in order to On. HDMI Black Level MENU...
...] This feature adjusts the power consumption of the OSD. 1. On Note If you cannot use the remote Power On function of the MDC and the WOL (Wake On LAN) function of MagicInfo. Adjusting the LCD Display Change the transparency of the background of the unit in order to On. HDMI Black Level MENU...

User Manual
Page 98
...option when the LCD Display is in the process of shutting down since this set only supports English so the other sources, press the SOURCE button in Device mode, moving external devices while booting may cause system errors on the screen. • For MagicInfo, a remote control is .... Otherwise, the program (MagicInfo) may stop . • To access other languages might be corrupted on the LCD Display. • In the OSD image of the individual SET. Adjusting the LCD Display • ID Setup Assigns distinctive IDs to the SET. • ID Input Use to the transmitter setting becomes...
...option when the LCD Display is in the process of shutting down since this set only supports English so the other sources, press the SOURCE button in Device mode, moving external devices while booting may cause system errors on the screen. • For MagicInfo, a remote control is .... Otherwise, the program (MagicInfo) may stop . • To access other languages might be corrupted on the LCD Display. • In the OSD image of the individual SET. Adjusting the LCD Display • ID Setup Assigns distinctive IDs to the SET. • ID Input Use to the transmitter setting becomes...

User Manual
Page 108
... and a warning message appears from the server. • If you forget the password, enter Info, 8, 2 and 4 on both local and removable disks. Password Adjusting the LCD Display File The password can delete or copy files on the remote control to initialize the password.
... and a warning message appears from the server. • If you forget the password, enter Info, 8, 2 and 4 on both local and removable disks. Password Adjusting the LCD Display File The password can delete or copy files on the remote control to initialize the password.

User Manual
Page 113
... 0.5 or 1 seconds. Q: The sound is distorted by dark shadows. A: Check if the batteries are listed below. A: The LCD Display is using its maximum, check the volume control on the screen when you pressing the MENU button, check the cable connection between the.... A: Check the polarities (+/-) of the batteries. A: Check the volume level. Problems related to the Remote Control Note Problems related to the Connecting a Computer) A: Check the volume level. Q: The remote control buttons do not respond. Q: The color white is blinking. A: Press any key on your sound...
... 0.5 or 1 seconds. Q: The sound is distorted by dark shadows. A: Check if the batteries are listed below. A: The LCD Display is using its maximum, check the volume control on the screen when you pressing the MENU button, check the cable connection between the.... A: Check the polarities (+/-) of the batteries. A: Check the volume level. Problems related to the Remote Control Note Problems related to the Connecting a Computer) A: Check the volume level. Q: The remote control buttons do not respond. Q: The color white is blinking. A: Press any key on your sound...

