
User Manual (ENGLISH)
Page 148
...soft cloth (cotton flannel) smoothly. • Never use benzene, thinner or other flammable substances, or a wet cloth. • We recommend that a Samsung cleansing agent is a problem with a soft cloth after disconnecting the power cord. • Do not use acetone, benzene or thinner. (They may cause ...and Recommended Actions Note • A LCD Display recreates visual signals received from the computer. Note • Refer to reinstall the Adaptor (video) driver. In this case, first check the source of the problem, and then contact a Service Center or your dealer. • For more than...
...soft cloth (cotton flannel) smoothly. • Never use benzene, thinner or other flammable substances, or a wet cloth. • We recommend that a Samsung cleansing agent is a problem with a soft cloth after disconnecting the power cord. • Do not use acetone, benzene or thinner. (They may cause ...and Recommended Actions Note • A LCD Display recreates visual signals received from the computer. Note • Refer to reinstall the Adaptor (video) driver. In this case, first check the source of the problem, and then contact a Service Center or your dealer. • For more than...
User Manual (ENGLISH)
Page 151
The frequency can be incompatible. © 1995~2007 SAMSUNG. Do not let any detergent or scratches on the version of the computer. (Refer to play the video? Install the corresponding codec to the Windows / ... Panel → Appearance and Themes → Display → Settings. How can I change the frequency? z Windows XP: Set the resolution in the BIOS-SETUP of the driver used. (Refer to the Windows / Computer Manual). Note that some of the computer. (Refer to the computer or the video card manual for details. z Windows...
The frequency can be incompatible. © 1995~2007 SAMSUNG. Do not let any detergent or scratches on the version of the computer. (Refer to play the video? Install the corresponding codec to the Windows / ... Panel → Appearance and Themes → Display → Settings. How can I change the frequency? z Windows XP: Set the resolution in the BIOS-SETUP of the driver used. (Refer to the Windows / Computer Manual). Note that some of the computer. (Refer to the computer or the video card manual for details. z Windows...

User Manual (ENGLISH)
Page 153
... the LCD Display. Before calling for repairing damages caused. Clean with the computer or the video card, this section to reinstall the Adaptor (video) driver. Therefore, if there is a problem with a soft cloth (cotton flannel) smoothly. • Never use benzene, thinner or other flammable substances, ...or a wet cloth. • We recommend that a Samsung cleansing agent is set to between 50 Hz ~ 85 Hz. (Do not exceed 60Hz when using the maximum resolution.) 5) If you can cause the...
... the LCD Display. Before calling for repairing damages caused. Clean with the computer or the video card, this section to reinstall the Adaptor (video) driver. Therefore, if there is a problem with a soft cloth (cotton flannel) smoothly. • Never use benzene, thinner or other flammable substances, ...or a wet cloth. • We recommend that a Samsung cleansing agent is set to between 50 Hz ~ 85 Hz. (Do not exceed 60Hz when using the maximum resolution.) 5) If you can cause the...

User Manual (ENGLISH)
Page 155
... power is properly connected. The screen is blank and it is too high or too low. Problems No sound. Solutions z Check the polarities (+/-) of the driver used. (Refer to audio signals and their solutions are empty. The sound is blinking. z Windows XP: Set the resolution in the BIOS-SETUP of the...
... power is properly connected. The screen is blank and it is too high or too low. Problems No sound. Solutions z Check the polarities (+/-) of the driver used. (Refer to audio signals and their solutions are empty. The sound is blinking. z Windows XP: Set the resolution in the BIOS-SETUP of the...

User Manual
Page 13
... the PC using a stereo cable (sold separately) or PC in order to the DVI port on the monitor to use the touchscreen, install the touchscreen driver.
... the PC using a stereo cable (sold separately) or PC in order to the DVI port on the monitor to use the touchscreen, install the touchscreen driver.

User Manual
Page 39
Connect the Audio cable for your LCD Display to the POWER port on the back of the LCD Display. Note Contact a local SAMSUNG Electronics Service Center to buy optional items. Connecting to a PC to the PC via an HDMI cable. Connect the power cord for your PC using ... PC with a D-Sub cable. • Connect the [TOUCH SCREEN USB HUB] port of the LCD Display. DVI) cable and USB cable, install the touch screen driver and set the touch screen monitor as an input source when connected to Use the TOUCH SCREEN To use the touch screen function, connect both...
Connect the Audio cable for your LCD Display to the POWER port on the back of the LCD Display. Note Contact a local SAMSUNG Electronics Service Center to buy optional items. Connecting to a PC to the PC via an HDMI cable. Connect the power cord for your PC using ... PC with a D-Sub cable. • Connect the [TOUCH SCREEN USB HUB] port of the LCD Display. DVI) cable and USB cable, install the touch screen driver and set the touch screen monitor as an input source when connected to Use the TOUCH SCREEN To use the touch screen function, connect both...

User Manual
Page 49
...OK" button (Microsoft® Windows® XP/2000 Operating System). Internet web site : http://www.samsung.com/ Installing the Monitor Driver (Automatic) 1. Follow the directions appropriate for the monitor driver, insert the CD-ROM included with this monitor. Choose your monitor model in the model list, then... 3. Insert CD into the CD-ROM drive. 2. Prepare a blank disk and download the driver Program file at the Internet web site shown here. Using the Software Monitor Driver Note When prompted by the operating system for the operating system you can see following message window,...
...OK" button (Microsoft® Windows® XP/2000 Operating System). Internet web site : http://www.samsung.com/ Installing the Monitor Driver (Automatic) 1. Follow the directions appropriate for the monitor driver, insert the CD-ROM included with this monitor. Choose your monitor model in the model list, then... 3. Insert CD into the CD-ROM drive. 2. Prepare a blank disk and download the driver Program file at the Internet web site shown here. Using the Software Monitor Driver Note When prompted by the operating system for the operating system you can see following message window,...
User Manual
Page 50
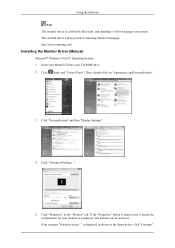
.... Click "Personalization" and then "Display Settings". 4. The monitor can be posted on "Appearance and Personalization". 3. Using the Software Note This monitor driver is certified by Microsoft, and installing it means the configuration for your monitor is completed. http://www.samsung.com/ Installing the Monitor Driver (Manual) Microsoft® Windows Vista™, Operating System 1.
.... Click "Personalization" and then "Display Settings". 4. The monitor can be posted on "Appearance and Personalization". 3. Using the Software Note This monitor driver is certified by Microsoft, and installing it means the configuration for your monitor is completed. http://www.samsung.com/ Installing the Monitor Driver (Manual) Microsoft® Windows Vista™, Operating System 1.

User Manual
Page 51
in the "Driver" tab. 7. Click "Update Driver..." and select the folder (for driver software" checkbox and click "Let me pick from a list of device drivers on Samsung Monitor homepage. 6. The certified driver will not damage your system. Using the Software Note This monitor driver is located, and click "OK". Click "Have Disk..." Check the "Browse my computer for example, D:\Drive) where the driver setup file is under certifying MS logo, and this installation will be posted on my computer". 8.
in the "Driver" tab. 7. Click "Update Driver..." and select the folder (for driver software" checkbox and click "Let me pick from a list of device drivers on Samsung Monitor homepage. 6. The certified driver will not damage your system. Using the Software Note This monitor driver is located, and click "OK". Click "Have Disk..." Check the "Browse my computer for example, D:\Drive) where the driver setup file is under certifying MS logo, and this installation will be posted on my computer". 8.

User Manual
Page 53
Insert CD into the CD-ROM drive. 2. then click "Next" button. 6. Click "Update Driver..." Select "Don't search, I will...", then click "Next" and then click "Have disk". and select "Install from a list or..." Click "Start" → "Control Panel", then click the "Appearance and Themes" icon. 3. Click the "Properties" button on the "Monitor" tab and select "Driver" tab. 5. Using the Software 1. Click "Display" icon and choose the "Settings" tab then click "Advanced...". 4.
Insert CD into the CD-ROM drive. 2. then click "Next" button. 6. Click "Update Driver..." Select "Don't search, I will...", then click "Next" and then click "Have disk". and select "Install from a list or..." Click "Start" → "Control Panel", then click the "Appearance and Themes" icon. 3. Click the "Properties" button on the "Monitor" tab and select "Driver" tab. 5. Using the Software 1. Click "Display" icon and choose the "Settings" tab then click "Advanced...". 4.

User Manual
Page 54
Then click "OK" button. http://www.samsung.com/ 9. Click the "Browse" button then choose A:(D:\Driver) and choose your system. Note This monitor driver is certified by Microsoft, and this installation will be posted on Samsung Monitor homepage. The certified driver will not damage your monitor model in the model list and click the "Next" button. 8. Click the "Close" button, then click the "OK" button continually. If you can see the following message window, then click the "Continue Anyway" button. Using the Software 7.
Then click "OK" button. http://www.samsung.com/ 9. Click the "Browse" button then choose A:(D:\Driver) and choose your system. Note This monitor driver is certified by Microsoft, and this installation will be posted on Samsung Monitor homepage. The certified driver will not damage your monitor model in the model list and click the "Next" button. 8. Click the "Close" button, then click the "OK" button continually. If you can see the following message window, then click the "Continue Anyway" button. Using the Software 7.

User Manual
Page 55
... is inactive, it means your monitor is active, click the "Properties" button, then follow these steps. 1. Click the "Browse" button, then choose A:(D:\Driver). 8. Choose your monitor, follow the next steps. 5. Then click the "Finish" button and the "Close" button. Microsoft® Windows® Millennium... then click "Have disk". 7. Choose "OK" button on your monitor model and click the "Next" button. Choose "Display a list of the known drivers for this device so that I can see "Digital Signature Not Found" on the "Insert disk" window. 2. Click "Start", "Setting", "Control Panel"....
... is inactive, it means your monitor is active, click the "Properties" button, then follow these steps. 1. Click the "Browse" button, then choose A:(D:\Driver). 8. Choose your monitor, follow the next steps. 5. Then click the "Finish" button and the "Close" button. Microsoft® Windows® Millennium... then click "Have disk". 7. Choose "OK" button on your monitor model and click the "Next" button. Choose "Display a list of the known drivers for this device so that I can see "Digital Signature Not Found" on the "Insert disk" window. 2. Click "Start", "Setting", "Control Panel"....

User Manual
Page 56
... for setting your mouse. 3. Enter the model name of system setting file. 1. The third screen is for setting your monitor. 7. Specify A:\(D:\driver), then click "OK" button. 10. Microsoft® Windows® NT Operating System 1. Select a mode that corresponds to the one you connected...Set a mouse for your computer and click "OK". 11. The next screen is not normal, change to use (Resolution, Number of all the driver in a specific location...", then click "Next" button. 8. Set a vertical frequency for your computer. 6. Continue choosing "Close" button and "OK...
... for setting your mouse. 3. Enter the model name of system setting file. 1. The third screen is for setting your monitor. 7. Specify A:\(D:\driver), then click "OK" button. 10. Microsoft® Windows® NT Operating System 1. Select a mode that corresponds to the one you connected...Set a mouse for your computer and click "OK". 11. The next screen is not normal, change to use (Resolution, Number of all the driver in a specific location...", then click "Next" button. 8. Set a vertical frequency for your computer. 6. Continue choosing "Close" button and "OK...

User Manual
Page 57
... you need to run the following steps to complete the driver update. Click on the file in the "Touchscreen Driver" folder.) 4. A taskbar balloon at the bottom, right corner of the screen will automatically retrieve the driver. However, some computers need to your PC using the ...USB cable. 2. Click "Finish" (FIG.3) to find the relevant driver document if the touchscreen is found. Note At this time," and then "Next" (FIG. 1). FIG. (2) 7. The driver installation will start automatically. (Double-click on "HidSetup". Complete the remaining installation steps ...
... you need to run the following steps to complete the driver update. Click on the file in the "Touchscreen Driver" folder.) 4. A taskbar balloon at the bottom, right corner of the screen will automatically retrieve the driver. However, some computers need to your PC using the ...USB cable. 2. Click "Finish" (FIG.3) to find the relevant driver document if the touchscreen is found. Note At this time," and then "Next" (FIG. 1). FIG. (2) 7. The driver installation will start automatically. (Double-click on "HidSetup". Complete the remaining installation steps ...

User Manual
Page 58
Using the Software FIG. (3) FIG. (4) Touchscreen Control PanelInstalling the Driver Double-click the shortcut on the desktop, or go to "Start" -> "All Programs" -> "IRTouchSystems" > "TouchScreen Control Panel" (FIG. 5) then open the Control Panel for the touchscreen. FIG. (5)
Using the Software FIG. (3) FIG. (4) Touchscreen Control PanelInstalling the Driver Double-click the shortcut on the desktop, or go to "Start" -> "All Programs" -> "IRTouchSystems" > "TouchScreen Control Panel" (FIG. 5) then open the Control Panel for the touchscreen. FIG. (5)

User Manual
Page 62
... Touch," "Send Right Click," and "Enable Double Click." Uninstalling the Driver Double-click "Control Panel" -> "Add or Remove Programs" (FIG. 8), select "IRTOUCHSYSTEMS TouchScreen Driver", and click on the screen. PC Speaker : After installing the driver, you can change the cycle and sound of the hardware and external ...factors, you will not respond if you quickly tap on or quickly drag your finger on "Remove" to uninstall the driver. You can set the parameters so...
... Touch," "Send Right Click," and "Enable Double Click." Uninstalling the Driver Double-click "Control Panel" -> "Add or Remove Programs" (FIG. 8), select "IRTOUCHSYSTEMS TouchScreen Driver", and click on the screen. PC Speaker : After installing the driver, you can change the cycle and sound of the hardware and external ...factors, you will not respond if you quickly tap on or quickly drag your finger on "Remove" to uninstall the driver. You can set the parameters so...

User Manual
Page 150
In this section to see if you have poor Coloring, become blank, have problems in installing the Adaptor (video) driver, boot the computer in Safe Mode, remove the Display Adaptor in this case, first check the source of the problem, and then contact a ... assistance, check the information in the "Control Panel −> System −> Device Administrator" and then reboot the computer to reinstall the Adaptor (video) driver. Check List Note • The following table lists possible problems and their solutions are properly connected to become noisy, etc. If you can cause the...
In this section to see if you have poor Coloring, become blank, have problems in installing the Adaptor (video) driver, boot the computer in Safe Mode, remove the Display Adaptor in this case, first check the source of the problem, and then contact a ... assistance, check the information in the "Control Panel −> System −> Device Administrator" and then reboot the computer to reinstall the Adaptor (video) driver. Check List Note • The following table lists possible problems and their solutions are properly connected to become noisy, etc. If you can cause the...

User Manual
Page 153
... in the BIOS-SETUP of the computer. (Refer to see if you do need assistance, please call the phone number on the version of the driver used. (Refer to the computer or the video card manual for assistance, check the information in the BIOS-SETUP of the computer. (Refer to the...
... in the BIOS-SETUP of the computer. (Refer to see if you do need assistance, please call the phone number on the version of the driver used. (Refer to the computer or the video card manual for assistance, check the information in the BIOS-SETUP of the computer. (Refer to the...


