User Guide
Page 2
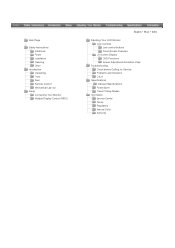
Main Page Safety Instructions Notational Power Installation Cleaning Other Introduction Unpacking Front Rear Remote Control Mechanical Lay-out Setup Connecting Your Monitor Multiple Display Control (MDC) English > Main > Index Adjusting Your LCD Monitor User Controls User control buttons Direct-Access Features On-Screen Display OSD Functions Screen Adjustment Animation Clips Troubleshooting Check before Calling for Service Problems and Solutions Q & A Specifications General Specifications PowerSaver Preset Timing Modes Information Service Center Terms Regulatory Natural Color Authority
Main Page Safety Instructions Notational Power Installation Cleaning Other Introduction Unpacking Front Rear Remote Control Mechanical Lay-out Setup Connecting Your Monitor Multiple Display Control (MDC) English > Main > Index Adjusting Your LCD Monitor User Controls User control buttons Direct-Access Features On-Screen Display OSD Functions Screen Adjustment Animation Clips Troubleshooting Check before Calling for Service Problems and Solutions Q & A Specifications General Specifications PowerSaver Preset Timing Modes Information Service Center Terms Regulatory Natural Color Authority
User Guide
Page 5
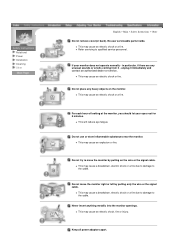
... electric shock or fire could be damaged. z This may be damaged or broken. Do not place the monitor face down the monitor carefully. Place the monitor on the monitor cabinet. z It could result inside the monitor. Put your monitor in a location with low humidity and a minimum of dust. z Bad ventilation may cause a breakdown or fire. Do...
... electric shock or fire could be damaged. z This may be damaged or broken. Do not place the monitor face down the monitor carefully. Place the monitor on the monitor cabinet. z It could result inside the monitor. Put your monitor in a location with low humidity and a minimum of dust. z Bad ventilation may cause a breakdown or fire. Do...
User Guide
Page 6
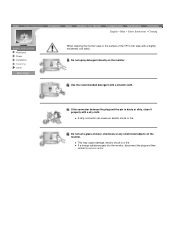
... or fire. Notational Power Installation Cleaning Other English > Main > Safety Instructions > Cleaning When cleaning the monitor case or the surface of water, chemicals or any small metal objects on the monitor. If the connector between the plug and the pin is dusty or dirty, clean it properly with a... slightly moistened, soft fabric. Do not set a glass of the TFT-LCD, wipe with a dry cloth. z If a foreign substance gets into the monitor, disconnect the plug and then contact a service center. z This may cause damage, electric shock or a fire. Do not spray detergent directly on the...
... or fire. Notational Power Installation Cleaning Other English > Main > Safety Instructions > Cleaning When cleaning the monitor case or the surface of water, chemicals or any small metal objects on the monitor. If the connector between the plug and the pin is dusty or dirty, clean it properly with a... slightly moistened, soft fabric. Do not set a glass of the TFT-LCD, wipe with a dry cloth. z If a foreign substance gets into the monitor, disconnect the plug and then contact a service center. z This may cause damage, electric shock or a fire. Do not spray detergent directly on the...
User Guide
Page 7
...it - z This may cause an electric shock or a fire. z This will reduce eye fatigue. Do not use or store inflammable substances near the monitor. z This may cause an electric shock, fire or injury. z This may cause a breakdown, electric shock or a fire due to damage to move the... monitor right or left by pulling on the monitor. Notational Power Installation Cleaning Other English > Main > Safety Instructions > Ohter Do not remove cover(or back). If your eyes rest for...
...it - z This may cause an electric shock or a fire. z This will reduce eye fatigue. Do not use or store inflammable substances near the monitor. z This may cause an electric shock, fire or injury. z This may cause a breakdown, electric shock or a fire due to damage to move the... monitor right or left by pulling on the monitor. Notational Power Installation Cleaning Other English > Main > Safety Instructions > Ohter Do not remove cover(or back). If your eyes rest for...
User Guide
Page 9
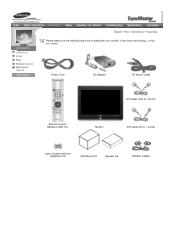
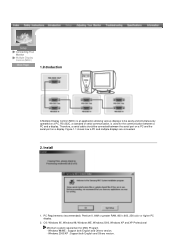
Unpacking Front Rear Remote Control Mechanical Lay-out English > Main > Introduction > Unpacking Please make sure the following items are missing, contact your monitor. If any items are included with your dealer. Power Cord DC Adapter PC Stereo Cable DVI Cable (DVI-D + DVI-D) Remote Control / Batteries (AAA X 2) Monitor DVI Cable (DVI-I + D-Sub) User's Guide and Driver Installation CD Wall Mount KIT Speaker set RS232C CABLE
Unpacking Front Rear Remote Control Mechanical Lay-out English > Main > Introduction > Unpacking Please make sure the following items are missing, contact your monitor. If any items are included with your dealer. Power Cord DC Adapter PC Stereo Cable DVI Cable (DVI-D + DVI-D) Remote Control / Batteries (AAA X 2) Monitor DVI Cable (DVI-I + D-Sub) User's Guide and Driver Installation CD Wall Mount KIT Speaker set RS232C CABLE
User Guide
Page 10
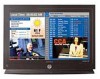
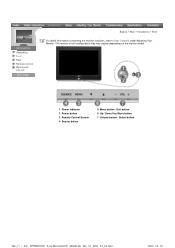
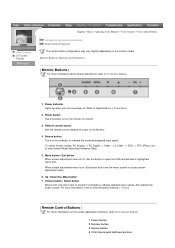
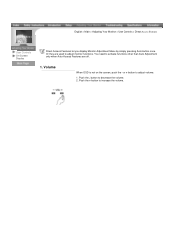
The monitor's front configuration may vary slightly depending on the monitor model. 1 Power indicator 2 Power button 3 Remote Control Sensor 4 Source button 5 Menu button / Exit button 6 Up / Down Key Move button 7 Volume button / Select button Unpacking Front Rear Remote Control Mechanical Lay-out English > Main > Introduction > Front For detail information concerning the monitor functions, refer to User Controls under Adjusting Your Monitor.
The monitor's front configuration may vary slightly depending on the monitor model. 1 Power indicator 2 Power button 3 Remote Control Sensor 4 Source button 5 Menu button / Exit button 6 Up / Down Key Move button 7 Volume button / Select button Unpacking Front Rear Remote Control Mechanical Lay-out English > Main > Introduction > Front For detail information concerning the monitor functions, refer to User Controls under Adjusting Your Monitor.
User Guide
Page 11
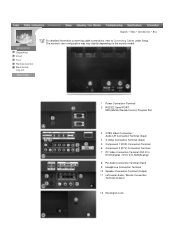
... (Input) 9 Headphone Connection Terminal 10 Speaker Connection Terminal (Output) 11 Left/center Audio / Woofer Connection Terminal (Output) 12 Kensington Lock The monitor's rear configuration may vary slightly depending on the monitor model. 1 Power Connection Terminal 2 RS232C Serial PORT : MDC(Multiful Devide Control) Program Port 3 CVBS Video Connection / Audio L/R Connection Terminal (Input) 4 S-Video...
... (Input) 9 Headphone Connection Terminal 10 Speaker Connection Terminal (Output) 11 Left/center Audio / Woofer Connection Terminal (Output) 12 Kensington Lock The monitor's rear configuration may vary slightly depending on the monitor model. 1 Power Connection Terminal 2 RS232C Serial PORT : MDC(Multiful Devide Control) Program Port 3 CVBS Video Connection / Audio L/R Connection Terminal (Input) 4 S-Video...
User Guide
Page 12
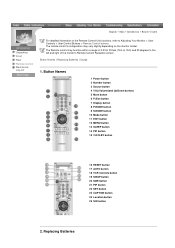
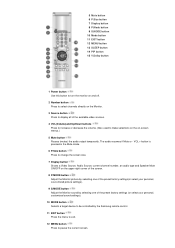
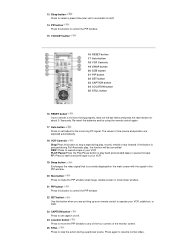
English > Main > Introduction > Remote Control Unpacking Front Rear Remote Control Mechanical Lay-out For detailed information of the monitor's Remote Control Reception sensor. The Remote control may vary slightly depending on the monitor model. Button Names 1 Power button 2 Number button 3 Source button 4 VOL(Volume)and Up/Down buttons 5 Mute button 6 P.Size button 7 Display... 0.23 to 33 feet (7cm to 10m) and 30 degrees to the left and right of the Remote Control Unit functions, refer to Adjusting Your Monitor > User Controls > User Control Buttons > Remote Control buttons.
English > Main > Introduction > Remote Control Unpacking Front Rear Remote Control Mechanical Lay-out For detailed information of the monitor's Remote Control Reception sensor. The Remote control may vary slightly depending on the monitor model. Button Names 1 Power button 2 Number button 3 Source button 4 VOL(Volume)and Up/Down buttons 5 Mute button 6 P.Size button 7 Display... 0.23 to 33 feet (7cm to 10m) and 30 degrees to the left and right of the Remote Control Unit functions, refer to Adjusting Your Monitor > User Controls > User Control Buttons > Remote Control buttons.

User Guide
Page 14
Speaker Monitor Head English > Main > Introduction > Mechanical Lay-out 2. Monitor Head | Rear | Speaker | Mounting Bracket Unpacking Front Rear Remote Control Mechanical Lay-out 1. Rear 3.
Speaker Monitor Head English > Main > Introduction > Mechanical Lay-out 2. Monitor Head | Rear | Speaker | Mounting Bracket Unpacking Front Rear Remote Control Mechanical Lay-out 1. Rear 3.
User Guide
Page 16
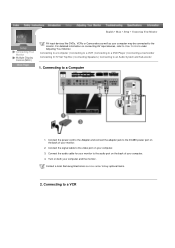
...a Computer 1. Connecting to User Controls under Adjusting Your Monitor. Connect the audio cable for your monitor to the video port on the back of your monitor. 2. Connect the signal cable to the audio port on...| Connecting to the DC28V power port on both your computer and the monitor. Connect the power cord to the Adapter and connect the adapter jack to an Audio System and... Sub-woofer 1. Connecting to the monitor. English > Main > Setup > Connecting Your Monitor Connecting Your Monitor Multiple Display Control (MDC) AV input devices like DVDs, ...
...a Computer 1. Connecting to User Controls under Adjusting Your Monitor. Connect the audio cable for your monitor to the video port on the back of your monitor. 2. Connect the signal cable to the audio port on...| Connecting to the DC28V power port on both your computer and the monitor. Connect the power cord to the Adapter and connect the adapter jack to an Audio System and... Sub-woofer 1. Connecting to the monitor. English > Main > Setup > Connecting Your Monitor Connecting Your Monitor Multiple Display Control (MDC) AV input devices like DVDs, ...
User Guide
Page 17
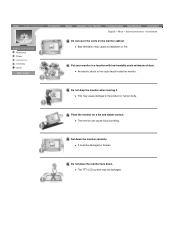
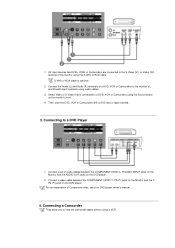
.... 4. Connecting a Camcorder They allow you to view the camcorder tapes without using audio cables. 3. S-VHS or RCA cable is connected to the monitor's L and R audio input terminals using a VCR. Connect the Audio (L) and Audio (R) terminals of Component video, see your DVD player owner's manual.... 4. Select Video or S-Video that is optional. 2. Connect a video cable between the COMPONENT1(DVD) L, R AUDIO INPUT jacks on the Monitor and the AUDIO OUT jacks on the DVD player. For an explanation of a DVD, VCR or Camcorders to a DVD, VCR or Camcorders using the S-...
.... 4. Connecting a Camcorder They allow you to view the camcorder tapes without using audio cables. 3. S-VHS or RCA cable is connected to the monitor's L and R audio input terminals using a VCR. Connect the Audio (L) and Audio (R) terminals of Component video, see your DVD player owner's manual.... 4. Select Video or S-Video that is optional. 2. Connect a video cable between the COMPONENT1(DVD) L, R AUDIO INPUT jacks on the Monitor and the AUDIO OUT jacks on the DVD player. For an explanation of a DVD, VCR or Camcorders to a DVD, VCR or Camcorders using the S-...

User Guide
Page 18
... of audio cables between the COMPONENT2(DTV) L, R AUDIO INPUT jacks on the Monitor and the AUDIO OUT jacks on the Monitor. Connect a video cable between the COMPONENT2(DTV) Y, Pb, Pr jacks on the Monitor and the Y, Pb, Pr jacks on the Monitor. 3. The audio-video cables shown here are shown below. 1. For an explanation...
... of audio cables between the COMPONENT2(DTV) L, R AUDIO INPUT jacks on the Monitor and the AUDIO OUT jacks on the Monitor. Connect a video cable between the COMPONENT2(DTV) Y, Pb, Pr jacks on the Monitor and the Y, Pb, Pr jacks on the Monitor. 3. The audio-video cables shown here are shown below. 1. For an explanation...
User Guide
Page 19
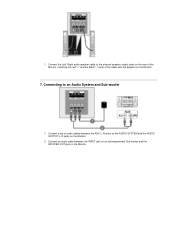
Connecting to the external speaker output jacks on the rear of the Monitor, matching the red "+" and the black "-" ends of audio cables between the INPUT jack on an active(powered) Sub woofer and the WOOFER OUT jack on the Monitor. 7. Connect an audio cable between the AUX L, R jacks on the AUDIO SYSTEM and the AUDIO OUTPUT L, R jacks on the Monitor. 2. 1. Connect the Left, Right audio speaker cable to an Audio System and Sub-woofer 1. Connect a set of the cable with the diagram on the Monitor.
Connecting to the external speaker output jacks on the rear of the Monitor, matching the red "+" and the black "-" ends of audio cables between the INPUT jack on an active(powered) Sub woofer and the WOOFER OUT jack on the Monitor. 7. Connect an audio cable between the AUX L, R jacks on the AUDIO SYSTEM and the AUDIO OUTPUT L, R jacks on the Monitor. 2. 1. Connect the Left, Right audio speaker cable to an Audio System and Sub-woofer 1. Connect a set of the cable with the diagram on the Monitor.
User Guide
Page 20
Connecting Your Monitor Multiple Display Control (MDC) 1.Introduction A Multiple Display Control (MDC) is used for MDC Program - Therefore, a serial cable should be easily and simultaneously operated on a display. ...
Connecting Your Monitor Multiple Display Control (MDC) 1.Introduction A Multiple Display Control (MDC) is used for MDC Program - Therefore, a serial cable should be easily and simultaneously operated on a display. ...
User Guide
Page 32
... screen adjustment, refer to On-Screen Display. 1 Power button 2 Number button 3 Source button 4 VOL(Volume)and Up/Down buttons Monitor Buttons | Remote Control Buttons | Monitor Buttons | For more information on the indicator to Specifications > PowerSaver. 2. Refer to indicate the currently displayed input signal. Menu button...menu item to view Screen Mode Switching Animation Clips) 5. Remote control sensor Aim the remote control towards this spot on the monitor model. When screen adjustment menu is off: Use this button to open the OSD and activate a highlighted menu item. To ...
... screen adjustment, refer to On-Screen Display. 1 Power button 2 Number button 3 Source button 4 VOL(Volume)and Up/Down buttons Monitor Buttons | Remote Control Buttons | Monitor Buttons | For more information on the indicator to Specifications > PowerSaver. 2. Refer to indicate the currently displayed input signal. Menu button...menu item to view Screen Mode Switching Animation Clips) 5. Remote control sensor Aim the remote control towards this spot on the monitor model. When screen adjustment menu is off: Use this button to open the OSD and activate a highlighted menu item. To ...
User Guide
Page 33
... 2 Number button Press to select channels directly on the Monitor. 3 Source button Press to display all of the preset factory settings (or select your personal, customized sound settings). 10 MODE button Selects a target device to be controlled by the Samsung remote control. 11 EXIT button Press the menu to exit.... 12 MENU button Press to make selections on the on the upper right corner of the screen. 8 P.MODE button Adjust the Monitor picture by selecting one of the preset factory ...
... 2 Number button Press to select channels directly on the Monitor. 3 Source button Press to display all of the preset factory settings (or select your personal, customized sound settings). 10 MODE button Selects a target device to be controlled by the Samsung remote control. 11 EXIT button Press the menu to exit.... 12 MENU button Press to make selections on the on the upper right corner of the screen. 8 P.MODE button Adjust the Monitor picture by selecting one of the preset factory ...
User Guide
Page 34
... operate your remote is not func-tioning properly, take out the bat-teries and press the reset button for about 2~3seconds. The values of the monitor screen. 25 STILL Press to stop a tape during play back prerecorded tapes or pause the tape FF: Press to fast forword the tape in your...
... operate your remote is not func-tioning properly, take out the bat-teries and press the reset button for about 2~3seconds. The values of the monitor screen. 25 STILL Press to stop a tape during play back prerecorded tapes or pause the tape FF: Press to fast forword the tape in your...
User Guide
Page 35
Volume When OSD is not on the screen, push the - Push the - button to adjust volume. 1. or + button to decrease the volume. 2. Push the + button to adjust monitor functions. English > Main > Adjusting Your Monitor > User Controls > Direct-Access Features User Controls On-Screen Display Direct-Access Features let you display Monitor Adjustment Menu by simply pressing Auto button once. You need to activate functions other than Auto Adjustment only when Auto-Access Features are used to increase the volume. Or they are off. 1.
Volume When OSD is not on the screen, push the - Push the - button to adjust volume. 1. or + button to decrease the volume. 2. Push the + button to adjust monitor functions. English > Main > Adjusting Your Monitor > User Controls > Direct-Access Features User Controls On-Screen Display Direct-Access Features let you display Monitor Adjustment Menu by simply pressing Auto button once. You need to activate functions other than Auto Adjustment only when Auto-Access Features are used to increase the volume. Or they are off. 1.
User Guide
Page 36
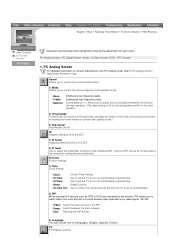
...automatically at the time the TV turns on automatically. 2) PIP: When external A/V devices such as VCR or DVD are connected to the monitor, PIP allows you to adjust the sound balance between the left and the right speakers. (The ideal setting is 50 for the left ...the transmitter functions of the speaker sound. • Bass: • Treble: • Balance: Emphasize low frequency audio. English > Main > Adjusting Your Monitor > On-Screen Display > OSD Functions User Controls On-Screen Display Characters and icons become highlighted in the PC Analog mode, refer to PC Analog Screen...
...automatically at the time the TV turns on automatically. 2) PIP: When external A/V devices such as VCR or DVD are connected to the monitor, PIP allows you to adjust the sound balance between the left and the right speakers. (The ideal setting is 50 for the left ...the transmitter functions of the speaker sound. • Bass: • Treble: • Balance: Emphasize low frequency audio. English > Main > Adjusting Your Monitor > On-Screen Display > OSD Functions User Controls On-Screen Display Characters and icons become highlighted in the PC Analog mode, refer to PC Analog Screen...

User Guide
Page 37
... Size • V-Position: Adjusting Vertical Size 4) Color adjust: Adjusting Color(Use this function for PC Analog Screen. You may control Monitor properties in the Video mode, refer to Video / S-Video Screen Adjustment Animation Clips. PC In PC digital mode, you can adjust only...using the Horizontal Control menu. 1) Image: PC Screen Settings • Brightness: • Contrast: • Size: Adjust Brightness. Coarse adjustment may control Monitor properties in the same way as for PC Analog Screen. Standard ) 3. Color3 ) • Red: • Green: • Blue: Adjusting ...
... Size • V-Position: Adjusting Vertical Size 4) Color adjust: Adjusting Color(Use this function for PC Analog Screen. You may control Monitor properties in the Video mode, refer to Video / S-Video Screen Adjustment Animation Clips. PC In PC digital mode, you can adjust only...using the Horizontal Control menu. 1) Image: PC Screen Settings • Brightness: • Contrast: • Size: Adjust Brightness. Coarse adjustment may control Monitor properties in the same way as for PC Analog Screen. Standard ) 3. Color3 ) • Red: • Green: • Blue: Adjusting ...


