User Manual
Page 3
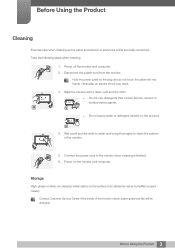
... LCDs are easily scratched. Otherwise, an electric shock may result. 3. z Do not spray water or detergent directly on the monitor and computer. Power on the product. 4. Wipe the monitor with wet hands. Hold the power cable by the plug and do not touch the cable with a clean, soft and dry... cloth. Before Using the Product Cleaning Exercise care when cleaning as the panel and exterior of the monitor needs cleaning (service fee will be charged). 3 Before Using the Product Storage High-glossy models can develop white stains on the surface if an ...
... LCDs are easily scratched. Otherwise, an electric shock may result. 3. z Do not spray water or detergent directly on the monitor and computer. Power on the product. 4. Wipe the monitor with wet hands. Hold the power cable by the plug and do not touch the cable with a clean, soft and dry... cloth. Before Using the Product Cleaning Exercise care when cleaning as the panel and exterior of the monitor needs cleaning (service fee will be charged). 3 Before Using the Product Storage High-glossy models can develop white stains on the surface if an ...

User Manual
Page 12
Do not hold the monitor upside-down or move it will be using the product for an extended period of time (vacation, etc). z The product may result. Looking at the ... image for an extended period of time may deteriorate. z Eye fatigue will become damaged or cause an injury. Leaving the screen fixed on using the monitor for every 1 hour of children. ! 12 Before Using the Product Before Using the Product Caution ! -_- ! ! Use the product at the screen too close for an...
Do not hold the monitor upside-down or move it will be using the product for an extended period of time (vacation, etc). z The product may result. Looking at the ... image for an extended period of time may deteriorate. z Eye fatigue will become damaged or cause an injury. Leaving the screen fixed on using the monitor for every 1 hour of children. ! 12 Before Using the Product Before Using the Product Caution ! -_- ! ! Use the product at the screen too close for an...

User Manual
Page 39
Commands will not respond. Power control z Function A TV/monitor can be powered on a TV/monitor z Nak r-CMD 0x11 Val1 Checksu m "Power" Header Comma Data length nd ID 0xAA 0xFF 3 Ack/Nak 'N' "ERR" : A code showing what error has occurred r-CMD 0x11 ... 0xAA 0x11 0 z Setting power ON/Off (Set Power ON / OFF) Header Command Data length ID 0xAA 0x11 1 "Power": Power code to be set on a TV/monitor 1 : Power ON 0 : Power OFF z Ack Data "Power" Checksum Header Comma Data length nd ID 0xAA 0xFF 3 Ack/Nak 'A' "Power": Power code to be set the...
Commands will not respond. Power control z Function A TV/monitor can be powered on a TV/monitor z Nak r-CMD 0x11 Val1 Checksu m "Power" Header Comma Data length nd ID 0xAA 0xFF 3 Ack/Nak 'N' "ERR" : A code showing what error has occurred r-CMD 0x11 ... 0xAA 0x11 0 z Setting power ON/Off (Set Power ON / OFF) Header Command Data length ID 0xAA 0x11 1 "Power": Power code to be set on a TV/monitor 1 : Power ON 0 : Power OFF z Ack Data "Power" Checksum Header Comma Data length nd ID 0xAA 0xFF 3 Ack/Nak 'A' "Power": Power code to be set the...

User Manual
Page 40
... Setting the volume (Set Volume) Header Command Data length Data ID 0xAA 0x12 1 "Volume" "Volume": Volume value code to be set on a TV/monitor (0-100) z Ack Checksum Header Comma nd Data length ID 0xAA 0xFF 3 Ack/Nak 'A' r-CMD 0x12 Val1 "Volume " Checksu m "Volume": Volume... value code to be adjusted using a PC. 1 Preparations Volume control z Function The volume of a TV/monitor can be set on a TV/monitor (0-100) z Nak Header Comma Data length nd ID 0xAA 0xFF 3 Ack/Nak 'N' r-CMD 0x12 Val1 "ERR" Checksu m "ERR" : A...
... Setting the volume (Set Volume) Header Command Data length Data ID 0xAA 0x12 1 "Volume" "Volume": Volume value code to be set on a TV/monitor (0-100) z Ack Checksum Header Comma nd Data length ID 0xAA 0xFF 3 Ack/Nak 'A' r-CMD 0x12 Val1 "Volume " Checksu m "Volume": Volume... value code to be adjusted using a PC. 1 Preparations Volume control z Function The volume of a TV/monitor can be set on a TV/monitor (0-100) z Nak Header Comma Data length nd ID 0xAA 0xFF 3 Ack/Nak 'N' r-CMD 0x12 Val1 "ERR" Checksu m "ERR" : A...
User Manual
Page 41
... be used with models that include a TV. 41 1 Preparations They only respond to be set on a TV/monitor 0x14 0x1E 0x18 0x0C 0x04 0x08 0x20 0x1F 0x30 0x40 0x21 0x22 0x23 0x24 0x25 PC BNC DVI Input source S-video Component MagicInfo DVI_video RF (...
... be used with models that include a TV. 41 1 Preparations They only respond to be set on a TV/monitor 0x14 0x1E 0x18 0x0C 0x04 0x08 0x20 0x1F 0x30 0x40 0x21 0x22 0x23 0x24 0x25 PC BNC DVI Input source S-video Component MagicInfo DVI_video RF (...

User Manual
Page 42
1 Preparations z Ack Header Comma nd Data length ID 0xAA 0xFF 3 Ack/Nak 'A' r-CMD 0x14 Val1 "Input Source" Checksu m "Input Source": An input source code to be set on a TV/monitor z Nak Header Comma Data length nd ID 0xAA 0xFF 3 Ack/Nak 'N' r-CMD 0x14 Val1 "ERR" Checksu m "ERR" : A code showing what error has occurred 42 1 Preparations
1 Preparations z Ack Header Comma nd Data length ID 0xAA 0xFF 3 Ack/Nak 'A' r-CMD 0x14 Val1 "Input Source" Checksu m "Input Source": An input source code to be set on a TV/monitor z Nak Header Comma Data length nd ID 0xAA 0xFF 3 Ack/Nak 'N' r-CMD 0x14 Val1 "ERR" Checksu m "ERR" : A code showing what error has occurred 42 1 Preparations

User Manual
Page 43
... only be changed using a PC. This control can be used on models that sets the TV/monitor status z Nak Header Comma nd ID 0xAA 0xFF Data length 3 Ack/Nak 'N' "ERR" : A code showing what error has occurred r-CMD 0x18 Val1 "Screen Mode" Checksu m ... 0 z Setting the picture size (Set Picture Size) Header Command Data length Data 0xAA 0x18 ID 1 "Screen Checksum Mode" "Screen Mode": A code that sets the TV/monitor status 0x01 0x04 0x31 0x0B 16 : 9 Zoom Wide Zoom 4 : 3 z Ack Header Comma nd Data length ID 0xAA 0xFF 3 Ack/Nak 'A' "Screen Mode": A code that ...
... only be changed using a PC. This control can be used on models that sets the TV/monitor status z Nak Header Comma nd ID 0xAA 0xFF Data length 3 Ack/Nak 'N' "ERR" : A code showing what error has occurred r-CMD 0x18 Val1 "Screen Mode" Checksu m ... 0 z Setting the picture size (Set Picture Size) Header Command Data length Data 0xAA 0x18 ID 1 "Screen Checksum Mode" "Screen Mode": A code that sets the TV/monitor status 0x01 0x04 0x31 0x0B 16 : 9 Zoom Wide Zoom 4 : 3 z Ack Header Comma nd Data length ID 0xAA 0xFF 3 Ack/Nak 'A' "Screen Mode": A code that ...

User Manual
Page 44
z Viewing the screen size (Get Screen Size Status) Header Command Data length ID Checksum 0xAA 0x19 0 z Ack Header Comma nd Data length ID 0xAA 0xFF 3 Ack/Nak 'A' r-CMD 0x19 Val1 "Screen Size" Checksu m "Screen Size": TV/monitor screen size (range: 0 - 255, unit: inch) z Nak Header Comma Data length nd ID 0xAA 0xFF 3 Ack/Nak 'N' r-CMD 0x19 Val1 "ERR" Checksu m "ERR" : A code showing what error has occurred 44 1 Preparations 1 Preparations Screen size control z Function The screen size of a TV/monitor can be changed using a PC.
z Viewing the screen size (Get Screen Size Status) Header Command Data length ID Checksum 0xAA 0x19 0 z Ack Header Comma nd Data length ID 0xAA 0xFF 3 Ack/Nak 'A' r-CMD 0x19 Val1 "Screen Size" Checksu m "Screen Size": TV/monitor screen size (range: 0 - 255, unit: inch) z Nak Header Comma Data length nd ID 0xAA 0xFF 3 Ack/Nak 'N' r-CMD 0x19 Val1 "ERR" Checksu m "ERR" : A code showing what error has occurred 44 1 Preparations 1 Preparations Screen size control z Function The screen size of a TV/monitor can be changed using a PC.

User Manual
Page 45
... (Set the PIP ON / OFF) Header Command Data length Data ID Checksum 0xAA 0x3C 1 "PIP" "PIP": A code used to turn the PIP mode of a TV/monitor on or off 1 : PIP ON 0 : PIP OFF z Ack Header Comma Data length nd ID 0xAA 0xFF 3 Ack/Nak 'A' r-CMD 0x3C Val1 "PIP" Checksu m "PIP":... A code used to On. † This function is set to turn the PIP mode of a TV/monitor on or off z Nak Header Comma Data length nd ID 0xAA 0xFF 3 Ack/Nak 'N' r-CMD 0x3C Val1 "ERR" Checksu m "ERR" : A code showing what error ...
... (Set the PIP ON / OFF) Header Command Data length Data ID Checksum 0xAA 0x3C 1 "PIP" "PIP": A code used to turn the PIP mode of a TV/monitor on or off 1 : PIP ON 0 : PIP OFF z Ack Header Comma Data length nd ID 0xAA 0xFF 3 Ack/Nak 'A' r-CMD 0x3C Val1 "PIP" Checksu m "PIP":... A code used to On. † This function is set to turn the PIP mode of a TV/monitor on or off z Nak Header Comma Data length nd ID 0xAA 0xFF 3 Ack/Nak 'N' r-CMD 0x3C Val1 "ERR" Checksu m "ERR" : A code showing what error ...

User Manual
Page 47
... Mode) Header Command Data length Data 0xAA 0x5C ID 1 "Video Wall Checksum Mode" "Video Wall Mode": A code used to activate Video Wall mode on a TV/monitor 1 : Full 0 : Natural z Ack Header Comma Data length Ack/Nak r-CMD Val1 nd Checksu ID "Video Wall m 0xAA 0xFF 3 'A' 0x5C Mode" "Video ...Wall Mode": A code used to activate Video Wall mode on a TV/monitor whose Video Wall is not available in MagicInfo. 1 Preparations Video Wall Mode Control z Function Video Wall Mode can be activated on a TV...
... Mode) Header Command Data length Data 0xAA 0x5C ID 1 "Video Wall Checksum Mode" "Video Wall Mode": A code used to activate Video Wall mode on a TV/monitor 1 : Full 0 : Natural z Ack Header Comma Data length Ack/Nak r-CMD Val1 nd Checksu ID "Video Wall m 0xAA 0xFF 3 'A' 0x5C Mode" "Video ...Wall Mode": A code used to activate Video Wall mode on a TV/monitor whose Video Wall is not available in MagicInfo. 1 Preparations Video Wall Mode Control z Function Video Wall Mode can be activated on a TV...

User Manual
Page 48
... : A code showing what error has occurred 48 1 Preparations This control is available regardless of whether or not the power is turned on a TV/monitor. z Viewing the safety lock state (Get Safety Lock Status) Header Command Data length ID Checksum 0xAA 0x5D 0 z Enabling or disabling safety lock (Set... Safety Lock Enable / Disable) Header Command Data length 0xAA 0x5D ID 1 "Safety Lock": Safety lock code to be set on a TV/monitor 1 : ON 0 : OFF z Ack Data "Safety Lock" Checksu m Header Comma nd ID 0xAA 0xFF Data length 3 Ack/Nak 'A' "Safety Lock": ...
... : A code showing what error has occurred 48 1 Preparations This control is available regardless of whether or not the power is turned on a TV/monitor. z Viewing the safety lock state (Get Safety Lock Status) Header Command Data length ID Checksum 0xAA 0x5D 0 z Enabling or disabling safety lock (Set... Safety Lock Enable / Disable) Header Command Data length 0xAA 0x5D ID 1 "Safety Lock": Safety lock code to be set on a TV/monitor 1 : ON 0 : OFF z Ack Data "Safety Lock" Checksu m Header Comma nd ID 0xAA 0xFF Data length 3 Ack/Nak 'A' "Safety Lock": ...

User Manual
Page 51
Connection Using an HDMI-DVI Cable DVI IN AUDIO IN 1 Connect an HDMI-DVI cable to the [DVI IN] port on the monitor and the HDMI port on the PC. 2 Connect a sound output cable to the [AUDIO IN] port on the product and the sound output port on ... you connect a PC to the product using a DVI cable (digital type) DVI IN AUDIO IN 1 Connect a DVI cable to the [DVI IN] port on the monitor and the DVI port on the PC. 2 Connect a sound output cable to the [AUDIO IN] port on the product and the sound output port on...
Connection Using an HDMI-DVI Cable DVI IN AUDIO IN 1 Connect an HDMI-DVI cable to the [DVI IN] port on the monitor and the HDMI port on the PC. 2 Connect a sound output cable to the [AUDIO IN] port on the product and the sound output port on ... you connect a PC to the product using a DVI cable (digital type) DVI IN AUDIO IN 1 Connect a DVI cable to the [DVI IN] port on the monitor and the DVI port on the PC. 2 Connect a sound output cable to the [AUDIO IN] port on the product and the sound output port on...

User Manual
Page 148
...of the graphics card settings menu. The cause of the problem is the PC or graphics card, and can be fixed by the monitor. This message is displayed. Check the cable connection to the product specifications. The screen will not switch on the screen look distorted. The... details on and off . If the graphics card settings menu has no option to adjust the screen size, update the graphics card driver to the monitor and PC. 7 Troubleshooting Guide 7.1.3 Check the followings. "Not Optimum Mode" is displayed when a signal from the graphics card exceeds the product's ...
...of the graphics card settings menu. The cause of the problem is the PC or graphics card, and can be fixed by the monitor. This message is displayed. Check the cable connection to the product specifications. The screen will not switch on the screen look distorted. The... details on and off . If the graphics card settings menu has no option to adjust the screen size, update the graphics card driver to the monitor and PC. 7 Troubleshooting Guide 7.1.3 Check the followings. "Not Optimum Mode" is displayed when a signal from the graphics card exceeds the product's ...

User Manual
Page 151
... "Windows 7": Go to Control Panel ĺ Appearance and Themes ĺ Display ĺ Settings ĺ Advanced ĺ Monitor and adjust the frequency in Monitor Settings. 151 7 Troubleshooting Guide z "Windows XP": Go to Control Panel ĺ Appearance and Personalization ĺ Display ĺ...; Adjust resolution ĺ Advanced Settings ĺ Monitor and adjust the frequency in Monitor Settings. z "Windows Vista": Go to Control Panel ĺ Display ĺ Settings ĺ Advanced ĺ Monitor and adjust the frequency in Monitor Settings. z "Windows ME/2000": Go to Control...
... "Windows 7": Go to Control Panel ĺ Appearance and Themes ĺ Display ĺ Settings ĺ Advanced ĺ Monitor and adjust the frequency in Monitor Settings. 151 7 Troubleshooting Guide z "Windows XP": Go to Control Panel ĺ Appearance and Personalization ĺ Display ĺ...; Adjust resolution ĺ Advanced Settings ĺ Monitor and adjust the frequency in Monitor Settings. z "Windows Vista": Go to Control Panel ĺ Display ĺ Settings ĺ Advanced ĺ Monitor and adjust the frequency in Monitor Settings. z "Windows ME/2000": Go to Control...
User Manual
Page 153
...Maximum resolution Maximum Pixel Clock Power Supply Signal connectors Dimensions (W x H x D) Weight VESA Mounting Interface Environmental Operating considerations Storage Plug-and-Play Panel Dots (Pixels) 400BX 40 inch (101 cm) 885.6mm (H) x 498.15 mm (V) 30~81 kHz 56~85 Hz 16.7 M 1920 x 1080 @ 60 Hz 1920 x 1080... 1 pixel per million (1ppm) may be installed and used with any Plug-and-Play compatible systems. Two-way data exchange between the monitor and PC system optimizes the monitor settings. Analog D-Sub(RGB/Component In), DVI-D In, CVBS(AV) In, RS232C In, Stereo Audio In, DC Out 969 x ...
...Maximum resolution Maximum Pixel Clock Power Supply Signal connectors Dimensions (W x H x D) Weight VESA Mounting Interface Environmental Operating considerations Storage Plug-and-Play Panel Dots (Pixels) 400BX 40 inch (101 cm) 885.6mm (H) x 498.15 mm (V) 30~81 kHz 56~85 Hz 16.7 M 1920 x 1080 @ 60 Hz 1920 x 1080... 1 pixel per million (1ppm) may be installed and used with any Plug-and-Play compatible systems. Two-way data exchange between the monitor and PC system optimizes the monitor settings. Analog D-Sub(RGB/Component In), DVI-D In, CVBS(AV) In, RS232C In, Stereo Audio In, DC Out 969 x ...
User Manual
Page 156
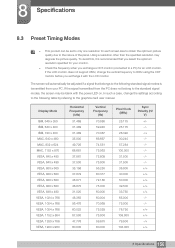
... to the nature of the panel. z Check the frequency when you exchange it is transmitted from your monitor. 8 Specifications 8.3 Preset Timing Modes z This product can be blank with the LCD monitor. In such a case, change the vertical frequency to the graphics card user manual. Using a resolution ... only one resolution for each screen size to obtain the optimum picture quality due to a PC) for your PC. If the LCD monitor does not support 85Hz, change the settings according to the following standard signal modes is recommended that belongs to the standard signal modes,...
... to the nature of the panel. z Check the frequency when you exchange it is transmitted from your monitor. 8 Specifications 8.3 Preset Timing Modes z This product can be blank with the LCD monitor. In such a case, change the vertical frequency to the graphics card user manual. Using a resolution ... only one resolution for each screen size to obtain the optimum picture quality due to a PC) for your PC. If the LCD monitor does not support 85Hz, change the settings according to the following standard signal modes is recommended that belongs to the standard signal modes,...

User Manual
Page 157
... 148.500 Sync Polarity (H/ V) Horizontal Frequency The time required to scan a single line from the left to display what the viewer sees. Vertical Frequency The monitor displays a single image multiple times per second is called vertical frequency or refresh rate. Vertical frequency is measured in Hz. 157 8 Specifications Horizontal frequency is...
... 148.500 Sync Polarity (H/ V) Horizontal Frequency The time required to scan a single line from the left to display what the viewer sees. Vertical Frequency The monitor displays a single image multiple times per second is called vertical frequency or refresh rate. Vertical frequency is measured in Hz. 157 8 Specifications Horizontal frequency is...

User Manual
Page 162
...found even after auto adjustment, adjust Coarse or Fine. Therefore, setting a resolution other than the specified resolution may be brighter or darker on your monitor. This does not affect product performance. † The number of sub-pixels by LCD panel type: 40 : 6,220,800 z Run "Auto ...product, approximately 1 pixel per million (1ppm) may degrade the picture quality. Appendix 162 z Unlike CDT monitors, TFT-LCD monitors (due to the nature of the panel) can be using the monitor for your PC and adjust the resolution and refresh rate as follows. If noise is not selected. †...
...found even after auto adjustment, adjust Coarse or Fine. Therefore, setting a resolution other than the specified resolution may be brighter or darker on your monitor. This does not affect product performance. † The number of sub-pixels by LCD panel type: 40 : 6,220,800 z Run "Auto ...product, approximately 1 pixel per million (1ppm) may degrade the picture quality. Appendix 162 z Unlike CDT monitors, TFT-LCD monitors (due to the nature of the panel) can be using the monitor for your PC and adjust the resolution and refresh rate as follows. If noise is not selected. †...

User Manual
Page 164
Avoid using grey as it for 12 hours. † Go to Display Properties > Power Supply on your PC and set the monitor to power off the product for 2 hours after using for 4 hours. Interval: Change text color and background color every 30 minutes FLIGHT : TIME OZ348 : 20:...
Avoid using grey as it for 12 hours. † Go to Display Properties > Power Supply on your PC and set the monitor to power off the product for 2 hours after using for 4 hours. Interval: Change text color and background color every 30 minutes FLIGHT : TIME OZ348 : 20:...

User Manual
Page 165
... TIME 20:30 UA102 21:10 z Screen Delete Function † Screen Scroll Effect: A black bar moves horizontally. Appendix † The best way to protect the monitor from afterimage burn-in is switching the power off or setting the PC or system to run a screen saver when not in use. z Screen Scroll...
... TIME 20:30 UA102 21:10 z Screen Delete Function † Screen Scroll Effect: A black bar moves horizontally. Appendix † The best way to protect the monitor from afterimage burn-in is switching the power off or setting the PC or system to run a screen saver when not in use. z Screen Scroll...


