
User Manual
Page 5
... yourself. • Otherwise, this may result in the discoloration and distortion of the TFT-LCD screen, wipe with a soft, dry cloth. • (Do not use the specified cloth only. Clean Others Safety Instructions When cleaning the monitor case or the surface of the structure and the screen surface may peel off the...
... yourself. • Otherwise, this may result in the discoloration and distortion of the TFT-LCD screen, wipe with a soft, dry cloth. • (Do not use the specified cloth only. Clean Others Safety Instructions When cleaning the monitor case or the surface of the structure and the screen surface may peel off the...

User Manual
Page 14
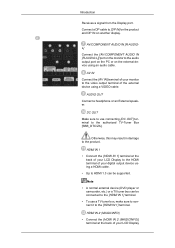
... RGB/DVI/DP/HDMI AUDIO IN (PC/DVI/ DP/HDMI Audio Connection Terminal (Input)) Connect the [RGB/DVI/DP/HDMI AUDIO IN] terminal of the monitor and the speaker output terminal of your computer's sound card using the DVI cable. DVI IN (PC Video Connection Terminal) Connect the [DVI IN] port... on the PC using a stereo cable (sold separately). Introduction POWER S/W ON [ ] / OFF Switches the LCD Display On/Off. POWER The power cord plugs into the LCD Display and the wall outlet.
... RGB/DVI/DP/HDMI AUDIO IN (PC/DVI/ DP/HDMI Audio Connection Terminal (Input)) Connect the [RGB/DVI/DP/HDMI AUDIO IN] terminal of the monitor and the speaker output terminal of your computer's sound card using the DVI cable. DVI IN (PC Video Connection Terminal) Connect the [DVI IN] port... on the PC using a stereo cable (sold separately). Introduction POWER S/W ON [ ] / OFF Switches the LCD Display On/Off. POWER The power cord plugs into the LCD Display and the wall outlet.
User Manual
Page 15
.../ZA]. HDMI IN 1 • Connect the [HDMI IN 1] terminal at the back of your LCD Display AV IN Connect the [AV IN] terminal of your monitor to the video output terminal of your LCD Display to the HDMI terminal of the external device using an audio cable. Note • A normal external... of your digital output device using a HDMI cable. • Up to the audio output port on the PC or on another display. AV/COMPONENT AUDIO IN [R-AUDIOL] Connect the [AV/COMPONENT AUDIO IN [R-AUDIO-L]] port on the monitor to HDMI 1.3 can be supported. Introduction Receives a signal from the...
.../ZA]. HDMI IN 1 • Connect the [HDMI IN 1] terminal at the back of your LCD Display AV IN Connect the [AV IN] terminal of your monitor to the video output terminal of your LCD Display to the HDMI terminal of the external device using an audio cable. Note • A normal external... of your digital output device using a HDMI cable. • Up to the audio output port on the PC or on another display. AV/COMPONENT AUDIO IN [R-AUDIOL] Connect the [AV/COMPONENT AUDIO IN [R-AUDIO-L]] port on the monitor to HDMI 1.3 can be supported. Introduction Receives a signal from the...
User Manual
Page 37
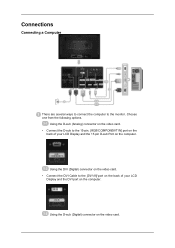
Using the DVI (Digital) connector on the video card. • Connect the DVI Cable to the 15-pin, [RGB/COMPONENT IN] port on the back of your LCD Display and the 15 pin D-sub Port on the computer. Using the D-sub (Analog) connector on the video card. • Connect the D-sub to the [DVI IN] port on the back of your LCD Display and the DVI port on the video card. Using the D-sub (Digital) connector on the computer. Connections Connecting a Computer There are several ways to connect the computer to the monitor. Choose one from the following options.
Using the DVI (Digital) connector on the video card. • Connect the DVI Cable to the 15-pin, [RGB/COMPONENT IN] port on the back of your LCD Display and the 15 pin D-sub Port on the computer. Using the D-sub (Analog) connector on the video card. • Connect the D-sub to the [DVI IN] port on the back of your LCD Display and the DVI port on the video card. Using the D-sub (Digital) connector on the computer. Connections Connecting a Computer There are several ways to connect the computer to the monitor. Choose one from the following options.
User Manual
Page 143
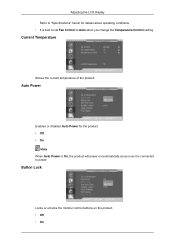
Auto Power Enables or disables Auto Power for details about operating conditions. • It is best to set Fan Control to Auto when you change the Temperature Control setting. Adjusting the LCD Display Refer to "Specifications" herein for the product. • Off • On Note When Auto Power is On, the product will power on the product. • Off • On Button Lock Locks or unlocks the monitor control buttons on automatically as soon as it is connected to power. Current Temperature Shows the current temperature of the product.
Auto Power Enables or disables Auto Power for details about operating conditions. • It is best to set Fan Control to Auto when you change the Temperature Control setting. Adjusting the LCD Display Refer to "Specifications" herein for the product. • Off • On Note When Auto Power is On, the product will power on the product. • Off • On Button Lock Locks or unlocks the monitor control buttons on automatically as soon as it is connected to power. Current Temperature Shows the current temperature of the product.
User Manual
Page 162
...pixel. The voltage difference between electrodes that is appeared as described below to enjoy the best picture quality. This is not from the monitor for an extended period of time. If there's still noise after the automatic adjustment, use it . PRODUCT INFORMATION (Image Retention ...provided for TFTLCD. • Resolution: 1366 x 768 • Vertical frequency (refresh rate): 60 Hz TFT-LCD panels manufactured by performing the "Auto Adjustment" function in display screen that work the liquid crystal (LC) in voltage between electrodes increases with time, forcing the liquid crystal ...
...pixel. The voltage difference between electrodes that is appeared as described below to enjoy the best picture quality. This is not from the monitor for an extended period of time. If there's still noise after the automatic adjustment, use it . PRODUCT INFORMATION (Image Retention ...provided for TFTLCD. • Resolution: 1366 x 768 • Vertical frequency (refresh rate): 60 Hz TFT-LCD panels manufactured by performing the "Auto Adjustment" function in display screen that work the liquid crystal (LC) in voltage between electrodes increases with time, forcing the liquid crystal ...


