
User Manual
Page 1
SyncMaster 320PX Install Programs PDF Manuals Registration Model Select Language Safety Instructions Introduction Connections Using the Software Adjusting the LCD Display Troubleshooting Specifications Information Appendix © 2006 Samsung Electronics Co., Ltd. All rights reserved.
SyncMaster 320PX Install Programs PDF Manuals Registration Model Select Language Safety Instructions Introduction Connections Using the Software Adjusting the LCD Display Troubleshooting Specifications Information Appendix © 2006 Samsung Electronics Co., Ltd. All rights reserved.
User Manual
Page 2
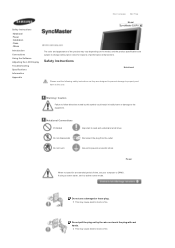
... Do not disassemble Do not touch Important to read the following safety instructions as they are subject to change without prior notice for an extended period of performance enhancement. z This may cause electric shock or fire. Do not use a damaged or loose plug. Select Language Main Page Safety Instructions Notational Power Installation Clean Others Introduction Connections Using the Software Adjusting the LCD Display Troubleshooting Specifications Information Appendix Model SyncMaster 320PX The color and...
... Do not disassemble Do not touch Important to read the following safety instructions as they are subject to change without prior notice for an extended period of performance enhancement. z This may cause electric shock or fire. Do not use a damaged or loose plug. Select Language Main Page Safety Instructions Notational Power Installation Clean Others Introduction Connections Using the Software Adjusting the LCD Display Troubleshooting Specifications Information Appendix Model SyncMaster 320PX The color and...
User Manual
Page 8
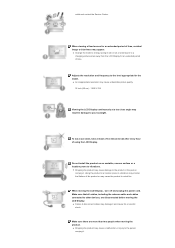
... product. Make sure that all cables, including the antenna cable and cables connected to vibrations. z Dropping the product may result in a location prone to vibrations may shorten the lifetime of time, residual image or blurriness may cause the product to a changing picture when away from the LCD Display for the model. outlet and contact the Service Center. z Change the mode to energy saving mode or set a screensaver...
... product. Make sure that all cables, including the antenna cable and cables connected to vibrations. z Dropping the product may result in a location prone to vibrations may shorten the lifetime of time, residual image or blurriness may cause the product to a changing picture when away from the LCD Display for the model. outlet and contact the Service Center. z Change the mode to energy saving mode or set a screensaver...

User Manual
Page 11
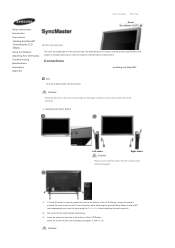
... Instructions Introduction Package Contents Your LCD Display Machanical Layout Connections Using the Software Adjusting the LCD Display Troubleshooting Specifications Information Appendix Model SyncMaster 320PX The color and appearance of the product may vary depending on the model, and the product specifications are subject to buy optional items. Note • This stand is not for reasons of performance enhancement. Manuals LCD Display Quick Setup Guide Warranty Card User's Guide, MDC Software (Not available in all locations) Cables D-Sub Cable Other Power Cord Speaker Wire Cable...
... Instructions Introduction Package Contents Your LCD Display Machanical Layout Connections Using the Software Adjusting the LCD Display Troubleshooting Specifications Information Appendix Model SyncMaster 320PX The color and appearance of the product may vary depending on the model, and the product specifications are subject to buy optional items. Note • This stand is not for reasons of performance enhancement. Manuals LCD Display Quick Setup Guide Warranty Card User's Guide, MDC Software (Not available in all locations) Cables D-Sub Cable Other Power Cord Speaker Wire Cable...
User Manual
Page 15
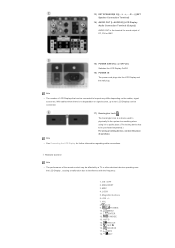
.... SOURCE 17. L - +, - - LOCK 5. VOL 8. AUTO 14. EXIT MagicNet buttons 6.+100 -/-- 7. Remote Control Note • The performance of purchase. • See Connecting the LCD Display for sound output of PC, DVI or BNC. 15) POWER S/W ON [ | ] / OFF [O] Switches the LCD Display On/Off. 16) POWER IN The power cord plugs into the LCD Display and the wall plug. MENU 11. INFO 18. ON / OFF 2. P.MO DE 13. MUTE 9. 13) EXT SPEAKER(8 Ω)[- - R - +] (EXT Speaker Connection Terminal) 14) AUDIO OUT [L -AUDIO-R] (LCD Display Audio Connection...
.... SOURCE 17. L - +, - - LOCK 5. VOL 8. AUTO 14. EXIT MagicNet buttons 6.+100 -/-- 7. Remote Control Note • The performance of purchase. • See Connecting the LCD Display for sound output of PC, DVI or BNC. 15) POWER S/W ON [ | ] / OFF [O] Switches the LCD Display On/Off. 16) POWER IN The power cord plugs into the LCD Display and the wall plug. MENU 11. INFO 18. ON / OFF 2. P.MO DE 13. MUTE 9. 13) EXT SPEAKER(8 Ω)[- - R - +] (EXT Speaker Connection Terminal) 14) AUDIO OUT [L -AUDIO-R] (LCD Display Audio Connection...
User Manual
Page 17
.... - In PC/DVI mode, sets the SOUND to another horizontally, vertically or adjusts selected menu values. 20) S.MODE When pressing this button, current picture mode is displayed at the factory. In general Video mode, selects FM Radio, and turns off . This fuction does not work for this monitor. 23) P.SIZE Press to circle through available preconfigured modes. (Entertain → Internet → Text → Custom ) 13) AUTO Adjusts the screen display automatically in the control panel, auto function is...
.... - In PC/DVI mode, sets the SOUND to another horizontally, vertically or adjusts selected menu values. 20) S.MODE When pressing this button, current picture mode is displayed at the factory. In general Video mode, selects FM Radio, and turns off . This fuction does not work for this monitor. 23) P.SIZE Press to circle through available preconfigured modes. (Entertain → Internet → Text → Custom ) 13) AUTO Adjusts the screen display automatically in the control panel, auto function is...
User Manual
Page 23
... the bottom of the LCD Display. Select Language Main Page Safety Instructions Introduction Connections Installing the Stand KIT Connecting the LCD Display Using the Software Adjusting the LCD Display Troubleshooting Specifications Information Appendix Model SyncMaster 320PX The color and appearance of the product may vary depending on the model, and the product specifications are subject to change without prior notice for damages caused by using the 'Cover-Hole' when attaching the wall mount kit. 2) Set up the left and...
... the bottom of the LCD Display. Select Language Main Page Safety Instructions Introduction Connections Installing the Stand KIT Connecting the LCD Display Using the Software Adjusting the LCD Display Troubleshooting Specifications Information Appendix Model SyncMaster 320PX The color and appearance of the product may vary depending on the model, and the product specifications are subject to change without prior notice for damages caused by using the 'Cover-Hole' when attaching the wall mount kit. 2) Set up the left and...
User Manual
Page 28
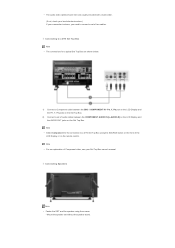
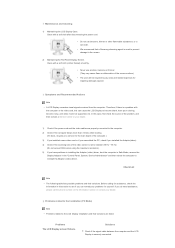
... not, check your local electronics store.) If your Set Top Box owner's manual. Note • For an explanation of audio cables between the BNC / COMP ONENT IN - PR, Y, PB port on the LCD Display and the PR, Y, PB jacks on the remote control. Connecting to a DTV Set Top Box Note • The connections for the connection to a DTV Set Top Box using the screws. * Mount the speaker set of Component video, see...
... not, check your local electronics store.) If your Set Top Box owner's manual. Note • For an explanation of audio cables between the BNC / COMP ONENT IN - PR, Y, PB port on the LCD Display and the PR, Y, PB jacks on the remote control. Connecting to a DTV Set Top Box Note • The connections for the connection to a DTV Set Top Box using the screws. * Mount the speaker set of Component video, see...
User Manual
Page 38
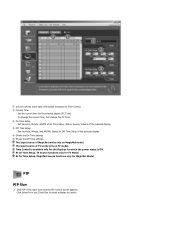
.../PM, Status for Off Time Setup of MagicNet works only on TV model. At On Time Setup, TV Source functions only for MagicNet Model. The Input source of the selected display. 4) Shows the On Time settings. 5) Shows the Off Time settings. To change the current time, first change the PC Time. 2) On Time Setup - Click PIP of the main icons and the PIP control screen appears.
.../PM, Status for Off Time Setup of MagicNet works only on TV model. At On Time Setup, TV Source functions only for MagicNet Model. The Input source of the selected display. 4) Shows the On Time settings. 5) Shows the Off Time settings. To change the current time, first change the PC Time. 2) On Time Setup - Click PIP of the main icons and the PIP control screen appears.

User Manual
Page 50
...reasons of performance enhancement. Select Language Main Page Safety Instructions Introduction Connections Using the Software Adjusting the LCD Display Input Picture [PC / BNC /DVI Mode] Picture [AV / S-Video / Component / DVI-Video Mode] Sound Setup Multi Control Direct Functions Troubleshooting Specifications Information Appendix Model SyncMaster 320PX The color and appearance of the product may vary depending on the remote control is the 'SOURCE' button.] Note • PIP turns off when the LCD Display is switched to an external source. Use to select the screen of your choice. 1) PC...
...reasons of performance enhancement. Select Language Main Page Safety Instructions Introduction Connections Using the Software Adjusting the LCD Display Input Picture [PC / BNC /DVI Mode] Picture [AV / S-Video / Component / DVI-Video Mode] Sound Setup Multi Control Direct Functions Troubleshooting Specifications Information Appendix Model SyncMaster 320PX The color and appearance of the product may vary depending on the remote control is the 'SOURCE' button.] Note • PIP turns off when the LCD Display is switched to an external source. Use to select the screen of your choice. 1) PC...

User Manual
Page 61
... only allowed when the graphics resolution is not displayed properly on the screen when setting the graphics card resolution of the computer to 1024 x 768 @ 60Hz, 1280 x 768 @ 60Hz, 1360 x 768 @ 60Hz or 1366 x768 @ 60Hz, by using this function(Resolution Select), you can change the Safety Screen Type. - Pixel - Reset The picture parameters are replaced with the factory default values. 1) Image Reset [ME NU ENTER ENTER] →...
... only allowed when the graphics resolution is not displayed properly on the screen when setting the graphics card resolution of the computer to 1024 x 768 @ 60Hz, 1280 x 768 @ 60Hz, 1360 x 768 @ 60Hz or 1366 x768 @ 60Hz, by using this function(Resolution Select), you can change the Safety Screen Type. - Pixel - Reset The picture parameters are replaced with the factory default values. 1) Image Reset [ME NU ENTER ENTER] →...

User Manual
Page 64
.... Select Language Main Page Safety Instructions Introduction Connections Using the Software Adjusting the LCD Display Troubleshooting Self-Test Feature Check Check List Q& A Specifications Information Appendix Model SyncMaster 320PX The color and appearance of the product may vary depending on both your LCD Display and reconnect the video cable; Self-Test Feature Check Your LCD Display provides a self test feature that you to change the screen resolution or stay in the Self-Test mode, the LED power indicator remains green and...
.... Select Language Main Page Safety Instructions Introduction Connections Using the Software Adjusting the LCD Display Troubleshooting Self-Test Feature Check Check List Q& A Specifications Information Appendix Model SyncMaster 320PX The color and appearance of the product may vary depending on both your LCD Display and reconnect the video cable; Self-Test Feature Check Your LCD Display provides a self test feature that you to change the screen resolution or stay in the Self-Test mode, the LED power indicator remains green and...
User Manual
Page 65
... connected to reinstall the Adaptor (video) driver. Before calling for repairing damages caused. Solutions z Check if the signal cable between 50 Hz ~ 85 Hz. (Do not exceed 60Hz when using the maximum resolution.) 5) If you can cause the LCD Display to become blank, have problems in installing the Adaptor (video) driver, boot the computer in Safe Mode, remove the Display Adaptor in this case, first check the source of the video screen...
... connected to reinstall the Adaptor (video) driver. Before calling for repairing damages caused. Solutions z Check if the signal cable between 50 Hz ~ 85 Hz. (Do not exceed 60Hz when using the maximum resolution.) 5) If you can cause the LCD Display to become blank, have problems in installing the Adaptor (video) driver, boot the computer in Safe Mode, remove the Display Adaptor in this case, first check the source of the video screen...

User Manual
Page 66
... Audio Note z Check if the resolution and frequency set for the computer video card falls in the range supported by dark shadows. Solutions z Ensure that the PC or video sources are listed. picture is poor. If not, reset them referring to the Connecting the LCD Display ) z Ensure that the power cord is firmly connected and the LCD LCD Display is firmly connected to the PC or video sources. (Refer to the current Information under OSD Color Adjustment menu. The color white...
... Audio Note z Check if the resolution and frequency set for the computer video card falls in the range supported by dark shadows. Solutions z Ensure that the PC or video sources are listed. picture is poor. If not, reset them referring to the Connecting the LCD Display ) z Ensure that the power cord is firmly connected and the LCD LCD Display is firmly connected to the PC or video sources. (Refer to the current Information under OSD Color Adjustment menu. The color white...

User Manual
Page 67
.... (Refer to the Windows / Computer Manual). z Check the volume level. z Check if the batteries are listed below. The frequency can I Adjusts the resolution? Q & A Question Answer How can I change the frequency? Note that the audio cable is on the computer sound card or software program. z Windows ME/2000: Set the resolution at the Control Panel → Display → Screen Saver. Disconnect the power cord and then clean the LCD Display with a soft cloth, using either a cleaning solution or plain water...
.... (Refer to the Windows / Computer Manual). z Check the volume level. z Check if the batteries are listed below. The frequency can I Adjusts the resolution? Q & A Question Answer How can I change the frequency? Note that the audio cable is on the computer sound card or software program. z Windows ME/2000: Set the resolution at the Control Panel → Display → Screen Saver. Disconnect the power cord and then clean the LCD Display with a soft cloth, using either a cleaning solution or plain water...

User Manual
Page 68
... of the product may vary depending on graphics card used Maximum resolution 1360 x 768 @ 60 Hz Input Signal, Terminated RGB Analog, DVI(Digital Visual Interface) Compliant Digital RGB. 0.7 Vp-p Positive at 75 Ω ± 10 % Separate H/V sync, Composite sync, SOG, TTL level , positive or negative. Safety Instructions Introduction Connections Using the Software Adjusting the Monitor Troubleshooting Specifications General PowerSaver Preset Timing Modes Information Appendix Select Language Main Page Model SyncMaster 320PX The color and appearance of performance enhancement.
... of the product may vary depending on graphics card used Maximum resolution 1360 x 768 @ 60 Hz Input Signal, Terminated RGB Analog, DVI(Digital Visual Interface) Compliant Digital RGB. 0.7 Vp-p Positive at 75 Ω ± 10 % Separate H/V sync, Composite sync, SOG, TTL level , positive or negative. Safety Instructions Introduction Connections Using the Software Adjusting the Monitor Troubleshooting Specifications General PowerSaver Preset Timing Modes Information Appendix Select Language Main Page Model SyncMaster 320PX The color and appearance of performance enhancement.
User Manual
Page 69
Dot Acceptable TFT LCD panels manufactured by switching your monitor to low-power mode when it has not been used with a computer equipped with a VESA DPMS compliant video card installed in your computer. But the pixels of RED, GREEN, BLUE and WHITE color appear to change without any Plug & Play compatible system. This is not from the computer is not needed, or when leaving it without prior notice. Note • Design and specifications are...
Dot Acceptable TFT LCD panels manufactured by switching your monitor to low-power mode when it has not been used with a computer equipped with a VESA DPMS compliant video card installed in your computer. But the pixels of RED, GREEN, BLUE and WHITE color appear to change without any Plug & Play compatible system. This is not from the computer is not needed, or when leaving it without prior notice. Note • Design and specifications are...

User Manual
Page 71
... Safety Instructions Introduction Connections Using the Software Adjusting the LCD Display Troubleshooting Specifications Information For Better Display PRODUCT INFORMATION (Image Retention Free) Appendix Model SyncMaster 320PX The color and appearance of the product may vary depending on the model, and the product specifications are subject to change without any problems. • For example, the number of TFT LCD sub pixels contained in this product are 3,133,440. Information For Better Display Adjust the computer resolution and screen inection rate (refresh rate...
... Safety Instructions Introduction Connections Using the Software Adjusting the LCD Display Troubleshooting Specifications Information For Better Display PRODUCT INFORMATION (Image Retention Free) Appendix Model SyncMaster 320PX The color and appearance of the product may vary depending on the model, and the product specifications are subject to change without any problems. • For example, the number of TFT LCD sub pixels contained in this product are 3,133,440. Information For Better Display Adjust the computer resolution and screen inection rate (refresh rate...

User Manual
Page 73
...'s User Guide at "OSD Function", some model's will be limited based on instruction guide. z Every 30 minutes, change the characters with Black Color move up and down. - Apply the Screen Scroll function on Product z Apply the Screen Pixel function - Time Period : 10 ~ 50 second ( Recommend : 50 ) z Apply the Screen Bar function - Symptom: Horizontal / Vertical Bar with Black Color move up and down. Select method . Symptom: Horizontal Bar with movement. Instruction Guide : OSD Menu -> Set...
...'s User Guide at "OSD Function", some model's will be limited based on instruction guide. z Every 30 minutes, change the characters with Black Color move up and down. - Apply the Screen Scroll function on Product z Apply the Screen Pixel function - Time Period : 10 ~ 50 second ( Recommend : 50 ) z Apply the Screen Bar function - Symptom: Horizontal / Vertical Bar with Black Color move up and down. Select method . Symptom: Horizontal Bar with movement. Instruction Guide : OSD Menu -> Set...

User Manual
Page 75
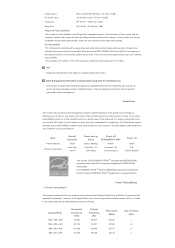
.../be http://www.samsung.com/cz Select Language Main Page Model Safety Instructions Introduction Connections Using the Software Adjusting the LCD Display Troubleshooting Specifications Information Appendix Contact SAMSUNG WORLDWIDE Terms Correct Disposal Authority The color and appearance of performance enhancement. U.S.A CANADA MEXICO North America 1-800-SAMSUNG (7267864) 1-800-SAMSUNG (7267864) 01-800-SAMSUNG (7267864) http://www.samsung.com http://www.samsung.com/ca http://www.samsung.com/mx ARGENTINE BRAZIL...
.../be http://www.samsung.com/cz Select Language Main Page Model Safety Instructions Introduction Connections Using the Software Adjusting the LCD Display Troubleshooting Specifications Information Appendix Contact SAMSUNG WORLDWIDE Terms Correct Disposal Authority The color and appearance of performance enhancement. U.S.A CANADA MEXICO North America 1-800-SAMSUNG (7267864) 1-800-SAMSUNG (7267864) 01-800-SAMSUNG (7267864) http://www.samsung.com http://www.samsung.com/ca http://www.samsung.com/mx ARGENTINE BRAZIL...


