User Manual (ENGLISH)
Page 2
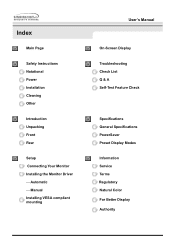
Automatic - Manual Installing VESA compliant mounting User's Manual On-Screen Display Troubleshooting Check List Q & A Self-Test Feature Check Specifications General Specifications PowerSaver Preset Display Modes Information Service Terms Regulatory Natural Color For Better Display Authority Index Main Page Safety Instructions Notational Power Installation Cleaning Other Introduction Unpacking Front Rear Setup Connecting Your Monitor Installing the Monitor Driver -
Automatic - Manual Installing VESA compliant mounting User's Manual On-Screen Display Troubleshooting Check List Q & A Self-Test Feature Check Specifications General Specifications PowerSaver Preset Display Modes Information Service Terms Regulatory Natural Color For Better Display Authority Index Main Page Safety Instructions Notational Power Installation Cleaning Other Introduction Unpacking Front Rear Setup Connecting Your Monitor Installing the Monitor Driver -

User Manual (ENGLISH)
Page 6
...8226; Bad ventilation may cause a breakdown or fire. • Put your monitor in a location with low humidity and a minimum of dust. • An electric shock or fire could result inside the monitor. • Do not drop the monitor when moving it. • This may cause damage to the product or ...human body. • Place the monitor on a flat and stable surface. • The monitor can cause injury by falling. • Set down...
...8226; Bad ventilation may cause a breakdown or fire. • Put your monitor in a location with low humidity and a minimum of dust. • An electric shock or fire could result inside the monitor. • Do not drop the monitor when moving it. • This may cause damage to the product or ...human body. • Place the monitor on a flat and stable surface. • The monitor can cause injury by falling. • Set down...

User Manual (ENGLISH)
Page 7
Safety Instructions User's Manual Installation • Do not place the monitor face down. • The TFT-LCD surface may be damaged.
Safety Instructions User's Manual Installation • Do not place the monitor face down. • The TFT-LCD surface may be damaged.

User Manual (ENGLISH)
Page 8
... or the surface of the TFT-LCD, wipe with a slightly moistened, soft fabric. • Do not spray detergent directly on the monitor. • Use the recommended detergent with a smooth cloth. • If the connector between the plug and the pin is dusty or dirty, clean it properly .... • A dirty connector can cause an electric shock or fire • Do not set a glass of water, chemicals or any small metal objects on the monitor. • This may cause damage, electric shock or a fire. • If a foreign substance gets into the...
... or the surface of the TFT-LCD, wipe with a slightly moistened, soft fabric. • Do not spray detergent directly on the monitor. • Use the recommended detergent with a smooth cloth. • If the connector between the plug and the pin is dusty or dirty, clean it properly .... • A dirty connector can cause an electric shock or fire • Do not set a glass of water, chemicals or any small metal objects on the monitor. • This may cause damage, electric shock or a fire. • If a foreign substance gets into the...

User Manual (ENGLISH)
Page 9
unplug it - in particular, if there are any heavy objects on the monitor. • This may cause an explosion or fire. No user serviceable parts inside. • This may cause an electric shock or a fire. • Refer servicing ...; This will reduce eye fatigue. • Do not use or store inflammable substances near the monitor. • This may cause an electric shock or a fire. • For each hour of looking at the monitor, you should let your monitor does not operate normally - Safety Instructions User's Manual Other • Do not remove cover...
unplug it - in particular, if there are any heavy objects on the monitor. • This may cause an explosion or fire. No user serviceable parts inside. • This may cause an electric shock or a fire. • Refer servicing ...; This will reduce eye fatigue. • Do not use or store inflammable substances near the monitor. • This may cause an electric shock or a fire. • For each hour of looking at the monitor, you should let your monitor does not operate normally - Safety Instructions User's Manual Other • Do not remove cover...

User Manual (ENGLISH)
Page 10
... the signal cable. • This may cause a breakdown, electric shock or a fire due to damage to the cable. • Do not move the monitor right or left by pulling only the wire or the signal cable. • This may cause a breakdown, electric shock or a fire due to damage to... the cable. • Never insert anything metallic into the monitor openings. • This may appear. ! Change the mode to energy save or set a screensaver to moving picture when you view a fixed screen for an ...
... the signal cable. • This may cause a breakdown, electric shock or a fire due to damage to the cable. • Do not move the monitor right or left by pulling only the wire or the signal cable. • This may cause a breakdown, electric shock or a fire due to damage to... the cable. • Never insert anything metallic into the monitor openings. • This may appear. ! Change the mode to energy save or set a screensaver to moving picture when you view a fixed screen for an ...

User Manual (ENGLISH)
Page 11
Introduction Unparking User's Manual Please make sure the following items are missing, contact your monitor. D-Sub Cable Quick Setup Guide DVI Cable(Option) Power Cord Warranty Card (Not available in all locations) Monitor and Stand User's Guide and Driver Installation CD PIVOT Installation CD (Not available in all locations) If any items are included with your dealer.
Introduction Unparking User's Manual Please make sure the following items are missing, contact your monitor. D-Sub Cable Quick Setup Guide DVI Cable(Option) Power Cord Warranty Card (Not available in all locations) Monitor and Stand User's Guide and Driver Installation CD PIVOT Installation CD (Not available in all locations) If any items are included with your dealer.

User Manual (ENGLISH)
Page 12
... the screen displaying the current mode -analog or digital input signal.) This light glows green during normal operation, and blinks green once as the monitor saves your adjustments. Menu button 5. Power button 6. When you push the Source button while the OSD is off .(When the power is not... you push the Source button to Exit the active menu or the OSD. Exit button Source button 3. These buttons allow you must connect your monitor OFF when it unattended for further information regarding power saving functions. Use this button to the graphic card with a digital port using the DVI...
... the screen displaying the current mode -analog or digital input signal.) This light glows green during normal operation, and blinks green once as the monitor saves your adjustments. Menu button 5. Power button 6. When you push the Source button while the OSD is off .(When the power is not... you push the Source button to Exit the active menu or the OSD. Exit button Source button 3. These buttons allow you must connect your monitor OFF when it unattended for further information regarding power saving functions. Use this button to the graphic card with a digital port using the DVI...

User Manual (ENGLISH)
Page 13
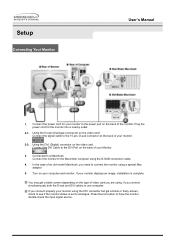
... power cord for further information regarding cable connections. Press the top side of the stand and then push the button at the back of the monitor may vary from product to product.) 1. Connect the DVI Cable to the DVI Port on the back of your... monitor to the 15-pin, D-sub connector on the back of your monitor. Power port 2. Connect the signal cable to the power port on the back of the monitor. DVI port 3. Stand Height Adjustment 1. Note: See Connecting Your...
... power cord for further information regarding cable connections. Press the top side of the stand and then push the button at the back of the monitor may vary from product to product.) 1. Connect the DVI Cable to the DVI Port on the back of your... monitor to the 15-pin, D-sub connector on the back of your monitor. Power port 2. Connect the signal cable to the power port on the back of the monitor. DVI port 3. Stand Height Adjustment 1. Note: See Connecting Your...
User Manual (ENGLISH)
Page 14
... DVI cables to analogue. Using the DVI (Digital) connector on the type of an old model Macintosh, you connect properly your Monitor. 3. Press Source button to a Macintosh. Connected to have the monitor double-check the input signal source. You may get a blank or fuzzy screen, check to see if the... monitor status is complete. Plug the power cord for your computer and monitor. In the case of video card you are using the DVI connector but get a blank screen depending on the ...
... DVI cables to analogue. Using the DVI (Digital) connector on the type of an old model Macintosh, you connect properly your Monitor. 3. Press Source button to a Macintosh. Connected to have the monitor double-check the input signal source. You may get a blank or fuzzy screen, check to see if the... monitor status is complete. Plug the power cord for your computer and monitor. In the case of video card you are using the DVI connector but get a blank screen depending on the ...
User Manual (ENGLISH)
Page 15
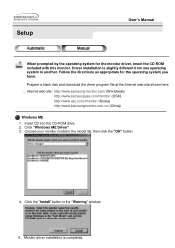
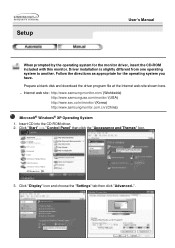
...site shown here. ? Internet web site : http://www.samsung-monitor.com/ (Worldwide) http://www.samsungusa.com/monitor/ (USA) http://www.sec.co.kr/monitor/ (Korea) http://www.samsungmonitor.com.cn/ (China) Windows ME 1. Monitor driver installation is slightly different from one operating system to ...another. Follow the directions as appropriate for the monitor driver, insert the CD-ROM included with this monitor. Choose your monitor model in the "Warning" window. 5. Click the "Install" button in the model list, then ...
...site shown here. ? Internet web site : http://www.samsung-monitor.com/ (Worldwide) http://www.samsungusa.com/monitor/ (USA) http://www.sec.co.kr/monitor/ (Korea) http://www.samsungmonitor.com.cn/ (China) Windows ME 1. Monitor driver installation is slightly different from one operating system to ...another. Follow the directions as appropriate for the monitor driver, insert the CD-ROM included with this monitor. Choose your monitor model in the "Warning" window. 5. Click the "Install" button in the model list, then ...

User Manual (ENGLISH)
Page 16
... click "OK" button. Choose your system.The certified driver will be posted on Samsung Monitor Homepage http://www.samsung-monitor.com/ 6. Monitor driver installation is under certifying MS logo,and this installation don't damage your monitor model in the "Warning" window. 5. This monitor driver is completed. Setup User's Manual Windows XP/2000 1. If you can see following...
... click "OK" button. Choose your system.The certified driver will be posted on Samsung Monitor Homepage http://www.samsung-monitor.com/ 6. Monitor driver installation is under certifying MS logo,and this installation don't damage your monitor model in the "Warning" window. 5. This monitor driver is completed. Setup User's Manual Windows XP/2000 1. If you can see following...
User Manual (ENGLISH)
Page 17
Driver installation is slightly different from one operating system to another. Follow the directions as appropriate for the monitor driver, insert the CD-ROM included with this monitor. Click "Display" icon and choose the "Settings" tab then click "Advanced..". Insert CD into the ... the driver program file at the Internet web site shown here. ? Internet web site : http://www.samsung-monitor.com/ (Worldwide) http://www.samsungusa.com/monitor/ (USA) http://www.sec.co.kr/monitor/ (Korea) http://www.samsungmonitor.com.cn/ (China) Microsoft® Windows® XP Operating System 1....
Driver installation is slightly different from one operating system to another. Follow the directions as appropriate for the monitor driver, insert the CD-ROM included with this monitor. Click "Display" icon and choose the "Settings" tab then click "Advanced..". Insert CD into the ... the driver program file at the Internet web site shown here. ? Internet web site : http://www.samsung-monitor.com/ (Worldwide) http://www.samsungusa.com/monitor/ (USA) http://www.sec.co.kr/monitor/ (Korea) http://www.samsungmonitor.com.cn/ (China) Microsoft® Windows® XP Operating System 1....
User Manual (ENGLISH)
Page 18
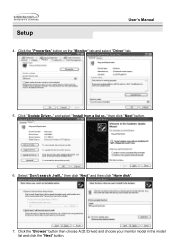
Click "Update Driver.." Select "Don't search ,I will.." then click "Next" button. 6. then click "Next" and then click "Have disk". 7. Setup User's Manual 4. and select "Install from a list or.." Click the "Browse" button then choose A:(D:\Driver) and choose your monitor model in the model list and click the "Next" button. Click the "Properties" button on the "Monitor" tab and select "Driver" tab. 5.
Click "Update Driver.." Select "Don't search ,I will.." then click "Next" button. 6. then click "Next" and then click "Have disk". 7. Setup User's Manual 4. and select "Install from a list or.." Click the "Browse" button then choose A:(D:\Driver) and choose your monitor model in the model list and click the "Next" button. Click the "Properties" button on the "Monitor" tab and select "Driver" tab. 5.

User Manual (ENGLISH)
Page 19
Setup User's Manual 8. This monitor driver is under certifying MS logo,and this installation don't damage your system.The certified driver will be posted on Samsung Monitor Homepage http://www.samsung-monitor.com/ 9. Then click "OK" button. Click the "Close" button then click "OK" button continually. If you can see following "Message" window, then click the "Continue Anyway" button.
Setup User's Manual 8. This monitor driver is under certifying MS logo,and this installation don't damage your system.The certified driver will be posted on Samsung Monitor Homepage http://www.samsung-monitor.com/ 9. Then click "OK" button. Click the "Close" button then click "OK" button continually. If you can see following "Message" window, then click the "Continue Anyway" button.
User Manual (ENGLISH)
Page 20
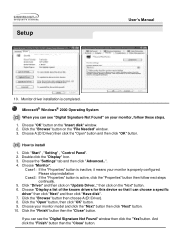
...steps continually. 5. Double click the "Display" Icon. 3. Please stop installation Case2: If the "Properties" button is inactive, it means your monitor model and click the "Next" button then click "Next" button. 10. Click "Driver" and then click on the "Next" button. ... see the "Digital Signature Not Found" window then click the "Yes"button. How to install 1. then click on "Update Driver.." Monitor driver installation is properly configured. Choose "Monitor". Click the "Finish" button then the "Close" button. Setup User's Manual 10. Choose "OK" button on the "Insert disk...
...steps continually. 5. Double click the "Display" Icon. 3. Please stop installation Case2: If the "Properties" button is inactive, it means your monitor model and click the "Next" button then click "Next" button. 10. Click "Driver" and then click on the "Next" button. ... see the "Digital Signature Not Found" window then click the "Yes"button. How to install 1. then click on "Update Driver.." Monitor driver installation is properly configured. Choose "Monitor". Click the "Finish" button then the "Close" button. Setup User's Manual 10. Choose "OK" button on the "Insert disk...

User Manual (ENGLISH)
Page 21
...of colors and Vertical frequency) and then click OK. 4. then click "Next" button. 8. Select "Show all devices" and choose the monitor that you see the screen working normally after executing the X86Config file. 2. Continue choosing "Close" button and "OK" button until you ...Settings, Control Panel, and then double-click Display icon. 2. If the screen is for selecting a keyboard. 5. Set a Keyboard for your monitor.) Microsoft® Windows® NT Operating System 1. In Display Registration Information window, click Settings Tab and then click All Display Modes. 3. Click...
...of colors and Vertical frequency) and then click OK. 4. then click "Next" button. 8. Select "Show all devices" and choose the monitor that you see the screen working normally after executing the X86Config file. 2. Continue choosing "Close" button and "OK" button until you ...Settings, Control Panel, and then double-click Display icon. 2. If the screen is for selecting a keyboard. 5. Set a Keyboard for your monitor.) Microsoft® Windows® NT Operating System 1. In Display Registration Information window, click Settings Tab and then click All Display Modes. 3. Click...
User Manual (ENGLISH)
Page 22
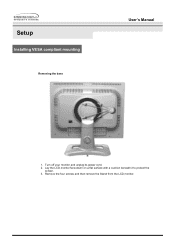
Remove the four screws and then remove the Stand from the LCD monitor. Turn off your monitor and unplug its power cord. 2. Setup Installing VESA compliant mounting Removing the base User's Manual 1. Lay the LCD monitor face-down on a flat surface with a cushion beneath it to protect the screen. 3.
Remove the four screws and then remove the Stand from the LCD monitor. Turn off your monitor and unplug its power cord. 2. Setup Installing VESA compliant mounting Removing the base User's Manual 1. Lay the LCD monitor face-down on a flat surface with a cushion beneath it to protect the screen. 3.

User Manual (ENGLISH)
Page 23
Mounting interface pad Align the Mounting Interface Pad with the holes in the Rear Cover Mounting Pad and secure it with the four screws that came with the arm-type base, wall mount hanger or other base. Setup Installing VESA compliant mounting User's Manual Attaching a base NOTE: This monitor accepts a 100mm x 100mm VESA-compliant mounting interface pad. 1. Rear cover mounting pad 2.
Mounting interface pad Align the Mounting Interface Pad with the holes in the Rear Cover Mounting Pad and secure it with the four screws that came with the arm-type base, wall mount hanger or other base. Setup Installing VESA compliant mounting User's Manual Attaching a base NOTE: This monitor accepts a 100mm x 100mm VESA-compliant mounting interface pad. 1. Rear cover mounting pad 2.

User Manual (ENGLISH)
Page 27
... ] button or [ + ] button until the Image screen is displayed. 3. Use the [ - ] or [ + ] buttons to change the horizontal position of the monitor's entire display. 1. Follow these instructions to open the sub-menu selection screen. 4. Push the [ - ] button or [ + ] button to select the V-Position. ...5. Push the Menu button to change the vertical position of the monitor's entire display. 1. Push the Menu button to open the sub-menu selection screen. 4. Push the [ - ] button or [ + ] button until the Image...
... ] button or [ + ] button until the Image screen is displayed. 3. Use the [ - ] or [ + ] buttons to change the horizontal position of the monitor's entire display. 1. Follow these instructions to open the sub-menu selection screen. 4. Push the [ - ] button or [ + ] button to select the V-Position. ...5. Push the Menu button to change the vertical position of the monitor's entire display. 1. Push the Menu button to open the sub-menu selection screen. 4. Push the [ - ] button or [ + ] button until the Image...


