
Quick Guide (ENGLISH)
Page 16
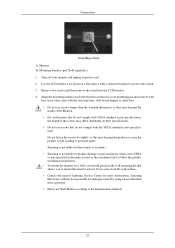
... wall mounting kit that do not comply with the VESA standard screw specifications. Monitor B. Mounting interface pad (Sold separately) 1. Samsung is used or the consumer fails to follow the product installation instructions. • To mount the monitor on their specifications. • Do not use Wall Mount according to mount the monitor at least 10 cm away from the LCD monitor. 4. Remove two screws and then remove the stand from the wall surface. • Contact the nearest Samsung Service...
... wall mounting kit that do not comply with the VESA standard screw specifications. Monitor B. Mounting interface pad (Sold separately) 1. Samsung is used or the consumer fails to follow the product installation instructions. • To mount the monitor on their specifications. • Do not use Wall Mount according to mount the monitor at least 10 cm away from the LCD monitor. 4. Remove two screws and then remove the stand from the wall surface. • Contact the nearest Samsung Service...
Quick Guide (ENGLISH)
Page 20
... adjusted when checking the Display Timing on the screen. There is a message that reads "Unrecognized monitor, Plug & Play (VESA DDC) monitor found" Q: Have you adjusted the resolution or frequency on the screen. Q: No sound. 50 A: Adjust screen image position and size using the OSD. The screen is blinking but no images on the menu? Q: Have you installed the monitor driver? The screen colors have changed the video card or the driver? Q: See the video card manual to the OSD. Readjust Position by referring to the Driver Installation Instructions. A: Install the monitor driver...
... adjusted when checking the Display Timing on the screen. There is a message that reads "Unrecognized monitor, Plug & Play (VESA DDC) monitor found" Q: Have you adjusted the resolution or frequency on the screen. Q: No sound. 50 A: Adjust screen image position and size using the OSD. The screen is blinking but no images on the menu? Q: Have you installed the monitor driver? The screen colors have changed the video card or the driver? Q: See the video card manual to the OSD. Readjust Position by referring to the Driver Installation Instructions. A: Install the monitor driver...

Quick Guide (ENGLISH)
Page 21
... download the installation software for the main board of the computer.) If you installed a new video card or if you changed your monitor. Check if the computer beeps more than 3 times when booting. (If it does, request an a service for MagicTune™ MAC. Check the volume level. Some graphic cards may not support your PC or video graphic card? itor/magictune Q: Did you have a problem with Window OS that the audio cable...
... download the installation software for the main board of the computer.) If you installed a new video card or if you changed your monitor. Check if the computer beeps more than 3 times when booting. (If it does, request an a service for MagicTune™ MAC. Check the volume level. Some graphic cards may not support your PC or video graphic card? itor/magictune Q: Did you have a problem with Window OS that the audio cable...
Quick Guide (ENGLISH)
Page 22
Troubleshooting If you have problems in installing the adapter (video) driver, boot the computer in Safe Mode, remove the Display Adapter in the Control Panel → Appearance and Themes → Display → Settings. A: Windows XP: Set the resolution in the "Control Panel → System → Device Administrator" and then reboot the computer to reinstall the adapter (video) driver. Q: How can I change the frequency? A: Note that video card support can I clean the outer case/LCD Panel? A: Windows XP: Set the resolution in this section to...
Troubleshooting If you have problems in installing the adapter (video) driver, boot the computer in Safe Mode, remove the Display Adapter in the Control Panel → Appearance and Themes → Display → Settings. A: Windows XP: Set the resolution in the "Control Panel → System → Device Administrator" and then reboot the computer to reinstall the adapter (video) driver. Q: How can I change the frequency? A: Note that video card support can I clean the outer case/LCD Panel? A: Windows XP: Set the resolution in this section to...
User Manual (ENGLISH)
Page 23
... to follow the product installation instructions. • To mount the monitor on a flat surface with VESA standard screw specifications, the length of the Monitor. • For wall mounts that allows you to personal injury. Mounting interface pad (Sold separately) 1. Connections Dual Hinge Stand A. Samsung Electronics will not be responsible for more information. Monitor B. Align the mounting interface pad with the holes in the rear cover mounting pad and secure...
... to follow the product installation instructions. • To mount the monitor on a flat surface with VESA standard screw specifications, the length of the Monitor. • For wall mounts that allows you to personal injury. Mounting interface pad (Sold separately) 1. Connections Dual Hinge Stand A. Samsung Electronics will not be responsible for more information. Monitor B. Align the mounting interface pad with the holes in the rear cover mounting pad and secure...
User Manual (ENGLISH)
Page 24
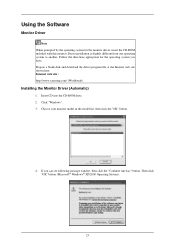
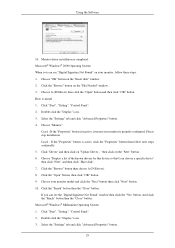
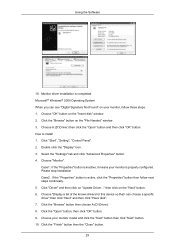
...download the driver program file at the Internet web site shown here. Click "Windows". 3. If you have. Then click "OK" button (Microsoft® Windows® XP/2000 Operating System). 23 Follow the directions appropriate for the monitor driver, insert the CD-ROM included with this monitor... : http://www.samsung.com/ (Worldwide) Installing the Monitor Driver (Automatic) 1. Driver installation is slightly different from one operating system to another. Choose your monitor model in the model list, then click the "OK" button. 4. Using the Software Monitor Driver Note When prompted by...
...download the driver program file at the Internet web site shown here. Click "Windows". 3. If you have. Then click "OK" button (Microsoft® Windows® XP/2000 Operating System). 23 Follow the directions appropriate for the monitor driver, insert the CD-ROM included with this monitor... : http://www.samsung.com/ (Worldwide) Installing the Monitor Driver (Automatic) 1. Driver installation is slightly different from one operating system to another. Choose your monitor model in the model list, then click the "OK" button. 4. Using the Software Monitor Driver Note When prompted by...
User Manual (ENGLISH)
Page 25
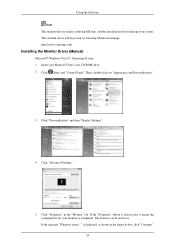
... on "Appearance and Personalization". 3. Click "Personalization" and then "Display Settings". 4. If the "Properties" button is . is displayed, as is deactivated, it means the configuration for your system. Click (Start) and "Control Panel". Then, double-click on Samsung Monitor homepage. Click "Advanced Settings...". 5. http://www.samsung.com/ Installing the Monitor Driver (Manual) Microsoft® Windows Vista™, Operating System 1. Insert your Manual CD into your CD-ROM drive. 2.
... on "Appearance and Personalization". 3. Click "Personalization" and then "Display Settings". 4. If the "Properties" button is . is displayed, as is deactivated, it means the configuration for your system. Click (Start) and "Control Panel". Then, double-click on Samsung Monitor homepage. Click "Advanced Settings...". 5. http://www.samsung.com/ Installing the Monitor Driver (Manual) Microsoft® Windows Vista™, Operating System 1. Insert your Manual CD into your CD-ROM drive. 2.
User Manual (ENGLISH)
Page 26
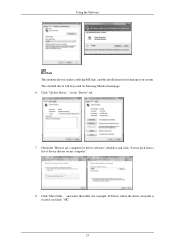
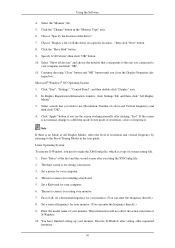
Click "Update Driver..." Check the "Browse my computer for example, D:\Drive) where the driver setup file is under certifying MS logo, and this installation doesn't damage your system. Using the Software Note This monitor driver is located, and click "OK". 25 in the "Driver" tab. 7. The certified driver will be posted on my computer". 8. Click "Have Disk..." and select the folder (for driver software" checkbox and click "Let me pick from a list of device drivers on Samsung Monitor homepage. 6.
Click "Update Driver..." Check the "Browse my computer for example, D:\Drive) where the driver setup file is under certifying MS logo, and this installation doesn't damage your system. Using the Software Note This monitor driver is located, and click "OK". 25 in the "Driver" tab. 7. The certified driver will be posted on my computer". 8. Click "Have Disk..." and select the folder (for driver software" checkbox and click "Let me pick from a list of device drivers on Samsung Monitor homepage. 6.
User Manual (ENGLISH)
Page 28
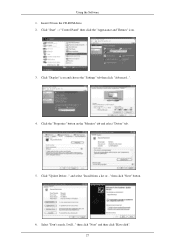
Click "Display" icon and choose the "Settings" tab then click "Advanced...". 4. Click the "Properties" button on the "Monitor" tab and select "Driver" tab. 5. Insert CD into the CD-ROM drive. 2. Click "Start" → "Control Panel" then click the "Appearance and Themes" icon. 3. Select "Don't search, I will..." then click "Next" button. 6. Click "Update Driver..." and select "Install from a list or..." Using the Software 1. then click "Next" and then click "Have disk". 27
Click "Display" icon and choose the "Settings" tab then click "Advanced...". 4. Click the "Properties" button on the "Monitor" tab and select "Driver" tab. 5. Insert CD into the CD-ROM drive. 2. Click "Start" → "Control Panel" then click the "Appearance and Themes" icon. 3. Select "Don't search, I will..." then click "Next" button. 6. Click "Update Driver..." and select "Install from a list or..." Using the Software 1. then click "Next" and then click "Have disk". 27
User Manual (ENGLISH)
Page 30
... "Open" button, then click "OK" button. 9. If you can see the "Digital Signature Not Found" window then click the "Yes" button. Microsoft® Windows® Millennium Operating System 1. How to install 1. Select the "Settings" tab and click "Advanced Properties" button. 4. Please stop installation Case2 : If the "Properties" button is inactive, it means your monitor model and click the "Next" button then click "Next" button. 10. Click "Start", "Setting", "Control Panel". 2. Monitor driver installation...
... "Open" button, then click "OK" button. 9. If you can see the "Digital Signature Not Found" window then click the "Yes" button. Microsoft® Windows® Millennium Operating System 1. How to install 1. Select the "Settings" tab and click "Advanced Properties" button. 4. Please stop installation Case2 : If the "Properties" button is inactive, it means your monitor model and click the "Next" button then click "Next" button. 10. Click "Start", "Setting", "Control Panel". 2. Monitor driver installation...
User Manual (ENGLISH)
Page 31
... driver in a specific location..." logue box. Click "Apply" button if you connected to the Preset Timing Modes in the "Monitor Type" area. 6. The next screen is for setting your computer. 6. then click "Next" button. 8. Click "Start", "Settings", "Control Panel", and then double-click "Display" icon. 2. Linux Operating System To execute X-Window, you close the Display Properties dia- Enter the model name of system setting file. 1. First of resolution and vertical frequency...
... driver in a specific location..." logue box. Click "Apply" button if you connected to the Preset Timing Modes in the "Monitor Type" area. 6. The next screen is for setting your computer. 6. then click "Next" button. 8. Click "Start", "Settings", "Control Panel", and then double-click "Display" icon. 2. Linux Operating System To execute X-Window, you close the Display Properties dia- Enter the model name of system setting file. 1. First of resolution and vertical frequency...

User Manual (ENGLISH)
Page 51
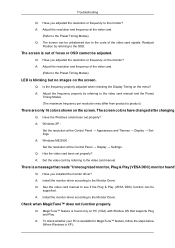
... adjusted the resolution or frequency to the Preset Timing Modes) LED is out of the video card signals. Q: See the video card manual to see if the Plug & Play (VESA DDC) function can be unbalanced due to the Preset Timing Modes) Q: The screen can be adjusted. Q: Have you installed the monitor driver? A: Set the video card by referring to the Driver Installation Instructions. Troubleshooting The screen suddenly has become unbalanced. A: Adjust screen image position and size using the OSD. Q: Have you changed after changing Q: Have the Windows colors...
... adjusted the resolution or frequency to the Preset Timing Modes) LED is out of the video card signals. Q: See the video card manual to see if the Plug & Play (VESA DDC) function can be unbalanced due to the Preset Timing Modes) Q: The screen can be adjusted. Q: Have you installed the monitor driver? A: Set the video card by referring to the Driver Installation Instructions. Troubleshooting The screen suddenly has become unbalanced. A: Adjust screen image position and size using the OSD. Q: Have you changed after changing Q: Have the Windows colors...

User Manual (ENGLISH)
Page 52
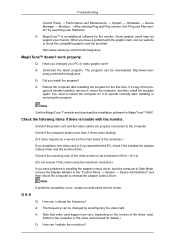
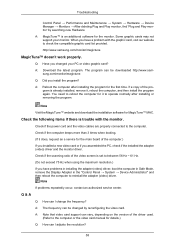
... 75 Hz when using the maximum resolution.) 51 http://www.samsung.com/monitor/magictune MagicTune™ doesn't work properly. Troubleshooting A: Ensure that the audio cable is still too low after turning the control to its maximum, check the volume control on PC (VGA) with Window OS that supports Plug and Play. When you install the program? Q: Have you assembled the PC, check if the installed the adapter(video) driver and the monitor driver. Check when MagicTune™...
... 75 Hz when using the maximum resolution.) 51 http://www.samsung.com/monitor/magictune MagicTune™ doesn't work properly. Troubleshooting A: Ensure that the audio cable is still too low after turning the control to its maximum, check the volume control on PC (VGA) with Window OS that supports Plug and Play. When you install the program? Q: Have you assembled the PC, check if the installed the adapter(video) driver and the monitor driver. Check when MagicTune™...

User Manual (ENGLISH)
Page 53
... an authorized service center. Note Before calling for details. Q & A Q: How can I change the frequency? A: The frequency can remedy any problems yourself. Q: How can I clean the outer case/LCD Panel? A: Windows XP: Set the resolution in the BIOS-SETUP of the computer. (Refer to the Windows / Computer Manual). A: Windows ME/2000: Set the resolution in the Control Panel → Display → Settings. * Contact the video card manufacturer for assistance, check the information in the "Control Panel →...
... an authorized service center. Note Before calling for details. Q & A Q: How can I change the frequency? A: The frequency can remedy any problems yourself. Q: How can I clean the outer case/LCD Panel? A: Windows XP: Set the resolution in the BIOS-SETUP of the computer. (Refer to the Windows / Computer Manual). A: Windows ME/2000: Set the resolution in the Control Panel → Display → Settings. * Contact the video card manufacturer for assistance, check the information in the "Control Panel →...
Quick Guide (easy Manual) (ver.1.0) (English)
Page 15
... or OSD cannot be supported. LED is XP); The screen colors have changed after changing Q: Have the Windows colors been set properly? Q: Has the video card been set properly? Q: MagicTune™ feature is a message that reads "Unrecognized monitor, Plug & Play (VESA DDC) monitor found only on the screen. Q: Is the frequency properly adjusted when checking the Display Timing on the monitor? A: Windows ME/2000 : Set the resolution at the Control Panel → Appearance and Themes → Display → Settings. A: Install the monitor driver...
... or OSD cannot be supported. LED is XP); The screen colors have changed after changing Q: Have the Windows colors been set properly? Q: Has the video card been set properly? Q: MagicTune™ feature is a message that reads "Unrecognized monitor, Plug & Play (VESA DDC) monitor found only on the screen. Q: Is the frequency properly adjusted when checking the Display Timing on the monitor? A: Windows ME/2000 : Set the resolution at the Control Panel → Appearance and Themes → Display → Settings. A: Install the monitor driver...
Quick Guide (easy Manual) (ver.1.0) (English)
Page 16
... authorized service center. Some graphic cards may not support your PC or video graphic card? http://www.samsung.com/monitor/magictune MagicTune™ doesn't work properly. You need to reboot the computer for the monitor. Check if the power cord and the video cables are properly connected to operate normally after installing the program for MagicTune™ MAC. A: The frequency can vary, depending on the version of the video screen is trouble...
... authorized service center. Some graphic cards may not support your PC or video graphic card? http://www.samsung.com/monitor/magictune MagicTune™ doesn't work properly. You need to reboot the computer for the monitor. Check if the power cord and the video cables are properly connected to operate normally after installing the program for MagicTune™ MAC. A: The frequency can vary, depending on the version of the video screen is trouble...

User Manual (user Manual) (ver.1.0) (English)
Page 24
and select "Install from a list or..." Using the Software 1. then click "Next" and then click "Have disk". 23 Click the "Properties" button on the "Monitor" tab and select "Driver" tab. 5. Select "Don't search, I will..." Click "Display" icon and choose the "Settings" tab then click "Advanced...". 4. Click "Update Driver..." Insert CD into the CD-ROM drive. 2. Click "Start" → "Control Panel" then click the "Appearance and Themes" icon. 3. then click "Next" button. 6.
and select "Install from a list or..." Using the Software 1. then click "Next" and then click "Have disk". 23 Click the "Properties" button on the "Monitor" tab and select "Driver" tab. 5. Select "Don't search, I will..." Click "Display" icon and choose the "Settings" tab then click "Advanced...". 4. Click "Update Driver..." Insert CD into the CD-ROM drive. 2. Click "Start" → "Control Panel" then click the "Appearance and Themes" icon. 3. then click "Next" button. 6.
User Manual (user Manual) (ver.1.0) (English)
Page 26
... you can choose a specific driver" then click "Next" and then click "Have disk". 7. How to install 1. then click on "Update Driver..." Click the "Open" button, then click "OK" button. 9. Using the Software 10. Select the "Settings" tab and click "Advanced Properties" button. 4. Choose your monitor is active, click the "Properties" button then follow these steps. 1. Choose "OK" button on the "File Needed" window. 3. Choose "Display a list of the...
... you can choose a specific driver" then click "Next" and then click "Have disk". 7. How to install 1. then click on "Update Driver..." Click the "Open" button, then click "OK" button. 9. Using the Software 10. Select the "Settings" tab and click "Advanced Properties" button. 4. Choose your monitor is active, click the "Properties" button then follow these steps. 1. Choose "OK" button on the "File Needed" window. 3. Choose "Display a list of the...

User Manual (user Manual) (ver.1.0) (English)
Page 59
... video card manual to the monitor? Troubleshooting Q: Have you adjusted the resolution or frequency to see if the Plug & Play (VESA DDC) function can be unbalanced due to the Monitor Driver. LED is found only on PC (VGA) with Window OS that reads "Unrecognized monitor, Plug & Play (VESA DDC) monitor found" Q: Have you adjusted the resolution or frequency on the screen. Q: Is the frequency properly adjusted when checking the Display Timing on the screen. A: Windows XP : Set the resolution at the Control Panel...
... video card manual to the monitor? Troubleshooting Q: Have you adjusted the resolution or frequency to see if the Plug & Play (VESA DDC) function can be unbalanced due to the Monitor Driver. LED is found only on PC (VGA) with Window OS that reads "Unrecognized monitor, Plug & Play (VESA DDC) monitor found" Q: Have you adjusted the resolution or frequency on the screen. Q: Is the frequency properly adjusted when checking the Display Timing on the screen. A: Windows XP : Set the resolution at the Control Panel...
User Manual (user Manual) (ver.1.0) (English)
Page 60
... authorized service center. Some graphic cards may not support your PC or video graphic card? http://www.samsung.com/monitor/magictune MagicTune™ doesn't work properly. Note Visit the MagicTune™ website and download the installation software for details.) Q: How can be changed your monitor. Check if the power cord and the video cables are properly connected to the computer or the video card manual for MagicTune™ MAC. A: Note that video card support can I adjusts the resolution...
... authorized service center. Some graphic cards may not support your PC or video graphic card? http://www.samsung.com/monitor/magictune MagicTune™ doesn't work properly. Note Visit the MagicTune™ website and download the installation software for details.) Q: How can be changed your monitor. Check if the power cord and the video cables are properly connected to the computer or the video card manual for MagicTune™ MAC. A: Note that video card support can I adjusts the resolution...


