Quick Guide (ENGLISH)
Page 5
... physically fix the system when using a locking device, contact where you purchase it in a public place. (The locking device has to the digital (DVI)-dedicated models only. RGB IN Connect the D-sub cable to the 15-pin, RGB IN port on the back of the product. DVI IN RGB IN Introduction... POWER port Connect the power cord for your monitor to the POWER port on its model. Note The location of the Kensington Lock may be purchased separately.) For using it in the locking direction . 11 Note Applicable to be different depending...
... physically fix the system when using a locking device, contact where you purchase it in a public place. (The locking device has to the digital (DVI)-dedicated models only. RGB IN Connect the D-sub cable to the 15-pin, RGB IN port on the back of the product. DVI IN RGB IN Introduction... POWER port Connect the power cord for your monitor to the POWER port on its model. Note The location of the Kensington Lock may be purchased separately.) For using it in the locking direction . 11 Note Applicable to be different depending...

Quick Guide (ENGLISH)
Page 10
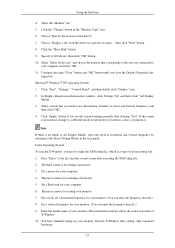
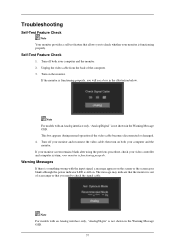
... disconnected or damaged. 4. Warning Messages If there is something wrong with an Analog interface only, "Analog/Digita" is still on. Note For models with the input signal, a message appears on the screen or the screen goes blank although the power indicator LED is not shown in the...of scan range or that you need to check whether your computer and the monitor. Turn off your computer and the monitor. 2. Note For models with an Analog interface only, "Analog/Digital" is functioning properly. your video controller and computer system; Self-Test Feature Check 1. Turn off ...
... disconnected or damaged. 4. Warning Messages If there is something wrong with an Analog interface only, "Analog/Digita" is still on. Note For models with the input signal, a message appears on the screen or the screen goes blank although the power indicator LED is not shown in the...of scan range or that you need to check whether your computer and the monitor. Turn off your computer and the monitor. 2. Note For models with an Analog interface only, "Analog/Digital" is functioning properly. your video controller and computer system; Self-Test Feature Check 1. Turn off ...

User Manual (ENGLISH)
Page 12
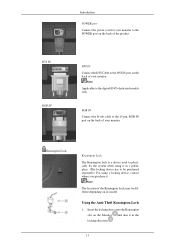
...of the Kensington Lock may be purchased separately.) For using it in the locking direction . 11 Note Applicable to be different depending on its model. Kensington Lock Kensington Lock The Kensington lock is a device used to physically fix the system when using a locking device, contact where you... purchase it in a public place. (The locking device has to the digital (DVI)-dedicated models only. Using the Anti-Theft Kensington Lock 1. Insert the locking device into the Kensington slot on the back of your monitor. Note The ...
...of the Kensington Lock may be purchased separately.) For using it in the locking direction . 11 Note Applicable to be different depending on its model. Kensington Lock Kensington Lock The Kensington lock is a device used to physically fix the system when using a locking device, contact where you... purchase it in a public place. (The locking device has to the digital (DVI)-dedicated models only. Using the Anti-Theft Kensington Lock 1. Insert the locking device into the Kensington slot on the back of your monitor. Note The ...
User Manual (ENGLISH)
Page 17
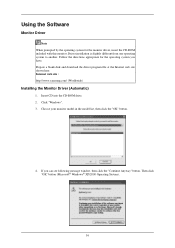
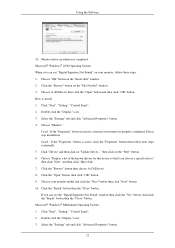
Follow the directions appropriate for the monitor driver, insert the CD-ROM included with this monitor. Internet web site : http://www.samsung.com/ (Worldwide) Installing the Monitor Driver (Automatic) 1. Click "Windows". 3. If you have. Then click "OK" button (Microsoft® Windows® XP/...2000 Operating System). 16 Insert CD into the CD-ROM drive. 2. Choose your monitor model in the model list, then click the "OK" button. 4. Prepare a blank disk and download the driver program file at the Internet web site shown here. ...
Follow the directions appropriate for the monitor driver, insert the CD-ROM included with this monitor. Internet web site : http://www.samsung.com/ (Worldwide) Installing the Monitor Driver (Automatic) 1. Click "Windows". 3. If you have. Then click "OK" button (Microsoft® Windows® XP/...2000 Operating System). 16 Insert CD into the CD-ROM drive. 2. Choose your monitor model in the model list, then click the "OK" button. 4. Prepare a blank disk and download the driver program file at the Internet web site shown here. ...
User Manual (ENGLISH)
Page 20
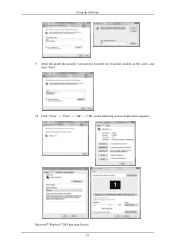
Click "Close" → "Close" → "OK" → "OK" on the screen, and click "Next". 10. Select the model that matches your monitor from the list of monitor models on the following screens displayed in sequence. Using the Software 9. Microsoft® Windows® XP Operating System 19
Click "Close" → "Close" → "OK" → "OK" on the screen, and click "Next". 10. Select the model that matches your monitor from the list of monitor models on the following screens displayed in sequence. Using the Software 9. Microsoft® Windows® XP Operating System 19

User Manual (ENGLISH)
Page 22
If you can see following message window, then click the "Continue Anyway" button. The certified driver will be posted on Samsung Monitor homepage. Click the "Close" button then click "OK" button continually. 21 Using the Software 7. Click the "Browse" button then choose A:(D:\Driver) and choose your system. Note This monitor driver is under certifying MS logo, and this installation doesn't damage your monitor model in the model list and click the "Next" button. 8. http://www.samsung.com/ 9. Then click "OK" button.
If you can see following message window, then click the "Continue Anyway" button. The certified driver will be posted on Samsung Monitor homepage. Click the "Close" button then click "OK" button continually. 21 Using the Software 7. Click the "Browse" button then choose A:(D:\Driver) and choose your system. Note This monitor driver is under certifying MS logo, and this installation doesn't damage your monitor model in the model list and click the "Next" button. 8. http://www.samsung.com/ 9. Then click "OK" button.
User Manual (ENGLISH)
Page 23
... A:(D:\Driver) then click the "Open" button and then click "OK" button. Click "Start", "Setting", "Control Panel". 2. Choose your monitor is inactive, it means your monitor model and click the "Next" button then click "Next" button. 10. And click the "Finish" button then the "Close" button. Microsoft® Windows® Millennium Operating...
... A:(D:\Driver) then click the "Open" button and then click "OK" button. Click "Start", "Setting", "Control Panel". 2. Choose your monitor is inactive, it means your monitor model and click the "Next" button then click "Next" button. 10. And click the "Finish" button then the "Close" button. Microsoft® Windows® Millennium Operating...
User Manual (ENGLISH)
Page 24
... can enter the frequency directly.) 9. Set a mouse for your computer. 4. Set a vertical frequency for your monitor. Microsoft® Windows® NT Operating System 1. Enter the model name of all the driver in the "Monitor Type" area. 6. Click the "Change" button in a specific location..." In Display Registration Information window, click Settings Tab...
... can enter the frequency directly.) 9. Set a mouse for your computer. 4. Set a vertical frequency for your monitor. Microsoft® Windows® NT Operating System 1. Enter the model name of all the driver in the "Monitor Type" area. 6. Click the "Change" button in a specific location..." In Display Registration Information window, click Settings Tab...
User Manual (ENGLISH)
Page 27
... the icon to install the MultiScreen, program. 6. Click the MultiScreen installation file. Using the Software MultiScreen Note The software may not appear depending on the model. Insert the installation CD into the CD-ROM drive. 2. When the Installation Shield Wizard window appears, click "Next". 4. Click "Finish". 9. Multiscreen execution icon may not...
... the icon to install the MultiScreen, program. 6. Click the MultiScreen installation file. Using the Software MultiScreen Note The software may not appear depending on the model. Insert the installation CD into the CD-ROM drive. 2. When the Installation Shield Wizard window appears, click "Next". 4. Click "Finish". 9. Multiscreen execution icon may not...
User Manual (ENGLISH)
Page 30
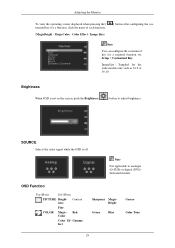
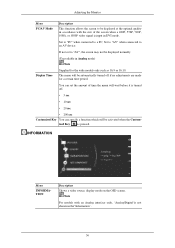
... video signal while the OSD is not on the screen, push the Brightness ( ) button to analogue (D-SUB)-or-digital (DVI)dedicated models. Gamma fect Sharpness MagicBright Green Blue Coarse Color Tone 29 Adjusting the Monitor To view the operating screen displayed when pressing the [ tomized ...key for the wide models only such as 16:9 or 16:10. ImageSize : Supplied for a function, click the name of each function. (MagicBright - Note...
... video signal while the OSD is not on the screen, push the Brightness ( ) button to analogue (D-SUB)-or-digital (DVI)dedicated models. Gamma fect Sharpness MagicBright Green Blue Coarse Color Tone 29 Adjusting the Monitor To view the operating screen displayed when pressing the [ tomized ...key for the wide models only such as 16:9 or 16:10. ImageSize : Supplied for a function, click the name of each function. (MagicBright - Note...

User Manual (ENGLISH)
Page 35
... cutoff when DVI (480p/576p/720p/1080i/1080p) signals are not supported. • If the wide screen which is the optimal resolution for the wide models only such as 16:9 or 16:10. Note • Signals not available in the standard mode table are input. Sets the picture to 4:3 normal mode...
... cutoff when DVI (480p/576p/720p/1080i/1080p) signals are not supported. • If the wide screen which is the optimal resolution for the wide models only such as 16:9 or 16:10. Note • Signals not available in the standard mode table are input. Sets the picture to 4:3 normal mode...

User Manual (ENGLISH)
Page 36
... (non-transparently). Off Timer On/ You can choose one of nine languages. You can select the language used to analogue (D-SUB)-or-digital (DVI)-dedicated models. 35 SETUP&RESET Adjusting the Monitor Menu Reset Description Reverts the product settings to factory defaults. • Yes • No Menu Transpar-
... (non-transparently). Off Timer On/ You can choose one of nine languages. You can select the language used to analogue (D-SUB)-or-digital (DVI)-dedicated models. 35 SETUP&RESET Adjusting the Monitor Menu Reset Description Reverts the product settings to factory defaults. • Yes • No Menu Transpar-
User Manual (ENGLISH)
Page 37
You can specify a function which will wait before it is turned off if no adjustments are made for the wide models only such as 16:9 or 16:10. If not set the amount of the screen when a 480P, 576P, 720P, 1080i, or 1080P video signal is ... to be displayed at the optimal quality in accordance with an Analog interface only, "Analog/Digital"is not shown in the"Information". 36 Note For models with the size of time the menu will be displayed normally. (Unavailable in Analog mode) Note Display Time Supplied for a certain time period.
You can specify a function which will wait before it is turned off if no adjustments are made for the wide models only such as 16:9 or 16:10. If not set the amount of the screen when a 480P, 576P, 720P, 1080i, or 1080P video signal is ... to be displayed at the optimal quality in accordance with an Analog interface only, "Analog/Digital"is not shown in the"Information". 36 Note For models with the size of time the menu will be displayed normally. (Unavailable in Analog mode) Note Display Time Supplied for a certain time period.
User Manual (ENGLISH)
Page 38
... or damaged. 4. The message may indicate that the monitor is out of the computer. 3. Note For models with an Analog interface only, "Analog/Digital" is not shown in the Warning Message OSD. Note For models with an Analog interface only, "Analog/Digita" is not shown in the illustration below. Self-Test Feature...
... or damaged. 4. The message may indicate that the monitor is out of the computer. 3. Note For models with an Analog interface only, "Analog/Digital" is not shown in the Warning Message OSD. Note For models with an Analog interface only, "Analog/Digita" is not shown in the illustration below. Self-Test Feature...

User Manual (ENGLISH)
Page 45
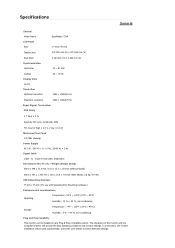
... % ~ 80 %, non-condensing Plug and Play Capability This monitor can be installed on any Plug & Play compatible system. to select alternate settings. Specifications General General Model Name LCD Panel Size SyncMaster 633NW 15.6 inch (39 cm) Display area 344.232 mm(H) x 193.536 mm(V) Pixel Pitch Synchronization Horizontal 0.252 mm(H) x 0.252...
... % ~ 80 %, non-condensing Plug and Play Capability This monitor can be installed on any Plug & Play compatible system. to select alternate settings. Specifications General General Model Name LCD Panel Size SyncMaster 633NW 15.6 inch (39 cm) Display area 344.232 mm(H) x 193.536 mm(V) Pixel Pitch Synchronization Horizontal 0.252 mm(H) x 0.252...
User Manual (ENGLISH)
Page 49
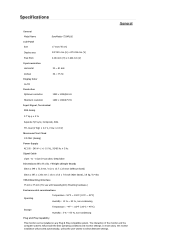
... & Play compatible system. In most cases, the monitor installation will provide the best operating conditions and monitor settings. to select alternate settings. Specifications General General Model Name LCD Panel Size SyncMaster 733A 17 inch (43 cm) Display area 337.920 mm (H) x 270.336 mm (V) Pixel Pitch Synchronization Horizontal 0.264 mm (H) x 0.264...
... & Play compatible system. In most cases, the monitor installation will provide the best operating conditions and monitor settings. to select alternate settings. Specifications General General Model Name LCD Panel Size SyncMaster 733A 17 inch (43 cm) Display area 337.920 mm (H) x 270.336 mm (V) Pixel Pitch Synchronization Horizontal 0.264 mm (H) x 0.264...
User Manual (ENGLISH)
Page 53
... & Play compatible system. to select alternate settings. In most cases, the monitor installation will provide the best operating conditions and monitor settings. Specifications General General Model Name LCD Panel Size SyncMaster 733APLUS 17 inch (43 cm) Display area 337.920 mm (H) x 270.336 mm (V) Pixel Pitch Synchronization Horizontal 0.264 mm (H) x 0.264...
... & Play compatible system. to select alternate settings. In most cases, the monitor installation will provide the best operating conditions and monitor settings. Specifications General General Model Name LCD Panel Size SyncMaster 733APLUS 17 inch (43 cm) Display area 337.920 mm (H) x 270.336 mm (V) Pixel Pitch Synchronization Horizontal 0.264 mm (H) x 0.264...

User Manual (ENGLISH)
Page 57
... : 5 % ~ 95 %, non-condensing Plug and Play Capability This monitor can be installed on any Plug & Play compatible system. to select alternate settings. Specifications General General Model Name LCD Panel Size SyncMaster 733N 17 inch (43 cm) Display area 337.920 mm (H) x 270.336 mm (V) Pixel Pitch Synchronization Horizontal 0.264 mm (H) x 0.264...
... : 5 % ~ 95 %, non-condensing Plug and Play Capability This monitor can be installed on any Plug & Play compatible system. to select alternate settings. Specifications General General Model Name LCD Panel Size SyncMaster 733N 17 inch (43 cm) Display area 337.920 mm (H) x 270.336 mm (V) Pixel Pitch Synchronization Horizontal 0.264 mm (H) x 0.264...

User Manual (ENGLISH)
Page 61
In most cases, the monitor installation will provide the best operating conditions and monitor settings. Specifications General General Model Name LCD Panel Size SyncMaster 733NPLUS 17 inch (43 cm) Display area 337.920 mm (H) x 270.336 mm (V) Pixel Pitch Synchronization Horizontal 0.264 mm (H) x 0.264 ...
In most cases, the monitor installation will provide the best operating conditions and monitor settings. Specifications General General Model Name LCD Panel Size SyncMaster 733NPLUS 17 inch (43 cm) Display area 337.920 mm (H) x 270.336 mm (V) Pixel Pitch Synchronization Horizontal 0.264 mm (H) x 0.264 ...

User Manual (ENGLISH)
Page 65
Specifications General Model Name LCD Panel Size SyncMaster 733NW 17 inch (43 cm) Display area 367.2 mm(H) x 229.5 mm(V) Pixel Pitch Synchronization Horizontal 0.255 mm(H) x 0.255 mm(V) 30 ~ ...
Specifications General Model Name LCD Panel Size SyncMaster 733NW 17 inch (43 cm) Display area 367.2 mm(H) x 229.5 mm(V) Pixel Pitch Synchronization Horizontal 0.255 mm(H) x 0.255 mm(V) 30 ~ ...

