
Owners Instructions
Page 6
Important Safety Information ... 3 Unpacking Your LCD TV/Monitor... 7 Inserting the Batteries in the Remote Control 7 Setting up Your LCD TV/Monitor Setting up an Ergonomic Workstation 8 LCD TV/Monitor location ... 8 Workstation height ... 8 Viewing angle ... 8 Plug and ... ... 9 Warm-up Time ... 9 Connecting Your LCD TV/Monitor ...10 15 Pin D-sub connector ...12 Viewing Your LCD TV/Monitor Front Controls ...13 Remote Control...14 Adjusting Your LCD TV/Monitor Automatic Save ...15 Accessing the Menu System...15 Changing your Language ...15 Setting the Channel ...16 Setting the...
Important Safety Information ... 3 Unpacking Your LCD TV/Monitor... 7 Inserting the Batteries in the Remote Control 7 Setting up Your LCD TV/Monitor Setting up an Ergonomic Workstation 8 LCD TV/Monitor location ... 8 Workstation height ... 8 Viewing angle ... 8 Plug and ... ... 9 Warm-up Time ... 9 Connecting Your LCD TV/Monitor ...10 15 Pin D-sub connector ...12 Viewing Your LCD TV/Monitor Front Controls ...13 Remote Control...14 Adjusting Your LCD TV/Monitor Automatic Save ...15 Accessing the Menu System...15 Changing your Language ...15 Setting the Channel ...16 Setting the...

Owners Instructions
Page 7
... 3 Replace the cover by pressing the downwards and then pulling firmly to remove it as shown in the Remote Control 1 Remove the cover on the battery against - Unpacking Your LCD TV/Monitor Please make sure the following items are missing, contact your ... EXIT 1 2 3 4 5 6 7 +100 SLEEP 8 9 PRE-CH 0 V.DOLBY ASPECT MTS ADD/ERASE CH.SCAN PBP LOCATE SIZE PIP ON V.CHIP CAPTION Installation CD (BH59-00179A) Remote Control (BN59-00226A) & Batteries (AAA x 2) (4301-000121) Power Cord (BH39-10339X) DC Adapter (BN44-00051D) PC Stereo Cable (BH39-00120A) 15-pin D-Sub Signal Cable...
... 3 Replace the cover by pressing the downwards and then pulling firmly to remove it as shown in the Remote Control 1 Remove the cover on the battery against - Unpacking Your LCD TV/Monitor Please make sure the following items are missing, contact your ... EXIT 1 2 3 4 5 6 7 +100 SLEEP 8 9 PRE-CH 0 V.DOLBY ASPECT MTS ADD/ERASE CH.SCAN PBP LOCATE SIZE PIP ON V.CHIP CAPTION Installation CD (BH59-00179A) Remote Control (BN59-00226A) & Batteries (AAA x 2) (4301-000121) Power Cord (BH39-10339X) DC Adapter (BN44-00051D) PC Stereo Cable (BH39-00120A) 15-pin D-Sub Signal Cable...

Owners Instructions
Page 13
... OSD. Viewing Your LCD TV/Monitor Front Controls Your LCD TV/Monitor allows you their numeric values as they change. 1 234 5 6 7 8 9 10 Œ Remote Control Sensor Aim the remote control towards this spot on the LCD TV/Monitor. ´ Source Displays a menu of all of the available input sources (TV/Video/S-Video...
... OSD. Viewing Your LCD TV/Monitor Front Controls Your LCD TV/Monitor allows you their numeric values as they change. 1 234 5 6 7 8 9 10 Œ Remote Control Sensor Aim the remote control towards this spot on the LCD TV/Monitor. ´ Source Displays a menu of all of the available input sources (TV/Video/S-Video...

Owners Instructions
Page 14
Viewing Your LCD TV/Monitor Remote Control Power Available sources selection (TV/Video/S-Video/DVD/DTV/PC) Picture effect selection Next channel Volume decrease Temporary sound switch-off Numeric buttons for ...
Viewing Your LCD TV/Monitor Remote Control Power Available sources selection (TV/Video/S-Video/DVD/DTV/PC) Picture effect selection Next channel Volume decrease Temporary sound switch-off Numeric buttons for ...
Owners Instructions
Page 16
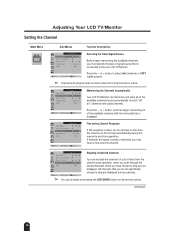
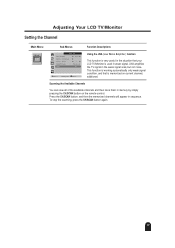
... skip are displayed during the memorize and store operation. Move Select Exit ➣ You can do easily by pressing the ADD/ERASE button on the remote control. Fine tuning Channel Reception If the reception is connected to the your choice from the channel scan operation. Adjusting Your LCD TV/Monitor Setting...
... skip are displayed during the memorize and store operation. Move Select Exit ➣ You can do easily by pressing the ADD/ERASE button on the remote control. Fine tuning Channel Reception If the reception is connected to the your choice from the channel scan operation. Adjusting Your LCD TV/Monitor Setting...
Owners Instructions
Page 17
... weak signal area, but not noise. This function is working automatically only weak signal condition, and that your LCD TV/Monitor is memorized on the remote control. LNA amplifies the TV signal in memory by simply pressing the CH.SCAN button on current channel, additional. To stop the scanning, press the...
... weak signal area, but not noise. This function is working automatically only weak signal condition, and that your LCD TV/Monitor is memorized on the remote control. LNA amplifies the TV signal in memory by simply pressing the CH.SCAN button on current channel, additional. To stop the scanning, press the...
Owners Instructions
Page 18
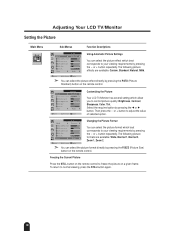
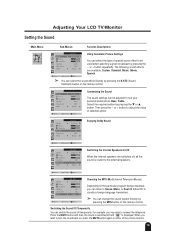
...frame. or + button to normal viewing, press the STILL button again. 18 Freezing the Current Picture Press the STILL button on the remote control to control picture quality: Brightness, Contrast, Sharpness, Color, Tint. Adjusting Your LCD TV/Monitor Setting the Picture Main Menu Sub-...¨ Wide Using Automatic Picture Settings You can select the picture effect directly by pressing the P.STD (Picture Standard) button on the remote control. The following picture formats are available: Custom, Standard, Natural, Mild. Move Select Exit ➣ You can select the picture ...
...frame. or + button to normal viewing, press the STILL button again. 18 Freezing the Current Picture Press the STILL button on the remote control to control picture quality: Brightness, Contrast, Sharpness, Color, Tint. Adjusting Your LCD TV/Monitor Setting the Picture Main Menu Sub-...¨ Wide Using Automatic Picture Settings You can select the picture effect directly by pressing the P.STD (Picture Standard) button on the remote control. The following picture formats are available: Custom, Standard, Natural, Mild. Move Select Exit ➣ You can select the picture ...
Owners Instructions
Page 19
... à ¨ Custom Bass Treble Dolby : On à ¨ Speaker MTS : On Mono Move Select Exit Choosing the MTS (Multichannel Television Stereo) Depending on the remote control. Switching the Sound Off Temporarily You can switch the sound off and " " is routed to turn the sound back on the...
... à ¨ Custom Bass Treble Dolby : On à ¨ Speaker MTS : On Mono Move Select Exit Choosing the MTS (Multichannel Television Stereo) Depending on the remote control. Switching the Sound Off Temporarily You can switch the sound off and " " is routed to turn the sound back on the...
Owners Instructions
Page 20
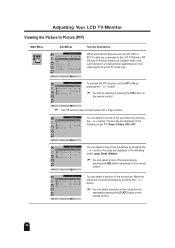
...or + button. ➣ You can do directly by pressing the PIP button on the remote control. 20 You can select a source of the sub picture by repeatedly pressing the LOCATE button on the remote control. Move Select Exit ➣ The PIP function does not work when the V-Chip ... video from such devices in the following order: TV, Video, S-Video, DVD, DTV. The sources are displayed in a small window superimposed on the remote control. or + button. Adjusting Your LCD TV/Monitor Viewing the Picture In Picture (PIP) Main Menu Sub-Menus Function à ¨ Sleep Timer...
...or + button. ➣ You can do directly by pressing the PIP button on the remote control. 20 You can select a source of the sub picture by repeatedly pressing the LOCATE button on the remote control. Move Select Exit ➣ The PIP function does not work when the V-Chip ... video from such devices in the following order: TV, Video, S-Video, DVD, DTV. The sources are displayed in a small window superimposed on the remote control. or + button. Adjusting Your LCD TV/Monitor Viewing the Picture In Picture (PIP) Main Menu Sub-Menus Function à ¨ Sleep Timer...
Owners Instructions
Page 21
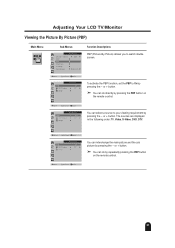
Move Select Exit Function PBP TV/Video Swap à : ¨ ¨ On TV You can do by repeatedly pressing the PBP button on the remote control. or + button. Move Select Exit 21 To activate the PBP function, set the PBP to watch double screen. The sources are displayed in the ... the - Move Select Exit Function PBP TV/Video Swap à : ¨ ¨ On TV You can do directly by pressing the PBP button on the remote control.
Move Select Exit Function PBP TV/Video Swap à : ¨ ¨ On TV You can do by repeatedly pressing the PBP button on the remote control. or + button. Move Select Exit 21 To activate the PBP function, set the PBP to watch double screen. The sources are displayed in the ... the - Move Select Exit Function PBP TV/Video Swap à : ¨ ¨ On TV You can do directly by pressing the PBP button on the remote control.
Owners Instructions
Page 22
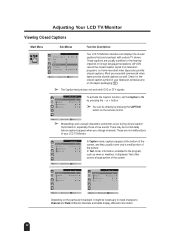
... of live events. Caption Mode Channel Field Function : On à ¨ Caption à ¨1 à ¨1 Move Select Exit Move Select Exit Depending on the remote control. Caption Mode Channel Field Function : On à ¨ Caption à ¨1 à ¨1 Move Select Exit Caption Mode Channel Field Function : On à ¨...
... of live events. Caption Mode Channel Field Function : On à ¨ Caption à ¨1 à ¨1 Move Select Exit Move Select Exit Depending on the remote control. Caption Mode Channel Field Function : On à ¨ Caption à ¨1 à ¨1 Move Select Exit Caption Mode Channel Field Function : On à ¨...
Owners Instructions
Page 23
...for 3 seconds. ➣ You can do directly by the viewer, which resets the pin to values preset by pressing the V.CHIP button on the remote control. If the two pin numbers do not approve. V-Chip (US only) The Telecommunications Act of the V-Chip restrictions can block certain rated television ... V-Chip Lock to Yes by the chip in the following sequence, which is meant to enter the pin number you forget the PIN, press the remote-control keys in each television. Move Select Exit ➣ When the V-Chip function is 0000. V-Chip Function Enter Pin _ O~9Select Exit Enter your ...
...for 3 seconds. ➣ You can do directly by the viewer, which resets the pin to values preset by pressing the V.CHIP button on the remote control. If the two pin numbers do not approve. V-Chip (US only) The Telecommunications Act of the V-Chip restrictions can block certain rated television ... V-Chip Lock to Yes by the chip in the following sequence, which is meant to enter the pin number you forget the PIN, press the remote-control keys in each television. Move Select Exit ➣ When the V-Chip function is 0000. V-Chip Function Enter Pin _ O~9Select Exit Enter your ...

Owners Instructions
Page 25
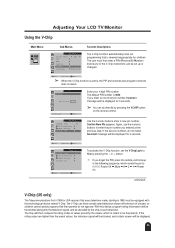
... are displayed in the following order: Expanded 1, Expanded 2, Normal. ➣ You can select a image size by pressing the P.SIZE (Picture Size) button repeatedly on the remote control. 25 Adjusting Your LCD TV/Monitor PC functions and adjustments - Move Select Exit œ Brightness √ œ Contrast √ PC Image Brightness à ¨...
... are displayed in the following order: Expanded 1, Expanded 2, Normal. ➣ You can select a image size by pressing the P.SIZE (Picture Size) button repeatedly on the remote control. 25 Adjusting Your LCD TV/Monitor PC functions and adjustments - Move Select Exit œ Brightness √ œ Contrast √ PC Image Brightness à ¨...

Owners Instructions
Page 28
... 28 The preset time intervals: 10, 20, 30, 60, 90, 120, 150, 180, 210, and 240 minutes. When you have been made. Depending on the remote control. Switching the Sound Off Temporarily You can switch the sound off . Press the MUTE button and then, the sound is switched off and " " is... may wish to turn the sound back on the selected source. Move Select Exit ➣ Using the "SLEEP" button Press the SLEEP button on the remote control. If the sleep timer is displayed. Press the SOURCE button one or more times until the required input is not yet set , the screen...
... 28 The preset time intervals: 10, 20, 30, 60, 90, 120, 150, 180, 210, and 240 minutes. When you have been made. Depending on the remote control. Switching the Sound Off Temporarily You can switch the sound off . Press the MUTE button and then, the sound is switched off and " " is... may wish to turn the sound back on the selected source. Move Select Exit ➣ Using the "SLEEP" button Press the SLEEP button on the remote control. If the sleep timer is displayed. Press the SOURCE button one or more times until the required input is not yet set , the screen...


