
User Manual (ENGLISH)
Page 2
Main Page Safety Instructions Notational Power Installation Cleaning Other Introduction Unpacking Front Rear Setup Connecting the Monitor Installing the Monitor Driver Automatic Manual Installing VESA compliant mounting On-Screen Display Troubleshooting Check List Q & A Self-Test Feature Check Specifications General Specifications PowerSaver Preset Timing Modes Information Service Terms Regulatory Natural Color For Better Display Authority
Main Page Safety Instructions Notational Power Installation Cleaning Other Introduction Unpacking Front Rear Setup Connecting the Monitor Installing the Monitor Driver Automatic Manual Installing VESA compliant mounting On-Screen Display Troubleshooting Check List Q & A Self-Test Feature Check Specifications General Specifications PowerSaver Preset Timing Modes Information Service Terms Regulatory Natural Color For Better Display Authority
User Manual (ENGLISH)
Page 10
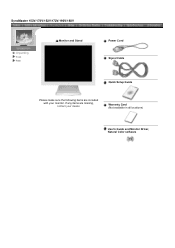
SyncMaster 153V/173V/152V/172V/193V/192V Unpacking Front Rear Monitor and Stand Power Cord Signal Cable Quick Setup Guide Please make sure the following items are missing, contact your monitor. If any items are included with your dealer. Warranty Card (Not available in all locations) User's Guide and Monitor Driver, Natural Color software
SyncMaster 153V/173V/152V/172V/193V/192V Unpacking Front Rear Monitor and Stand Power Cord Signal Cable Quick Setup Guide Please make sure the following items are missing, contact your monitor. If any items are included with your dealer. Warranty Card (Not available in all locations) User's Guide and Monitor Driver, Natural Color software
User Manual (ENGLISH)
Page 11
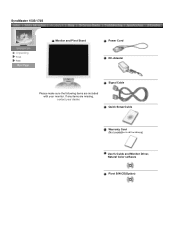
Signal Cable Quick Setup Guide Warranty Card (Not available in all locations) User's Guide and Monitor Driver, Natural Color software Pivot S/W CD(Option) SyncMaster 153S/173S Unpacking Front Rear Monitor and Pivot Stand Power Cord DC-Adapter Please make sure the following items are missing, contact your monitor. If any items are included with your dealer.
Signal Cable Quick Setup Guide Warranty Card (Not available in all locations) User's Guide and Monitor Driver, Natural Color software Pivot S/W CD(Option) SyncMaster 153S/173S Unpacking Front Rear Monitor and Pivot Stand Power Cord DC-Adapter Please make sure the following items are missing, contact your monitor. If any items are included with your dealer.
User Manual (ENGLISH)
Page 12
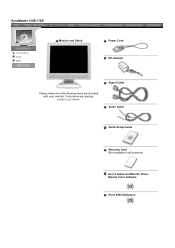
If any items are included with your dealer. Signal Cable Audio Cable Quick Setup Guide Warranty Card (Not available in all locations) User's Guide and Monitor Driver, Natural Color software Pivot S/W CD(Option) SyncMaster 153B/173B Unpacking Front Rear Monitor and Stand Power Cord DC-Adapter Please make sure the following items are missing, contact your monitor.
If any items are included with your dealer. Signal Cable Audio Cable Quick Setup Guide Warranty Card (Not available in all locations) User's Guide and Monitor Driver, Natural Color software Pivot S/W CD(Option) SyncMaster 153B/173B Unpacking Front Rear Monitor and Stand Power Cord DC-Adapter Please make sure the following items are missing, contact your monitor.

User Manual (ENGLISH)
Page 19
... the case of the monitor. Connect the monitor to connect the monitor using the D-SUB connection cable. 4. SyncMaster 153V/173V/152V/172V/193V/192V Connecting the Monitor Installing the Monitor Driver Installing VESA compliant mounting 1. Connect the signal cable to the power port on the back of your monitor. 3. Connect the power...
... the case of the monitor. Connect the monitor to connect the monitor using the D-SUB connection cable. 4. SyncMaster 153V/173V/152V/172V/193V/192V Connecting the Monitor Installing the Monitor Driver Installing VESA compliant mounting 1. Connect the signal cable to the power port on the back of your monitor. 3. Connect the power...

User Manual (ENGLISH)
Page 20
... port on the back of the monitor. Plug the power cord for your computer and monitor. SyncMaster 153S/173S Connecting the Monitor Installing the Monitor Driver Installing VESA compliant mounting English > Main > Setup > Connecting Your Monitor 1. Connect the signal cable to connect the monitor using the D-SUB connection cable. 4. Turn on...
... port on the back of the monitor. Plug the power cord for your computer and monitor. SyncMaster 153S/173S Connecting the Monitor Installing the Monitor Driver Installing VESA compliant mounting English > Main > Setup > Connecting Your Monitor 1. Connect the signal cable to connect the monitor using the D-SUB connection cable. 4. Turn on...

User Manual (ENGLISH)
Page 21
... monitor. If your monitor. 3. PC sound connection terminal (Input) 2. To listen in privacy,connect headphones here. 5. SyncMaster 153B/173B Connecting the Monitor Installing the Monitor Driver Installing VESA compliant mounting English > Main > Setup > Connecting Your Monitor 1. Connect the signal cable to the audio port on your computer. 4. Connect the power cord...
... monitor. If your monitor. 3. PC sound connection terminal (Input) 2. To listen in privacy,connect headphones here. 5. SyncMaster 153B/173B Connecting the Monitor Installing the Monitor Driver Installing VESA compliant mounting English > Main > Setup > Connecting Your Monitor 1. Connect the signal cable to the audio port on your computer. 4. Connect the power cord...

User Manual (ENGLISH)
Page 22
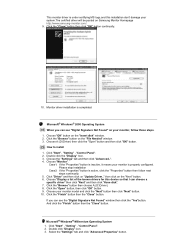
... the CD-ROM included with this monitor. Prepare a blank disk and download the driver program file at the Internet web site shown here. Click "Windows ME Driver". 3. Monitor driver installation is slightly different from one operating system to another. Choose your monitor model in the model ...the CD-ROM drive. 2. Click the "Install" button in the model list, then click the "OK" button. 4. z Internet web site : http://www.samsung-monitor.com/ (Worldwide) http://www.samsungusa.com/monitor/ (USA) http://www.sec.co.kr/monitor/ (Korea) http://www.samsungmonitor.com.cn/ (China) Windows...
... the CD-ROM included with this monitor. Prepare a blank disk and download the driver program file at the Internet web site shown here. Click "Windows ME Driver". 3. Monitor driver installation is slightly different from one operating system to another. Choose your monitor model in the model ...the CD-ROM drive. 2. Click the "Install" button in the model list, then click the "OK" button. 4. z Internet web site : http://www.samsung-monitor.com/ (Worldwide) http://www.samsungusa.com/monitor/ (USA) http://www.sec.co.kr/monitor/ (Korea) http://www.samsungmonitor.com.cn/ (China) Windows...
User Manual (ENGLISH)
Page 23
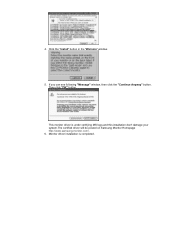
Click the "Install" button in the "Warning" window. 5. If you can see following "Message" window, then click the "Continue Anyway" button. This monitor driver is completed. Then click "OK" button. 4. Monitor driver installation is under certifying MS logo,and this installation don't damage your system.The certified driver will be posted on Samsung Monitor Homepage http://www.samsung-monitor.com/. 6.
Click the "Install" button in the "Warning" window. 5. If you can see following "Message" window, then click the "Continue Anyway" button. This monitor driver is completed. Then click "OK" button. 4. Monitor driver installation is under certifying MS logo,and this installation don't damage your system.The certified driver will be posted on Samsung Monitor Homepage http://www.samsung-monitor.com/. 6.

User Manual (ENGLISH)
Page 24
..." -> "Control Panel" then click the "Appearance and Themes" Icon. 3. Click the "Properties" button on the "Monitor" tab and select "Driver" tab. Insert CD into the CD-ROM driver. 2. z Internet web site : http://www.samsung-monitor.com/ (Worldwide) http://www.samsungusa.com/monitor/ (USA) http://www.sec.co.kr/monitor/ (Korea) http://www.samsungmonitor...
..." -> "Control Panel" then click the "Appearance and Themes" Icon. 3. Click the "Properties" button on the "Monitor" tab and select "Driver" tab. Insert CD into the CD-ROM driver. 2. z Internet web site : http://www.samsung-monitor.com/ (Worldwide) http://www.samsungusa.com/monitor/ (USA) http://www.sec.co.kr/monitor/ (Korea) http://www.samsungmonitor...

User Manual (ENGLISH)
Page 25
Click the "Browse" button then choose A:(D:\Driver) and choose your monitor model in the model list and click the "Next" button. 8. then click "Next" button. 6. Then click "OK" button. and select "Install from a list or.." Select "Don't search ,I will.." If you can see following "Message" window, then click the "Continue Anyway" button. Click "Update Driver.." 5. then click "Next" and then click "Have disk". 7.
Click the "Browse" button then choose A:(D:\Driver) and choose your monitor model in the model list and click the "Next" button. 8. then click "Next" button. 6. Then click "OK" button. and select "Install from a list or.." Select "Don't search ,I will.." If you can see following "Message" window, then click the "Continue Anyway" button. Click "Update Driver.." 5. then click "Next" and then click "Have disk". 7.
User Manual (ENGLISH)
Page 26
... "OK" button. 9. Double click the "Display" Icon. 3. Click the "Browse" button then choose A:(D:\Driver). 8. How to install 1. Case1: If the "Properties" button is inactive, it means your system.The certified driver will be posted on Samsung Monitor Homepage http://www.samsung-monitor.com/. 9. then click on the "Insert disk" window. 2. Click "Start" , "Setting" , "Control...
... "OK" button. 9. Double click the "Display" Icon. 3. Click the "Browse" button then choose A:(D:\Driver). 8. How to install 1. Case1: If the "Properties" button is inactive, it means your system.The certified driver will be posted on Samsung Monitor Homepage http://www.samsung-monitor.com/. 9. then click on the "Insert disk" window. 2. Click "Start" , "Setting" , "Control...
User Manual (ENGLISH)
Page 27
... "Change" button in a specific location.." The next screen is a type of resolution, colors or frequency). Select "Show all the driver in the "Monitor Type" area. 6. Choose "Display a list of the driver". 7. Specify A:\(D:\driver) then click "OK" button. 10. Choose "Specify the location of all devices" and choose the monitor that you need to...
... "Change" button in a specific location.." The next screen is a type of resolution, colors or frequency). Select "Show all the driver in the "Monitor Type" area. 6. Choose "Display a list of the driver". 7. Specify A:\(D:\driver) then click "OK" button. 10. Choose "Specify the location of all devices" and choose the monitor that you need to...
User Manual (ENGLISH)
Page 28
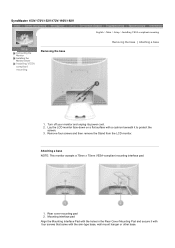
SyncMaster 153V/173V/152V/172V/193V/192V Connecting the Monitor Installing the Monitor Driver Installing VESA compliant mounting Removing the base English > Main > Setup > Installing VESA compliant mounting Removing the base | Attaching a base 1. Remove four screws and then remove ...
SyncMaster 153V/173V/152V/172V/193V/192V Connecting the Monitor Installing the Monitor Driver Installing VESA compliant mounting Removing the base English > Main > Setup > Installing VESA compliant mounting Removing the base | Attaching a base 1. Remove four screws and then remove ...
User Manual (ENGLISH)
Page 29
SyncMaster 153S/173S Connecting the Monitor Installing the Monitor Driver Installing VESA compliant mounting Removing the base 1. Lay the LCD monitor face-down on a flat surface with a cushion beneath it with four screws that came ...
SyncMaster 153S/173S Connecting the Monitor Installing the Monitor Driver Installing VESA compliant mounting Removing the base 1. Lay the LCD monitor face-down on a flat surface with a cushion beneath it with four screws that came ...
User Manual (ENGLISH)
Page 30
... with four screws that came with a cushion beneath it to protect the screen. 3. SyncMaster 153B/173B Removing the base Connecting the Monitor Installing the Monitor Driver Installing VESA compliant mounting 1. Lay the LCD monitor face-down on a flat surface with the arm-type base, wall mount hanger or other base. Turn...
... with four screws that came with a cushion beneath it to protect the screen. 3. SyncMaster 153B/173B Removing the base Connecting the Monitor Installing the Monitor Driver Installing VESA compliant mounting 1. Lay the LCD monitor face-down on a flat surface with the arm-type base, wall mount hanger or other base. Turn...

User Manual (ENGLISH)
Page 34
... is on, reboot the computer to see the initial screen(the login screen), which can properly handle. Have you changed the video card or the driver? Have the screen colors become Have you locked the On Screen Unlock the OSD by referring to a crash between applications? Press a key on the keyboard...
... is on, reboot the computer to see the initial screen(the login screen), which can properly handle. Have you changed the video card or the driver? Have the screen colors become Have you locked the On Screen Unlock the OSD by referring to a crash between applications? Press a key on the keyboard...

User Manual (ENGLISH)
Page 35
... Have you adjusted the resolution or frequency on the menu? Has the video card been set properly? Install the monitor driver according to the Driver Installation Instructions. Note: If problems repeatedly occur, contact an authorized service center. Is the frequency properly adjusted when checking ... -service for the main board of the video screen is blinking but no images on the screen. Install the monitor driver according to the Driver Installation Instructions. Adjust the resolution and frequency of focus or OSD cannot be supported. For Windows ME/XP/2000 :...
... Have you adjusted the resolution or frequency on the menu? Has the video card been set properly? Install the monitor driver according to the Driver Installation Instructions. Note: If problems repeatedly occur, contact an authorized service center. Is the frequency properly adjusted when checking ... -service for the main board of the video screen is blinking but no images on the screen. Install the monitor driver according to the Driver Installation Instructions. Adjust the resolution and frequency of focus or OSD cannot be supported. For Windows ME/XP/2000 :...

User Manual (ENGLISH)
Page 36
... at the Control Panel, Display, Settings. * Contact the video card manufacturer for details.) Windows ME/XP/2000 : Set the resolution at BIOS-SETUP of the driver used. (Refer to Windows/Computer Manual). Disconnect the power cord and then clean the monitor with a soft cloth, using either a cleaning solution or plain water...
... at the Control Panel, Display, Settings. * Contact the video card manufacturer for details.) Windows ME/XP/2000 : Set the resolution at BIOS-SETUP of the driver used. (Refer to Windows/Computer Manual). Disconnect the power cord and then clean the monitor with a soft cloth, using either a cleaning solution or plain water...

User Manual (ENGLISH)
Page 2
Main Page Safety Instructions Notational Power Installation Cleaning Other Introduction Unpacking Front Rear Setup Connecting Your Monitor Installing the Monitor Driver Automatic Manual Installing VESA compliant mounting On-Screen Display Troubleshooting Check List Q & A Self-Test Feature Check Specifications General Specifications PowerSaver Preset Display Modes Information Service Terms Regulatory Natural Color For Better Display Authority
Main Page Safety Instructions Notational Power Installation Cleaning Other Introduction Unpacking Front Rear Setup Connecting Your Monitor Installing the Monitor Driver Automatic Manual Installing VESA compliant mounting On-Screen Display Troubleshooting Check List Q & A Self-Test Feature Check Specifications General Specifications PowerSaver Preset Display Modes Information Service Terms Regulatory Natural Color For Better Display Authority


