User Manual (ENGLISH)
Page 2
... Installation Cleaning Other Introduction Unpacking Front Rear Remote Control Setup Connecting Your Monitor Connecting to a Computer Connecting to Other Devices Installing the Monitor Driver Automatic Manual Installing a VESA Base Folding the base / Removing the base Installing a VESA Base Adjusting Your LCD Monitor User Controls User control buttons Direct-Access Features On-Screen Display OSD...
... Installation Cleaning Other Introduction Unpacking Front Rear Remote Control Setup Connecting Your Monitor Connecting to a Computer Connecting to Other Devices Installing the Monitor Driver Automatic Manual Installing a VESA Base Folding the base / Removing the base Installing a VESA Base Adjusting Your LCD Monitor User Controls User control buttons Direct-Access Features On-Screen Display OSD...
User Manual (ENGLISH)
Page 5
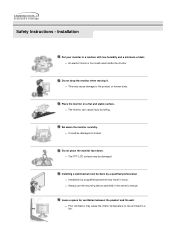
z Poor ventilation may be damaged or broken. Do not drop the monitor when moving it. z The TFT-LCD surface may cause the interior temperature to rise and lead to the product or human body. z It could result inside the monitor. Installing a wall bracket must be done by falling. z An electric shock or fire could...
z Poor ventilation may be damaged or broken. Do not drop the monitor when moving it. z The TFT-LCD surface may cause the interior temperature to rise and lead to the product or human body. z It could result inside the monitor. Installing a wall bracket must be done by falling. z An electric shock or fire could...
User Manual (ENGLISH)
Page 7
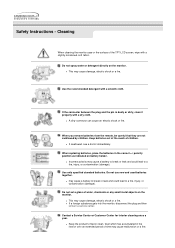
...a fire, injury, or contamination (damage). z This may cause damage, electric shock or a fire. z If a foreign substance gets into the monitor, disconnect the plug and then contact a service center. z Keep the product's interior clean. Keep batteries out of the reach of water, chemicals ... once a year. polarity position as indicated on the monitor. Use the recommended detergent with a slightly moistened, soft fabric. When replacing batteries, place the batteries in the interior over an extended period of the TFT-LCD screen, wipe with a smooth cloth. If the connector...
...a fire, injury, or contamination (damage). z This may cause damage, electric shock or a fire. z If a foreign substance gets into the monitor, disconnect the plug and then contact a service center. z Keep the product's interior clean. Keep batteries out of the reach of water, chemicals ... once a year. polarity position as indicated on the monitor. Use the recommended detergent with a slightly moistened, soft fabric. When replacing batteries, place the batteries in the interior over an extended period of the TFT-LCD screen, wipe with a smooth cloth. If the connector...
User Manual (ENGLISH)
Page 25
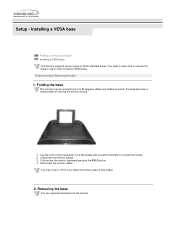
... the base Installing a VESA base This monitor supports various types of VESA-standard bases. You need to either fold or remove the base in use in order to protect the screen. 2. Folding the base | Removing the base 1. Lay the LCD monitor face-down on a flat surface with ...a cushion beneath it to install a VESA base. Disconnect the monitor cables. 3. Folding the base The monitor may install a VESA base when the monitor base is fully folded. 2. When fully folded (reclined), the base...
... the base Installing a VESA base This monitor supports various types of VESA-standard bases. You need to either fold or remove the base in use in order to protect the screen. 2. Folding the base | Removing the base 1. Lay the LCD monitor face-down on a flat surface with ...a cushion beneath it to install a VESA base. Disconnect the monitor cables. 3. Folding the base The monitor may install a VESA base when the monitor base is fully folded. 2. When fully folded (reclined), the base...
User Manual (ENGLISH)
Page 26
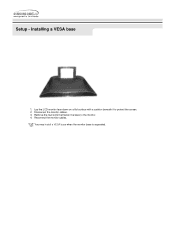
Installing a VESA base 1. Reconnect the monitor cables. You may install a VESA base when the monitor base is separated. Lay the LCD monitor face-down on a flat surface with a cushion beneath it to the monitor. 4. Disconnect the monitor cables. 3. Remove the four bolts that fasten the base to protect the screen. 2. Setup -
Installing a VESA base 1. Reconnect the monitor cables. You may install a VESA base when the monitor base is separated. Lay the LCD monitor face-down on a flat surface with a cushion beneath it to the monitor. 4. Disconnect the monitor cables. 3. Remove the four bolts that fasten the base to protect the screen. 2. Setup -
User Manual (ENGLISH)
Page 28
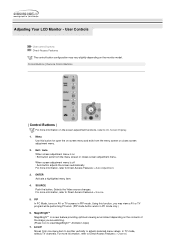
ENTER Activate a highlighted menu item. 4. For more information on AV or TV screens in PC mode only.) 6. Adjusting Your LCD Monitor - Control Buttons | Remote Control Buttons | Control Buttons | For more information, refer to Direct-Access Features > Auto Adjustment. 3. When screen adjustment menu is off : Auto button ... When screen adjustment menu is a new feature providing optimum viewing environment depending on the contents of the image you may vary slightly depending on the monitor model.
ENTER Activate a highlighted menu item. 4. For more information on AV or TV screens in PC mode only.) 6. Adjusting Your LCD Monitor - Control Buttons | Remote Control Buttons | Control Buttons | For more information, refer to Direct-Access Features > Auto Adjustment. 3. When screen adjustment menu is off : Auto button ... When screen adjustment menu is a new feature providing optimum viewing environment depending on the contents of the image you may vary slightly depending on the monitor model.
User Manual (ENGLISH)
Page 29
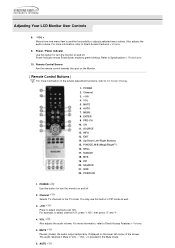
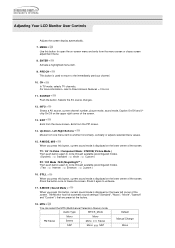
... Direct-Access Features > Volume. 5. MUTE Pauses (mutes) the audio output temporarily. MENU 8. CH 11. AUTO STILL 17. SOURCE 21. INFO 13. P.MODE, M/B (MagicBright ) 16. MTS 19. SOURCE 12. Also adjusts the audio volume. Channel Selects TV channels in the Mute mode. 6. The audio resumes if Mute or VOL - / VOL + is pressed... Control Sensor Aim the remote control towards this button in PIP mode as well. 3. +100 Press to Specifications > PowerSaver. 10. PRE-CH 10. Adjusting Your LCD Monitor User Controls 8. - S.MODE 18.
... Direct-Access Features > Volume. 5. MUTE Pauses (mutes) the audio output temporarily. MENU 8. CH 11. AUTO STILL 17. SOURCE 21. INFO 13. P.MODE, M/B (MagicBright ) 16. MTS 19. SOURCE 12. Also adjusts the audio volume. Channel Selects TV channels in the Mute mode. 6. The audio resumes if Mute or VOL - / VOL + is pressed... Control Sensor Aim the remote control towards this button in PIP mode as well. 3. +100 Press to Specifications > PowerSaver. 10. PRE-CH 10. Adjusting Your LCD Monitor User Controls 8. - S.MODE 18.
User Manual (ENGLISH)
Page 30
... Component Mode : P.MODE( Picture Mode ) Then push button again to circle through available preconfigured modes. ( Text Internet Entertain Custom ) 16. Adjusting Your LCD Monitor User Controls Adjusts the screen display automatically. 7. INFO Shows a AV source, current channel number, picture mode, sound mode, Caption On/Off and Vchip On/... values. 15. SOURCE Push the button, Selects the AV source changes. 12. Exits from the menu screen. The Monitor has five automatic sound settings ("Standard", "Music", "Movie", "Speech" and "Custom" ) that are preset at the factory. 18.
... Component Mode : P.MODE( Picture Mode ) Then push button again to circle through available preconfigured modes. ( Text Internet Entertain Custom ) 16. Adjusting Your LCD Monitor User Controls Adjusts the screen display automatically. 7. INFO Shows a AV source, current channel number, picture mode, sound mode, Caption On/Off and Vchip On/... values. 15. SOURCE Push the button, Selects the AV source changes. 12. Exits from the menu screen. The Monitor has five automatic sound settings ("Standard", "Music", "Movie", "Speech" and "Custom" ) that are preset at the factory. 18.

User Manual (ENGLISH)
Page 31
Adjusting Your LCD Monitor User Controls 19. Then push button again to PIP screen ON. 20. PIP Push the PIP button to circle through available preconfigured modes. ( Lower-Right Upper-Right Upper-Left Lower-Left ) SOURCE Push the button, the PIP window's signal source changes. 21. POSITION Changing the Position of the PIP window. SIZE Adjusts the PIP image size in PIP mode. 22.
Adjusting Your LCD Monitor User Controls 19. Then push button again to PIP screen ON. 20. PIP Push the PIP button to circle through available preconfigured modes. ( Lower-Right Upper-Right Upper-Left Lower-Left ) SOURCE Push the button, the PIP window's signal source changes. 21. POSITION Changing the Position of the PIP window. SIZE Adjusts the PIP image size in PIP mode. 22.
User Manual (ENGLISH)
Page 32
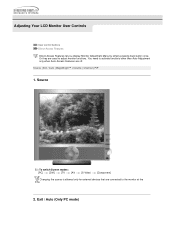
Adjusting Your LCD Monitor User Controls User control buttons Direct-Access Features Direct-Access Features let you display Monitor Adjustment Menu by simply pressing Auto button once. Or they are connected to the monitor at the time. 2. Source Ex) To switch Screen modes: [PC] [DVI] [TV] [AV] [S-Video] [Component] Changing the source is allowed only... Adjustment only when Auto-Access Features are off. Source | Exit / Auto | MagicBright™ | Volume | Channel | PIP 1. Exit / Auto (Only PC mode) You need to adjust monitor functions.
Adjusting Your LCD Monitor User Controls User control buttons Direct-Access Features Direct-Access Features let you display Monitor Adjustment Menu by simply pressing Auto button once. Or they are connected to the monitor at the time. 2. Source Ex) To switch Screen modes: [PC] [DVI] [TV] [AV] [S-Video] [Component] Changing the source is allowed only... Adjustment only when Auto-Access Features are off. Source | Exit / Auto | MagicBright™ | Volume | Channel | PIP 1. Exit / Auto (Only PC mode) You need to adjust monitor functions.
User Manual (ENGLISH)
Page 33
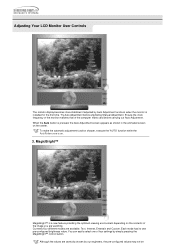
Adjusting Your LCD Monitor User Controls The monitor display becomes more stabilized if adjusted by our engineers, the pre-configured values may not be To make the automatic adjustment function sharper, execute the '... are watching. MagicBright™ MagicBright™ is installed for the first time. Currently four different modes are carefully chosen by Auto Adjustment functions when the monitor is a new feature providing the optimum viewing environment depending on the contents of four settings by simply pressing the MagicBright™ control button. Although the...
Adjusting Your LCD Monitor User Controls The monitor display becomes more stabilized if adjusted by our engineers, the pre-configured values may not be To make the automatic adjustment function sharper, execute the '... are watching. MagicBright™ MagicBright™ is installed for the first time. Currently four different modes are carefully chosen by Auto Adjustment functions when the monitor is a new feature providing the optimum viewing environment depending on the contents of four settings by simply pressing the MagicBright™ control button. Although the...
User Manual (ENGLISH)
Page 34
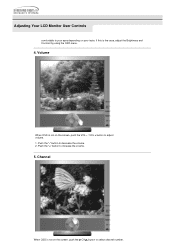
Channel When OSD is not on the screen, push the CH button to your taste. If this is not on your eyes depending on the screen, push the VOL - / VOL + button to increase the volume. 5. Adjusting Your LCD Monitor User Controls comfortable to select channel number. Push the "+" button to adjust volume. 1. Volume When OSD is the case, adjust the Brightness and Contrast by using the OSD menu. 4. Push the "-" button to decrease the volume. 2.
Channel When OSD is not on the screen, push the CH button to your taste. If this is not on your eyes depending on the screen, push the VOL - / VOL + button to increase the volume. 5. Adjusting Your LCD Monitor User Controls comfortable to select channel number. Push the "+" button to adjust volume. 1. Volume When OSD is the case, adjust the Brightness and Contrast by using the OSD menu. 4. Push the "-" button to decrease the volume. 2.
User Manual (ENGLISH)
Page 35
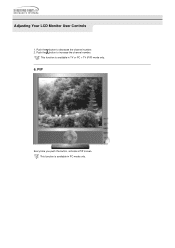
PIP Every time you push the button, activate a PIP screen. Push the button to increase the channel number. This function is available in PC mode only. Push the button to decrease the channel number. 2. Adjusting Your LCD Monitor User Controls 1. This function is available in TV or PC + TV (PIP) mode only. 6.
PIP Every time you push the button, activate a PIP screen. Push the button to increase the channel number. This function is available in PC mode only. Push the button to decrease the channel number. 2. Adjusting Your LCD Monitor User Controls 1. This function is available in TV or PC + TV (PIP) mode only. 6.
User Manual (ENGLISH)
Page 36
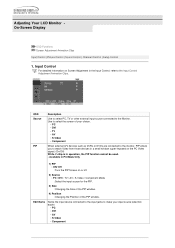
Use to select the screen of the PIP window. Adjusting Your LCD Monitor On-Screen Display OSD Functions Screen Adjustment Animation Clips Input Control | Picture Control | Sound Control | Channel Contrrol | Setup Control 1. OSD Source PIP Description Use to ... choice. • PC • DVI • TV • AV • S-Video • Component When external A/V devices such as VCRs or DVDs are connected to the monitor, PIP allows you to watch Video from those devices in a small window super-imposed on the PC Video signal. (On/Off) While V-chip is in...
Use to select the screen of the PIP window. Adjusting Your LCD Monitor On-Screen Display OSD Functions Screen Adjustment Animation Clips Input Control | Picture Control | Sound Control | Channel Contrrol | Setup Control 1. OSD Source PIP Description Use to ... choice. • PC • DVI • TV • AV • S-Video • Component When external A/V devices such as VCRs or DVDs are connected to the monitor, PIP allows you to watch Video from those devices in a small window super-imposed on the PC Video signal. (On/Off) While V-chip is in...
User Manual (ENGLISH)
Page 37
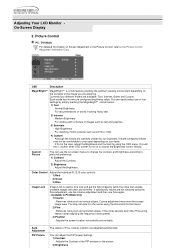
Adjusting Your LCD Monitor On-Screen Display 2. Each mode has its own pre-configured brightness value. Color Control Adjust the individual R, G, B color controls. 1) Red 2) Green 3) Blue Image Lock Image ...
Adjusting Your LCD Monitor On-Screen Display 2. Each mode has its own pre-configured brightness value. Color Control Adjust the individual R, G, B color controls. 1) Red 2) Green 3) Blue Image Lock Image ...
User Manual (ENGLISH)
Page 38
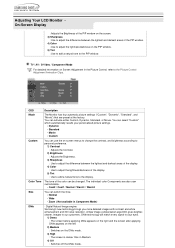
... color can switch the Size. • Normal • Wide • Zoom ( Not available in Component Mode) DNIe - Adjusting Your LCD Monitor On-Screen Display : Adjusts the Brightness of the PIP window on the screen. 3) Sharpness : Use to adjust the difference between the lightest...that are also user customizable. • Cool2 / Cool1 / Normal / Warm1 / Warm2 Size You can be changed. Digital Natural Image engine Samsung's new technology brings you more detailed images with contrast and white enhancement and 3D noise reduction. DNIe technology will match every signal to the display...
... color can switch the Size. • Normal • Wide • Zoom ( Not available in Component Mode) DNIe - Adjusting Your LCD Monitor On-Screen Display : Adjusts the Brightness of the PIP window on the screen. 3) Sharpness : Use to adjust the difference between the lightest...that are also user customizable. • Cool2 / Cool1 / Normal / Warm1 / Warm2 Size You can be changed. Digital Natural Image engine Samsung's new technology brings you more detailed images with contrast and white enhancement and 3D noise reduction. DNIe technology will match every signal to the display...
User Manual (ENGLISH)
Page 39
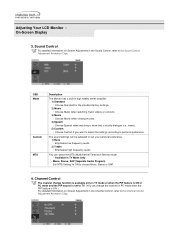
... to ON to choose Mono, Stereo or SAP. 4. The sound settings can be adjusted to personal preference. OSD Mode Custom MTS Description The Monitor has a built-in the Sound Control, refer to the Channel Control Adjustment Animation Clips. Available in the Channel Control, refer to the Sound ...Control Adjustment Animation Clips. Adjusting Your LCD Monitor On-Screen Display 3. You can change function is available only in TV mode or when the PIP feature is ON in PC mode and...
... to ON to choose Mono, Stereo or SAP. 4. The sound settings can be adjusted to personal preference. OSD Mode Custom MTS Description The Monitor has a built-in the Sound Control, refer to the Channel Control Adjustment Animation Clips. Available in the Channel Control, refer to the Sound ...Control Adjustment Animation Clips. Adjusting Your LCD Monitor On-Screen Display 3. You can change function is available only in TV mode or when the PIP feature is ON in PC mode and...

User Manual (ENGLISH)
Page 40
... Control For detailed information on the computer. Due to turn off automatically a set number of minutes. (Off, 30, 60, 90, 120, 150, 180) - Adjusting Your LCD Monitor On-Screen Display OSD Air/CATV Auto Program Fine Tune Add/Delete Description The channel system can choose one to the Setup Control Adjustment Animation... Clips. OSD Sleep Language Half tone Reset Caption V-Chip Description Use to set the Monitor to weak signals or an incorrect antenna configuration, some of the OSD.
... Control For detailed information on the computer. Due to turn off automatically a set number of minutes. (Off, 30, 60, 90, 120, 150, 180) - Adjusting Your LCD Monitor On-Screen Display OSD Air/CATV Auto Program Fine Tune Add/Delete Description The channel system can choose one to the Setup Control Adjustment Animation... Clips. OSD Sleep Language Half tone Reset Caption V-Chip Description Use to set the Monitor to weak signals or an incorrect antenna configuration, some of the OSD.
User Manual (ENGLISH)
Page 44
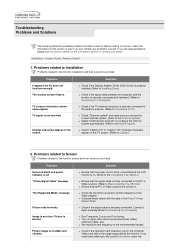
... z Compare these values with the data in the range supported by the monitor. Installation | Screen | Audio | Remote Control 1. Solutions z Ensure that the power cord is firmly connected and the LCD monitor is on the screen. Problems It appears the PC does not function normally...assistance, please call, the phone number on . Troubleshooting Problems and Solutions The following table lists possible problems and their solutions. The monitor screen flickers. Solutions z Check if the Display Adapter Driver (VGA Driver) is properly installed. (Refer to Installing Driver) z ...
... z Compare these values with the data in the range supported by the monitor. Installation | Screen | Audio | Remote Control 1. Solutions z Ensure that the power cord is firmly connected and the LCD monitor is on the screen. Problems It appears the PC does not function normally...assistance, please call, the phone number on . Troubleshooting Problems and Solutions The following table lists possible problems and their solutions. The monitor screen flickers. Solutions z Check if the Display Adapter Driver (VGA Driver) is properly installed. (Refer to Installing Driver) z ...
User Manual (ENGLISH)
Page 46
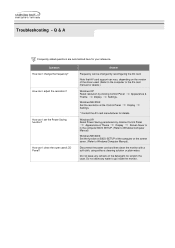
... Saving parameters by clicking Control Panel Appearance & Theme Display Screen Saver or in the computer BIOS SETUP. (Refer to go inside the monitor. Note that AV card support can be changed by clicking Control Panel Theme Display Settings. Disconnect the power cord and then clean the...or the AV card manual for details.) Windows XP: Reset resolution by reconfiguring the AV card. How can I clean the outer case/LCD Panel? Troubleshooting - How can I set the Power Saving function? Do not allow any remains of the driver used. (Refer to Windows/Computer Manual)....
... Saving parameters by clicking Control Panel Appearance & Theme Display Screen Saver or in the computer BIOS SETUP. (Refer to go inside the monitor. Note that AV card support can be changed by clicking Control Panel Theme Display Settings. Disconnect the power cord and then clean the...or the AV card manual for details.) Windows XP: Reset resolution by reconfiguring the AV card. How can I clean the outer case/LCD Panel? Troubleshooting - How can I set the Power Saving function? Do not allow any remains of the driver used. (Refer to Windows/Computer Manual)....


