User Manual (SPANISH)
Page 57
... type (parallel blades) plug cap. IC Compliance Notice This Class B digital apparatus meets all requirements of the Canadian Interference-Causing Equipment Regulations of the FCC Rules. It may be determined by the Federal Communications Commission. For 120 Volt applications, use only UL Listed Detachable power supply cord with the limits for help. The party responsible for product compliance: SAMSUNG ELECTRONICS...
... type (parallel blades) plug cap. IC Compliance Notice This Class B digital apparatus meets all requirements of the Canadian Interference-Causing Equipment Regulations of the FCC Rules. It may be determined by the Federal Communications Commission. For 120 Volt applications, use only UL Listed Detachable power supply cord with the limits for help. The party responsible for product compliance: SAMSUNG ELECTRONICS...
User Manual (ENGLISH)
Page 2
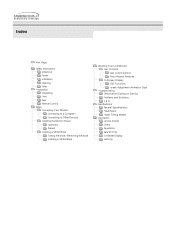
... Power Installation Cleaning Other Introduction Unpacking Front Rear Remote Control Setup Connecting Your Monitor Connecting to a Computer Connecting to Other Devices Installing the Monitor Driver Automatic Manual Installing a VESA Base Folding the base / Removing the base Installing a VESA Base Adjusting Your LCD Monitor User Controls User control buttons Direct-Access Features On-Screen Display OSD Functions Screen Adjustment Animation Clips Troubleshooting Check before Calling for Service Problems and Solutions Q & A Specifications General Specifications PowerSaver Preset Timing Modes...
... Power Installation Cleaning Other Introduction Unpacking Front Rear Remote Control Setup Connecting Your Monitor Connecting to a Computer Connecting to Other Devices Installing the Monitor Driver Automatic Manual Installing a VESA Base Folding the base / Removing the base Installing a VESA Base Adjusting Your LCD Monitor User Controls User control buttons Direct-Access Features On-Screen Display OSD Functions Screen Adjustment Animation Clips Troubleshooting Check before Calling for Service Problems and Solutions Q & A Specifications General Specifications PowerSaver Preset Timing Modes...
User Manual (ENGLISH)
Page 15
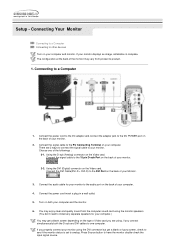
... the computer sound card using , if you are 2 ways to connect the signal cable to a Computer 1. If your monitor displays an image, installation is set to the DVI Port on the back of your computer and monitor. Connect the DVI Cable(DVI-D + DVI-D) to analog. Connect the power cord insert a plug in a wall outlet. 5. Press Source button to the 15 pin D-sub Port on your computer. 4. Connect the power cord to the DC adapter and connect the adapter jack to other...
... the computer sound card using , if you are 2 ways to connect the signal cable to a Computer 1. If your monitor displays an image, installation is set to the DVI Port on the back of your computer and monitor. Connect the DVI Cable(DVI-D + DVI-D) to analog. Connect the power cord insert a plug in a wall outlet. 5. Press Source button to the 15 pin D-sub Port on your computer. 4. Connect the power cord to the DC adapter and connect the adapter jack to other...

User Manual (ENGLISH)
Page 16
... monitor allows the user to the monitor's R and L audio input terminals using the SOURCE button on . 1. The configuration at the back of the monitor using the RCA or S-Video cable. You may vary from product to an antenna or CATV cable without disconnecting the PC. Select AV or S-Video using audio cables. 3. S-Video or RCA cable is connected to product. Connecting TV You may view television programs on your computer. Setup - Connecting AV Devices | Connecting TV | Connecting DVD / DTV Set Top Box Connecting...
... monitor allows the user to the monitor's R and L audio input terminals using the SOURCE button on . 1. The configuration at the back of the monitor using the RCA or S-Video cable. You may vary from product to an antenna or CATV cable without disconnecting the PC. Select AV or S-Video using audio cables. 3. S-Video or RCA cable is connected to product. Connecting TV You may view television programs on your computer. Setup - Connecting AV Devices | Connecting TV | Connecting DVD / DTV Set Top Box Connecting...
User Manual (ENGLISH)
Page 17
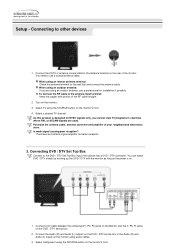
... programs in countries where PAL or SECAM signals are using audio cables. 3. To connect the RF cable to the Audio (R) and Audio (L) inputs on . 1. Connecting DVD / DTV Set Top Box Connect to use a professional for better reception. 3. Connect a AV cable between the component(Y, Pb, Pr) jacks on the Monitor and the Y, Pb, Pr jacks on the wall first and connect the antenna cable. Connect the Audio (R) and Audio (L) outputs on the DVD / DTV set top box. 2. Is weak signal causing poor reception? Purchase and install a signal...
... programs in countries where PAL or SECAM signals are using audio cables. 3. To connect the RF cable to the Audio (R) and Audio (L) inputs on . 1. Connecting DVD / DTV Set Top Box Connect to use a professional for better reception. 3. Connect a AV cable between the component(Y, Pb, Pr) jacks on the Monitor and the Y, Pb, Pr jacks on the wall first and connect the antenna cable. Connect the Audio (R) and Audio (L) outputs on the DVD / DTV set top box. 2. Is weak signal causing poor reception? Purchase and install a signal...
User Manual (ENGLISH)
Page 19
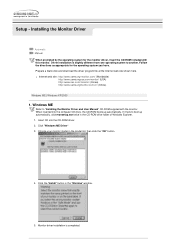
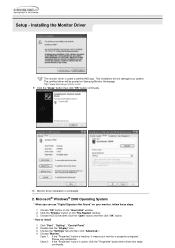
... ME Refer to another. When inserted into the CD-ROM driver. 2. Driver installation is completed. Click the "Install" button in the model list, then click the "OK" button. 4. Installing the Monitor Driver Automatic Manual When prompted by the operating system for the operating system you have. Prepare a blank disk and download the driver program file at the Internet web site shown here. If it fails to boot up automatically...
... ME Refer to another. When inserted into the CD-ROM driver. 2. Driver installation is completed. Click the "Install" button in the model list, then click the "OK" button. 4. Installing the Monitor Driver Automatic Manual When prompted by the operating system for the operating system you have. Prepare a blank disk and download the driver program file at the Internet web site shown here. If it fails to boot up automatically...
User Manual (ENGLISH)
Page 20
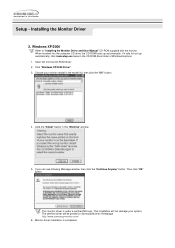
... to "Installing the Monitor Driver and User Manual" CD-ROM supplied with the monitor. Click the "Install" button in the CD-ROM drive folder of Windows Explorer. 1. If you can see following Message window, then click the "Continue Anyway" button. Setup - This installation will be posted on Samsung Monitor Homepage http://www.samsung-monitor.com/ 6. When inserted into the CD-ROM driver. 2. Then click "OK" button. Monitor driver installation is under...
... to "Installing the Monitor Driver and User Manual" CD-ROM supplied with the monitor. Click the "Install" button in the CD-ROM drive folder of Windows Explorer. 1. If you can see following Message window, then click the "Continue Anyway" button. Setup - This installation will be posted on Samsung Monitor Homepage http://www.samsung-monitor.com/ 6. When inserted into the CD-ROM driver. 2. Then click "OK" button. Monitor driver installation is under...
User Manual (ENGLISH)
Page 21
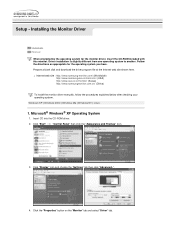
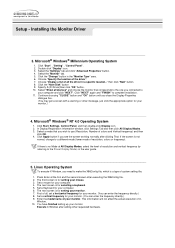
... install the monitor driver manually, follow the procedures explained below after checking your operating system. Insert CD into the CD-ROM driver. 2. Click "Display" icon and choose the "Settings" tab then click "Advanced..". 4. Prepare a blank disk and download the driver program file at the Internet web site shown here. Click "Start" "Control Panel" then click the "Appearance and Themes" Icon. 3. Click the "Properties" button on the "Monitor...
... install the monitor driver manually, follow the procedures explained below after checking your operating system. Insert CD into the CD-ROM driver. 2. Click "Display" icon and choose the "Settings" tab then click "Advanced..". 4. Prepare a blank disk and download the driver program file at the Internet web site shown here. Click "Start" "Control Panel" then click the "Appearance and Themes" Icon. 3. Click the "Properties" button on the "Monitor...
User Manual (ENGLISH)
Page 23
..." , "Setting" , "Control Panel". 2. Microsoft® Windows® 2000 Operating System * When you can see "Digital Signature Not Found" on Samsung Monitor Homepage http://www.samsung-monitor.com/ 9. Choose A:(D:\Driver)then click the "Open" button and then click "OK" button. * How to install 1. Double click the "Display" Icon. 3. Setup - The certified driver will not damage your monitor is active, click the "Properties" button then follow these steps. 1. Click the "Close" button...
..." , "Setting" , "Control Panel". 2. Microsoft® Windows® 2000 Operating System * When you can see "Digital Signature Not Found" on Samsung Monitor Homepage http://www.samsung-monitor.com/ 9. Choose A:(D:\Driver)then click the "Open" button and then click "OK" button. * How to install 1. Double click the "Display" Icon. 3. Setup - The certified driver will not damage your monitor is active, click the "Properties" button then follow these steps. 1. Click the "Close" button...
User Manual (ENGLISH)
Page 24
... X86Config file, which is for setting your monitor. Continue choosing "CLOSE" button and "OK" button until you see the screen working normally after clicking Test. Select a mode that corresponds to the one you need to complete installation. 11. Linux Operating System To execute X-Window, you connected to use (Resolution, Number of system setting file. 1. The third screen is for your monitor. (You can enter the frequency directly.) 8. The next screen is for selecting a keyboard...
... X86Config file, which is for setting your monitor. Continue choosing "CLOSE" button and "OK" button until you see the screen working normally after clicking Test. Select a mode that corresponds to the one you need to complete installation. 11. Linux Operating System To execute X-Window, you connected to use (Resolution, Number of system setting file. 1. The third screen is for your monitor. (You can enter the frequency directly.) 8. The next screen is for selecting a keyboard...
User Manual (ENGLISH)
Page 28
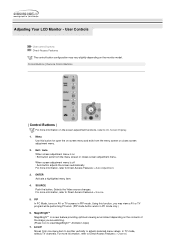
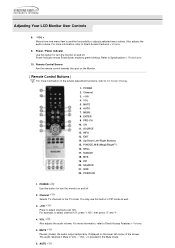
.... Adjusting Your LCD Monitor - PIP In PC Mode, turns on -screen menu and exits from the menu screen or closes screen adjustment menu. 2. Using this button for open the on AV or TV screens in PC mode only.) 6. Control Buttons | Remote Control Buttons | Control Buttons | For more information, refer to view MagicBright Animation Clips) 7. Exit / Auto When screen adjustment menu is on the screen adjustment functions, refer to another vertically or adjusts selected menu values. SOURCE Push the button, Selects the Video source changes. User Controls User control buttons Direct-Access...
.... Adjusting Your LCD Monitor - PIP In PC Mode, turns on -screen menu and exits from the menu screen or closes screen adjustment menu. 2. Using this button for open the on AV or TV screens in PC mode only.) 6. Control Buttons | Remote Control Buttons | Control Buttons | For more information, refer to view MagicBright Animation Clips) 7. Exit / Auto When screen adjustment menu is on the screen adjustment functions, refer to another vertically or adjusts selected menu values. SOURCE Push the button, Selects the Video source changes. User Controls User control buttons Direct-Access...
User Manual (ENGLISH)
Page 29
.... Displayed on the Monitor. | Remote Control Buttons | For more information, refer to Direct-Access Features > Volume. 5. Power / Power indicator Use this button for turn the monitor on and off . ENTER 9. POWER Use this button for turn the monitor on the screen adjustment functions, refer to select channels over 100. VOL Also adjusts the audio volume. For more information on and off . 2. The audio resumes if Mute or VOL - / VOL + is pressed in the TV mode. Adjusting Your LCD Monitor User Controls 8. - Refer to select channel...
.... Displayed on the Monitor. | Remote Control Buttons | For more information, refer to Direct-Access Features > Volume. 5. Power / Power indicator Use this button for turn the monitor on and off . ENTER 9. POWER Use this button for turn the monitor on the screen adjustment functions, refer to select channels over 100. VOL Also adjusts the audio volume. For more information on and off . 2. The audio resumes if Mute or VOL - / VOL + is pressed in the TV mode. Adjusting Your LCD Monitor User Controls 8. - Refer to select channel...
User Manual (ENGLISH)
Page 36
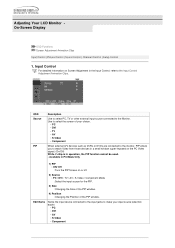
.... Available in operation, the PIP function cannot be used. - Input Control For detailed information on or off. 2) Source • PC / DVI : TV / AV / S-Video / Component Mode : Select the input source for the PIP. 3) Size : Changing the Size of the PIP window. 4) Position : Changing the Position of your input source selection easier. • PC • DVI • AV • S-Video • Component Adjusting Your LCD Monitor On-Screen Display OSD Functions Screen Adjustment Animation Clips Input Control | Picture Control | Sound Control | Channel Contrrol | Setup Control 1.
.... Available in operation, the PIP function cannot be used. - Input Control For detailed information on or off. 2) Source • PC / DVI : TV / AV / S-Video / Component Mode : Select the input source for the PIP. 3) Size : Changing the Size of the PIP window. 4) Position : Changing the Position of your input source selection easier. • PC • DVI • AV • S-Video • Component Adjusting Your LCD Monitor On-Screen Display OSD Functions Screen Adjustment Animation Clips Input Control | Picture Control | Sound Control | Channel Contrrol | Setup Control 1.
User Manual (ENGLISH)
Page 37
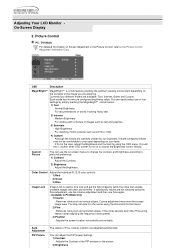
... using the Horizontal Control menu. 2) Fine : Removes noise such as horizontal stripes. Auto Adjustment PIP Picture The values of the image you are adjusted automatically. Custom Picture You can adjust the PIP Screen Settings. 1) Contrast : Adjusts the Contrast of images such as text and graphics. 3) Entertain : High Brightness For watching motion pictures such as vertical stripes. You may move the screen image area. Adjusting Your LCD Monitor On-Screen Display 2. Or push the (+) button...
... using the Horizontal Control menu. 2) Fine : Removes noise such as horizontal stripes. Auto Adjustment PIP Picture The values of the image you are adjusted automatically. Custom Picture You can adjust the PIP Screen Settings. 1) Contrast : Adjusts the Contrast of images such as text and graphics. 3) Entertain : High Brightness For watching motion pictures such as vertical stripes. You may move the screen image area. Adjusting Your LCD Monitor On-Screen Display 2. Or push the (+) button...
User Manual (ENGLISH)
Page 42
... that the adapter driver is 85Hz or higher, the monitor goes into Not Supported Mode and the screen becomes blank after disconnecting the power cord. Maintaining the Flat Panel Display Screen. Since the monitor does not support a vertical resolution that is not properly installed. The user must adjust the frequency within that one minute, but the warning message below are for general circumstances. z Do not use acetone, benzene...
... that the adapter driver is 85Hz or higher, the monitor goes into Not Supported Mode and the screen becomes blank after disconnecting the power cord. Maintaining the Flat Panel Display Screen. Since the monitor does not support a vertical resolution that is not properly installed. The user must adjust the frequency within that one minute, but the warning message below are for general circumstances. z Do not use acetone, benzene...
User Manual (ENGLISH)
Page 44
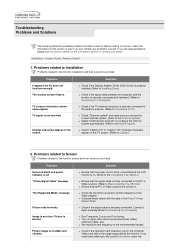
... after removing all accessories (Video extension cable, etc.) z Set resolution and frequency to a Computer) z Run Frequency Coarse and Fine tuning. Solutions z Check if the Display Adapter Driver (VGA Driver) is properly installed. (Refer to Installing Driver) z Check if the signal cable between the computer and the monitor is securely connected and tightened. (Refer to Connecting to Caption) 2. Image is blurred. z Check the maximum resolution and the frequency of the Video adaptor. Installation | Screen | Audio | Remote Control 1. Picture...
... after removing all accessories (Video extension cable, etc.) z Set resolution and frequency to a Computer) z Run Frequency Coarse and Fine tuning. Solutions z Check if the Display Adapter Driver (VGA Driver) is properly installed. (Refer to Installing Driver) z Check if the signal cable between the computer and the monitor is securely connected and tightened. (Refer to Connecting to Caption) 2. Image is blurred. z Check the maximum resolution and the frequency of the Video adaptor. Installation | Screen | Audio | Remote Control 1. Picture...

User Manual (ENGLISH)
Page 45
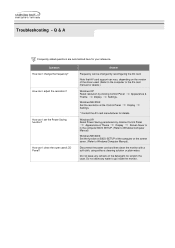
... the audio-in settings to the Brightness, Contrast) z Adjust color using its maximum, check the volume control on in the picture. Sound is too high pitched or too low pitched Solutions z Ensure that the audio cable is on the computer sound card or software program. Problems The remote control buttons do not respond. Troubleshooting Problems and Solutions Ghost images are shown in the vicinity. The image is too light or too dark Screen color is...
... the audio-in settings to the Brightness, Contrast) z Adjust color using its maximum, check the volume control on in the picture. Sound is too high pitched or too low pitched Solutions z Ensure that the audio cable is on the computer sound card or software program. Problems The remote control buttons do not respond. Troubleshooting Problems and Solutions Ghost images are shown in the vicinity. The image is too light or too dark Screen color is...
User Manual (ENGLISH)
Page 46
... the power cord and then clean the monitor with a soft cloth, using either a cleaning solution or plain water. How can I adjust the resolution? Note that AV card support can I clean the outer case/LCD Panel? Windows XP: Reset Power Saving parameters by clicking Control Panel Appearance & Theme Display Screen Saver or in the computer BIOS SETUP. (Refer to the computer or the AV card manual for details...
... the power cord and then clean the monitor with a soft cloth, using either a cleaning solution or plain water. How can I adjust the resolution? Note that AV card support can I clean the outer case/LCD Panel? Windows XP: Reset Power Saving parameters by clicking Control Panel Appearance & Theme Display Screen Saver or in the computer BIOS SETUP. (Refer to the computer or the AV card manual for details...

User Manual (ENGLISH)
Page 48
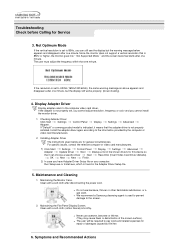
The number of black pixels could be installed on any Plug & Play compatible system. This is used for this product. Dot Acceptable TFT LCD panel manufactured by using advanced semiconductor technology with precision of the monitor and computer systems will proceed automatically, unless the user wishes to be bright sometimes or some of TFT LCD pixels : z 19 inch: 3,932,160 Interaction of 99.999% above is...
The number of black pixels could be installed on any Plug & Play compatible system. This is used for this product. Dot Acceptable TFT LCD panel manufactured by using advanced semiconductor technology with precision of the monitor and computer systems will proceed automatically, unless the user wishes to be bright sometimes or some of TFT LCD pixels : z 19 inch: 3,932,160 Interaction of 99.999% above is...
User Manual (ENGLISH)
Page 61
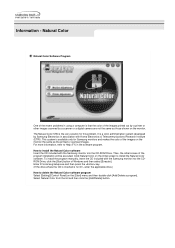
... Color software program Select [Setting]/[Control Panel] on the monitor. Enter D:\color\eng\setup.exe and then press the key. (If the drive where the CD is inserted is the very solution for Samsung monitors and makes the color of Windows and then select [Execute]. To install the program manually, insert the CD included with Korea Electronics & Telecommunications Research Institute (ETRI). Then, the initial screen of the recent problems...
... Color software program Select [Setting]/[Control Panel] on the monitor. Enter D:\color\eng\setup.exe and then press the key. (If the drive where the CD is inserted is the very solution for Samsung monitors and makes the color of Windows and then select [Execute]. To install the program manually, insert the CD included with Korea Electronics & Telecommunications Research Institute (ETRI). Then, the initial screen of the recent problems...


