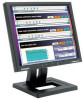
User Manual (user Manual) (English)
Page 2
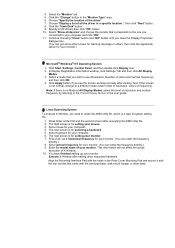
Main Page Safety Instructions Notational Power Installation Cleaning Other Introduction Unpacking Front Rear Setup Connecting Your Monitor Installing the Monitor Driver Automatic Manual Installing VESA compliant mounting On-Screen Display Troubleshooting Check List Q & A Self-Test Feature Check Specifications General Specifications PowerSaver Preset Display Modes Information Service Terms Regulatory Natural Color For Better Display Authority
Main Page Safety Instructions Notational Power Installation Cleaning Other Introduction Unpacking Front Rear Setup Connecting Your Monitor Installing the Monitor Driver Automatic Manual Installing VESA compliant mounting On-Screen Display Troubleshooting Check List Q & A Self-Test Feature Check Specifications General Specifications PowerSaver Preset Display Modes Information Service Terms Regulatory Natural Color For Better Display Authority

User Manual (user Manual) (English)
Page 4
... during storms or lightening or if it is not used for a long period of time, set your PC to DPMS. If using a screen saver, set it to the active screen mode. z This may cause an electric shock or fire. Do not pull the plug out by the wire nor touch the plug...
... during storms or lightening or if it is not used for a long period of time, set your PC to DPMS. If using a screen saver, set it to the active screen mode. z This may cause an electric shock or fire. Do not pull the plug out by the wire nor touch the plug...

User Manual (user Manual) (English)
Page 8
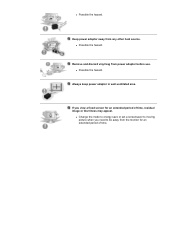
Remove and discard vinyl bag from the monitor for an extended period of time. If you need to moving picture when you view a fixed screen for an extended period of time, residual image or blurriness may appear. z Possible fire hazard. z Change the mode to energy save or set a screensaver to be away from power adaptor before use. Always keep power adaptor in well-ventilated area. Keep power adaptor away from any other heat source. z Possible fire hazard. z Possible fire hazard.
Remove and discard vinyl bag from the monitor for an extended period of time. If you need to moving picture when you view a fixed screen for an extended period of time, residual image or blurriness may appear. z Possible fire hazard. z Change the mode to energy save or set a screensaver to be away from power adaptor before use. Always keep power adaptor in well-ventilated area. Keep power adaptor away from any other heat source. z Possible fire hazard. z Possible fire hazard.
User Manual (user Manual) (English)
Page 10
z Possible fire hazard. If you need to be away from the monitor for an extended period of time. Remove and discard vinyl bag from any other heat source. z Possible fire hazard. z Change the mode to energy save or set a screensaver to moving picture when you view a fixed screen for an extended period of time, residual image or blurriness may appear. Always keep power adaptor in well-ventilated area. z Possible fire hazard. Keep power adaptor away from power adaptor before use.
z Possible fire hazard. If you need to be away from the monitor for an extended period of time. Remove and discard vinyl bag from any other heat source. z Possible fire hazard. z Change the mode to energy save or set a screensaver to moving picture when you view a fixed screen for an extended period of time, residual image or blurriness may appear. Always keep power adaptor in well-ventilated area. z Possible fire hazard. Keep power adaptor away from power adaptor before use.

User Manual (user Manual) (English)
Page 13
... optimum viewing environment depending on and off . (When the Source button is pressed to change the input mode, a message appears in the center of the screen displaying the current mode -- Menu button Use this button to open the OSD and activate a highlighted menu item. 6. For energy conservation, turn the monitor on...
... optimum viewing environment depending on and off . (When the Source button is pressed to change the input mode, a message appears in the center of the screen displaying the current mode -- Menu button Use this button to open the OSD and activate a highlighted menu item. 6. For energy conservation, turn the monitor on...
User Manual (user Manual) (English)
Page 17
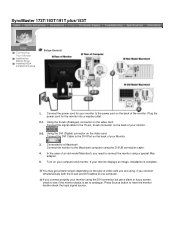
... both the D-sub and DVI cables to the power port on the type of video card you are using the DVI connector but get a blank screen depending on the back of the monitor. In the case of an old model Macintosh, you connect properly your monitor to one computer. Turn on... power cord for the monitor into a nearby outlet. 2-1. If you need to the Macintosh computer using a special Mac adaptor. 5. You may get a blank or fuzzy screen, check to the 15-pin, D-sub connector on the video card. Connect the signal cable to see if the monitor status is complete. Using the...
... both the D-sub and DVI cables to the power port on the type of video card you are using the DVI connector but get a blank screen depending on the back of the monitor. In the case of an old model Macintosh, you connect properly your monitor to one computer. Turn on... power cord for the monitor into a nearby outlet. 2-1. If you need to the Macintosh computer using a special Mac adaptor. 5. You may get a blank or fuzzy screen, check to the 15-pin, D-sub connector on the video card. Connect the signal cable to see if the monitor status is complete. Using the...
User Manual (user Manual) (English)
Page 26
.... (You can enter the frequency directly.) 8. Set a mouse for selecting a keyboard. 5. First of your monitor. (You can get some other screen for warning message or others, then click the appreciate option for setting your monitor. Set a vertical frequency for your computer. 4. Enter the model name...driver". 7. Select "Show all the driver in the "Monitor Type" area. 6. Specify A:\(D:\driver) then click "OK" button. 10. If the screen is a type of all devices" and choose the monitor that came with the arm-type base, wall mount hanger or other requested hardware. Choose "...
.... (You can enter the frequency directly.) 8. Set a mouse for selecting a keyboard. 5. First of your monitor. (You can get some other screen for warning message or others, then click the appreciate option for setting your monitor. Set a vertical frequency for your computer. 4. Enter the model name...driver". 7. Select "Show all the driver in the "Monitor Type" area. 6. Specify A:\(D:\driver) then click "OK" button. 10. If the screen is a type of all devices" and choose the monitor that came with the arm-type base, wall mount hanger or other requested hardware. Choose "...

User Manual (user Manual) (English)
Page 27
... with the holes in the Rear Cover Mounting Pad and secure it with the four screws that came with a cushion beneath it to protect the screen. 3. Remove the two screws and then remove the Stand from the LCD monitor. Rear cover mounting pad 2.
... with the holes in the Rear Cover Mounting Pad and secure it with the four screws that came with a cushion beneath it to protect the screen. 3. Remove the two screws and then remove the Stand from the LCD monitor. Rear cover mounting pad 2.

User Manual (user Manual) (English)
Page 30
... Brightness. 1. Push the Menu button to adjust Brightness - Push the Menu button. 2. Brightness Menu Contrast Menu How to open the Contrast adjustment screen. 4. Push the Menu button. 2. Push the Menu button to decrease the contrast. Adjust Contrast. 1. Use the [ + ] button to ...increase the contrast or [ - ] button to open the Brightness adjustment screen. 3. How to decrease the brightness. Use the [ + ] button to increase the brightness or [ - ] button to adjust Contrast - Direct Access ...
... Brightness. 1. Push the Menu button to adjust Brightness - Push the Menu button. 2. Brightness Menu Contrast Menu How to open the Contrast adjustment screen. 4. Push the Menu button. 2. Push the Menu button to decrease the contrast. Adjust Contrast. 1. Use the [ + ] button to ...increase the contrast or [ - ] button to open the Brightness adjustment screen. 3. How to decrease the brightness. Use the [ + ] button to increase the brightness or [ - ] button to adjust Contrast - Direct Access ...

User Manual (user Manual) (English)
Page 31
...creates unstable images with jitters and shimmers. How to adjust Image Lock [Fine] - Image Lock is used to open the Coarse adjustment screen. 5. Push the Menu button to fine tune and get the best image by removing noises that creates unstable images with jitters and shimmers...1. Use the [ - ] button or [ + ] button to remove any noise. Push the Menu button. 2. Push the [ - ] button or [ + ] button until the Image Lock screen is displayed. 3. Use the [ - ] button or [ + ] button to remove any noise. Push the Menu button again and then press the [ - ] or [ + ] button until...
...creates unstable images with jitters and shimmers. How to adjust Image Lock [Fine] - Image Lock is used to open the Coarse adjustment screen. 5. Push the Menu button to fine tune and get the best image by removing noises that creates unstable images with jitters and shimmers...1. Use the [ - ] button or [ + ] button to remove any noise. Push the Menu button. 2. Push the [ - ] button or [ + ] button until the Image Lock screen is displayed. 3. Use the [ - ] button or [ + ] button to remove any noise. Push the Menu button again and then press the [ - ] or [ + ] button until...

User Manual (user Manual) (English)
Page 32
... of the monitor's entire display. 1. Push the Menu button. 2. Push the [ - ] button or [ + ] button until the V-Position screen is displayed. 3. Follow these instructions to change the horizontal position of the monitor's viewing area. Use the [ - ] button or [ + ]... button to adjust H-Position - Push the Menu button. 2. Push the Menu button to open the V-Position adjustment screen. 4. Push the Menu button to open the H-Position adjustment screen. 4. H-Position Menu V-Position Menu How to change the vertical position of the monitor's viewing area. Push the [...
... of the monitor's entire display. 1. Push the Menu button. 2. Push the [ - ] button or [ + ] button until the V-Position screen is displayed. 3. Follow these instructions to change the horizontal position of the monitor's viewing area. Use the [ - ] button or [ + ]... button to adjust H-Position - Push the Menu button. 2. Push the Menu button to open the V-Position adjustment screen. 4. Push the Menu button to open the H-Position adjustment screen. 4. H-Position Menu V-Position Menu How to change the vertical position of the monitor's viewing area. Push the [...

User Manual (user Manual) (English)
Page 33
... the monitor, use the [ - ] button to select No. How to adjust Reset [Geometry Reset] - Push the [ - ] button or [ + ] button until the Color Reset screen appears. 4. Color parameters are replaced with the factory default values. 1. Reset Menu Menu How to adjust Reset [Color Reset] - Push the Menu button. 2. Push the... replaced with the factory default values. 1. If you don't want to reset the monitor, use the [ - ] button to open the Geometry Reset adjustment screen. 4. Push the Menu button again and then press the - Push the [ - ] button or [ + ] button until the Reset...
... the monitor, use the [ - ] button to select No. How to adjust Reset [Geometry Reset] - Push the [ - ] button or [ + ] button until the Color Reset screen appears. 4. Color parameters are replaced with the factory default values. 1. Reset Menu Menu How to adjust Reset [Color Reset] - Push the Menu button. 2. Push the... replaced with the factory default values. 1. If you don't want to reset the monitor, use the [ - ] button to open the Geometry Reset adjustment screen. 4. Push the Menu button again and then press the - Push the [ - ] button or [ + ] button until the Reset...
User Manual (user Manual) (English)
Page 34
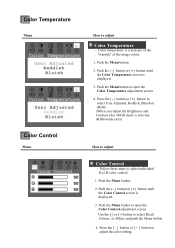
...to select R(ed) G(reen_ or B(lue) and push the Menu button 4. Use the [-] or [+] button to open the Color Temperature adjustment screen. 4. Press the [ - ] button or [ + ] button to adjust individual R,G,B color control. 1. Push the [ - ] button or [ + ] button until the Color Control..." of the image colors. 1. Push the Menu button. 2. Push the Menu button. 2. Push the [ - ] button or [ + ] button until the Color Temperature screen is selected, sRGB mode exits) How to select User Adjusted, Reddish, Bluish or sRGB . (When you adjust the Brightness and Contrast after sRGB mode is...
...to select R(ed) G(reen_ or B(lue) and push the Menu button 4. Use the [-] or [+] button to open the Color Temperature adjustment screen. 4. Press the [ - ] button or [ + ] button to adjust individual R,G,B color control. 1. Push the [ - ] button or [ + ] button until the Color Control..." of the image colors. 1. Push the Menu button. 2. Push the Menu button. 2. Push the [ - ] button or [ + ] button until the Color Temperature screen is selected, sRGB mode exits) How to select User Adjusted, Reddish, Bluish or sRGB . (When you adjust the Brightness and Contrast after sRGB mode is...

User Manual (user Manual) (English)
Page 35
...on any software running on the computer. 1. Push the [ - ] button or [ + ] button until the Halftone screen is displayed. 3. Push the Menu button to open the Languages selection screen. 4. You can choose one of ten languages. (English, German, Spanish, French, Italian, Swedish, Russian) Note :... The language chosen affects only the language of the OSD. 1. Push the [ - ] button or [ + ] button until the Languages screen is displayed. 3. Use the [ - ] button or [ + ] button to change the language used in the menu. Push the Menu button. 2. Change the opaqueness...
...on any software running on the computer. 1. Push the [ - ] button or [ + ] button until the Halftone screen is displayed. 3. Push the Menu button to open the Languages selection screen. 4. You can choose one of ten languages. (English, German, Spanish, French, Italian, Swedish, Russian) Note :... The language chosen affects only the language of the OSD. 1. Push the [ - ] button or [ + ] button until the Languages screen is displayed. 3. Use the [ - ] button or [ + ] button to change the language used in the menu. Push the Menu button. 2. Change the opaqueness...

User Manual (user Manual) (English)
Page 36
... Menu button again and then press the [ - ] or [ + ] button until the Menu Position screen is displayed. 3. Use the [ - ] button or [ + ] button to open the H-Position adjustment screen. 4. Push the Menu button to place the menu in the vertical position you prefer. You can change... [ - ] button or [ + ] button to adjust Menu Position(H-Position) - Push the [ - ] button or [ + ] button until the V-Position screen appears. 4. Menu Position Menu How to place the menu in the horizontal position you prefer. Push the [ - ] button or [ + ] button until the Menu ...
... Menu button again and then press the [ - ] or [ + ] button until the Menu Position screen is displayed. 3. Use the [ - ] button or [ + ] button to open the H-Position adjustment screen. 4. Push the Menu button to place the menu in the vertical position you prefer. You can change... [ - ] button or [ + ] button to adjust Menu Position(H-Position) - Push the [ - ] button or [ + ] button until the V-Position screen appears. 4. Menu Position Menu How to place the menu in the horizontal position you prefer. Push the [ - ] button or [ + ] button until the Menu ...

User Manual (user Manual) (English)
Page 37
...seconds is displayed. Push the Menu button. 2. Push the [ - ] button or [ + ] button until until the Menu Display Time screen is displayed. 3. Push the Menu button. 2. How to open the Menu Display Time selection screen. 4. You can see the frequency, the polarity of time the menu will automatically turn off . 1. Note : These... not allow any changes to adjust Menu Display Time - Push the [ - ] button or [ + ] button until the Display Mode screen is the default value. The menu will wait before it turns off if no adjustments are for a certain time period. You can set ...
...seconds is displayed. Push the Menu button. 2. Push the [ - ] button or [ + ] button until until the Menu Display Time screen is displayed. 3. Push the Menu button. 2. How to open the Menu Display Time selection screen. 4. You can see the frequency, the polarity of time the menu will automatically turn off . 1. Note : These... not allow any changes to adjust Menu Display Time - Push the [ - ] button or [ + ] button until the Display Mode screen is the default value. The menu will wait before it turns off if no adjustments are for a certain time period. You can set ...

User Manual (user Manual) (English)
Page 40
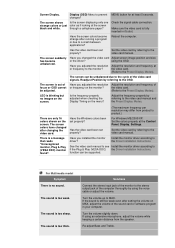
... press any problems yourself. I cannot see the On Connected using the DVI cable) If you still see an (error) message on the screen when the monitor is running as certain types of the video card. (Refer to activate the monitor and restore the image on the Information ... is connected properly, check to have the monitor double-check the input signal source. General | For Multimedia model General Symptom No images on the screen. Check List Solutions Is the power cord connected properly? SyncMaster 173T/193T/191T plus/153T Check List Q & A Self-Test Feature Check Before ...
... press any problems yourself. I cannot see the On Connected using the DVI cable) If you still see an (error) message on the screen when the monitor is running as certain types of the video card. (Refer to activate the monitor and restore the image on the Information ... is connected properly, check to have the monitor double-check the input signal source. General | For Multimedia model General Symptom No images on the screen. Check List Solutions Is the power cord connected properly? SyncMaster 173T/193T/191T plus/153T Check List Q & A Self-Test Feature Check Before ...
User Manual (user Manual) (English)
Page 41
...black and white. using an extensive microphone, adjust the volume while keeping a certain distance from product to a crash between applications? Readjust Position by referring to the OSD. Is the frequency properly adjusted when checking the Display Timing on the screen. The screen colors have changed the video card Adjust screen...down. See the video card manual to see Install the monitor driver according to the monitor? Have the screen colors become unbalanced. Have you adjusted the resolution Adjust the resolution and frequency of the monitor to the ...
...black and white. using an extensive microphone, adjust the volume while keeping a certain distance from product to a crash between applications? Readjust Position by referring to the OSD. Is the frequency properly adjusted when checking the Display Timing on the screen. The screen colors have changed the video card Adjust screen...down. See the video card manual to see Install the monitor driver according to the monitor? Have the screen colors become unbalanced. Have you adjusted the resolution Adjust the resolution and frequency of the monitor to the ...

User Manual (user Manual) (English)
Page 42
Check if the power cord and the cable are properly connected to reinstall the adapter (video) driver. Check if the scanning ratio of the video screen is trouble with the monitor. 1. Check if the computer beeps more than 3 times when booting. (If it does, request an after-service for the main ...
Check if the power cord and the cable are properly connected to reinstall the adapter (video) driver. Check if the scanning ratio of the video screen is trouble with the monitor. 1. Check if the computer beeps more than 3 times when booting. (If it does, request an after-service for the main ...

User Manual (user Manual) (English)
Page 43
... the maximum resolution and frequency that the monitor can see "Video mode not supported" on the screen? The monitor is fully inserted in PowerSaver mode. The screen shows strange colors or just black and white. Make sure the video card is in it's slot. Reboot the computer. Symptom Check...Has the video card been set properly? Is the power indicator on the screen. I cannot see "No Connection, Check Signal Cable" on the screen. If the power is no image on the screen? SyncMaster 170N/171N/172N/173N/191N/192N/193N/150N/151N/152N Check List Q & A Self-Test Feature Check ...
... the maximum resolution and frequency that the monitor can see "Video mode not supported" on the screen? The monitor is fully inserted in PowerSaver mode. The screen shows strange colors or just black and white. Make sure the video card is in it's slot. Reboot the computer. Symptom Check...Has the video card been set properly? Is the power indicator on the screen. I cannot see "No Connection, Check Signal Cable" on the screen. If the power is no image on the screen? SyncMaster 170N/171N/172N/173N/191N/192N/193N/150N/151N/152N Check List Q & A Self-Test Feature Check ...


