User Manual (user Manual) (Spanish)
Page 63
...15P type (tandem blades) plug cap. z Increase the separation between the equipment and receiver. If this monitor is a detachable power supply cord with the limits for product compliance: SAMSUNG ELECTRONICS CO., LTD America QA Lab of the computer convenience outlet is encouraged to try to correct the ... making the connection, make sure the voltage rating of Samsung 3351 Michelson Drive, Suite #290, Irvine, CA92612 USA Tel) 949-975-7310 Fax) 949-922-8301 Warning User must use only UL Listed detachable power cord with the instructions, may be determined by turning the equipment...
...15P type (tandem blades) plug cap. z Increase the separation between the equipment and receiver. If this monitor is a detachable power supply cord with the limits for product compliance: SAMSUNG ELECTRONICS CO., LTD America QA Lab of the computer convenience outlet is encouraged to try to correct the ... making the connection, make sure the voltage rating of Samsung 3351 Michelson Drive, Suite #290, Irvine, CA92612 USA Tel) 949-975-7310 Fax) 949-922-8301 Warning User must use only UL Listed detachable power cord with the instructions, may be determined by turning the equipment...

User Manual (user Manual) (English)
Page 7
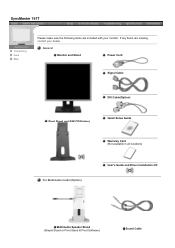
User's Guide and Driver Installation CD If any items are included with your dealer. SyncMaster 181T Unpacking Front Rear Monitor and Stand Power Cord Signal Cable DVI Cable Pivot Stand and S/W CD(Option) Quick Setup Guide Warranty Card (Not available in all locations) Please make sure the following items are missing, contact your monitor.
User's Guide and Driver Installation CD If any items are included with your dealer. SyncMaster 181T Unpacking Front Rear Monitor and Stand Power Cord Signal Cable DVI Cable Pivot Stand and S/W CD(Option) Quick Setup Guide Warranty Card (Not available in all locations) Please make sure the following items are missing, contact your monitor.
User Manual (user Manual) (English)
Page 8
SyncMaster 191T Unpacking Front Rear Please make sure the following items are missing, contact your monitor. If any items are included with your dealer. General Monitor and Stand Power Cord Signal Cable DVI Cable(Option) Pivot Stand and S/W CD(Option) Quick Setup Guide Warranty Card (Not available in all locations) For Multimedia model (Option) User's Guide and Driver Installation CD Multimedia Speaker Stand (Simple Stand or Pivot Stand & Pivot Software) Sound Cable
SyncMaster 191T Unpacking Front Rear Please make sure the following items are missing, contact your monitor. If any items are included with your dealer. General Monitor and Stand Power Cord Signal Cable DVI Cable(Option) Pivot Stand and S/W CD(Option) Quick Setup Guide Warranty Card (Not available in all locations) For Multimedia model (Option) User's Guide and Driver Installation CD Multimedia Speaker Stand (Simple Stand or Pivot Stand & Pivot Software) Sound Cable
User Manual (user Manual) (English)
Page 9
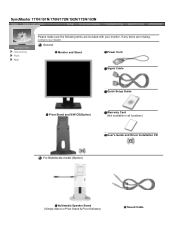
SyncMaster 171N/191N/170N/172N/192N/173N/193N Unpacking Front Rear Please make sure the following items are missing, contact your monitor. If any items are included with your dealer. General Monitor and Stand Power Cord Signal Cable Quick Setup Guide Pivot Stand and S/W CD(Option) Warranty Card (Not available in all locations) User's Guide and Driver Installation CD For Multimedia model (Option) Multimedia Speaker Stand (Simple Stand or Pivot Stand & Pivot Software) Sound Cable
SyncMaster 171N/191N/170N/172N/192N/173N/193N Unpacking Front Rear Please make sure the following items are missing, contact your monitor. If any items are included with your dealer. General Monitor and Stand Power Cord Signal Cable Quick Setup Guide Pivot Stand and S/W CD(Option) Warranty Card (Not available in all locations) User's Guide and Driver Installation CD For Multimedia model (Option) Multimedia Speaker Stand (Simple Stand or Pivot Stand & Pivot Software) Sound Cable
User Manual (user Manual) (English)
Page 10
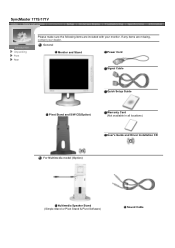
General Monitor and Stand Power Cord Signal Cable Quick Setup Guide Pivot Stand and S/W CD(Option) Warranty Card (Not available in all locations) User's Guide and Driver Installation CD For Multimedia model (Option) Multimedia Speaker Stand (Simple Stand or Pivot Stand & Pivot Software) Sound Cable If any items are included with your dealer. SyncMaster 171S/171V Unpacking Front Rear Please make sure the following items are missing, contact your monitor.
General Monitor and Stand Power Cord Signal Cable Quick Setup Guide Pivot Stand and S/W CD(Option) Warranty Card (Not available in all locations) User's Guide and Driver Installation CD For Multimedia model (Option) Multimedia Speaker Stand (Simple Stand or Pivot Stand & Pivot Software) Sound Cable If any items are included with your dealer. SyncMaster 171S/171V Unpacking Front Rear Please make sure the following items are missing, contact your monitor.
User Manual (user Manual) (English)
Page 14
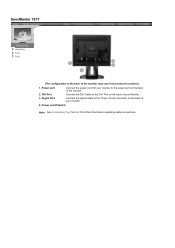
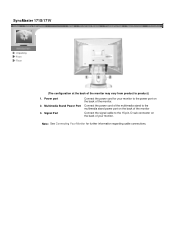
Power on the back of your monitor. 4. Connect the DVI Cable to the DVI Port on the back of your Monitor. SyncMaster 181T Unpacking Front Rear (The configuration at the back of the monitor. Connect the signal cable to product.) 1. Signal Port Connect the power cord for your monitor to the power port on the back of the monitor may vary from product to the 15-pin, D-sub connector on /off Switch Note: See Connecting Your Monitor for further information regarding cable connections. Power port 2. DVI Port 3.
Power on the back of your monitor. 4. Connect the DVI Cable to the DVI Port on the back of your Monitor. SyncMaster 181T Unpacking Front Rear (The configuration at the back of the monitor. Connect the signal cable to product.) 1. Signal Port Connect the power cord for your monitor to the power port on the back of the monitor may vary from product to the 15-pin, D-sub connector on /off Switch Note: See Connecting Your Monitor for further information regarding cable connections. Power port 2. DVI Port 3.
User Manual (user Manual) (English)
Page 15
... on the back of your Monitor. SyncMaster 191T Unpacking Front Rear (The configuration at the back of the monitor may vary from product to the DVI Port on the back of your monitor. Power port 2. Connect the power cord of the multimedia stand to the multimedia stand power port on the back of the monitor. Connect the signal cable to...
... on the back of your Monitor. SyncMaster 191T Unpacking Front Rear (The configuration at the back of the monitor may vary from product to the DVI Port on the back of your monitor. Power port 2. Connect the power cord of the multimedia stand to the multimedia stand power port on the back of the monitor. Connect the signal cable to...
User Manual (user Manual) (English)
Page 16
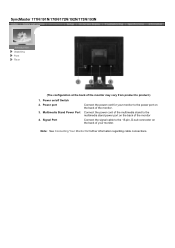
... 4. Note: See Connecting Your Monitor for your monitor. Signal Port Connect the power cord for further information regarding cable connections. Connect the power cord of the multimedia stand to product.) 1. Power on the back of the monitor may vary from product to the multimedia stand power port on the back of the monitor. Power port 3. SyncMaster 171N/191N/170N/172N/192N/173N...
... 4. Note: See Connecting Your Monitor for your monitor. Signal Port Connect the power cord for further information regarding cable connections. Connect the power cord of the multimedia stand to product.) 1. Power on the back of the monitor may vary from product to the multimedia stand power port on the back of the monitor. Power port 3. SyncMaster 171N/191N/170N/172N/192N/173N...
User Manual (user Manual) (English)
Page 17
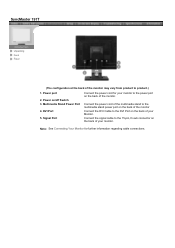
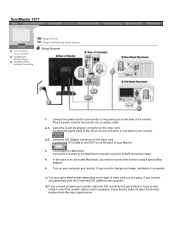
Connect the power cord of the multimedia stand to the multimedia stand power port on the back of the monitor Connect the signal cable to the 15-pin, D-sub connector on the back of your monitor to the power port on the back of the monitor may vary from product to product.) 1. Power port 2. SyncMaster 171S/171V Unpacking Front Rear (The configuration at the back of the monitor. Signal Port Connect the power cord for further information regarding cable connections. Multimedia Stand Power Port 3. Note: See Connecting Your Monitor for your monitor.
Connect the power cord of the multimedia stand to the multimedia stand power port on the back of the monitor Connect the signal cable to the 15-pin, D-sub connector on the back of your monitor to the power port on the back of the monitor may vary from product to product.) 1. Power port 2. SyncMaster 171S/171V Unpacking Front Rear (The configuration at the back of the monitor. Signal Port Connect the power cord for further information regarding cable connections. Multimedia Stand Power Port 3. Note: See Connecting Your Monitor for your monitor.
User Manual (user Manual) (English)
Page 18
SyncMaster 181T Connecting Your Monitor Installing the Monitor Driver Installing VESA compliant mounting 1. Turn on your monitor using the D-SUB connection cable. 4. Connect the power cord for the monitor into a nearby outlet. 2-1. Connected to have the monitor double-check the input signal source. Using the DVI (Digital) connector on the video card. If your monitor to the power... connector on the type of video card you connect properly your computer and monitor. Plug the power cord for your monitor displays an image, installation is set to one computer. You may get...
SyncMaster 181T Connecting Your Monitor Installing the Monitor Driver Installing VESA compliant mounting 1. Turn on your monitor using the D-SUB connection cable. 4. Connect the power cord for the monitor into a nearby outlet. 2-1. Connected to have the monitor double-check the input signal source. Using the DVI (Digital) connector on the video card. If your monitor to the power... connector on the type of video card you connect properly your computer and monitor. Plug the power cord for your monitor displays an image, installation is set to one computer. You may get...
User Manual (user Manual) (English)
Page 19
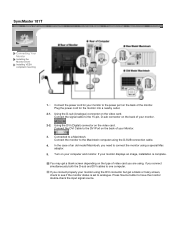
Connect the power cord for the monitor into a nearby outlet. 2-1. Using the DVI (Digital) connector on your Monitor. 3. Connect the DVI Cable to the power port on the back of your computer and monitor. Turn on the video card. SyncMaster 191T Connecting Your Monitor Installing the Monitor Driver Installing... blank or fuzzy screen, check to see if the monitor status is complete. Press Source button to a Macintosh. Using the D-sub (Analogue) connector on the back of the monitor. Plug the power cord for your monitor displays an image, installation is set to one computer...
Connect the power cord for the monitor into a nearby outlet. 2-1. Using the DVI (Digital) connector on your Monitor. 3. Connect the DVI Cable to the power port on the back of your computer and monitor. Turn on the video card. SyncMaster 191T Connecting Your Monitor Installing the Monitor Driver Installing... blank or fuzzy screen, check to see if the monitor status is complete. Press Source button to a Macintosh. Using the D-sub (Analogue) connector on the back of the monitor. Plug the power cord for your monitor displays an image, installation is set to one computer...
User Manual (user Manual) (English)
Page 20
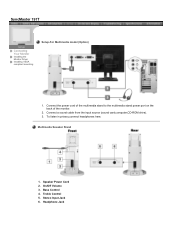
Connect the power cord of the multimedia stand to the multimedia stand power port on the back of the monitor. 2. Speaker Power Cord 2. Stereo Input Jack 6. Connect a sound cable from the input source (sound card,computer,CD-ROM drive). 3. Multimedia Speaker Stand 1. Bass Control 4. Treble Control 5. SyncMaster 191T Connecting Your Monitor Installing the Monitor Driver Installing VESA compliant mounting Setup-For Multimedia model (Option) 1. To listen in privacy,connect headphones here. On/Off Volume 3. Headphone Jack
Connect the power cord of the multimedia stand to the multimedia stand power port on the back of the monitor. 2. Speaker Power Cord 2. Stereo Input Jack 6. Connect a sound cable from the input source (sound card,computer,CD-ROM drive). 3. Multimedia Speaker Stand 1. Bass Control 4. Treble Control 5. SyncMaster 191T Connecting Your Monitor Installing the Monitor Driver Installing VESA compliant mounting Setup-For Multimedia model (Option) 1. To listen in privacy,connect headphones here. On/Off Volume 3. Headphone Jack
User Manual (user Manual) (English)
Page 21
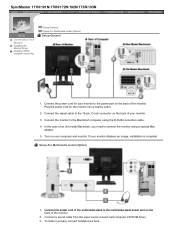
SyncMaster 171N/191N/170N/172N/192N/173N/193N Connecting Your Monitor Installing the Monitor Driver Installing VESA compliant mounting Setup-General Setup-For Multimedia model (Option) Setup-General 1. Connect the power cord of the multimedia stand to connect the monitor using the D-SUB connection cable. 4. To listen in privacy,connect headphones here. In the case of the...
SyncMaster 171N/191N/170N/172N/192N/173N/193N Connecting Your Monitor Installing the Monitor Driver Installing VESA compliant mounting Setup-General Setup-For Multimedia model (Option) Setup-General 1. Connect the power cord of the multimedia stand to connect the monitor using the D-SUB connection cable. 4. To listen in privacy,connect headphones here. In the case of the...
User Manual (user Manual) (English)
Page 23
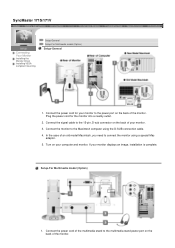
... an image, installation is complete. If your computer and monitor. Setup-For Multimedia model (Option) 1. Plug the power cord for your monitor. 3. SyncMaster 171S/171V Connecting Your Monitor Installing the Monitor Driver Installing VESA compliant mounting Setup-General Setup-For Multimedia model (Option) Setup-General 1. Connect the signal cable to the 15-pin, D-sub connector on ...
... an image, installation is complete. If your computer and monitor. Setup-For Multimedia model (Option) 1. Plug the power cord for your monitor. 3. SyncMaster 171S/171V Connecting Your Monitor Installing the Monitor Driver Installing VESA compliant mounting Setup-General Setup-For Multimedia model (Option) Setup-General 1. Connect the signal cable to the 15-pin, D-sub connector on ...
User Manual (user Manual) (English)
Page 24
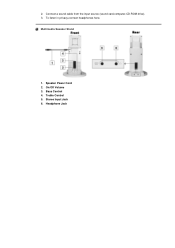
Speaker Power Cord 2. 2. Stereo Input Jack 6. Connect a sound cable from the input source (sound card,computer,CD-ROM drive). 3. Treble Control 5. To listen in privacy,connect headphones here. Bass Control 4. Headphone Jack Multimedia Speaker Stand 1. On/Off Volume 3.
Speaker Power Cord 2. 2. Stereo Input Jack 6. Connect a sound cable from the input source (sound card,computer,CD-ROM drive). 3. Treble Control 5. To listen in privacy,connect headphones here. Bass Control 4. Headphone Jack Multimedia Speaker Stand 1. On/Off Volume 3.
User Manual (user Manual) (English)
Page 31
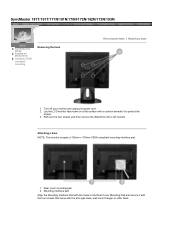
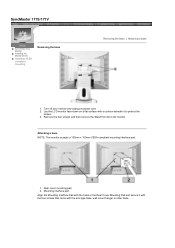
... monitor and unplug its power cord. 2. Remove the four screws and then remove the Stand from the LCD monitor. Attaching a base NOTE: This monitor accepts a 100mm x 100mm VESA-compliant mounting interface pad. 1. Rear cover mounting pad 2. Mounting interface pad Align the Mounting Interface Pad with the arm-type base, wall mount hanger or other base. SyncMaster 181T/191T...
... monitor and unplug its power cord. 2. Remove the four screws and then remove the Stand from the LCD monitor. Attaching a base NOTE: This monitor accepts a 100mm x 100mm VESA-compliant mounting interface pad. 1. Rear cover mounting pad 2. Mounting interface pad Align the Mounting Interface Pad with the arm-type base, wall mount hanger or other base. SyncMaster 181T/191T...
User Manual (user Manual) (English)
Page 32
.... Lay the LCD monitor face-down on a flat surface with a cushion beneath it with the four screws that came with the holes in the Rear Cover Mounting Pad and secure it to protect the screen. 3. Remove the four screws and then remove the Stand from the LCD monitor. Turn off your monitor and unplug its power cord. 2.
.... Lay the LCD monitor face-down on a flat surface with a cushion beneath it with the four screws that came with the holes in the Rear Cover Mounting Pad and secure it to protect the screen. 3. Remove the four screws and then remove the Stand from the LCD monitor. Turn off your monitor and unplug its power cord. 2.
User Manual (user Manual) (English)
Page 36
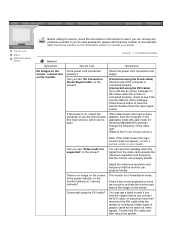
... at 1 second intervals? Check List Solutions Is the power cord connected properly? If the power is in this message when the signal from the video card exceeds the maximum resolution and frequency that the monitor can properly handle. Note: If the initial screen (the login screen) does not ...DVI cable) If you still see an (error) message on the screen when the monitor is connected properly, check to see the initial screen (the login screen), which can properly handle. Check the power cord connection and supply. You can remedy any problems yourself. Check List Q & A Self...
... at 1 second intervals? Check List Solutions Is the power cord connected properly? If the power is in this message when the signal from the video card exceeds the maximum resolution and frequency that the monitor can properly handle. Note: If the initial screen (the login screen) does not ...DVI cable) If you still see an (error) message on the screen when the monitor is connected properly, check to see the initial screen (the login screen), which can properly handle. Check the power cord connection and supply. You can remedy any problems yourself. Check List Q & A Self...

User Manual (user Manual) (English)
Page 38
... Place a magazine or a pad under the stand of your computer. If you assembled the PC, check if the installed the adapter (video) driver and the monitor driver. 4. If using the voice cable or adjust the volume. Check the following items if there is too sharp. Check if the computer beeps more... distance from the speaker. If the sound is distorted Solutions Connect the stereo input jack of the monitor to the stereo output jack of the computer.) 3. Turn the volume slightly down . Check if the power cord and the cable are properly connected to MAX. If you installed a new video card or if...
... Place a magazine or a pad under the stand of your computer. If you assembled the PC, check if the installed the adapter (video) driver and the monitor driver. 4. If using the voice cable or adjust the volume. Check the following items if there is too sharp. Check if the computer beeps more... distance from the speaker. If the sound is distorted Solutions Connect the stereo input jack of the monitor to the stereo output jack of the computer.) 3. Turn the volume slightly down . Check if the power cord and the cable are properly connected to MAX. If you installed a new video card or if...
User Manual (user Manual) (English)
Page 39
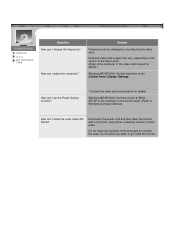
.../LCD Panel? Windows ME/XP/2000: Set the function at the Control Panel, Display, Settings. How can I adjust the resolution? Note that video card support can vary, depending on the version of the detergent nor scratch the case. Disconnect the power cord and then clean the monitor ...with a soft cloth, using either a cleaning solution or plain water. How can I change the frequency? Check List Q & A Self-Test Feature Check Question How can I set the Power Saving function? * Contact the video card...
.../LCD Panel? Windows ME/XP/2000: Set the function at the Control Panel, Display, Settings. How can I adjust the resolution? Note that video card support can vary, depending on the version of the detergent nor scratch the case. Disconnect the power cord and then clean the monitor ...with a soft cloth, using either a cleaning solution or plain water. How can I change the frequency? Check List Q & A Self-Test Feature Check Question How can I set the Power Saving function? * Contact the video card...

