
User Manual (user Manual) (ver.1.0) (English)
Page 3
... Video Driver 6 Self-Test Feature Check (STFC 6 Getting Help 7 Warm-up Time 7 Adjusting Your LCD Monitor 8 User Controls 8 Automatic Save 9 Direct-Access Features 10 OSD Lock/Unlock 10 ON-Screen Display (OSD 11 Accessing the Menu System 11 OSD Functions and Adjustments 12 Appendix 19 By Remote-Control 19 PowerSaver 21...
... Video Driver 6 Self-Test Feature Check (STFC 6 Getting Help 7 Warm-up Time 7 Adjusting Your LCD Monitor 8 User Controls 8 Automatic Save 9 Direct-Access Features 10 OSD Lock/Unlock 10 ON-Screen Display (OSD 11 Accessing the Menu System 11 OSD Functions and Adjustments 12 Appendix 19 By Remote-Control 19 PowerSaver 21...
User Manual (user Manual) (ver.1.0) (English)
Page 6
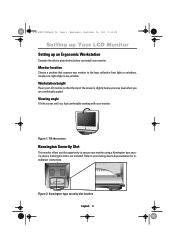
... English 4 Figure 1. Refer to any window. Tilt the screen Kensington Security Slot This monitor offers you are comfortably seated. Figure 2. Kensington lock is slightly below before you install your locking device documentation for installation instructions. Monitor location Choose a position that the top of the screen is not included. Workstation height Place your...
... English 4 Figure 1. Refer to any window. Tilt the screen Kensington Security Slot This monitor offers you are comfortably seated. Figure 2. Kensington lock is slightly below before you install your locking device documentation for installation instructions. Monitor location Choose a position that the top of the screen is not included. Workstation height Place your...
User Manual (user Manual) (ver.1.0) (English)
Page 12
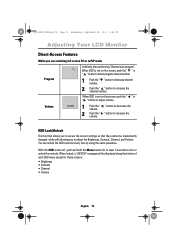
... settings so that they cannot be displayed along the bottom of each OSD menu except for at any time by using the same procedure. When locked, a 'LOCKED!' When OSD is not on the screen, push the " " or " " button to adjust volume. 50 1 Push the " " button to decrease the volume... to increase the volume. 4_E150MP170MPbody.fm Page 10 Wednesday, September 19, 2001 2:54 PM Adjusting Your LCD Monitor Direct-Access Features While you to lock or unlock the controls. With the OSD screen off, push and hold the Menu button for these screens : • Brightness • Contrast ...
... settings so that they cannot be displayed along the bottom of each OSD menu except for at any time by using the same procedure. When locked, a 'LOCKED!' When OSD is not on the screen, push the " " or " " button to adjust volume. 50 1 Push the " " button to decrease the volume... to increase the volume. 4_E150MP170MPbody.fm Page 10 Wednesday, September 19, 2001 2:54 PM Adjusting Your LCD Monitor Direct-Access Features While you to lock or unlock the controls. With the OSD screen off, push and hold the Menu button for these screens : • Brightness • Contrast ...

User Manual (user Manual) (ver.1.0) (English)
Page 14
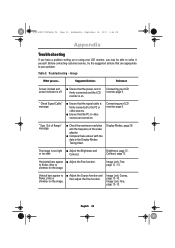
...with jitters and shimmers. English 12 Brightness PC V1 V2 TV Source PIP Exit Menu SyncMaster 150MP CH VOL PC V1 V2 TV Source PIP Exit Menu SyncMaster 150MP CH VOL Image Lock PC V1 V2 TV Source PIP Exit Menu SyncMaster 150MP CH VOL PC V1 V2 TV Source PIP Exit Menu SyncMaster... 150MP CH VOL Image Lock is used to the incoming video signal. The values of fine, coarse ...
...with jitters and shimmers. English 12 Brightness PC V1 V2 TV Source PIP Exit Menu SyncMaster 150MP CH VOL PC V1 V2 TV Source PIP Exit Menu SyncMaster 150MP CH VOL Image Lock PC V1 V2 TV Source PIP Exit Menu SyncMaster 150MP CH VOL PC V1 V2 TV Source PIP Exit Menu SyncMaster... 150MP CH VOL Image Lock is used to the incoming video signal. The values of fine, coarse ...

User Manual (user Manual) (ver.1.0) (English)
Page 15
...September 19, 2001 2:54 PM Adjusting Your LCD Monitor Table 1. Use the H-Position menu to remove any noise. When Coarse value is wrong. Image lock and position parameters are not obtained using the Fine adjustment, use the Coarse adjustment and then use Fine again. Screen controls (Continued) Icon Menus and... When Fine value is wrong. V-Position PC V1 V2 TV Source PIP Exit Menu SyncMaster 150MP CH VOL PC V1 V2 TV Source PIP Exit Menu SyncMaster 150MP CH VOL PC V1 V2 TV Source PIP Exit Menu SyncMaster 150MP CH VOL PC V1 V2 TV Source PIP Exit Menu SyncMaster...
...September 19, 2001 2:54 PM Adjusting Your LCD Monitor Table 1. Use the H-Position menu to remove any noise. When Coarse value is wrong. Image lock and position parameters are not obtained using the Fine adjustment, use the Coarse adjustment and then use Fine again. Screen controls (Continued) Icon Menus and... When Fine value is wrong. V-Position PC V1 V2 TV Source PIP Exit Menu SyncMaster 150MP CH VOL PC V1 V2 TV Source PIP Exit Menu SyncMaster 150MP CH VOL PC V1 V2 TV Source PIP Exit Menu SyncMaster 150MP CH VOL PC V1 V2 TV Source PIP Exit Menu SyncMaster...
User Manual (user Manual) (ver.1.0) (English)
Page 24
... 19, 2001 2:54 PM Appendix Troubleshooting If you have a problem setting up or using your problem. The image is on . Image Lock, Fine, page 12~13. Before contacting customer service, try the suggested actions that the power cord is firmly connected and the LCD...I Ensure that are turned on . I Ensure that the PC or video sources are appropriate to solve it yourself. Out of the video adaptor. Image Lock, Coarse, page 12~13. Table 3. Troubleshooting - " Check Signal Cable" message I Ensure that the signal cable is firmly connected to fl...
... 19, 2001 2:54 PM Appendix Troubleshooting If you have a problem setting up or using your problem. The image is on . Image Lock, Fine, page 12~13. Before contacting customer service, try the suggested actions that the power cord is firmly connected and the LCD...I Ensure that are turned on . I Ensure that the PC or video sources are appropriate to solve it yourself. Out of the video adaptor. Image Lock, Coarse, page 12~13. Table 3. Troubleshooting - " Check Signal Cable" message I Ensure that the signal cable is firmly connected to fl...
User Manual (user Manual) (ver.1.0) (English)
Page 35
... 13 Color 14 Contrast 12 D DC adapter 3 Display Modes 28 Duration 18 E Exit 8 F Fine 13 Function icons 11 H Halftone 18 H-position 13 I Image lock 12 Image effect 18 Image size 17 Information 13 Installation CD 3 K Kensington security slot 4 L Language 18 M Manual Tune 15 Menu 8 MTS/S-Mode 20 O ON...-Screen Display 11 Index OSD Lock/Unlock 10 OSD Control 18 P PAL-NTSC connector 3 PAL Broadcasting System 29 Pan 17 Pin Assignments 27 PIP 8, 14 Plug and Play 6 Power 8 Power ...
... 13 Color 14 Contrast 12 D DC adapter 3 Display Modes 28 Duration 18 E Exit 8 F Fine 13 Function icons 11 H Halftone 18 H-position 13 I Image lock 12 Image effect 18 Image size 17 Information 13 Installation CD 3 K Kensington security slot 4 L Language 18 M Manual Tune 15 Menu 8 MTS/S-Mode 20 O ON...-Screen Display 11 Index OSD Lock/Unlock 10 OSD Control 18 P PAL-NTSC connector 3 PAL Broadcasting System 29 Pan 17 Pin Assignments 27 PIP 8, 14 Plug and Play 6 Power 8 Power ...


