
Open Source Guide (user Manual) (ver.1.0) (English)
Page 1
... licensed as part of a whole which are not required to accept this License, since you changed the files and the date of any change the software or use of the Program is to say, a work under the scope of the corresponding source code, to the Free Software Foundation; We protect your freedom to copy, distribute and/or modify the software. This License...
... licensed as part of a whole which are not required to accept this License, since you changed the files and the date of any change the software or use of the Program is to say, a work under the scope of the corresponding source code, to the Free Software Foundation; We protect your freedom to copy, distribute and/or modify the software. This License...
Open Source Guide (user Manual) (ver.1.0) (English)
Page 2
... file to most effectively convey the exclusion of each file should have at least the "copyright" line and a pointer to the public, we recommend making it free software that everyone can do so by permitting redistribution under the terms of the greatest possible use to where the full notice is safest to attach them to the start...
... file to most effectively convey the exclusion of each file should have at least the "copyright" line and a pointer to the public, we recommend making it free software that everyone can do so by permitting redistribution under the terms of the greatest possible use to where the full notice is safest to attach them to the start...
Safety Guide User Manual Ver.1.0 (English, Croatian, Czech, Danish, Dutch, Estonian, Finnish, French, German, Greek)
Page 1
.../TV technician for help. For 120-volt applications, use only UL listed detachable power cords with NEMA configuration 6-15P type (tandem blades) plug caps. This television receiver provides display of television closed captioning in diameter models only) RF Radiation Exposure Statement This equipment complies with FCC RF Radiation Exposure limits set forth for a Class B digital device, pursuant to provide...
.../TV technician for help. For 120-volt applications, use only UL listed detachable power cords with NEMA configuration 6-15P type (tandem blades) plug caps. This television receiver provides display of television closed captioning in diameter models only) RF Radiation Exposure Statement This equipment complies with FCC RF Radiation Exposure limits set forth for a Class B digital device, pursuant to provide...

Safety Guide User Manual Ver.1.0 (English, Croatian, Czech, Danish, Dutch, Estonian, Finnish, French, German, Greek)
Page 2
... coloured BLUE must be connected to the terminal marked with the following Product : Digital Photo Player Model(s) : PS08PS, 800P, PS10PS, 1000P Manufactured at the below Manufacturer's address. Do NOT connect the plug to reach a power point, you should obtain a suitable safety-approved extension lead or consult your house or the cable is required, it requires replacing, a fuse approved to cut...
... coloured BLUE must be connected to the terminal marked with the following Product : Digital Photo Player Model(s) : PS08PS, 800P, PS10PS, 1000P Manufactured at the below Manufacturer's address. Do NOT connect the plug to reach a power point, you should obtain a suitable safety-approved extension lead or consult your house or the cable is required, it requires replacing, a fuse approved to cut...
User Manual Ver.1.0 (English)
Page 1
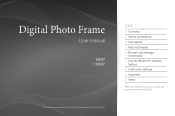
Digital Photo Frame User manual 800P 1000P The images and screen shots used in this manual thoroughly for proper use and maintenance instructions. Click Contents Safety precautions Get started Play multimedia Browse and manage multimedia Use the Bluetooth wireless feature Customize settings Appendix Index Read this manual are from the 800P.
Digital Photo Frame User manual 800P 1000P The images and screen shots used in this manual thoroughly for proper use and maintenance instructions. Click Contents Safety precautions Get started Play multimedia Browse and manage multimedia Use the Bluetooth wireless feature Customize settings Appendix Index Read this manual are from the 800P.
User Manual Ver.1.0 (English)
Page 2
... Use as a PC mini-monitor 42 Update Firmware 43 Troubleshooting 44 Specifications 46 Correct disposal of the frame 47 Contact information of product functions. situations that could cause damage to your frame 10 Connect the adapter and turn the power on 10 Customize basic settings 11 Get to know the Main menu 12 View the time and date 13 Connect external memory devices ..........14 Select a memory location 15 Connect to a PC 16 Transfer files from SAMSUNG ELECTRONICS...
... Use as a PC mini-monitor 42 Update Firmware 43 Troubleshooting 44 Specifications 46 Correct disposal of the frame 47 Contact information of product functions. situations that could cause damage to your frame 10 Connect the adapter and turn the power on 10 Customize basic settings 11 Get to know the Main menu 12 View the time and date 13 Connect external memory devices ..........14 Select a memory location 15 Connect to a PC 16 Transfer files from SAMSUNG ELECTRONICS...

User Manual Ver.1.0 (English)
Page 6
Get started What's in the box Digital frame Power cable* Adapter USB cable Quick Start Guide and Warranty** CD-ROM (User Manual) * The shape of the plug may differ depending on your region. ** Warranty may be unavailable depending on your region. Remote control Cloth 6
Get started What's in the box Digital frame Power cable* Adapter USB cable Quick Start Guide and Warranty** CD-ROM (User Manual) * The shape of the plug may differ depending on your region. ** Warranty may be unavailable depending on your region. Remote control Cloth 6

User Manual Ver.1.0 (English)
Page 11
... includes View Mode, Slideshow Transition, Clock Set, and Startup Mode settings Do you setup several settings to view the product guide. 5 Review the basic usage instructions for the first time, the Quick setup screen appears. Setting View Mode Slideshow Transition Clock Set Startup Mode Description Select a view mode for a slideshow (p. 20) Select a transition effect for a slideshow (p. 22) Set the current time and date (p. 13) Select a mode to activate when the frame turns on (p. 39) 4 When you complete the setup, select Yes to use your photo frame. Select...
... includes View Mode, Slideshow Transition, Clock Set, and Startup Mode settings Do you setup several settings to view the product guide. 5 Review the basic usage instructions for the first time, the Quick setup screen appears. Setting View Mode Slideshow Transition Clock Set Startup Mode Description Select a view mode for a slideshow (p. 20) Select a transition effect for a slideshow (p. 22) Set the current time and date (p. 13) Select a mode to activate when the frame turns on (p. 39) 4 When you complete the setup, select Yes to use your photo frame. Select...

User Manual Ver.1.0 (English)
Page 12
Frame Memory Photos Music Videos Bluetooth Clock Mini Monitor Settings Menu Photos Music Videos Bluetooth Clock Mini Monitor Settings Description Browse photos stored in the internal memory or on an external memory device and change options (p. 19) Listen to music stored in the internal memory or on an external memory device and change options (p. 26) View videos stored in the internal memory or on an external memory device and change options (p. 24) Use the Bluetooth wireless feature to connect to other wireless devices (p. 32) View the current time and date (p. 13) Use the frame as a ...
Frame Memory Photos Music Videos Bluetooth Clock Mini Monitor Settings Menu Photos Music Videos Bluetooth Clock Mini Monitor Settings Description Browse photos stored in the internal memory or on an external memory device and change options (p. 19) Listen to music stored in the internal memory or on an external memory device and change options (p. 26) View videos stored in the internal memory or on an external memory device and change options (p. 24) Use the Bluetooth wireless feature to connect to other wireless devices (p. 32) View the current time and date (p. 13) Use the frame as a ...
User Manual Ver.1.0 (English)
Page 17
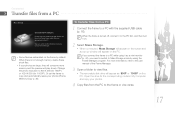
... set the frame to view files. • The removable disk drive will appear as a mini-monitor (p. 42), you need to switch to a PC with the supplied USB cable (p. 16). For more memory and the preview will appear on the PC. Change the photo resolution to the PC. Do not insert or remove storage devices to/ from the Photo Frame while they will consume more information, refer to the user manual of the Frame Manager. 3 Open a folder...
... set the frame to view files. • The removable disk drive will appear as a mini-monitor (p. 42), you need to switch to a PC with the supplied USB cable (p. 16). For more memory and the preview will appear on the PC. Change the photo resolution to the PC. Do not insert or remove storage devices to/ from the Photo Frame while they will consume more information, refer to the user manual of the Frame Manager. 3 Open a folder...
User Manual Ver.1.0 (English)
Page 26
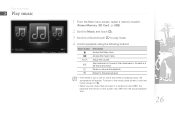
...), the playback time shown on the screen may differ from the actual playback time. 26 Play multimedia Play music Pause Volume Prev/Next 1 From the Main menu screen, select a memory location (Frame Memory, SD Card, or USB). 2 Scroll to Music and touch e. 3 Scroll to a file and touch e to play music files encoded in use for p. • When you play music. 4 Control playback using the following buttons: Touch button Description h Access the Main menu m Access the music menu d/u l/r e Adjust...
...), the playback time shown on the screen may differ from the actual playback time. 26 Play multimedia Play music Pause Volume Prev/Next 1 From the Main menu screen, select a memory location (Frame Memory, SD Card, or USB). 2 Scroll to Music and touch e. 3 Scroll to a file and touch e to play music files encoded in use for p. • When you play music. 4 Control playback using the following buttons: Touch button Description h Access the Main menu m Access the music menu d/u l/r e Adjust...

User Manual Ver.1.0 (English)
Page 30
... the Main menu screen, select a memory location (Frame Memory, SD Card, or USB). 2 Scroll to Photos, Videos, or Music and touch e. 3 Scroll to be copied. 30 Copy files Connect an external memory device (SD memory card or USB memory device) to the frame and copy files from the Main menu screen, select Settings → General → Frame Memory Copy → Original Size (p. 39). • The resized photos will be automatically resized to the file you can store more photos. SD Card USB • Photos copied to the frame will have...
... the Main menu screen, select a memory location (Frame Memory, SD Card, or USB). 2 Scroll to Photos, Videos, or Music and touch e. 3 Scroll to be copied. 30 Copy files Connect an external memory device (SD memory card or USB memory device) to the frame and copy files from the Main menu screen, select Settings → General → Frame Memory Copy → Original Size (p. 39). • The resized photos will be automatically resized to the file you can store more photos. SD Card USB • Photos copied to the frame will have...

User Manual Ver.1.0 (English)
Page 32
... feature turns on by default. • To turn off the Bluetooth wireless feature, from the Main menu screen, select Settings → Bluetooth → Bluetooth Mode → Off. 2 Select Search to find other Bluetooth-enabled devices. 3 Scroll to a device and touch e. • When the owner of the frame. • You cannot receive files when connected to instability of the other wireless devices for exchanging data. Use...
... feature turns on by default. • To turn off the Bluetooth wireless feature, from the Main menu screen, select Settings → Bluetooth → Bluetooth Mode → Off. 2 Select Search to find other Bluetooth-enabled devices. 3 Scroll to a device and touch e. • When the owner of the frame. • You cannot receive files when connected to instability of the other wireless devices for exchanging data. Use...
User Manual Ver.1.0 (English)
Page 39
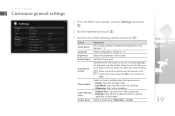
... screen Screen Saver Select a screensaver (Slideshow or Clock) 39 Customize settings Customize general settings Settings Category Photos Clock Alarm General Bluetooth Support Option Quick Setup Language Brightness Button Sound Auto Picture On/Off Startup Mode Frame Memory Copy Screen Saver : English : 70 : Off : Home : Original Size : Slideshow 1 From the Main menu screen, scroll to Settings and touch e. 2 Scroll to General and touch e. 3 Scroll to one of the screen Button Sound Set the button sound Auto Picture On/Off Set the time for the screen to turn...
... screen Screen Saver Select a screensaver (Slideshow or Clock) 39 Customize settings Customize general settings Settings Category Photos Clock Alarm General Bluetooth Support Option Quick Setup Language Brightness Button Sound Auto Picture On/Off Startup Mode Frame Memory Copy Screen Saver : English : 70 : Off : Home : Original Size : Slideshow 1 From the Main menu screen, scroll to Settings and touch e. 2 Scroll to General and touch e. 3 Scroll to one of the screen Button Sound Set the button sound Auto Picture On/Off Set the time for the screen to turn...
User Manual Ver.1.0 (English)
Page 41
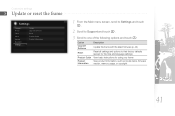
... firmware (p. 43) Reset all settings and options to one of the following options and touch e. Customize settings Update or reset the frame Settings Category Photos Clock Alarm General Bluetooth Settings Option Upgrade Software Reset Product Guide Product Information 1 From the Main menu screen, scroll to Settings and touch e. 2 Scroll to Support and touch e. 3 Scroll to their factory defaults (except for the time and language settings) View basic instructions for using your frame View product information, such as model name, firmware version, memory...
... firmware (p. 43) Reset all settings and options to one of the following options and touch e. Customize settings Update or reset the frame Settings Category Photos Clock Alarm General Bluetooth Settings Option Upgrade Software Reset Product Guide Product Information 1 From the Main menu screen, scroll to Settings and touch e. 2 Scroll to Support and touch e. 3 Scroll to their factory defaults (except for the time and language settings) View basic instructions for using your frame View product information, such as model name, firmware version, memory...

User Manual Ver.1.0 (English)
Page 43
... disconnect the external device (SD memory card or USB memory device) from the frame. --Do not touch any buttons. --Do not insert any other memory cards. --Do not turn the frame off , remove the external memory device (SD memory card or USB memory device), and turn the frame on. 43 Do not remove the storage device. Upgrade Software Getting upgrade files now. Appendix Update Firmware Download and install the latest firmware from the PC, and then connect it to the frame. 4 From the Main menu screen, scroll to Settings and touch...
... disconnect the external device (SD memory card or USB memory device) from the frame. --Do not touch any buttons. --Do not insert any other memory cards. --Do not turn the frame off , remove the external memory device (SD memory card or USB memory device), and turn the frame on. 43 Do not remove the storage device. Upgrade Software Getting upgrade files now. Appendix Update Firmware Download and install the latest firmware from the PC, and then connect it to the frame. 4 From the Main menu screen, scroll to Settings and touch...
User Manual Ver.1.0 (English)
Page 44
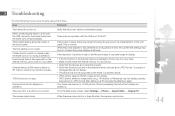
... damaged files will not display. • JPEG photos edited by the frame. JPEG photos do not function properly. Try another device. • JPEG photos saved in a slideshow. The proportion of the clock screen. Appendix Troubleshooting Try the following if you have trouble using the frame. Issue Resolution The frame will not display in JPEG format after editing on . The time setting is normal. This is not correct. When the power adapter is free...
... damaged files will not display. • JPEG photos edited by the frame. JPEG photos do not function properly. Try another device. • JPEG photos saved in a slideshow. The proportion of the clock screen. Appendix Troubleshooting Try the following if you have trouble using the frame. Issue Resolution The frame will not display in JPEG format after editing on . The time setting is normal. This is not correct. When the power adapter is free...
User Manual Ver.1.0 (English)
Page 45
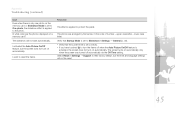
... the current time is activated, the screen does not turn on automatically. Verify that Startup Mode is set to Slideshow in the order of number - The slideshow will not be reset. 45 Appendix Troubleshooting (continued) Issue Even when there is only one photo on the memory card or Slideshow Mode is set to One photo, the slideshow effect is applied to protect the panel. The photos are the photos displayed on a memory card?
... the current time is activated, the screen does not turn on automatically. Verify that Startup Mode is set to Slideshow in the order of number - The slideshow will not be reset. 45 Appendix Troubleshooting (continued) Issue Even when there is only one photo on the memory card or Slideshow Mode is set to One photo, the slideshow effect is applied to protect the panel. The photos are the photos displayed on a memory card?
User Manual Ver.1.0 (English)
Page 46
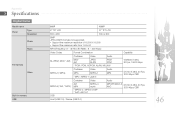
Appendix Specifications Digital frame Model name Panel Type Resolution Photo Music File formats Video Built-in memory USB 800P 1000P 8" TFT LCD 10" TFT LCD 800 x 480 1024 x 600 BMP JPEG (CMYK formats not supported) • Support the maximum resolution of 16,000 X 16,000 • Support the maximum ratio from 1:6 to 6:1 MP3 (Frequency: 8 ~ 48 Khz, Bit Rates : 8 ~ 320 Kbps) Video Codec Format Combination Capability Container Video Audio M-JPEG(*.MOV, *.AVI) MOV AVI...
Appendix Specifications Digital frame Model name Panel Type Resolution Photo Music File formats Video Built-in memory USB 800P 1000P 8" TFT LCD 10" TFT LCD 800 x 480 1024 x 600 BMP JPEG (CMYK formats not supported) • Support the maximum resolution of 16,000 X 16,000 • Support the maximum ratio from 1:6 to 6:1 MP3 (Frequency: 8 ~ 48 Khz, Bit Rates : 8 ~ 320 Kbps) Video Codec Format Combination Capability Container Video Audio M-JPEG(*.MOV, *.AVI) MOV AVI...
User Manual Ver.1.0 (English)
Page 51
Appendix Index (continued) S screensaver, 39 slideshow aspect ratio, 23 background music, 21 display photo info, 23 mode, 22 order, 23 play slideshow, 19 rotate, 21 settings, 21 speed, 22 transition, 22 view mode, 20, 23 zoom, 21 specifications, 46 startup mode, 39 supplementary monitor, 42 T touch buttons, 7 troubleshooting, 44 U USB connector, 16 V video mode, 25 order, 25 play video, 24 repeat, 25 settings, 25 view mode, 20 Z zoom, 21 51
Appendix Index (continued) S screensaver, 39 slideshow aspect ratio, 23 background music, 21 display photo info, 23 mode, 22 order, 23 play slideshow, 19 rotate, 21 settings, 21 speed, 22 transition, 22 view mode, 20, 23 zoom, 21 specifications, 46 startup mode, 39 supplementary monitor, 42 T touch buttons, 7 troubleshooting, 44 U USB connector, 16 V video mode, 25 order, 25 play video, 24 repeat, 25 settings, 25 view mode, 20 Z zoom, 21 51


