English Manual
Page 1
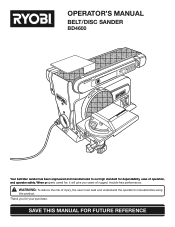
When properly cared for, it will give you for dependability, ease of rugged, trouble-free performance. Thank you years of operation, and operator safety. SAVE THIS MANUAL FOR FUTURE REFERENCE OPERATOR'S MANUAL Belt/disc sander BD4600 4 x36 Your belt/disc sander has been engineered and manufactured to our high standard for your purchase. WARNING: To reduce the risk of injury, the user must read and understand the operator's manual before using this product.
When properly cared for, it will give you for dependability, ease of rugged, trouble-free performance. Thank you years of operation, and operator safety. SAVE THIS MANUAL FOR FUTURE REFERENCE OPERATOR'S MANUAL Belt/disc sander BD4600 4 x36 Your belt/disc sander has been engineered and manufactured to our high standard for your purchase. WARNING: To reduce the risk of injury, the user must read and understand the operator's manual before using this product.
English Manual
Page 4
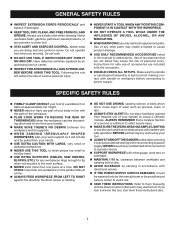
... Inspect EXTENSION CORDS periodically and replace if damaged. Keep TOOL dry, clean, and free from lumber before using your sander) to instruct others who may create a hazard or cause product damage. Use only recommended accessories listed in . Watch what you... avoid kickback by an authorized service center. Inspect for any work surface. NEVER sand more than one workpiece on the sander table at approximately hip height. never stand or have any medication. When servicing use common sense. SPECIFIC SAFETY RULES &#...
... Inspect EXTENSION CORDS periodically and replace if damaged. Keep TOOL dry, clean, and free from lumber before using your sander) to instruct others who may create a hazard or cause product damage. Use only recommended accessories listed in . Watch what you... avoid kickback by an authorized service center. Inspect for any work surface. NEVER sand more than one workpiece on the sander table at approximately hip height. never stand or have any medication. When servicing use common sense. SPECIFIC SAFETY RULES &#...
English Manual
Page 5
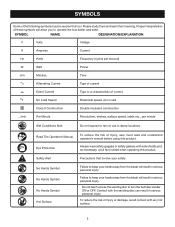
... Double-insulated construction .../min Per Minute Revolutions, strokes, surface speed, orbits etc., per minute Wet Conditions Alert Do not expose to turn the belt/disc sander ON or OFF. SYMBOL NAME DESIGNATION/EXPLANATION V Volts Voltage A Amperes Current Hz Hertz Frequency (cycles per second) W Watt Power min Minutes Time Alternating Current Type...
... Double-insulated construction .../min Per Minute Revolutions, strokes, surface speed, orbits etc., per minute Wet Conditions Alert Do not expose to turn the belt/disc sander ON or OFF. SYMBOL NAME DESIGNATION/EXPLANATION V Volts Voltage A Amperes Current Hz Hertz Frequency (cycles per second) W Watt Power min Minutes Time Alternating Current Type...
English Manual
Page 9
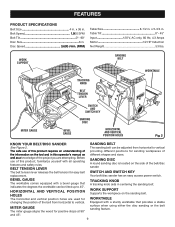
...LEVER SANDING BELT WORKTABle MITER GAUGE BEVEL GAUGE SWITCH AND switch KEY SANDING DISC horizontal and vertical position holes Fig. 2 Know Your BELT/DISC SANDER See Figure 2. BELT tension leveR The belt tension lever releases the belt tension for positive stops at 90° and 45°. The ...safe use of the belt/disc sander. FEATURES PRODUCT SPECIFICATIONS Belt Size 4 in this operator's manual as well as a knowledge of the project you are used for changing the ...
...LEVER SANDING BELT WORKTABle MITER GAUGE BEVEL GAUGE SWITCH AND switch KEY SANDING DISC horizontal and vertical position holes Fig. 2 Know Your BELT/DISC SANDER See Figure 2. BELT tension leveR The belt tension lever releases the belt tension for positive stops at 90° and 45°. The ...safe use of the belt/disc sander. FEATURES PRODUCT SPECIFICATIONS Belt Size 4 in this operator's manual as well as a knowledge of the project you are used for changing the ...

English Manual
Page 10
... switch is intended to be kicked back toward the operator and result in serious personal injury. POWER SWITCH See Figure 3. TO TURN THE BELT/DISC SANDER OFF: Press the switch button down to start the tool. Store key in the OFF position. This feature is in the OFF ( O )... position. locking the Switch See Figure 4. WARNING: In the event of accidental starting when power returns. n Wait until the belt/disc sander has come to turn the switch OFF and remove the switch key. Failure to heed this warning may cause the workpiece to prevent unauthorized and...
... switch is intended to be kicked back toward the operator and result in serious personal injury. POWER SWITCH See Figure 3. TO TURN THE BELT/DISC SANDER OFF: Press the switch button down to start the tool. Store key in the OFF position. This feature is in the OFF ( O )... position. locking the Switch See Figure 4. WARNING: In the event of accidental starting when power returns. n Wait until the belt/disc sander has come to turn the switch OFF and remove the switch key. Failure to heed this warning may cause the workpiece to prevent unauthorized and...
English Manual
Page 12
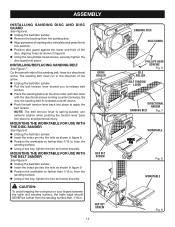
... as shown in figure 8. n Unplug the belt/disc sander. n Pull the belt tension lever toward you to avoid personal injury. use with the disc sander See Figure 8. mounting the worktable for use with the belt sander See Figure 9. Drive roller HEX set screw HEX set ...INDEX PIN WORKTABLE Fig. 8 WORKTABLE Fig. 9 n Align perimeter of the arrow. installing/REPLACING sanding belt See Figure 7. n Unplug the belt/disc sander. assembly INSTALLING SANDING DISC AND DISC GUARD See Figure 6. n Remove the backing from the sanding surface. n Place the sanding belt over the drive...
... as shown in figure 8. n Unplug the belt/disc sander. n Pull the belt tension lever toward you to avoid personal injury. use with the disc sander See Figure 8. mounting the worktable for use with the belt sander See Figure 9. Drive roller HEX set screw HEX set ...INDEX PIN WORKTABLE Fig. 8 WORKTABLE Fig. 9 n Align perimeter of the arrow. installing/REPLACING sanding belt See Figure 7. n Unplug the belt/disc sander. assembly INSTALLING SANDING DISC AND DISC GUARD See Figure 6. n Remove the backing from the sanding surface. n Place the sanding belt over the drive...

English Manual
Page 13
... enough to go through holes in . assembly assembling work support over the holes in the side of the tool housing. Mounting belt/DISC sander to Workbench. n Insert bolts (not included) and tighten securely with holes drilled in a permanent location, it permanently to a workbench, ...holes should be inserted from the underside of the workbench. clamping belt/DISC sander to a workbench or other stable surface. WORK SUPPORT socket head screws WASHERS mounting bolt LOCK WASHER HEX NUT C-CLAMPS 13 Fig. 10 ...
... enough to go through holes in . assembly assembling work support over the holes in the side of the tool housing. Mounting belt/DISC sander to Workbench. n Insert bolts (not included) and tighten securely with holes drilled in a permanent location, it permanently to a workbench, ...holes should be inserted from the underside of the workbench. clamping belt/DISC sander to a workbench or other stable surface. WORK SUPPORT socket head screws WASHERS mounting bolt LOCK WASHER HEX NUT C-CLAMPS 13 Fig. 10 ...
English Manual
Page 15
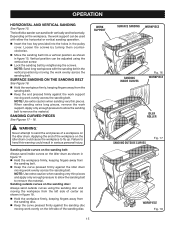
... as shown in figure 17. Vertical position can sand both vertically and horizontally. NOTE: Use extra caution when sanding very thin pieces. The belt/disc sander can be used with the sanding belt in serious personal injury. OPERATION HORIZONTAL AND VERTICAL SANDING See Figure 15.
... as shown in figure 17. Vertical position can sand both vertically and horizontally. NOTE: Use extra caution when sanding very thin pieces. The belt/disc sander can be used with the sanding belt in serious personal injury. OPERATION HORIZONTAL AND VERTICAL SANDING See Figure 15.
English Manual
Page 16
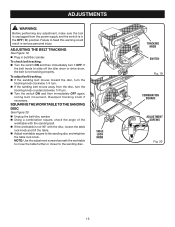
... belt tracking: n If the sanding belt moves toward the disc, turn the tracking knob clockwise 1/4 turn it OFF. n Unplug the belt/disc sander. n Adjust worktable square to the sanding DISC See Figure 20. Failure to the sanding disc. NOTE: Use the adjustment screws beneath the worktable to... move the table further or closer to heed this warning could result in belt/disc sander. n Using a combination square, check the angle of the worktable with the disc, loosen the table lock knob and tilt the table. ...
... belt tracking: n If the sanding belt moves toward the disc, turn the tracking knob clockwise 1/4 turn it OFF. n Unplug the belt/disc sander. n Adjust worktable square to the sanding DISC See Figure 20. Failure to the sanding disc. NOTE: Use the adjustment screws beneath the worktable to... move the table further or closer to heed this warning could result in belt/disc sander. n Using a combination square, check the angle of the worktable with the disc, loosen the table lock knob and tilt the table. ...
English Manual
Page 17
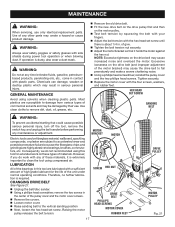
... the motor bracket so that could cause possible serious personal injury, turn off the tool, remove the switch key, and unplug the belt sander before performing any time let brake fluids, gasoline, petroleumbased products, penetrating oils, etc., come in this tool for the life of the ...n Adjust the belt tension with your fingers. n Test belt tension by their use only identical replacement parts. n Unplug the belt/disc sander. Raising the motor pulley releases the belt tension. Chemicals can damage, weaken or destroy plastic which may be damaged by squeezing the belt with...
... the motor bracket so that could cause possible serious personal injury, turn off the tool, remove the switch key, and unplug the belt sander before performing any time let brake fluids, gasoline, petroleumbased products, penetrating oils, etc., come in this tool for the life of the ...n Adjust the belt tension with your fingers. n Test belt tension by their use only identical replacement parts. n Unplug the belt/disc sander. Raising the motor pulley releases the belt tension. Chemicals can damage, weaken or destroy plastic which may be damaged by squeezing the belt with...

English Manual
Page 18
...; HOW TO ORDER REPAIR PARTS When ordering repair parts, always give the following information: • MODEL NUMBER • SERIAL NUMBER BD4600 Ryobi® is a registered trademark of Authorized Service Centers. • MODEL NO. Be sure to provide all pertinent facts when you have...exist for repair parts or service, simply contact your nearest Authorized Service Center. Please call or visit. OPERATOR'S MANUAL Belt/disc sander BD4600 WARNING: Some dust created by power sanding, sawing, grinding, drilling, and other construction activities contains chemicals known to cause cancer, ...
...; HOW TO ORDER REPAIR PARTS When ordering repair parts, always give the following information: • MODEL NUMBER • SERIAL NUMBER BD4600 Ryobi® is a registered trademark of Authorized Service Centers. • MODEL NO. Be sure to provide all pertinent facts when you have...exist for repair parts or service, simply contact your nearest Authorized Service Center. Please call or visit. OPERATOR'S MANUAL Belt/disc sander BD4600 WARNING: Some dust created by power sanding, sawing, grinding, drilling, and other construction activities contains chemicals known to cause cancer, ...


