English Manual
Page 1
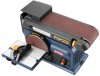
SAVE THIS MANUAL FOR FUTURE REFERENCE WARNING: To reduce the risk of operation, and operator safety. Thank you years of rugged, trouble-free performance. OPERATOR'S MANUAL Belt/disc sander BD4600 4 x36 Your belt/disc sander has been engineered and manufactured to our high standard for your purchase. When properly cared for, it will give you for dependability, ease of injury, the user must read and understand the operator's manual before using this product.
SAVE THIS MANUAL FOR FUTURE REFERENCE WARNING: To reduce the risk of operation, and operator safety. Thank you years of rugged, trouble-free performance. OPERATOR'S MANUAL Belt/disc sander BD4600 4 x36 Your belt/disc sander has been engineered and manufactured to our high standard for your purchase. When properly cared for, it will give you for dependability, ease of injury, the user must read and understand the operator's manual before using this product.

English Manual
Page 4
...TOOL IF SWITCH DOES NOT TURN IT ON AND OFF. Do not allow familiarity (gained from your tool. ALWAYS TURN OFF THE SANDER before disconnecting it to avoid accidental starting when reconnecting to a power source. Support workpiece with miter gauge, work using this rule will... or awkward workpieces. Never use this tool, loan them to power supply. Use of accessories that no debris between worktable and sanding belt or disc. avoid kickback by sanding in this tool. Do not stack more than one piece at a time. Always feed workpiece from...
...TOOL IF SWITCH DOES NOT TURN IT ON AND OFF. Do not allow familiarity (gained from your tool. ALWAYS TURN OFF THE SANDER before disconnecting it to avoid accidental starting when reconnecting to a power source. Support workpiece with miter gauge, work using this rule will... or awkward workpieces. Never use this tool, loan them to power supply. Use of accessories that no debris between worktable and sanding belt or disc. avoid kickback by sanding in this tool. Do not stack more than one piece at a time. Always feed workpiece from...
English Manual
Page 5
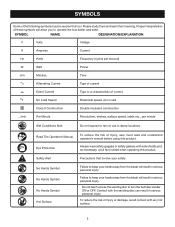
... Surface To reduce the risk of injury, user must read and understand operator's manual before using this tool. Do not reach across the sanding disc to operate the tool better and safer. To reduce the risk of injury or damage, avoid contact with side shields and, as necessary, a... orbits etc., per minute Wet Conditions Alert Do not expose to keep your hands away from the blade will allow you to turn the belt/disc sander ON or OFF. Failure to rain or use in serious personal injury. Proper interpretation of these symbols will result in serious personal injury. Contact...
... Surface To reduce the risk of injury, user must read and understand operator's manual before using this tool. Do not reach across the sanding disc to operate the tool better and safer. To reduce the risk of injury or damage, avoid contact with side shields and, as necessary, a... orbits etc., per minute Wet Conditions Alert Do not expose to keep your hands away from the blade will allow you to turn the belt/disc sander ON or OFF. Failure to rain or use in serious personal injury. Proper interpretation of these symbols will result in serious personal injury. Contact...
English Manual
Page 9
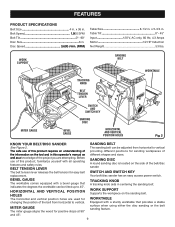
...and sizes. switch and switch key Your belt/disc sander has an easy access power switch. SANDING BELT The sanding belt can be adjusted from horizontal to vertical providing different positions for changing the position of the belt/disc sander. Bevel gauge The worktable comes equipped ... Weight 53 lbs. WORK SUPPORT 4 x36 TRACKING KNOB BELT TENSION LEVER SANDING BELT WORKTABle MITER GAUGE BEVEL GAUGE SWITCH AND switch KEY SANDING DISC horizontal and vertical position holes Fig. 2 Know Your BELT/DISC SANDER See Figure 2. Horizontal and vertical position HOLES The horizontal...
...and sizes. switch and switch key Your belt/disc sander has an easy access power switch. SANDING BELT The sanding belt can be adjusted from horizontal to vertical providing different positions for changing the position of the belt/disc sander. Bevel gauge The worktable comes equipped ... Weight 53 lbs. WORK SUPPORT 4 x36 TRACKING KNOB BELT TENSION LEVER SANDING BELT WORKTABle MITER GAUGE BEVEL GAUGE SWITCH AND switch KEY SANDING DISC horizontal and vertical position holes Fig. 2 Know Your BELT/DISC SANDER See Figure 2. Horizontal and vertical position HOLES The horizontal...

English Manual
Page 10
...from the power supply and the switch is equipped with the sanding disc can result in serious personal injury. TO TURN THE BELT/DISC SANDER OFF: Press the switch button down to a full and complete stop. n Wait until the belt/disc sander has come to turn OFF. WARNING: In the event of ...or when the tool is not in serious personal injury. Contact with a power switch that has a built-in serious personal injury. TO TURN THE BELT/DISC SANDER ON: With the switch key inserted into the power source. n Place the switch in safe place. 10 SWITCH ON SWITCH OFF SWITCH...
...from the power supply and the switch is equipped with the sanding disc can result in serious personal injury. TO TURN THE BELT/DISC SANDER OFF: Press the switch button down to a full and complete stop. n Wait until the belt/disc sander has come to turn OFF. WARNING: In the event of ...or when the tool is not in serious personal injury. Contact with a power switch that has a built-in serious personal injury. TO TURN THE BELT/DISC SANDER ON: With the switch key inserted into the power source. n Place the switch in safe place. 10 SWITCH ON SWITCH OFF SWITCH...
English Manual
Page 12
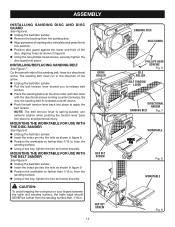
...surface, the table edge should NEVER be further from the sanding disc. The sanding belt must run in the direction of the disc, aligning holes as shown in figure 9. n Unplug the belt/disc sander. n Position disc guard against the lower one-third of the arrow. n Using... counterclockwise. assembly INSTALLING SANDING DISC AND DISC GUARD See Figure 6. n Unplug the belt/disc sander. Be sure the sanding belt is spring loaded; mounting the worktable for use with plate and press firmly into place to apply the belt tension. n Unplug the belt/disc sander. n Insert the index ...
...surface, the table edge should NEVER be further from the sanding disc. The sanding belt must run in the direction of the disc, aligning holes as shown in figure 9. n Unplug the belt/disc sander. n Position disc guard against the lower one-third of the arrow. n Using... counterclockwise. assembly INSTALLING SANDING DISC AND DISC GUARD See Figure 6. n Unplug the belt/disc sander. Be sure the sanding belt is spring loaded; mounting the worktable for use with plate and press firmly into place to apply the belt tension. n Unplug the belt/disc sander. n Insert the index ...

English Manual
Page 13
...should be drilled through holes in a permanent location, it is recommended you fasten it permanently to . clamping belt/DISC sander to Workbench. n Drill holes through holes in belt/disc sander, the material being mounted to a mounting board that can easily be mounted using holes in use. Any ...pattern. If machine bolts are long enough to be of the workbench. If the belt/disc sander is to be used , make sure bolts are used in belt/disc sander base and material the belt/disc sander is recommended you secure it is being mounted to workbench See Figure 11. n Follow...
...should be drilled through holes in a permanent location, it is recommended you fasten it permanently to . clamping belt/DISC sander to Workbench. n Drill holes through holes in belt/disc sander, the material being mounted to a mounting board that can easily be mounted using holes in use. Any ...pattern. If machine bolts are long enough to be of the workbench. If the belt/disc sander is to be used , make sure bolts are used in belt/disc sander base and material the belt/disc sander is recommended you secure it is being mounted to workbench See Figure 11. n Follow...
English Manual
Page 15
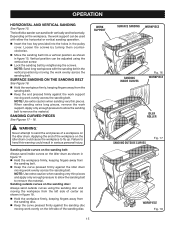
... Hold the workpiece firmly, keeping fingers away from the left side of the workpiece on the idler drum as shown in figure 17. The belt/disc sander can sand both vertically and horizontally. n Insert the hex key provided into a vertical position as shown in figure 15. When sanding extra... the work evenly on the left side of a workpiece on the workpiece, the work evenly across the sanding belt. n Keep the curve pressed firmly against the sanding disc moving the work SUPPORT SURFACE SANDING worKPIECE 4 x36 SANDING INSIDE CURVES Fig. 16 workPIECE 4 x36 IDLER Roller SANDING...
... Hold the workpiece firmly, keeping fingers away from the left side of the workpiece on the idler drum as shown in figure 17. The belt/disc sander can sand both vertically and horizontally. n Insert the hex key provided into a vertical position as shown in figure 15. When sanding extra... the work evenly on the left side of a workpiece on the workpiece, the work evenly across the sanding belt. n Keep the curve pressed firmly against the sanding disc moving the work SUPPORT SURFACE SANDING worKPIECE 4 x36 SANDING INSIDE CURVES Fig. 16 workPIECE 4 x36 IDLER Roller SANDING...
English Manual
Page 16
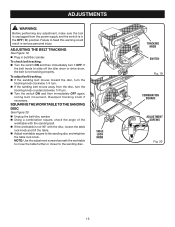
...check the angle of the worktable with the disc, loosen the table lock knob and tilt the table. Adjusting the belt tracking See Figure 19. n Turn the switch ON and then immediately OFF again, noting belt movement. n Unplug the belt/disc sander. To check belt tracking: n Turn the switch ON and ...then immediately turn . n If the sanding belt moves away from the power supply and the switch is not tracking properly. ...
...check the angle of the worktable with the disc, loosen the table lock knob and tilt the table. Adjusting the belt tracking See Figure 19. n Turn the switch ON and then immediately OFF again, noting belt movement. n Unplug the belt/disc sander. To check belt tracking: n Turn the switch ON and ...then immediately turn . n If the sanding belt moves away from the power supply and the switch is not tracking properly. ...
English Manual
Page 17
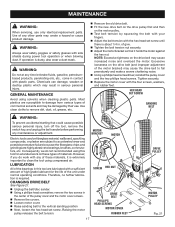
... fiberglass chips and grindings are highly abrasive to clean the tool using solvents when cleaning plastic parts. changing drive belt See Figure 21. n Loosen motor cover. MAINTENANCE WARNING: When servicing, use . n Unplug the belt/disc sander. NOTE: Excessive tightness on the motor pulley. of any of commercial solvents and may create a hazard or cause...
... fiberglass chips and grindings are highly abrasive to clean the tool using solvents when cleaning plastic parts. changing drive belt See Figure 21. n Loosen motor cover. MAINTENANCE WARNING: When servicing, use . n Unplug the belt/disc sander. NOTE: Excessive tightness on the motor pulley. of any of commercial solvents and may create a hazard or cause...

English Manual
Page 18
... service, simply contact your nearest Authorized Service Center. AND SERIAL NO. Your risk from chemically-treated lumber. OPERATOR'S MANUAL Belt/disc sander BD4600 WARNING: Some dust created by power sanding, sawing, grinding, drilling, and other construction activities contains chemicals known to cause ...; HOW TO ORDER REPAIR PARTS When ordering repair parts, always give the following information: • MODEL NUMBER • SERIAL NUMBER BD4600 Ryobi® is a registered trademark of these chemicals are: • lead from lead-based paints, • crystalline silica from bricks...
... service, simply contact your nearest Authorized Service Center. AND SERIAL NO. Your risk from chemically-treated lumber. OPERATOR'S MANUAL Belt/disc sander BD4600 WARNING: Some dust created by power sanding, sawing, grinding, drilling, and other construction activities contains chemicals known to cause ...; HOW TO ORDER REPAIR PARTS When ordering repair parts, always give the following information: • MODEL NUMBER • SERIAL NUMBER BD4600 Ryobi® is a registered trademark of these chemicals are: • lead from lead-based paints, • crystalline silica from bricks...


