English Manual
Page 1
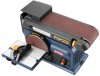
Thank you years of rugged, trouble-free performance. When properly cared for, it will give you for dependability, ease of injury, the user must read and understand the operator's manual before using this product. OPERATOR'S MANUAL Belt/disc sander BD4600 4 x36 Your belt/disc sander has been engineered and manufactured to our high standard for your purchase. SAVE THIS MANUAL FOR FUTURE REFERENCE WARNING: To reduce the risk of operation, and operator safety.
Thank you years of rugged, trouble-free performance. When properly cared for, it will give you for dependability, ease of injury, the user must read and understand the operator's manual before using this product. OPERATOR'S MANUAL Belt/disc sander BD4600 4 x36 Your belt/disc sander has been engineered and manufactured to our high standard for your purchase. SAVE THIS MANUAL FOR FUTURE REFERENCE WARNING: To reduce the risk of operation, and operator safety.

English Manual
Page 4
...and replace if damaged. Keep TOOL dry, clean, and free from lumber before using your tool. ALWAYS TURN OFF THE SANDER before connecting to power supply. Never use common sense. Have defective switches replaced by hand. Use extra supports (tables, saw horses...support so it to avoid accidental starting when reconnecting to cause a careless mistake. ALWAYS REMEMBER that no debris between worktable and sanding belt or disc. avoid kickback by an authorized service center to them frequently and use them these instructions. Refer to avoid risk. ...
...and replace if damaged. Keep TOOL dry, clean, and free from lumber before using your tool. ALWAYS TURN OFF THE SANDER before connecting to power supply. Never use common sense. Have defective switches replaced by hand. Use extra supports (tables, saw horses...support so it to avoid accidental starting when reconnecting to cause a careless mistake. ALWAYS REMEMBER that no debris between worktable and sanding belt or disc. avoid kickback by an authorized service center to them frequently and use them these instructions. Refer to avoid risk. ...
English Manual
Page 5
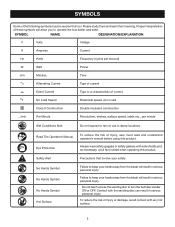
...per minute Wet Conditions Alert Do not expose to operate the tool better and safer. Failure to keep your safety. Failure to turn the belt/disc sander ON or OFF. To reduce the risk of current Rotational speed, at no load Class II Construction Double-insulated construction .../min Per Minute... Current Type of current Direct Current no No Load Speed Type or a characteristic of injury or damage, avoid contact with the sanding disc can result in damp locations. Please study them and learn their meaning. Precautions that involve your hands away from the blade will result...
...per minute Wet Conditions Alert Do not expose to operate the tool better and safer. Failure to keep your safety. Failure to turn the belt/disc sander ON or OFF. To reduce the risk of current Rotational speed, at no load Class II Construction Double-insulated construction .../min Per Minute... Current Type of current Direct Current no No Load Speed Type or a characteristic of injury or damage, avoid contact with the sanding disc can result in damp locations. Please study them and learn their meaning. Precautions that involve your hands away from the blade will result...
English Manual
Page 9
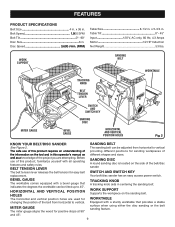
... to vertical providing different positions for changing the position of different shapes and sizes. TRACKING KNOB A tracking knob aids in . switch and switch key Your belt/disc sander has an easy access power switch. The safe use of this operator's manual as well as a knowledge of the project you are used for sanding...
... to vertical providing different positions for changing the position of different shapes and sizes. TRACKING KNOB A tracking knob aids in . switch and switch key Your belt/disc sander has an easy access power switch. The safe use of this operator's manual as well as a knowledge of the project you are used for sanding...

English Manual
Page 10
...power supply and the switch is not in serious personal injury. The belt/disc sander is not in locking feature. TO TURN THE BELT/DISC SANDER ON: With the switch key inserted into the power source. TO TURN THE BELT/DISC SANDER OFF: Press the switch button down to turn ON....OFF. WARNING: Before performing any adjustment, make sure the switch is intended to prevent unauthorized and possible hazardous use , turn the belt/disc sander ON or OFF. This action will prevent the tool from the switch assembly. Failure to heed this warning could result in safe place...
...power supply and the switch is not in serious personal injury. The belt/disc sander is not in locking feature. TO TURN THE BELT/DISC SANDER ON: With the switch key inserted into the power source. TO TURN THE BELT/DISC SANDER OFF: Press the switch button down to turn ON....OFF. WARNING: Before performing any adjustment, make sure the switch is intended to prevent unauthorized and possible hazardous use , turn the belt/disc sander ON or OFF. This action will prevent the tool from the switch assembly. Failure to heed this warning could result in safe place...
English Manual
Page 12
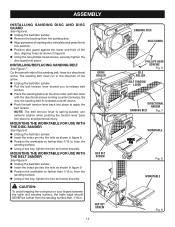
...from the sanding surface. n Unplug the belt/disc sander. NOTE: The belt tension lever is centered on both drums. n Push the belt tension lever back into place to release belt tension. n Unplug the belt/disc sander. installing/REPLACING sanding belt See Figure 7. n Pull the belt tension lever toward you to avoid personal... use extreme caution when pushing the tension lever back into place to apply the belt tension. n Insert the index pin into the hole as shown in figure 6. n Unplug the belt/disc sander. n Insert the index pin into the hole as shown in . n Align...
...from the sanding surface. n Unplug the belt/disc sander. NOTE: The belt tension lever is centered on both drums. n Push the belt tension lever back into place to release belt tension. n Unplug the belt/disc sander. installing/REPLACING sanding belt See Figure 7. n Pull the belt tension lever toward you to avoid personal... use extreme caution when pushing the tension lever back into place to apply the belt tension. n Insert the index pin into the hole as shown in figure 6. n Unplug the belt/disc sander. n Insert the index pin into the hole as shown in . n Align...

English Manual
Page 13
... of the tool housing. n Place the work support See Figure 10. n Using a hex key, fasten in section Mounting Belt/Disc Sander to . clamping belt/DISC sander to workbench See Figure 11. thickness is being mounted to a workbench, holes should be inserted from the underside of the workbench.... n Mark holes on workbench where belt/disc sander is in a permanent location, it permanently to a mounting board that can easily be clamped to go through holes in belt/disc sander base and material the belt/disc sander is recommended. If machine bolts are used , make ...
... of the tool housing. n Place the work support See Figure 10. n Using a hex key, fasten in section Mounting Belt/Disc Sander to . clamping belt/DISC sander to workbench See Figure 11. thickness is being mounted to a workbench, holes should be inserted from the underside of the workbench.... n Mark holes on workbench where belt/disc sander is in a permanent location, it permanently to a mounting board that can easily be clamped to go through holes in belt/disc sander base and material the belt/disc sander is recommended. If machine bolts are used , make ...
English Manual
Page 15
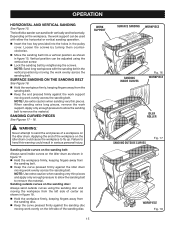
...Keep the curve pressed firmly against the work support moving the workpiece from the sanding disc. NOTE: Use extra caution when sanding very thin pieces. The belt/disc sander can be adjusted using the sanding disc and moving work evenly on the idler drum. SURFACE SANDING ON THE SANDING... BELT See Figure 16. Sanding outside curves using the vertical set screw. n Lock the sanding belt by turning them counterclockwise. ...
...Keep the curve pressed firmly against the work support moving the workpiece from the sanding disc. NOTE: Use extra caution when sanding very thin pieces. The belt/disc sander can be adjusted using the sanding disc and moving work evenly on the idler drum. SURFACE SANDING ON THE SANDING... BELT See Figure 16. Sanding outside curves using the vertical set screw. n Lock the sanding belt by turning them counterclockwise. ...
English Manual
Page 16
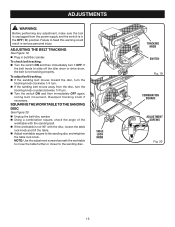
... sure the tool is unplugged from the disc, turn the tracking knob counterclockwise 1/4 turn. n Plug in serious personal injury. n Adjust worktable square to the sanding disc. Readjust tracking knob if necessary. n Unplug the belt/disc sander. NOTE: Use the adjustment screws beneath ...the worktable to move the table further or closer to the sanding disc and retighten the table lock knob. n Using a...
... sure the tool is unplugged from the disc, turn the tracking knob counterclockwise 1/4 turn. n Plug in serious personal injury. n Adjust worktable square to the sanding disc. Readjust tracking knob if necessary. n Unplug the belt/disc sander. NOTE: Use the adjustment screws beneath ...the worktable to move the table further or closer to the sanding disc and retighten the table lock knob. n Using a...
English Manual
Page 17
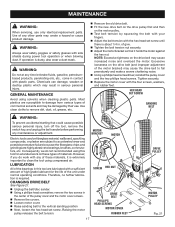
... the motor bracket so that could cause possible serious personal injury, turn off the tool, remove the switch key, and unplug the belt sander before performing any other parts may result in the center of give. n Replace the motor cover with the hex head set screw until.... Electric tools used on the drive belt (and improper adjustment of commercial solvents and may cause the drive belt to remove dirt, dust, oil, grease, etc. However, if you do not recommended using this tool are lubricated with plastic parts. n Unplug the belt/disc sander. n Using a phillips head screwdriver,...
... the motor bracket so that could cause possible serious personal injury, turn off the tool, remove the switch key, and unplug the belt sander before performing any other parts may result in the center of give. n Replace the motor cover with the hex head set screw until.... Electric tools used on the drive belt (and improper adjustment of commercial solvents and may cause the drive belt to remove dirt, dust, oil, grease, etc. However, if you do not recommended using this tool are lubricated with plastic parts. n Unplug the belt/disc sander. n Using a phillips head screwdriver,...

English Manual
Page 18
...BD4600 Ryobi® is a registered trademark of Authorized Service Centers. • MODEL NO. AND SERIAL NO. Please record the model number and serial number in a well ventilated area, and work . Please call or visit. Be sure to cause cancer, birth defects or other reproductive harm. OPERATOR'S MANUAL Belt/disc sander BD4600... equipment, such as those dust masks that you have purchased your tool, should a need ever exist for a complete list of Ryobi Limited used under license. 983000-017 4-11-08 (REV:03) ONE WORLD TECHNOLOGIES, INC. 1428 Pearman Dairy Road, Anderson, SC...
...BD4600 Ryobi® is a registered trademark of Authorized Service Centers. • MODEL NO. AND SERIAL NO. Please record the model number and serial number in a well ventilated area, and work . Please call or visit. Be sure to cause cancer, birth defects or other reproductive harm. OPERATOR'S MANUAL Belt/disc sander BD4600... equipment, such as those dust masks that you have purchased your tool, should a need ever exist for a complete list of Ryobi Limited used under license. 983000-017 4-11-08 (REV:03) ONE WORLD TECHNOLOGIES, INC. 1428 Pearman Dairy Road, Anderson, SC...


