English Manual
Page 10
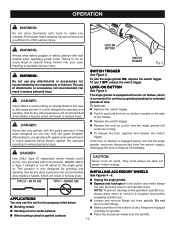
...27 − OK to make you careless. DANGER: Never use this angle grinder. It has been designed for the purposes listed below: Grinding metals Sanding wood or metal surfaces Wire brushing rusted or painted surfaces CAUTION: Never cover air vents. To turn it ...OFF, release the switch trigger. To turn the angle grinder ON, depress the switch trigger. Never attach a Type 1 straight or...
...27 − OK to make you careless. DANGER: Never use this angle grinder. It has been designed for the purposes listed below: Grinding metals Sanding wood or metal surfaces Wire brushing rusted or painted surfaces CAUTION: Never cover air vents. To turn it ...OFF, release the switch trigger. To turn the angle grinder ON, depress the switch trigger. Never attach a Type 1 straight or...
English Manual
Page 11
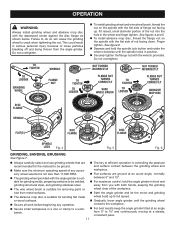
... thrown from 5° to loosen To install grinding wheel and wire wheel brush, thread the nut on the spindle with the flat side of the workpiece. Start the angle grinder and let the motor and grinding wheel build up . to tighten to loosen Grinding ... wheel contacts the workpiece. For best results keep the angle grinder tilted at an angle from the angle grinder. Finger tighten. Do not overtighten. NuT TURNED INCORRECTLY NuT TURNED INCORRECTLY flange NuT TURNED CORRECTLY WIRE Wheel BRUSH to tighten to loosen flange NuT TURNED CORRECTLY ABRASIVE MOP DISC Disc...
... thrown from 5° to loosen To install grinding wheel and wire wheel brush, thread the nut on the spindle with the flat side of the workpiece. Start the angle grinder and let the motor and grinding wheel build up . to tighten to loosen Grinding ... wheel contacts the workpiece. For best results keep the angle grinder tilted at an angle from the angle grinder. Finger tighten. Do not overtighten. NuT TURNED INCORRECTLY NuT TURNED INCORRECTLY flange NuT TURNED CORRECTLY WIRE Wheel BRUSH to tighten to loosen flange NuT TURNED CORRECTLY ABRASIVE MOP DISC Disc...
English Manual
Page 12
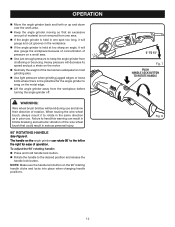
Heavy pressure will decrease its speed and put a strain on the metal edge. Lift the angle grinder away from the workpiece before turning the angle grinder off. When reusing the wire wheel brush, always mount it will bend during use . To adjust the 90˚ rotating handle: Press and hold ...a small area. Use just enough pressure to rotate handle Fig. 8 12 WARNING: Wire wheel brush bristles will gouge and cut grooves in the workpiece. If the angle grinder is the potential for ease of operation. Failure to heed this warning can rotate 90˚ to the ...
Heavy pressure will decrease its speed and put a strain on the metal edge. Lift the angle grinder away from the workpiece before turning the angle grinder off. When reusing the wire wheel brush, always mount it will bend during use . To adjust the 90˚ rotating handle: Press and hold ...a small area. Use just enough pressure to rotate handle Fig. 8 12 WARNING: Wire wheel brush bristles will gouge and cut grooves in the workpiece. If the angle grinder is the potential for ease of operation. Failure to heed this warning can rotate 90˚ to the ...
English Manual
Page 14
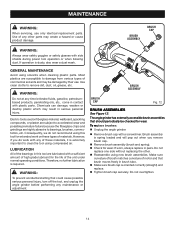
... cause possible serious personal injury, turn off the tool, and unplug the angle grinder before performing any other . n Tighten brush cap securely. If operation is required. BRUSH ASSEMBLY BRUSH CAP Fig. 12 BRUSH ASSEMBLIES See Figure 12. n Check for the life of materials. n Reassemble...to accelerated wear and possible premature failure because the fiberglass chips and grindings are lubricated with plastic parts. To replace brushes: n Unplug the angle grinder. If worn, always replace in contact with a sufficient amount of high grade lubricant for wear. WARNING: Do...
... cause possible serious personal injury, turn off the tool, and unplug the angle grinder before performing any other . n Tighten brush cap securely. If operation is required. BRUSH ASSEMBLY BRUSH CAP Fig. 12 BRUSH ASSEMBLIES See Figure 12. n Check for the life of materials. n Reassemble...to accelerated wear and possible premature failure because the fiberglass chips and grindings are lubricated with plastic parts. To replace brushes: n Unplug the angle grinder. If worn, always replace in contact with a sufficient amount of high grade lubricant for wear. WARNING: Do...
Repair Sheet
Page 3
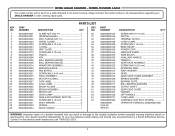
MODEL NUMBER AG452 The model number will be performed by a Ryobi Authorized Service Center. Always mention the model number in damage to the motor housing. CLAMP NUT (5/8-11 1 GRINDING WHEEL 1...BRUSH 1 AUXILLARY HANDLE 1 WRENCH 1 GEAR CASE ASSEMBLY 1 SCREW (M4.2 X 25 mm 4 RETAINING RING 1 WAVY WASHER 1 GEAR 1 GEAR CASE COVER ASSEMBLY 1 SPRING WASHER 7 BEARING PLATE 1 BALL BEARING (62002RS 1 OUTPUT SHAFT 1 GEAR CASE COVER 1 WASHER 4 LEFT HANDLE 1 CORD LABEL 1 CARRYING CASE (NOT SHOWN 1 OPERATOR'S MANUAL (039028001065) WARNING: Improper repair of your ANGLE GRINDER...
MODEL NUMBER AG452 The model number will be performed by a Ryobi Authorized Service Center. Always mention the model number in damage to the motor housing. CLAMP NUT (5/8-11 1 GRINDING WHEEL 1...BRUSH 1 AUXILLARY HANDLE 1 WRENCH 1 GEAR CASE ASSEMBLY 1 SCREW (M4.2 X 25 mm 4 RETAINING RING 1 WAVY WASHER 1 GEAR 1 GEAR CASE COVER ASSEMBLY 1 SPRING WASHER 7 BEARING PLATE 1 BALL BEARING (62002RS 1 OUTPUT SHAFT 1 GEAR CASE COVER 1 WASHER 4 LEFT HANDLE 1 CORD LABEL 1 CARRYING CASE (NOT SHOWN 1 OPERATOR'S MANUAL (039028001065) WARNING: Improper repair of your ANGLE GRINDER...


