Ryobi RMX001 Support and Manuals
Get Help and Manuals for this Ryobi item
View All Support Options Below
Free Ryobi RMX001 manuals!
Problems with Ryobi RMX001?
Ask a Question
Free Ryobi RMX001 manuals!
Problems with Ryobi RMX001?
Ask a Question
Popular Ryobi RMX001 Manual Pages
Operation Manual - Page 3
...repair person using only identical replacement parts. Power tools are not designed for processing food.
Follow the instructions...mixer. When lifting, hold the tool with your legs, not your power tool serviced...accessories, or storing power tools. Read operator's manual carefully. Wear a face or dust mask if... limitations, as well as the specific potential hazards related to operate the...
Operation Manual - Page 4

... water, and other substances in storm drains, roadsides, landfills, or other part that is in length. A cord exceeding 100 feet is damaged should be properly repaired or replaced by an authorized service center to prevent movement and possible damage.
Save these instructions.
Unplug tool when leaving work area or when tool is out of...
Operation Manual - Page 5
... in death or serious injury.
Proper interpretation of loose clothing, long hair, and body parts being drawn into spinning drum.
Wet Conditions Alert
Do not expose to a potential injury ...:
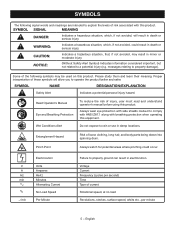
Indicates a hazardous situation, which , if not avoided, could occur.
Read Operator's Manual Eye and Breathing Protection
To reduce the risk of current
Rotational speed, at no
.../min...
Operation Manual - Page 6
...mixer...in contact with a qualified electrician or service personnel if the grounding instructions are identified by a marking "Acceptable ...in serious injury. This is green with all local codes and ordinances.
A substantial voltage drop will cause a...outlet installed by the letters "W-A" or "W" on the cord's jacket. WARNING:
Improper installation of electric shock. When repair or replacement ...
Operation Manual - Page 8

...in .
MOTOR - NOTICE:
Do not exceed the batch capacity of cement. ON/OFF SWITCH -
ft) Motor 1/2 HP
Rating 120 V~,... are designed to mix thick and heavy materials. FEATURES
PRODUCT SPECIFICATIONS
Drum Size 5 cu. DRUM
MIXING TINES
POWER CORD
PIVOT... − English
ft. of this operator's manual as well as moving the mixer. There is 5 cu. The heavy duty steel...
Operation Manual - Page 13
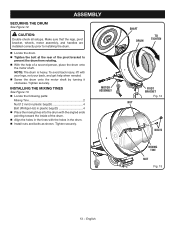
INSTALLING THE MIXING TINES
See Figure 13. Locate the following parts:
Mixing Tine 2 Nut (12 mm) in plastic bag (D 4 Bolt (Phillips Hd.) in plastic bag...Double check all setups.
Tighten securely. To avoid back injury, lift with the holes in the tines with your legs, not your back, and get help of the drum. Align the holes in the drum. Install nuts and bolts...
Operation Manual - Page 14

... the mixer still does not resume operation, unplug the tool and empty some or all missing or damaged parts are replaced.
Failure to the material manufacturer's instructions. NOTICE:
Use caution when working with fast hardening material such as screws, nuts, bolts, caps, etc. Setting times vary;
Please contact customer service or a qualified service center for any part of...
Operation Manual - Page 16
... hazard, operate the mixer on prior to set concrete.
NOTICE:
Routinely...mixer. NOTE: To protect the motor and ensure that can harden quickly and could cause property damage or personal injury if spilled.
Do not let materials dry and harden inside the drum or on any part of the mixer and the material being mixed. Setting times vary, refer to the material manufacturer's instructions...
Operation Manual - Page 17

...; Slowly lift the handles up to the material manufacturer's instructions.
NOTICE:
Use caution when working with fast hardening material such as described in the previous section.
Turn the mixer off the motor, and clean the mixer as described later. Failure to set concrete.
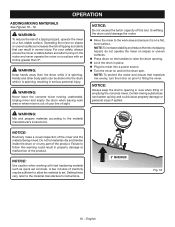
CEMENT
WARNING:
Keep hands away from the drum while it is...
Operation Manual - Page 18

... areas designated for assistance. OPERATION
CLEANING THE DRUM
See Figure 21. Unplug the mixer. Empty the drum. Unlock the drum. Lift the handles... not operate this product are replaced. Tighten securely all missing or damaged parts are lubricated with a dry cloth. Please contact customer service or a qualified service center for that purpose. Therefore...
Operation Manual - Page 19
...
Power supply is tripped
breaker reset button and put on/off switch
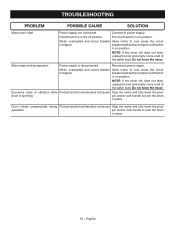
in on position. TROUBLESHOOTING
PROBLEM
POSSIBLE CAUSE
SOLUTION
Mixer won't start , unplug the tool and empty some or all of the batch load.
Do not force the mixer. Excessive noise or vibration while Pivot pin and/or lock handle is not secure...
Parts Diagram - Page 1
Box 1288, Anderson, SC 29622 • Phone 1-800-525-2579
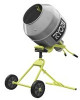
www.ryobitools.com P.O. RYOBI 5 cu. ft. (0.14 m3) Concrete Mixer
Model Number RMX001 Repair Sheet
ONE WORLD TECHNOLOGIES, INC.
Parts Diagram - Page 3
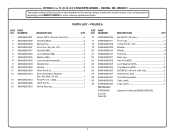
...PART NO. RMX001
The model number will be found on a label attached to the rear leg. PARTS...1
KEY PART NO. RYOBI 5 cu. ft. (0.14 m3) CONCRETE MIXER − MODEL NO. ...Instruction Label 1 Icon Warning label 1 Data Label 1 Logo Label 1
Operator's Manual (089046001906)
3 Always mention the model number in all correspondence regarding your CEMENT MIXER or when ordering replacement parts...
Parts Diagram - Page 5
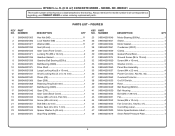
... your CEMENT MIXER or when ordering replacement parts. Key No. 47 1 Cord Wrap Label 1 Motor Specifications Label 1 Strain Relief Pressure Plate 1
5 PARTS LIST - Key No. 46 1 Overload Protector 1 On/Off Switch 1 Rotor 1 Ball Bearing (6202z 1 Bell Housing 1 Bolt (M5 x 138 mm 4 Fan 1 Screw (M4 x 10 mm 4 Fan Cover (Inc. ft. (0.14 m3) CONCRETE MIXER − MODEL NO. RMX001...
Parts Diagram - Page 6

RMX001
Main Red
Ground Green
Power Cord
Auxiliary Black
Condenser
Black
Red Red
Blue
White Switch
Blue Overload Protector
WIRING DIAGRAM
6 ft. (0.14 m3) CONCRETE MIXER − MODEL NO. RYOBI 5 cu.
Ryobi RMX001 Reviews
We have not received any reviews for Ryobi yet.