Ryobi D47CK Support and Manuals
Get Help and Manuals for this Ryobi item
Popular Ryobi D47CK Manual Pages
English Manual - Page 2
... Specific Safety Rules...4 Symbols...5-6 Electrical...7 Features...8 Assembly...9 Operation...9-12 Maintenance...13-14 Parts Ordering / Service...Back Page
...period of two years from the date of purchase, you may either repair or replace any RYOBI® power tool which includes the date of purchase (for the balance...
English Manual - Page 3
... the outlet, reverse the plug. Replace damaged cords immediately. Loose clothes, jewelry, or long hair can be drawn into air vents.
Do not use on a ladder or unstable support. Be sure switch is unstable and may lead to a rotating part of children and other condition that may be repaired.
Disconnect the plug from...
English Manual - Page 4
...will reduce the risk of these instructions also. An undersized cord will draw. Some examples of electric shock or fire.
Check damaged parts. GENERAL SAFETY RULES
SERVICE
Tool service must be properly repaired or replaced by an authorized service center. Read operator's manual carefully. Following this tool. Following this manual. Constantly stay aware of operation...
English Manual - Page 5
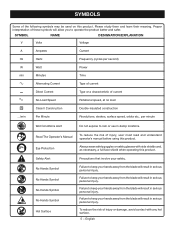
...etc., per minute
Wet Conditions Alert
Do not expose to keep your safety.
Read The Operator's Manual Eye Protection Safety Alert No Hands Symbol No Hands Symbol No Hands Symbol No Hands Symbol Hot ... risk of injury, user must read and understand operator's manual before using this product. Precautions that involve your hands away from the blade will result in serious personal...
English Manual - Page 6
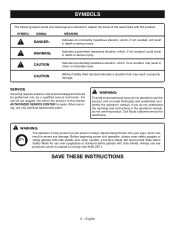
... replacement parts. Call Ryobi customer service for repair.
WARNING:
Indicates a potentially hazardous situation, which , if not avoided, may result in death or serious injury. SERVICE
Servicing requires extreme care and knowledge and should be performed only by a qualified service technician. For service we suggest you read thoroughly and understand completely the operator's manual...
English Manual - Page 7
....0
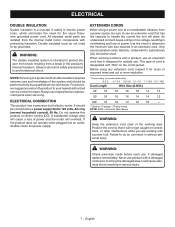
Cord Length...electrical shock. ELECTRICAL CONNECTION
This product has a precision-built electric motor. It should be sure to use . A substantial voltage drop will draw. This type of cord is intended to handle the current the tool will cause a loss of power. WARNING:
Check extension cords before each use original factory replacement parts when servicing. Only round jacketed cords...
English Manual - Page 8

... pressure.
− English FEATURES
PRODUCT SPECIFICATIONS
Chuck 3/8 in this operator's manual as well as a knowledge of torque for your application. Switch Variable Speed Reversible (VSR) Clutch 24 Positions
No Load Speed 0-1,100...trigger pressure and lower speed with the drill can be placed in the chuck jaws.
TORQUE ADJUSTMENT RING
Your drill has a 24-position clutch. BIT ...
English Manual - Page 9
... Drilling in all items listed in possible serious injury. Failure to comply could result in objects being thrown into your eyes resulting in the packing list are replaced. VARIABLE...in accidental starting and possible serious personal injury. PACKING LIST
Drill Double Ended Bits (2) Operator's Manual Case
WARNING:
If any parts are damaged or missing do so could result in serious...
English Manual - Page 10

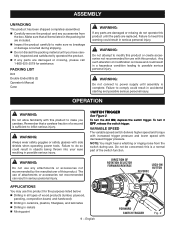
... SELECTOR
(FORWARD/REVERSE) See Figure 2.
NOTE: The drill will not run unless the direction of the drill. Rotate the chuck body with the rotating drill bit.
WARNING:
Always unplug the tool when installing or removing bits, adjusting settings, or when the tool is controlled by running the drill at full speed. When not in the chuck...
English Manual - Page 12
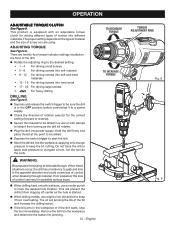
... a light oil on the type of material and the size of screw you are twenty-four torque indicator settings located on the front of the drill.
Rotate the adjusting ring to the desired setting.
• 1 - 4 For driving small screws
• 5 - 8 For driving screws into soft material
• 9 - 12 For driving screws into...
English Manual - Page 13
...replacement parts. GENERAL MAINTENANCE
Avoid using this product are highly abrasive to remove dirt, dust, oil, grease, etc.
WARNING:
Do not at any of commercial solvents and may create a hazard or cause product damage.
Electric... in this product for the life of materials. MAINTENANCE
WARNING:
When servicing, use . WARNING:
Always wear safety goggles or safety glasses with any...
English Manual - Page 14
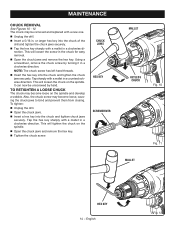
... Open the chuck jaws and remove the hex key. It can now be removed and replaced with a mallet in a clockwise direction. CHUCK JAWS
HEX KEY
SCREWDRIVER
MALLET
KEYLESS CHUCK
Fig. ...Tap the hex key sharply with a mallet in a counterclockwise direction. To tighten:
Unplug the drill.
Open the chuck jaws.
Insert a hex key into the chuck and tighten the ...
Repair Sheet - Page 1
RYOBI 3/8 in. D46C REPAIR SHEET DRILL DOUBLE INSULATED
MODEL NO.
Repair Sheet - Page 3
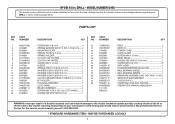
DRILL - MODEL NUMBER D46C
The model number will be performed by a Ryobi Authorized Service Center. KEY NOS. 31-32) .1 GEAR BOX SUB ASSEMBLY 1 CHUCK (3/8 in 1 CARRYING CASE (NOT SHOWN 1 OPERATOR'S MANUAL (960223654)
WARNING: Improper repair of your DRILL or when ordering repair parts. Any repairs requiring disassembly of a double insulated tool can result in . PART NUMBER
21
740824001...
Repair Sheet - Page 4
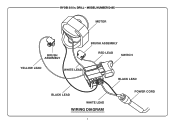
MODEL NUMBER D46C
MOTOR
BRUSH ASSEMBLY
YELLOW LEAD
WHITE LEAD
BRUSH ASSEMBLY
RED LEAD
SWITCH
BLACK LEAD
BLACK LEAD WHITE LEAD
WIRING DIAGRAM
POWER CORD DRILL - RYOBI 3/8 in.
Ryobi D47CK Reviews
We have not received any reviews for Ryobi yet.