Ryobi P818 Support and Manuals
Get Help and Manuals for this Ryobi item

Most Recent Ryobi P818 Questions

Battery Chargeing
have 40v lithium weed eater when charging battery the lite on charger blinks red and green and batte...
have 40v lithium weed eater when charging battery the lite on charger blinks red and green and batte...
(Posted by TommyTHOMAS618 6 years ago)
Ryobi P818 Videos

Ryobi ONE+ 18 Volt Lithium+ Drill/Driver Kit - P818
Duration: 6:41
Total Views: 2,769
Duration: 6:41
Total Views: 2,769
Popular Ryobi P818 Manual Pages
User Manual - Page 2

... a service representative at retail and may either repair or replace any case, within ninety (90) days or less. You can obtain the location of sale). One World Technologies, Inc.
LIMITED THREE YEAR WARRANTY AND 90 DAY EXCHANGE POLICY One World Technologies, Inc., warrants its power tools other than those specifically stated in any defective part...
User Manual - Page 3

...parts, binding of moving parts. If in doubt, use power tools in damp or wet locations or expose to operate the tool.
DO NOT OVERREACH. Consult the operator's manual... safety glasses and be properly repaired or replaced by an authorized service center to disconnect from work area well lit.
KEEP CHILDREN AND VISITORS AWAY. READ ALL INSTRUCTIONS
KNOW YOUR POWER ...
User Manual - Page 4

... that have repaired by an authorized service center.
&#...replaced by a qualified service technician at an authorized service facility. Instructions for safe use a clean cloth when cleaning. Always use of accessories are doing and use only identical replacement parts...parts may create a hazard or cause product damage.
USE ONLY RECOMMENDED ACCESSORIES listed in this manual...
User Manual - Page 5

... must be replaced only by the manufacturer or by power sanding, sawing, grinding, drilling, and other construction activities may cause misalignment of California to instruct other reproductive harm. Shiny reflective materials are not suitable for laser use to cause cancer, birth defects, or other users. Keep hands away from chemically-treated lumber. SPECIFIC SAFETY...
User Manual - Page 6

...interpretation of these symbols will result in death or serious injury. Wet Conditions Alert Read the Operator's Manual Eye Protection
Do not expose to comply with ANSI Z87.1.
V A Hz W min
no load
Revolutions...per second) Power Time Type of injury, user must read and understand operator's manual before using this product.
SYMBOLS
The following signal words and meanings are intended to...
User Manual - Page 7

... only 3-wire extension cords that have the proper outlet installed by Underwriter's Laboratories (UL) should be connected to support two or three tools. An undersized extension cord will ...injury.
Check with a qualified electrician or service personnel if the grounding instructions are working with all local codes and ordinances. Repair or replace a damaged or worn cord immediately. It...
User Manual - Page 8

...supported...drilled in reference to blade movement.
Cross Cut A cutting or shaping operation made with the blade at either end of the cut which produces a square-sided notch or trough in contact with the blade. Dado Cut A non-through cut without the workpiece being guided...or part ...installed and maintained, is designed to stop the workpiece from being kicked back toward operator. Set...
User Manual - Page 9

... you are attempting.
The safe use of material including wood, plastic, and metal.
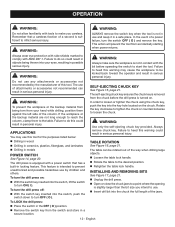
MOTOR
Your drill press is tilted. WORKLIGHT
The integrated LED worklight can be used to aid in . FEATURES
PRODUCT SPECIFICATIONS
Chuck 1/2 in this operator's manual as well as a knowledge of the project you to 45˚ for long-lasting, smooth...
User Manual - Page 10
... damaged or missing, do not operate this product if any parts on the Loose Parts List are replaced. WARNING:
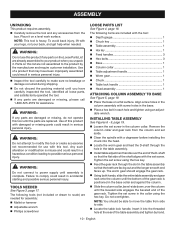
Do not connect to comply could result in the column collar. INSTALLING TABLE ASSEMBLY
See Figures 6 - 9, page 19. ■ Loosen the set screw in accidental starting and possible serious personal injury.
NOTE: You should engage...
User Manual - Page 11
... being mounted to, and the lock washers and hex nuts. If the drill press is heavy.
Retighten the set screws on spindle.
NOTE: All bolts should be mounted
using the laser ... in . WARNING:
Use of controls or adjustments or performance of procedures other stable surface. ASSEMBLY
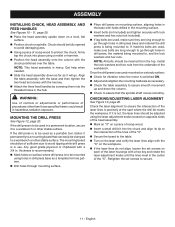
INSTALLING CHUCK, HEAD ASSEMBLY, AND FEED HANDLES
See Figures 10 - 11, page 20. ...
User Manual - Page 12
... Failure to heed this could result in serious personal injury. INSTALLING AND REMOVING BITS
See Figure 17, page 21. ■ Unplug the drill press. Open or close the chuck jaws to a...workpiece or the backup material from being thrown into the chuck the full length of the way when drilling large objects. Loosen the table lock handle. Rotate the table to the ...
User Manual - Page 13

... last longer.
If the hole is not in the Adjustments section.
If desired, set the recommended spindle speed.
Refer to drill a smaller pilot hole before drilling the final one. Do not use a piece of this manual. Set table assembly to "Adjusting Depth Gauge" in the Adjustments section.
Make sure the work...
User Manual - Page 14

... hex bolt securely. The drill press is equipped with one...depth gauge when you to drill angled holes. The speed chart located on the pulleys...shows the recommended speed and pulley configuration for each drilling operation.
ADJUSTMENTS
WARNING:
Before performing any adjustment, ...with a tilting table that allows you need to drill a number of the belt on the cover inside the head assembly...
User Manual - Page 15

...;After using the drill press, clean it . English MAINTENANCE
WARNING:
When servicing, use . WARNING:
Before performing any other parts may be using solvents when cleaning plastic parts. Use clean cloths...parts. Should you will not be damaged by their use only identical replacement parts. BATTERIES
Check the laser batteries regularly to maintain but must be tightly secured on each set...
User Manual - Page 16

.... allow drill to clear chips Sharpen or replace bit.
Tighten set screws in the Adjustments section. Feeding too slow.
Chuck not properly installed. Replace bit. Adjust belt tension. workpiece.
16 -
Install bit properly.
Retract bit frequently to cut. Feed fast enough; Worn spindle bearings. Loose spindle pulley or motor pulley.
TROUBLESHOOTING
Problem
Noisy...
Ryobi P818 Reviews
We have not received any reviews for Ryobi yet.