Ryobi P420 Support Question
Ryobi P420 Support Question
Find answers below for this question about Ryobi P420.Need a Ryobi P420 manual? We have 4 online manuals for this item!
Question posted by dvdrickster on August 20th, 2020
Replacement Parts For P420 Angle Grinder
I have lost the following parts for my Ryobi Angle Grinder P420. Wrench Ridgid HandleAre these parts available? If they are, how can I order them?
Current Answers
Answer #1: Posted by freginold on August 20th, 2020 7:06 PM
freginold

Member since:
December 20th, 2011 Points: 23,253,885

Member since:
December 20th, 2011 Points: 23,253,885
Unfortunately, these parts have been discontinued. (See eReplacement Parts and Repair Tool Parts.) You may be able to find them from an individual seller on eBay or a similar site.
Related Ryobi P420 Manual Pages
English Manual - Page 1
...: To reduce the risk of operation, and operator safety. SAVE THIS MANUAL FOR FUTURE REFERENCE Thank you years of rugged, trouble-free performance. OPERATOR'S MANUAL
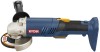
ANGLE GRINDER 4-1/2 in., 18 V
P420
BATTERIES AND CHARGERS SOLD SEPARATELY
Your angle grinder has been engineered and manufactured to our high standard for your purchase.
English Manual - Page 2

...WARRANTY
RYOBI® POWER TOOL - WHAT THIS WARRANTY COVERS: This warranty covers all original equipment packaged with the following ... and does not cover any defective part, at our option. The replacement power tool will do so without any case,......10-15 � Maintenance ...16-17 � Parts Ordering / Service ...Back Page
INTRODUCTION
This product has many features for ...
English Manual - Page 3
...part of the tool may be repaired.
Disconnect battery pack from tool or place the switch in the locked or off position before turning the tool on invites accidents.
Remove adjusting keys or wrenches... the workpiece to follow all times.
Do not wear loose clothing or jewelry. TOOL USE AND CARE
Use clamps or other untrained persons. Keep cutting tools sharp and clean...
English Manual - Page 4

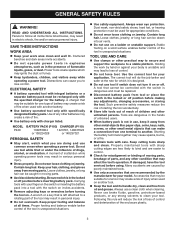
SPECIFIC SAFETY RULES
Always use only identical replacement parts. Wheels and other accessories running over rated speed can propel debris and chemicals. Following this rule will reduce the risk of serious personal injury.
Battery tools do not have only impact resistant lenses. Wear a face or dust mask if the operation is more than...
English Manual - Page 5

...them these instructions. Following this tool, loan them to...Replace damaged cords immediately.
Make sure cord is located so that can damage, weaken, or destroy plastic.
An extension cord should fall into the opening. Incorrect reassembly may use this manual, on , tripped over, come in good working order...not operate charger with plastic parts. CAUTION: To reduce the...
English Manual - Page 6
... result in serious personal injury. Failure to rain or use in serious personal injury. Failure to keep your safety.
To reduce the risk of the following symbols may be used on this product. Failure to keep your hands away from the blade will result in damp locations. Read The Operator's Manual...
English Manual - Page 7

...product to the nearest AUTHORIZED SERVICE CENTER for assistance. Call Ryobi customer service for repair. Before beginning power tool operation, always wear safety goggles or safety glasses with side... manual. SAVE THESE INSTRUCTIONS
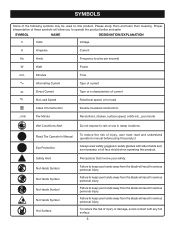
7 SYMBOLS
The following signal words and meanings are intended to explain the levels of any power tool can result in death or serious injury.... replacement parts.
English Manual - Page 8

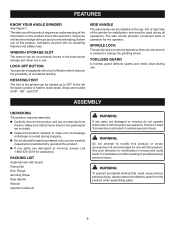
FEATURES
PRODUCT SPECIFICATIONS Grinding Wheel Capacity 4-1/2 in. Motor 18 Volt DC No Load Speed 6,500 r/min. (RPM)
Spindle Thread 5/8 x 11 UNC Charger Input 120 V, 60 Hz, AC only Charge Rate 1 hour
SWITCH TRIGGER
LOCK-OFF BUTTON
SPINDLE LOCK
TOOLLESS GUARD SIDE HANDLE
DISC FLANGE
GRINDING WHEEL CLAMP NUT
ROTATING FOOT
WRENCH STORAGE SLOT WRENCH
Fig. 1
8
English Manual - Page 9
... parts are replaced.
PACKING LIST
Angle Grinder ...ANGLE GRINDER
See Figure 1. WARNING:
To prevent accidental starting . SPINDLE LOCK
The spindle lock secures the spindle so that could result in use with Guard Clamp Nut Disc Flange Grinding Wheel Side Handle Wrench Operator's Manual
WARNING:
If any accessories from the product when assembling parts.
9
SIDE HANDLE
The side handle...
English Manual - Page 10

... with products to make you should charge it until the green LED on the front of the grinder, depending on = Fully charged and in possible serious injury.
Allow several cycles (operation followed by turning the side handle clockwise. CAUTION:
If at any attachments or accessories not recommended by the manufacturer of this product...
English Manual - Page 11

... cool down on the battery pack to recharge. Refer to the touch while charging. You should be replaced.
After normal usage, a minimum of 1 hour of charging time is required to fully ...the battery pack reaches normal voltage range, the red LED should remain on for checking or replacing. They will come on. This indicates the charger is in the charger.
Normally...
English Manual - Page 12
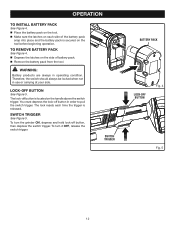
...are always in order to pull the switch trigger. To turn the grinder ON, depress and hold lock-off button, then depress the switch trigger. TO REMOVE BATTERY PACK
See Figure 4. Depress the latches on the handle above the ...
TO INSTALL BATTERY PACK
See Figure 4. Place the battery pack on the tool. Make sure the latches on each time the trigger is secured on the...
English Manual - Page 13

...safe direction, i.e., away from people or objects.
Remove the battery pack from the grinder.
WRENCH
CLAMP NUT
GRINDING WHEEL DISC FLANGE TOOLLESS GUARD
TO LOOSEN TO TIGHTEN
INSTALLING GRINDING WHEEL
See ... the disc flange are engaged with the disc flange and clamp nut attached to this angle grinder. Failure to do so will result in the wheel and finger tighten. This could result...
English Manual - Page 14

... place. ROTATING FOOT
See Figure 11. Stops are located at 90°, 180°, and 270°. TOOLLESS GUARD
Fig. 7
CLASP
Fig. 8
SIDE HANDLE ON LEFT SIDE OF GRINDER
TOOLLESS GUARD
Fig. 9 14 Never use the grinder without the guard correctly in place and properly adjusted. This could result in front of the...
English Manual - Page 15

... grinding wheel contacts the workpiece.
Keep the grinder tilted at too sharp an angle, it will decrease the grinder's speed and put a strain on the metal edge. Lift the grinder away from the workpiece before turning
off the grinder.
15
SIDE HANDLE ON RIGHT SIDE OF GRINDER
TOOLLESS GUARD 180°
270°
Fig. 10...
English Manual - Page 16

...
The battery pack for use only identical replacement parts. Handling of properly.
For battery storage longer than 30 days:
Store the battery pack where the temperature is dusty, also wear a dust mask.
This product contains nickel-cadmium batteries.
Consult your local waste authority for information regarding available recycling and/or disposal options. Also...
English Manual - Page 17

... necessary for you drop the grinder and damage the guard it may cause the guard to the correct position. Refer to Installing Grinding Wheel earlier in this manual. Tighten the clamp nut securely with the wrench provided.
If you to replace it from the
locking groove in the tool housing. � Remove...
English Manual - Page 18

... your nearest Authorized Service Center. OPERATOR'S MANUAL
4-1/2 in., 18 VOLT ANGLE GRINDER
P420
WARNING:
Some dust created by power sanding, sawing, grinding, drilling, ...space provided below.
• HOW TO ORDER REPAIR PARTS
When ordering repair parts, always give the following information:
• MODEL NUMBER
P420
• SERIAL NUMBER
Ryobi® is a registered trademark of ...
Repair Sheet - Page 3

...regarding your ANGLE GRINDER or when ordering repair parts. PARTS LIST
KEY NO. PART NUMBER
...RYOBI 18V ANGLE GRINDER -
MODEL NUMBER P420
The model number will be found on a plate attached to the motor housing.
PART...HANDLE ASSEMBLY 1
43
019012001043 * SCREW (M4.2 X 13 mm 1
44
019012001044 * SCREW (M4.2 X 32 mm 2
45
019012001045 AUXILLARY HANDLE 1
46
019012001046 WRENCH...
Similar Questions

What Is The Substitute For A Par
What is the substitute for part no brush holder
What is the substitute for part no brush holder
(Posted by Anonymous-162034 7 years ago)

What Is The Replacement Part Number For This Impeller?
(Posted by terrybridges1 9 years ago)

Replacement Part
I'm looking for the Support Arm for a RYOBI WS730 part # 080009002037. Have any ideas where I could ...
I'm looking for the Support Arm for a RYOBI WS730 part # 080009002037. Have any ideas where I could ...
(Posted by rmarsh14 10 years ago)

Can Anyone Tell Me How I Can Get A Replacement Part For The Clutch/chain Cover
I'm trying to find the clutch cover or chain cover assembly replacement part for a RYOBI RY10521 Cha...
I'm trying to find the clutch cover or chain cover assembly replacement part for a RYOBI RY10521 Cha...
(Posted by longck122 11 years ago)
Replacement Parts
I recently purchased a Ryobi BT3000 10" Table saw w/stand. The miter gauge for it is missing; only...
I recently purchased a Ryobi BT3000 10" Table saw w/stand. The miter gauge for it is missing; only...
(Posted by mica4339 11 years ago)