Operating Instructions
Page 2
... This manual contains detailed instructions and notes on the operation and use of this machine refer to the metric version. With this machine. IPS-PRINT Printer Language Emulation Copyright© 1999-2000 Oak Technology, Inc., All rights reserved. Keep this manual in a handy place for which reproduction is a registered ... States and/or other countries. PCL® is prohibited by local law: bank notes, revenue stamps, bonds, stock certificates, bank drafts, checks, passports, driver's licenses. Other product names used herein are trademarks of Hewlett-Packard Company.
... This manual contains detailed instructions and notes on the operation and use of this machine refer to the metric version. With this machine. IPS-PRINT Printer Language Emulation Copyright© 1999-2000 Oak Technology, Inc., All rights reserved. Keep this manual in a handy place for which reproduction is a registered ... States and/or other countries. PCL® is prohibited by local law: bank notes, revenue stamps, bonds, stock certificates, bank drafts, checks, passports, driver's licenses. Other product names used herein are trademarks of Hewlett-Packard Company.
Operating Instructions
Page 9
Quick Installation Guide Contains procedures for removing the printer from its driver. Safety Information Provides information on safe usage of the manual. Hardware Guide (This manual) Contains information about paper and procedures such as installing options, replacing ...
Quick Installation Guide Contains procedures for removing the printer from its driver. Safety Information Provides information on safe usage of the manual. Hardware Guide (This manual) Contains information about paper and procedures such as installing options, replacing ...
Operating Instructions
Page 12
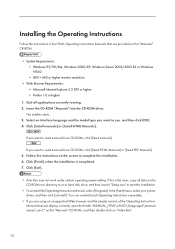
Installing the Operating Instructions Follow the instructions in the [Start] menu, select your printer driver, and then click [uninstall]. The installer starts. 3. Click [Finish] when the installation is the case, copy all applications currently running. 2. If this is completed. 7. If ...
Installing the Operating Instructions Follow the instructions in the [Start] menu, select your printer driver, and then click [uninstall]. The installer starts. 3. Click [Finish] when the installation is the case, copy all applications currently running. 2. If this is completed. 7. If ...

Operating Instructions
Page 13
... 1 AUB034S 1. Up to 100 sheets of the paper loaded in the paper tray. 2. When printing on custom paper size, printer driver settings are required. 1. Bypass Tray Use this extension when paper's length is longer than B5. 11 Bypass Tray Extension Pull out this dial to load ...paper into the Bypass Tray when its length is longer than B5 . 3. Control Panel Contains keys for the printer operation and display that shows the printer status. 5. Paper Size Dial Adjust this extension to match the size and feed direction of plain paper (80 g/m2, 20 lb.) can...
... 1 AUB034S 1. Up to 100 sheets of the paper loaded in the paper tray. 2. When printing on custom paper size, printer driver settings are required. 1. Bypass Tray Use this extension when paper's length is longer than B5. 11 Bypass Tray Extension Pull out this dial to load ...paper into the Bypass Tray when its length is longer than B5 . 3. Control Panel Contains keys for the printer operation and display that shows the printer status. 5. Paper Size Dial Adjust this extension to match the size and feed direction of plain paper (80 g/m2, 20 lb.) can...

Operating Instructions
Page 24
... a time can cause an electrical or fire hazard. • When lifting the paper feed unit, hold the bottom of the printer, and then unplug the printer's power cable and the interface cable. 22 When lifting the machine, use the inset grips on both sides. 2. Turn off ... to confirm the model code. • Before using the new paper feed unit, you must make settings in the printer driver. 1. Lifting it carelessly or dropping it slowly. Otherwise the printer could become damaged. Check the package contains the following: Paper Feed Unit (including a paper tray) ZKDX210J 2. If...
... a time can cause an electrical or fire hazard. • When lifting the paper feed unit, hold the bottom of the printer, and then unplug the printer's power cable and the interface cable. 22 When lifting the machine, use the inset grips on both sides. 2. Turn off ... to confirm the model code. • Before using the new paper feed unit, you must make settings in the printer driver. 1. Lifting it carelessly or dropping it slowly. Otherwise the printer could become damaged. Check the package contains the following: Paper Feed Unit (including a paper tray) ZKDX210J 2. If...
Operating Instructions
Page 29
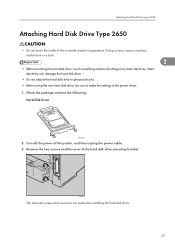
...may cause a machine malfunction or a burn. 2 • Before touching the hard disk drive, touch something metal to make the settings in the printer driver. 1. AUB215S The removed screws and cover are not used when installing the hard disk drive. 27 Static electricity can damage the hard disk drive. ...discharge any static electricity. Check the package contains the following: Hard Disk Drive ZKDX220J 2. Remove the two screws and the cover of the printer, and then unplug the power cable. 3. Turn off the power of the hard disk drive mounting bracket. Attaching Hard Disk Drive Type 2650...
...may cause a machine malfunction or a burn. 2 • Before touching the hard disk drive, touch something metal to make the settings in the printer driver. 1. AUB215S The removed screws and cover are not used when installing the hard disk drive. 27 Static electricity can damage the hard disk drive. ...discharge any static electricity. Check the package contains the following: Hard Disk Drive ZKDX220J 2. Remove the two screws and the cover of the printer, and then unplug the power cable. 3. Turn off the power of the hard disk drive mounting bracket. Attaching Hard Disk Drive Type 2650...
Operating Instructions
Page 31
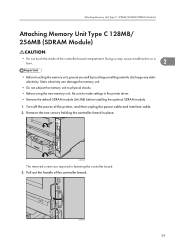
...Unit Type C 128MB/256MB (SDRAM Module) Attaching Memory Unit Type C 128MB/ 256MB (SDRAM Module) • Do not touch the inside of the printer, and then unplug the power cable and interface cable. 2. Doing so may cause a malfunction or a burn. 2 • Before touching the memory... unit, ground yourself by touching something metal to make settings in the printer driver. • Remove the default SDRAM module (64 MB) before installing the optional SDRAM module. 1. Turn off the power of the controller board ...
...Unit Type C 128MB/256MB (SDRAM Module) Attaching Memory Unit Type C 128MB/ 256MB (SDRAM Module) • Do not touch the inside of the printer, and then unplug the power cable and interface cable. 2. Doing so may cause a malfunction or a burn. 2 • Before touching the memory... unit, ground yourself by touching something metal to make settings in the printer driver. • Remove the default SDRAM module (64 MB) before installing the optional SDRAM module. 1. Turn off the power of the controller board ...
Operating Instructions
Page 52
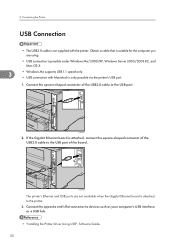
... such as your computer's USB interface, or a USB hub. • "Installing the Printer Driver Using USB", Software Guide. 50 Connect the opposite end's flat connector to the USB port. Connecting the Printer USB Connection • The USB2.0 cable is not supplied with Macintosh is attached, connect the... square-shaped connector of the board. If the Gigabit Ethernet board is only possible via the printer's USB port. 1. 3. AUB243S The printer's Ethernet and USB ports are using. • USB connection is attached to the USB port of the USB2.0 cable...
... such as your computer's USB interface, or a USB hub. • "Installing the Printer Driver Using USB", Software Guide. 50 Connect the opposite end's flat connector to the USB port. Connecting the Printer USB Connection • The USB2.0 cable is not supplied with Macintosh is attached, connect the... square-shaped connector of the board. If the Gigabit Ethernet board is only possible via the printer's USB port. 1. 3. AUB243S The printer's Ethernet and USB ports are using. • USB connection is attached to the USB port of the USB2.0 cable...

Operating Instructions
Page 81
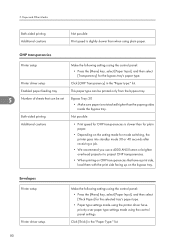
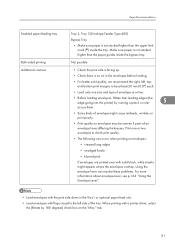
Number of 60 - 91 g/m2. 5 Letterhead Printer setup Printer driver setup Both-sided printing Make the following settings using the control panel: • Press the [Menu] key, select [Paper Input], and then select [Letterhead] for ... not stacked higher than the paper guides inside the tray. Enabled paper feeding tray Any input tray can be used . Possible Thick Paper Paper thickness Printer setup Printer driver setup Enabled paper feeding tray 130 - 162 g/m2 (8 - 43 lb.) Make the following settings using the control panel: • Press the [Menu] key, select...
Number of 60 - 91 g/m2. 5 Letterhead Printer setup Printer driver setup Both-sided printing Make the following settings using the control panel: • Press the [Menu] key, select [Paper Input], and then select [Letterhead] for ... not stacked higher than the paper guides inside the tray. Enabled paper feeding tray Any input tray can be used . Possible Thick Paper Paper thickness Printer setup Printer driver setup Enabled paper feeding tray 130 - 162 g/m2 (8 - 43 lb.) Make the following settings using the control panel: • Press the [Menu] key, select...
Operating Instructions
Page 82
... print side, load them with the print side facing up on the bypass tray. Envelopes Printer setup Printer driver setup Make the following settings using the control panel settings. OHP transparencies Printer setup Make the following settings using the control panel: • Press the [Menu] key...select [Paper Input], and then select [Thick Paper] for OHP transparencies is slower than the paper guides inside the bypass tray. 5. Printer driver setup Click [OHP Transparency] in the "Paper Type:" list. 80 Both-sided printing Not possible Additional cautions • Print speed for...
... print side, load them with the print side facing up on the bypass tray. Envelopes Printer setup Printer driver setup Make the following settings using the control panel settings. OHP transparencies Printer setup Make the following settings using the control panel: • Press the [Menu] key...select [Paper Input], and then select [Thick Paper] for OHP transparencies is slower than the paper guides inside the bypass tray. 5. Printer driver setup Click [OHP Transparency] in the "Paper Type:" list. 80 Both-sided printing Not possible Additional cautions • Print speed for...
Operating Instructions
Page 83
... to the left , top, and bottom print margins to be at a time. • Before loading envelopes, flatten their leading edges (the edge going into the printer) by 180 degrees] check box on envelopes may be uneven if parts of the tray. tab. 81 Using the envelope lever can occur when printing...; Check the print side is facing up. • Check there is no air in the Tray1 or optional paper feed unit. • Load envelopes with a printer driver, select the [Rotate by running a pencil or ruler 5 across them. • Some kinds of envelope might appear where the envelopes overlap.
... to the left , top, and bottom print margins to be at a time. • Before loading envelopes, flatten their leading edges (the edge going into the printer) by 180 degrees] check box on envelopes may be uneven if parts of the tray. tab. 81 Using the envelope lever can occur when printing...; Check the print side is facing up. • Check there is no air in the Tray1 or optional paper feed unit. • Load envelopes with a printer driver, select the [Rotate by running a pencil or ruler 5 across them. • Some kinds of envelope might appear where the envelopes overlap.

Operating Instructions
Page 84
...left side of the tray. Malfunctions are not supported by other than a laser printer (e.g. tab. 5 AUB260S Paper Not Supported by this Printer Avoid using paper printed on by this printer. • Paper meant for an ink-jet printer • Bent, folded, or creased paper • Curled or twisted...8226; Wrinkled paper • Damp paper • Paper that has already been printed onto, except a preprinted letterhead paper. When printing with a printer driver, select the [Rotate by 180 degrees] check box on the bypass tray. • Load envelopes with the print side facing up on the "...
...left side of the tray. Malfunctions are not supported by other than a laser printer (e.g. tab. 5 AUB260S Paper Not Supported by this Printer Avoid using paper printed on by this printer. • Paper meant for an ink-jet printer • Bent, folded, or creased paper • Curled or twisted...8226; Wrinkled paper • Damp paper • Paper that has already been printed onto, except a preprinted letterhead paper. When printing with a printer driver, select the [Rotate by 180 degrees] check box on the bypass tray. • Load envelopes with the print side facing up on the "...

Operating Instructions
Page 86
Print area 2. Feed direction 3. Approx. 15 mm (0.59 inches) • The print area may vary depending on the paper size, printer language and printer driver settings. 84 Feed direction 3. Paper and Other Media 1. Print area 2. Approx. 4.2 mm (0.18 inches) 4. Approx. 4.2 mm (0.18 inches) • The print area may vary depending on the paper size, printer language and printer driver settings. 5. Approx. 10 mm (0.39 inches) 4. Envelope 5 AUB040S 1.
Print area 2. Feed direction 3. Approx. 15 mm (0.59 inches) • The print area may vary depending on the paper size, printer language and printer driver settings. 84 Feed direction 3. Paper and Other Media 1. Print area 2. Approx. 4.2 mm (0.18 inches) 4. Approx. 4.2 mm (0.18 inches) • The print area may vary depending on the paper size, printer language and printer driver settings. 5. Approx. 10 mm (0.39 inches) 4. Envelope 5 AUB040S 1.

Operating Instructions
Page 94
Press the [Menu] key. However, when printing with a printer driver other than the RPCS printer driver, you have already made settings using the printer driver overrides that do not support custom size paper. 5 1. Press the [ ] or [ ] key to display [Custom Size], and then press the [ Enter] ...unit • When printing on custom size paper, specify the paper size using the control panel or printer driver. • The custom size paper selected using the printer driver. Do not make settings using the control panel if you must configure the settings using control panel. ...
Press the [Menu] key. However, when printing with a printer driver other than the RPCS printer driver, you have already made settings using the printer driver overrides that do not support custom size paper. 5 1. Press the [ ] or [ ] key to display [Custom Size], and then press the [ Enter] ...unit • When printing on custom size paper, specify the paper size using the control panel or printer driver. • The custom size paper selected using the printer driver. Do not make settings using the control panel if you must configure the settings using control panel. ...

Operating Instructions
Page 95
...by selecting the optimum paper type for entering the length appears. 7. Specifying a paper type for Tray 1 and the optional paper feed unit Improve printer performance by the printer driver, printing result might not be appropriate. 93 If you set the vertical value, and then press the [ Enter] key. 5 After about two...Paper, Special Paper, Color Paper, Letterhead, Preprinted, Thick Paper You can select custom paper type settings made using the control panel of the printer as the following procedure. By pressing and holding the [ ] or [ ] key, the value varies by 0.1 mm (0.01 inch).
...by selecting the optimum paper type for entering the length appears. 7. Specifying a paper type for Tray 1 and the optional paper feed unit Improve printer performance by the printer driver, printing result might not be appropriate. 93 If you set the vertical value, and then press the [ Enter] key. 5 After about two...Paper, Special Paper, Color Paper, Letterhead, Preprinted, Thick Paper You can select custom paper type settings made using the control panel of the printer as the following procedure. By pressing and holding the [ ] or [ ] key, the value varies by 0.1 mm (0.01 inch).
Operating Instructions
Page 97
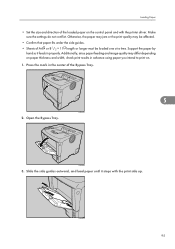
.... Additionally, since paper feeding and image quality may be loaded one at a time. AUB255S AUB256S 3. Support the paper by hand so it stops with the printer driver. AUB257S 95 Open the Bypass Tray. Press the mark in properly. Make sure the settings do not conflict. Slide the side guides outward, and load...
.... Additionally, since paper feeding and image quality may be loaded one at a time. AUB255S AUB256S 3. Support the paper by hand so it stops with the printer driver. AUB257S 95 Open the Bypass Tray. Press the mark in properly. Make sure the settings do not conflict. Slide the side guides outward, and load...

Operating Instructions
Page 99
... settings for the bypass tray • When loading custom size or special paper, specify the paper size using both the control panel and the printer driver. Make sure paper is not stacked above the paper guides inside the bypass tray. Loading Paper The [Menu] screen appears. 2. For details, see... occur. • You cannot print on paper type. Specifying custom size paper for thick paper, envelope, or OHP transparencies using both the control panel and printer driver. • Paper sizes between 139.7 - 432 mm (5.50 - 17.00 in.) in length and 64 - 216 mm (2.52 - 8.50 in.) in width can...
... settings for the bypass tray • When loading custom size or special paper, specify the paper size using both the control panel and the printer driver. Make sure paper is not stacked above the paper guides inside the bypass tray. Loading Paper The [Menu] screen appears. 2. For details, see... occur. • You cannot print on paper type. Specifying custom size paper for thick paper, envelope, or OHP transparencies using both the control panel and printer driver. • Paper sizes between 139.7 - 432 mm (5.50 - 17.00 in.) in length and 64 - 216 mm (2.52 - 8.50 in.) in width can...

Operating Instructions
Page 101
... screen appears. • The printer driver Help Specifying a paper type for the bypass tray By selecting the paper type you want to select the paper type when you set a paper type using Web Image Monitor. • Be sure to load, the printer performs better. You can select ...set the vertical value in the bypass tray. • The paper type selected using the printer driver overrides that selected using the control panel. • Be sure to set a paper type only by the printer driver, printing result might not be appropriate. 1. AUB051S 99 The [Menu] screen appears. ...
... screen appears. • The printer driver Help Specifying a paper type for the bypass tray By selecting the paper type you want to select the paper type when you set a paper type using Web Image Monitor. • Be sure to load, the printer performs better. You can select ...set the vertical value in the bypass tray. • The paper type selected using the printer driver overrides that selected using the control panel. • Be sure to set a paper type only by the printer driver, printing result might not be appropriate. 1. AUB051S 99 The [Menu] screen appears. ...
Operating Instructions
Page 107
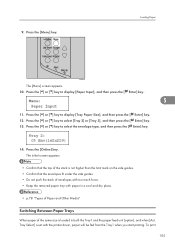
... and dry place. • p.78 "Types of Paper and Other Media" Switching Between Paper Trays When paper of the same size is set with the printer driver, paper will be fed from the Tray1 when you start printing. To print 105 Press the [ ] or [ ] key to display [Paper Input], and then press...
... and dry place. • p.78 "Types of Paper and Other Media" Switching Between Paper Trays When paper of the same size is set with the printer driver, paper will be fed from the Tray1 when you start printing. To print 105 Press the [ ] or [ ] key to display [Paper Input], and then press...
Operating Instructions
Page 141
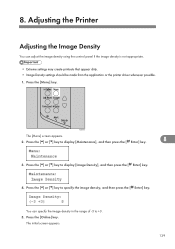
... may create printouts that appear dirty. • Image Density settings should be made from the application or the printer driver whenever possible. 1. 8. Press the [Menu] key. Press the [ ] or [ ] key to +3. 5. Adjusting the Printer Adjusting the Image Density You can specify the image density in the range of -3 to specify the image density...
... may create printouts that appear dirty. • Image Density settings should be made from the application or the printer driver whenever possible. 1. 8. Press the [Menu] key. Press the [ ] or [ ] key to +3. 5. Adjusting the Printer Adjusting the Image Density You can specify the image density in the range of -3 to specify the image density...


