

User Guide
Page 3
TABLE OF CONTENTS How to Read This Manual...6 Introduction...6 Legal Prohibition...6 Disclaimer...6 About IP Address...7 Differences in the State of Facsimile Unit...11 NOTICE TO USERS (NEW ZEALAND)...11 Important Safety Instructions ...12 Notes to Components...15 ...Tray 1...35 1 Guide to the Machine Guide to Users in Performance/Functions between Different Models 7 Model-Specific Information...8 Important Safety Instructions ...9 User Information on Electrical & Electronic Equipment 9 Environmental Advice for Users...9 Note for the Battery and/or Accumulator Symbol (...
TABLE OF CONTENTS How to Read This Manual...6 Introduction...6 Legal Prohibition...6 Disclaimer...6 About IP Address...7 Differences in the State of Facsimile Unit...11 NOTICE TO USERS (NEW ZEALAND)...11 Important Safety Instructions ...12 Notes to Components...15 ...Tray 1...35 1 Guide to the Machine Guide to Users in Performance/Functions between Different Models 7 Model-Specific Information...8 Important Safety Instructions ...9 User Information on Electrical & Electronic Equipment 9 Environmental Advice for Users...9 Note for the Battery and/or Accumulator Symbol (...

User Guide
Page 11
... yield Please refer to discard this product, please contact your local dealer or sales/service representatives. All Other Users If you wish to either the User's Manual for this product, please contact the shop where you purchased it, your local dealer or sales/service representatives....environment. The symbol indicates that this product is produced in accordance with the symbol below. Important Safety Instructions User Information on Electrical & Electronic Equipment Users in the countries where this symbol shown in this section has been specified in national law on collection and...
... yield Please refer to discard this product, please contact your local dealer or sales/service representatives. All Other Users If you wish to either the User's Manual for this product, please contact the shop where you purchased it, your local dealer or sales/service representatives....environment. The symbol indicates that this product is produced in accordance with the symbol below. Important Safety Instructions User Information on Electrical & Electronic Equipment Users in the countries where this symbol shown in this section has been specified in national law on collection and...
User Guide
Page 23
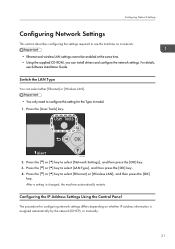
... network settings. Press the [ ] or [ ] key to select [LAN Type], and then press the [OK] key. 4. CTT129 2. For details, see Software Installation Guide. Press the [User Tools] key. Press the [ ] or [ ] key to select [Network Settings], and then press the [OK] key. 3. Configuring Network Settings Configuring Network Settings This section describes... to use the machine on whether IP address information is changed, the machine automatically restarts. After a setting is assigned automatically by the network (DHCP), or manually. 21
... network settings. Press the [ ] or [ ] key to select [LAN Type], and then press the [OK] key. 4. CTT129 2. For details, see Software Installation Guide. Press the [User Tools] key. Press the [ ] or [ ] key to select [Network Settings], and then press the [OK] key. 3. Configuring Network Settings Configuring Network Settings This section describes... to use the machine on whether IP address information is changed, the machine automatically restarts. After a setting is assigned automatically by the network (DHCP), or manually. 21
User Guide
Page 25
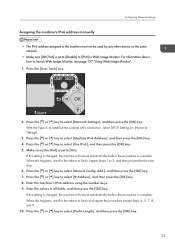
Press the [User Tools] key. CTT129 2. If this happens, wait for the reboot to finish, repeat Steps 1 to 3, ... to finish and repeat the procedure except Steps 4, 5, 7, 8, and 9. 10. Configuring Network Settings Assigning the machine's IPv6 address manually • The IPv6 address assigned to the machine must not be used by any other device on the same network. • Make... in all fields, and then press the [OK] key. Press the [ ] or [ ] key to select [Manual Config. Add.], and then press the [OK] key. 7. For information about how to [Disable] in [IPv6] in [Network Settings]. 3.
Press the [User Tools] key. CTT129 2. If this happens, wait for the reboot to finish, repeat Steps 1 to 3, ... to finish and repeat the procedure except Steps 4, 5, 7, 8, and 9. 10. Configuring Network Settings Assigning the machine's IPv6 address manually • The IPv6 address assigned to the machine must not be used by any other device on the same network. • Make... in all fields, and then press the [OK] key. Press the [ ] or [ ] key to select [Manual Config. Add.], and then press the [OK] key. 7. For information about how to [Disable] in [IPv6] in [Network Settings]. 3.
User Guide
Page 26
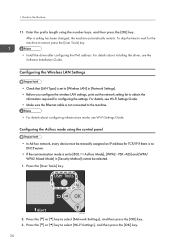
... configuring the settings. For details, see Wi-Fi Settings Guide. • Make sure the Ethernet cable is set to restart, press the [User Tools] key. • Install the driver after configuring the IPv6 address. CTT129 2. For details about configuring infrastructure mode, see the Software Installation...]. • Before you configure the wireless LAN settings, print out the network setting list to [Wireless LAN] in [Security Method] cannot be manually assigned an IP address for the machine to [802.11 Ad-hoc Mode], [WPA2 - Configuring the Ad hoc mode using the number keys,...
... configuring the settings. For details, see Wi-Fi Settings Guide. • Make sure the Ethernet cable is set to restart, press the [User Tools] key. • Install the driver after configuring the IPv6 address. CTT129 2. For details about configuring infrastructure mode, see the Software Installation...]. • Before you configure the wireless LAN settings, print out the network setting list to [Wireless LAN] in [Security Method] cannot be manually assigned an IP address for the machine to [802.11 Ad-hoc Mode], [WPA2 - Configuring the Ad hoc mode using the number keys,...

User Guide
Page 107
...the handset. 105 To receive a fax, press the [3] key. (3: RX) 4. Press the [User Tools] key to return to fax mode using the [Facsimile] key, and then press the [Start] key. Press the... [User Tools] key. When you hear a fax calling tone or no sound, switch to the initial screen.... press the [OK] key. 6. Press the [ ] or [ ] keys to first remove any originals loaded in Manual mode • To receive faxes, be sure to select [RX Settings], and then press the [OK] key. 4. 1. Receiving a fax in...
...the handset. 105 To receive a fax, press the [3] key. (3: RX) 4. Press the [User Tools] key to return to fax mode using the [Facsimile] key, and then press the [Start] key. Press the... [User Tools] key. When you hear a fax calling tone or no sound, switch to the initial screen.... press the [OK] key. 6. Press the [ ] or [ ] keys to first remove any originals loaded in Manual mode • To receive faxes, be sure to select [RX Settings], and then press the [OK] key. 4. 1. Receiving a fax in...

User Guide
Page 116
... machine only reduces the size down to fit the fax on a single sheet, it receives incoming calls. The header includes the current date and time, user fax name and number, Session number, and page information. The machine receives faxes only when you send. 7. Default: [On] • Off • On RX ...to reduce the size of paper. Default: [On] • Off • On Print Fax Header Sets the machine to add a header to every fax you manually operate the machine to redial the fax destination automatically when the line is too large to 15 seconds, in fax reception mode. •...
... machine only reduces the size down to fit the fax on a single sheet, it receives incoming calls. The header includes the current date and time, user fax name and number, Session number, and page information. The machine receives faxes only when you send. 7. Default: [On] • Off • On RX ...to reduce the size of paper. Default: [On] • Off • On Print Fax Header Sets the machine to add a header to every fax you manually operate the machine to redial the fax destination automatically when the line is too large to 15 seconds, in fax reception mode. •...

User Guide
Page 119
... PBX Access Number Specifies the dial number to access the external line when the machine is enabled, when trying to send a fax by manually entering a fax number, the user will be prompted to re-enter the number for every 100 fax jobs (both sent and received). Otherwise, you may not be sent...
... PBX Access Number Specifies the dial number to access the external line when the machine is enabled, when trying to send a fax by manually entering a fax number, the user will be prompted to re-enter the number for every 100 fax jobs (both sent and received). Otherwise, you may not be sent...


