User Guide
Page 3
... Using the Web Image Monitor 15 Configuring the IP Address Settings Using the Web Image Monitor 15 Configuring the Wireless LAN Settings...16 2. Loading Paper Supported Paper...21 Non-Recommended Paper Types...23 Print Area...24 Loading Paper...25 Loading Paper into Tray 1...25 Loading Paper into Bypass Tray...28 Specifying Paper Type and Paper Size Using Smart Organizing Monitor 29 3. Guide to the Machine Guide to Users in Performance/Functions between Different Models 5 Model-Specific Information...6 Important Safety Instructions ...7 User Information on Both Sides...
... Using the Web Image Monitor 15 Configuring the IP Address Settings Using the Web Image Monitor 15 Configuring the Wireless LAN Settings...16 2. Loading Paper Supported Paper...21 Non-Recommended Paper Types...23 Print Area...24 Loading Paper...25 Loading Paper into Tray 1...25 Loading Paper into Bypass Tray...28 Specifying Paper Type and Paper Size Using Smart Organizing Monitor 29 3. Guide to the Machine Guide to Users in Performance/Functions between Different Models 5 Model-Specific Information...6 Important Safety Instructions ...7 User Information on Both Sides...

User Guide
Page 4
... Error and Status Messages Appear on the Smart Organizing Monitor 68 7. Appendix Notes About the Toner...71 Moving and Transporting the Machine...72 Disposal...72 2 Troubleshooting Common Problems...57 Paper Feed Problems...58 Removing Printing Jams...59 Print Quality Problems...65 Checking the Condition of the Machine...56 6. Canceling a Print Job...33 If a Paper Mismatch Occurs...34 Continuing Printing Using Mismatched Paper 34 Resetting the Print Job...34 4. Configuring the Machine Using Utilities Using Web Image Monitor...35 Displaying Top Page...35 Changing the Interface Language...
... Error and Status Messages Appear on the Smart Organizing Monitor 68 7. Appendix Notes About the Toner...71 Moving and Transporting the Machine...72 Disposal...72 2 Troubleshooting Common Problems...57 Paper Feed Problems...58 Removing Printing Jams...59 Print Quality Problems...65 Checking the Condition of the Machine...56 6. Canceling a Print Job...33 If a Paper Mismatch Occurs...34 Continuing Printing Using Mismatched Paper 34 Resetting the Print Job...34 4. Configuring the Machine Using Utilities Using Web Image Monitor...35 Displaying Top Page...35 Changing the Interface Language...
User Guide
Page 10
... that the default setting for recycling will be accepted free of time passes, the device switches to return from an energy saving mode than from your household waste. The machine is to print again, it prints the last page. Duplex printing (if applicable) Duplex printing enables both sides of a sheet of them correctly at your service person. For details about the return program, please refer to the Web page below or...
... that the default setting for recycling will be accepted free of time passes, the device switches to return from an energy saving mode than from your household waste. The machine is to print again, it prints the last page. Duplex printing (if applicable) Duplex printing enables both sides of a sheet of them correctly at your service person. For details about the return program, please refer to the Web page below or...

User Guide
Page 13
... rear side of paper in progress. 11 Power Indicator This indicator lights up blue when the machine is in duplex printing and to execute forced printing. 3. Exterior 9 1 2 3 10 4 5 6 7 8 11 12 13 14 CTT108 1. [Job Reset] key Press this key to cancel an ongoing print job. 2. [Start] key Press this key to paper running out or a paper settings error. It flashes when a print job is received and while printing is turned on...
... rear side of paper in progress. 11 Power Indicator This indicator lights up blue when the machine is in duplex printing and to execute forced printing. 3. Exterior 9 1 2 3 10 4 5 6 7 8 11 12 13 14 CTT108 1. [Job Reset] key Press this key to cancel an ongoing print job. 2. [Start] key Press this key to paper running out or a paper settings error. It flashes when a print job is received and while printing is turned on...

User Guide
Page 14
... settings specified by the driver, or when other errors occur. 5. Tray Cover Attach this cover to deliver sheets face up red when the machine runs out of the cable into a nearby wall outlet. 11. Guide to replace consumables or clear a paper jam. 7. Front Cover Open this port to connect the machine to turn the power on or off . 6. 1. Ethernet Port Use this fence to network using a USB cable. 13. Alert Indicator This indicator lights up or remove jammed paper. 12. Stop...
... settings specified by the driver, or when other errors occur. 5. Tray Cover Attach this cover to deliver sheets face up red when the machine runs out of the cable into a nearby wall outlet. 11. Guide to replace consumables or clear a paper jam. 7. Front Cover Open this port to connect the machine to turn the power on or off . 6. 1. Ethernet Port Use this fence to network using a USB cable. 13. Alert Indicator This indicator lights up or remove jammed paper. 12. Stop...

User Guide
Page 16
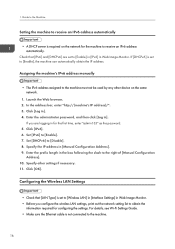
... check the list of [Error Skip:]. • Modify the wireless LAN settings Configure the wireless LAN settings manually. For Type 2 models, specify [Auto Continue:] instead of settings for this machine and other information. • Modify the IPv4 Address Use to specify the IPv4 address. • Modify the system settings Use to change custom paper size settings and other settings on this machine. • Modify the printer settings Use to use Smart Organizing Monitor, see Software Installation Guide. For details about basic instructions...
... check the list of [Error Skip:]. • Modify the wireless LAN settings Configure the wireless LAN settings manually. For Type 2 models, specify [Auto Continue:] instead of settings for this machine and other information. • Modify the IPv4 Address Use to specify the IPv4 address. • Modify the system settings Use to change custom paper size settings and other settings on this machine. • Modify the printer settings Use to use Smart Organizing Monitor, see Software Installation Guide. For details about basic instructions...
User Guide
Page 17
... [OK]. In the address bar, enter "http://(machine's IP address)/". 3. Launch the Web browser. 2. Configuring Network Settings Configuring Network Settings This section explains how to configure network settings. • Ethernet and wireless LAN settings cannot be enabled at the same time. • Using the supplied CD-ROM, you are logging in for the first time, enter "admin133" as the password. 5. For details, see the Software Installation Guide. 15 Set [LAN Type] to configure this setting for the Type 2 model. 1.
... [OK]. In the address bar, enter "http://(machine's IP address)/". 3. Launch the Web browser. 2. Configuring Network Settings Configuring Network Settings This section explains how to configure network settings. • Ethernet and wireless LAN settings cannot be enabled at the same time. • Using the supplied CD-ROM, you are logging in for the first time, enter "admin133" as the password. 5. For details, see the Software Installation Guide. 15 Set [LAN Type] to configure this setting for the Type 2 model. 1.
User Guide
Page 18
... same network. 1. Set [IPv6] to [Disable]. 8. Specify the IP address in ]. 4. Assigning the machine's IPv6 address manually • The IPv6 address assigned to the machine. 16 If [DHCPv6] is not connected to the machine must not be used by any other settings if necessary. 11. If you are set to [Enable] in [IPv6] in Web Image Monitor. • Before you configure the wireless LAN settings, print out the network setting list...
... same network. 1. Set [IPv6] to [Disable]. 8. Specify the IP address in ]. 4. Assigning the machine's IPv6 address manually • The IPv6 address assigned to the machine. 16 If [DHCPv6] is not connected to the machine must not be used by any other settings if necessary. 11. If you are set to [Enable] in [IPv6] in Web Image Monitor. • Before you configure the wireless LAN settings, print out the network setting list...
User Guide
Page 28
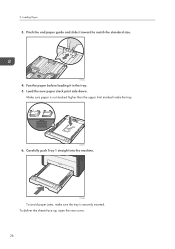
CTT075 6. Fan the paper before loading it inward to match the standard size. Loading Paper 3. Carefully push Tray 1 straight into the machine. CTT074 4. 2. Make sure paper is securely inserted. CTT029 To avoid paper jams, make sure the tray is not stacked higher than the upper limit marked inside the tray. Pinch the end paper guide and slide it in the tray. 5. Load the new paper stack print side down. To deliver the sheets face up, open the rear cover. 26
CTT075 6. Fan the paper before loading it inward to match the standard size. Loading Paper 3. Carefully push Tray 1 straight into the machine. CTT074 4. 2. Make sure paper is securely inserted. CTT029 To avoid paper jams, make sure the tray is not stacked higher than the upper limit marked inside the tray. Pinch the end paper guide and slide it in the tray. 5. Load the new paper stack print side down. To deliver the sheets face up, open the rear cover. 26

User Guide
Page 33
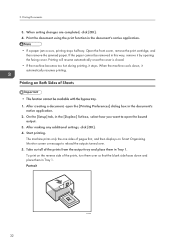
... print settings can be specified using the printer driver: • Printing multiple pages on a sheet • Splitting a single page across multiple sheets • Printing on both sides of sheets • Not having blank pages printed • Having prints sorted • Saving printer driver settings as a file • Recalling and deleting saved printer properties settings • Printing on a custom size paper • Printing a large paper size document on smaller size paper • Reducing and enlarging a document size • Changing the print resolution • Saving on toner...
... print settings can be specified using the printer driver: • Printing multiple pages on a sheet • Splitting a single page across multiple sheets • Printing on both sides of sheets • Not having blank pages printed • Having prints sorted • Saving printer driver settings as a file • Recalling and deleting saved printer properties settings • Printing on a custom size paper • Printing a large paper size document on smaller size paper • Reducing and enlarging a document size • Changing the print resolution • Saving on toner...
User Guide
Page 34
... function cannot be removed in Tray 1. Printing Documents 3. Print the document using the print function in Tray 1. Open the front cover, remove the print cartridge, and then remove the jammed paper. Printing will resume automatically once the cover is closed. • If the machine becomes too hot during printing, it by opening the fusing cover. After creating a document, open the bound output. 3. After making any additional settings, click [OK]. 4. Start printing. When setting changes are completed, click...
... function cannot be removed in Tray 1. Printing Documents 3. Print the document using the print function in Tray 1. Open the front cover, remove the print cartridge, and then remove the jammed paper. Printing will resume automatically once the cover is closed. • If the machine becomes too hot during printing, it by opening the fusing cover. After creating a document, open the bound output. 3. After making any additional settings, click [OK]. 4. Start printing. When setting changes are completed, click...
User Guide
Page 43
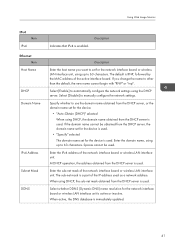
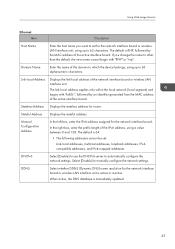
... device. • "Auto-Obtain (DHCP)" selected When using up to 63 characters. When active, the DNS database is enabled. Using Web Image Monitor IPv4 Item IPv4 Ethernet Item Host Name DHCP Domain Name IPv4 Address Subnet Mask DDNS Indicates that IPv4 is immediately updated. 41 Description Description Enter the host name you change the name to set for the network interface board or wireless LAN interface unit, using the DHCP server...
... device. • "Auto-Obtain (DHCP)" selected When using up to 63 characters. When active, the DNS database is enabled. Using Web Image Monitor IPv4 Item IPv4 Ethernet Item Host Name DHCP Domain Name IPv4 Address Subnet Mask DDNS Indicates that IPv4 is immediately updated. 41 Description Description Enter the host name you change the name to set for the network interface board or wireless LAN interface unit, using the DHCP server...
User Guide
Page 45
... [Enable] to use the DHCPv6 server to automatically configure the network settings. The default is active or inactive. Link-local Address Displays the link-local address of the active interface board. Stateful Address Displays the stateful address. Manual Configuration Address In the left box, enter the IPv6 address assigned for router. The link-local address applies only within the local network (local segment) and begins with "RNP" or "rnp". Select [Disable...
... [Enable] to use the DHCPv6 server to automatically configure the network settings. The default is active or inactive. Link-local Address Displays the link-local address of the active interface board. Stateful Address Displays the stateful address. Manual Configuration Address In the left box, enter the IPv6 address assigned for router. The link-local address applies only within the local network (local segment) and begins with "RNP" or "rnp". Select [Disable...
User Guide
Page 46
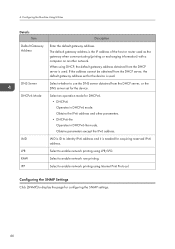
... identity IPv6 address and it is used. Select an operation mode for acquiring reserved IPv6 address. Configuring the SNMP Settings Click [SNMP] to enable network printing using Internet Print Protocol. Select to display the page for the device. When using LPR/LPD. Select to enable network raw printing. If the address cannot be obtained from the DHCP server is the IP address of the host or router used . The default gateway address is used as the...
... identity IPv6 address and it is used. Select an operation mode for acquiring reserved IPv6 address. Configuring the SNMP Settings Click [SNMP] to enable network printing using Internet Print Protocol. Select to display the page for the device. When using LPR/LPD. Select to enable network raw printing. If the address cannot be obtained from the DHCP server is the IP address of the host or router used . The default gateway address is used as the...
User Guide
Page 50
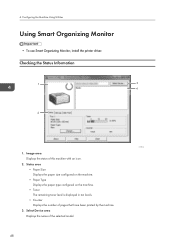
...; Paper Type Displays the paper type configured on the machine. • Toner The remaining toner level is displayed in ten levels. • Counter Displays the number of this machine with an icon. 2. Image area Displays the status of pages that have been printed by the machine. 3. Select Device area Displays the name of the selected model. 48 Configuring the Machine Using Utilities Using Smart Organizing Monitor • To use Smart Organizing Monitor, install the printer driver. Checking the Status...
...; Paper Type Displays the paper type configured on the machine. • Toner The remaining toner level is displayed in ten levels. • Counter Displays the number of this machine with an icon. 2. Image area Displays the status of pages that have been printed by the machine. 3. Select Device area Displays the name of the selected model. 48 Configuring the Machine Using Utilities Using Smart Organizing Monitor • To use Smart Organizing Monitor, install the printer driver. Checking the Status...

User Guide
Page 51
... Monitor for SP xxx Series Status]. 4. Printer tab • Configure how the machine behaves when its paper size and/or type settings do not match those of the printer driver. • Specify the period of the machine settings that will elapse before switching to improve the printing quality when printed results are using Smart Organizing Monitor. For details about error messages, see page 68 "Error and Status Messages Appear on each setting item, see...
... Monitor for SP xxx Series Status]. 4. Printer tab • Configure how the machine behaves when its paper size and/or type settings do not match those of the printer driver. • Specify the period of the machine settings that will elapse before switching to improve the printing quality when printed results are using Smart Organizing Monitor. For details about error messages, see page 68 "Error and Status Messages Appear on each setting item, see...

User Guide
Page 68
... after it . • Check whether other applications, as graphics-heavy documents, take longer to a larger value than the current settings. A print job is being used. Troubleshooting Printer Problems Problem Solution An error occurs. Adjust the print position by specifying [Tray1: Registration] or [Bypass Tray: Registration] on data volume. Use paper that the latest printer driver is canceled. • Set I/O Timeout to process. If an error occurs when printing, change in Smart Organizing Monitor...
... after it . • Check whether other applications, as graphics-heavy documents, take longer to a larger value than the current settings. A print job is being used. Troubleshooting Printer Problems Problem Solution An error occurs. Adjust the print position by specifying [Tray1: Registration] or [Bypass Tray: Registration] on data volume. Use paper that the latest printer driver is canceled. • Set I/O Timeout to process. If an error occurs when printing, change in Smart Organizing Monitor...
User Guide
Page 69
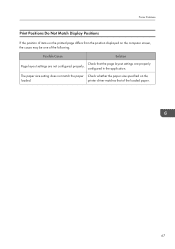
printer driver matches that the page layout settings are not configured properly. Check that of the following. Printer Problems Print Positions Do Not Match Display Positions If the position of items on the printed page differs from the position displayed on the loaded. The paper size setting does not match the paper Check whether the paper size specified on the computer screen, the cause may be one of the loaded paper. 67 Possible Cause Solution Page layout settings are properly configured in the application.
printer driver matches that the page layout settings are not configured properly. Check that of the following. Printer Problems Print Positions Do Not Match Display Positions If the position of items on the printed page differs from the position displayed on the loaded. The paper size setting does not match the paper Check whether the paper size specified on the computer screen, the cause may be one of the loaded paper. 67 Possible Cause Solution Page layout settings are properly configured in the application.
User Guide
Page 70
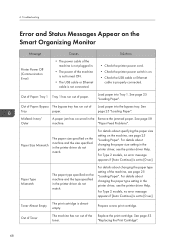
... printer driver Help. See page 53 toner. 6. See page 25 "Loading Paper". Load paper into Tray 1. Misfeed: Inner/ Outer A paper jam has occurred in . • The power of the machine is not turned ON. • The USB cable or Ethernet cable is not connected. • Check the printer power cord. • Check the printer power switch is on the Smart Organizing Monitor Message Causes Solutions Printer Power Off (Communication Error) • The power cable of paper. "Replacing the Print Cartridge". 68 Troubleshooting Error and Status Messages Appear on . • Check...
... printer driver Help. See page 53 toner. 6. See page 25 "Loading Paper". Load paper into Tray 1. Misfeed: Inner/ Outer A paper jam has occurred in . • The power of the machine is not turned ON. • The USB cable or Ethernet cable is not connected. • Check the printer power cord. • Check the printer power switch is on the Smart Organizing Monitor Message Causes Solutions Printer Power Off (Communication Error) • The power cable of paper. "Replacing the Print Cartridge". 68 Troubleshooting Error and Status Messages Appear on . • Check...
User Guide
Page 81
... page 50 Consumables 73 D Disclaimer 4 Duplex 32 E Error messages 68 Exterior 11 F Firmware 50 I Important Safety Instructions 7, 9 Interior 12 Introduction 4 IP address 15 J Job cancel 33 L Legal prohibition 4 Loading paper 25 M Machine settings 49 Models 6 Moving 72 N Network settings 15 Non-recommended paper 23 P Paper feed problems 58 Paper jam 59, 62 Paper mismatch 34 Print area 24 Print cartridge 53, 73 Print quality problems 65 Printer function 75 Printer problems 66 R Replace 53 S Smart Organizing Monitor 14 Specifications 74, 75 Specifying the paper type...
... page 50 Consumables 73 D Disclaimer 4 Duplex 32 E Error messages 68 Exterior 11 F Firmware 50 I Important Safety Instructions 7, 9 Interior 12 Introduction 4 IP address 15 J Job cancel 33 L Legal prohibition 4 Loading paper 25 M Machine settings 49 Models 6 Moving 72 N Network settings 15 Non-recommended paper 23 P Paper feed problems 58 Paper jam 59, 62 Paper mismatch 34 Print area 24 Print cartridge 53, 73 Print quality problems 65 Printer function 75 Printer problems 66 R Replace 53 S Smart Organizing Monitor 14 Specifications 74, 75 Specifying the paper type...


