Operation Manual
Page 2
... from Liability Ricoh Co., Ltd. Keep the manual handy for your camera is a registered trademark of SunDisk Corporation in the United States of America. If interference occurs, follow the procedures below. - Introduction Thank you have questions about any part of test shots. Warranty This product is manufactured to record or play back images caused by taking a number of the manual, or...
... from Liability Ricoh Co., Ltd. Keep the manual handy for your camera is a registered trademark of SunDisk Corporation in the United States of America. If interference occurs, follow the procedures below. - Introduction Thank you have questions about any part of test shots. Warranty This product is manufactured to record or play back images caused by taking a number of the manual, or...
Operation Manual
Page 3
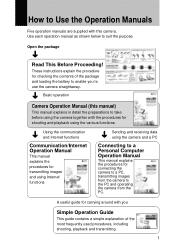
...; Camera Operation Manual (this camera. A useful guide for carrying around with the procedures for shooting and playback using the various functions. ➜ ➜ Using the communication and Internet functions Communication/Internet Operation Manual This manual explains the procedures for transmitting images and using the camera and a PC Connecting to a Personal Computer Operation Manual This manual explains the procedures for checking the contents of the package and loading the battery to enable you Simple Operation Guide...
...; Camera Operation Manual (this camera. A useful guide for carrying around with the procedures for shooting and playback using the various functions. ➜ ➜ Using the communication and Internet functions Communication/Internet Operation Manual This manual explains the procedures for transmitting images and using the camera and a PC Connecting to a Personal Computer Operation Manual This manual explains the procedures for checking the contents of the package and loading the battery to enable you Simple Operation Guide...

Operation Manual
Page 4
... Started Before Using the Camera 14 Attaching the Neck Strap 14 Attaching the Lens Cap 14 Powering the Camera 15 Charging the Battery 15 Loading the Battery 16 Connecting an AC Adapter 18 Storage Memory 19 Inserting a CF Card or PC Card 20 Chapter 2 Basic Operations Turning On/Off the Camera 24 How to Use the Mode Dial 25 LCD Monitor and LCD Panel 26 Recording Mode 26 Play Mode 27 Adjusting the LCD Monitor 28 Adjusting the LCD...
... Started Before Using the Camera 14 Attaching the Neck Strap 14 Attaching the Lens Cap 14 Powering the Camera 15 Charging the Battery 15 Loading the Battery 16 Connecting an AC Adapter 18 Storage Memory 19 Inserting a CF Card or PC Card 20 Chapter 2 Basic Operations Turning On/Off the Camera 24 How to Use the Mode Dial 25 LCD Monitor and LCD Panel 26 Recording Mode 26 Play Mode 27 Adjusting the LCD Monitor 28 Adjusting the LCD...
Operation Manual
Page 5
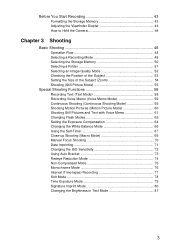
...Special Shooting Functions 58 Recording Text (Text Mode 58 Recording Voice Memo (Voice Memo Mode 59 Continuous Shooting (Continuous Shooting Mode 59 Shooting Motion Pictures (Motion Picture Mode 60 Shooting Still Pictures and Text with Voice Memo 61 Changing Flash Modes 62 Setting the Exposure Compensation 64 Changing the White Balance Mode 66 Using the Self-Timer 67 Close-up Shooting (Macro Mode 69 Manual Focus Shooting 70 Date Imprinting 71 Changing the ISO Sensitivity 72 Using Auto Bracket 73 Redeye Reduction Mode 74 Non-Compressed Mode 75 Monochrome Mode 76 Interval (Time...
...Special Shooting Functions 58 Recording Text (Text Mode 58 Recording Voice Memo (Voice Memo Mode 59 Continuous Shooting (Continuous Shooting Mode 59 Shooting Motion Pictures (Motion Picture Mode 60 Shooting Still Pictures and Text with Voice Memo 61 Changing Flash Modes 62 Setting the Exposure Compensation 64 Changing the White Balance Mode 66 Using the Self-Timer 67 Close-up Shooting (Macro Mode 69 Manual Focus Shooting 70 Date Imprinting 71 Changing the ISO Sensitivity 72 Using Auto Bracket 73 Redeye Reduction Mode 74 Non-Compressed Mode 75 Monochrome Mode 76 Interval (Time...

Operation Manual
Page 6
.../Deleting Basic Playback 84 Files Playable on the Camera 84 Playing a Still Picture, Text or Continuous Shooting File 84 Playing a Voice Memo File 85 Playing a Motion Picture File 86 Playback Using a TV 88 Special Functions 89 Switching to Edit Mode 89 Displaying One File at a Time (Single Image Playback 89 Displaying Several Files at Once (Thumbnail Playback 90 Magnifying a File (Zoom Playback 91 Copying and Moving Files 92 Editing Images 94 Adding a Memo or Voice Memo to a File 97 Selecting a Folder 100 Protecting a File 100 Auto Playback 101 Setting DPOF (Digital Print...
.../Deleting Basic Playback 84 Files Playable on the Camera 84 Playing a Still Picture, Text or Continuous Shooting File 84 Playing a Voice Memo File 85 Playing a Motion Picture File 86 Playback Using a TV 88 Special Functions 89 Switching to Edit Mode 89 Displaying One File at a Time (Single Image Playback 89 Displaying Several Files at Once (Thumbnail Playback 90 Magnifying a File (Zoom Playback 91 Copying and Moving Files 92 Editing Images 94 Adding a Memo or Voice Memo to a File 97 Selecting a Folder 100 Protecting a File 100 Auto Playback 101 Setting DPOF (Digital Print...
Operation Manual
Page 7
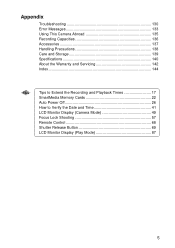
Appendix Troubleshooting 130 Error Messages 133 Using This Camera Abroad 135 Recording Capacities 136 Accessories 137 Handling Precautions 138 Care and Storage 139 Specifications 140 About the Warranty and Servicing 142 Index 144 Tips Tips to Extend the Recording and Playback Times 17 SmartMedia Memory Cards 22 Auto Power Off 26 How to Verify the Date and Time 41 LCD Monitor Display (Camera Mode 49 Focus Lock Shooting 57 Remote Control 68 Shutter Release Button 69 LCD Monitor Display (Play Mode 87 5
Appendix Troubleshooting 130 Error Messages 133 Using This Camera Abroad 135 Recording Capacities 136 Accessories 137 Handling Precautions 138 Care and Storage 139 Specifications 140 About the Warranty and Servicing 142 Index 144 Tips Tips to Extend the Recording and Playback Times 17 SmartMedia Memory Cards 22 Auto Power Off 26 How to Verify the Date and Time 41 LCD Monitor Display (Camera Mode 49 Focus Lock Shooting 57 Remote Control 68 Shutter Release Button 69 LCD Monitor Display (Play Mode 87 5
Operation Manual
Page 8
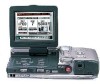
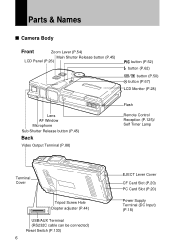
Parts & Names s Camera Body Front Zoom Lever (P.54) Main Shutter Release button (P.45) LCD Panel (P.26) button (P.52) button (P.62) button (P.50) button (P.67) LCD Monitor (P.28) Lens AF Window Microphone Sub Shutter Release button (P.45) Back Video Output Terminal (P.88) Flash Remote Control Reception (P.125)/ Self Timer Lamp Terminal Cover Tripod Screw Hole Diopter adjuster (P.44) USB/AUX Terminal (RS232C cable can be connected) Reset Switch (P.133) 6 EJECT Lever Cover CF Card Slot (P.20) PC Card Slot (P.20) Power Supply Terminal (DC Input) (P.18)
Parts & Names s Camera Body Front Zoom Lever (P.54) Main Shutter Release button (P.45) LCD Panel (P.26) button (P.52) button (P.62) button (P.50) button (P.67) LCD Monitor (P.28) Lens AF Window Microphone Sub Shutter Release button (P.45) Back Video Output Terminal (P.88) Flash Remote Control Reception (P.125)/ Self Timer Lamp Terminal Cover Tripod Screw Hole Diopter adjuster (P.44) USB/AUX Terminal (RS232C cable can be connected) Reset Switch (P.133) 6 EJECT Lever Cover CF Card Slot (P.20) PC Card Slot (P.20) Power Supply Terminal (DC Input) (P.18)
Operation Manual
Page 9
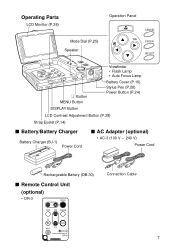
Operating Parts LCD Monitor (P.28) Operation Panel Mode Dial (P.25) Speaker Ô Button MENU Button Viewfinder • Flash Lamp • Auto Focus Lamp Battery Cover (P.16) Stylus Pen (P.28) Power Button (P.24) DISPLAY Button LCD Contrast Adjustment Button (P.28) Strap Eyelet (P.14) s Battery/Battery Charger Battery Charger (BJ-1) Power Cord s AC Adapter (optional) • AC-3 (100 V - 240 V) Power Cord Rechargeable Battery (DB-30) s Remote Control Unit (optional) • DR-3 Connection Cable 7
Operating Parts LCD Monitor (P.28) Operation Panel Mode Dial (P.25) Speaker Ô Button MENU Button Viewfinder • Flash Lamp • Auto Focus Lamp Battery Cover (P.16) Stylus Pen (P.28) Power Button (P.24) DISPLAY Button LCD Contrast Adjustment Button (P.28) Strap Eyelet (P.14) s Battery/Battery Charger Battery Charger (BJ-1) Power Cord s AC Adapter (optional) • AC-3 (100 V - 240 V) Power Cord Rechargeable Battery (DB-30) s Remote Control Unit (optional) • DR-3 Connection Cable 7

Operation Manual
Page 11
... or other than that specifically recommended for at your earliest convenience. Remove the battery as soon as a strange smell or discoloration, during use of the equipment immemorytely if it is ingested, rinse the mouth out thoroughly with metallic ballpoint pens, necklaces, coins, hairpins, etc. • Remove the battery from the camera or battery charger immemorytely in the event of...
... or other than that specifically recommended for at your earliest convenience. Remove the battery as soon as a strange smell or discoloration, during use of the equipment immemorytely if it is ingested, rinse the mouth out thoroughly with metallic ballpoint pens, necklaces, coins, hairpins, etc. • Remove the battery from the camera or battery charger immemorytely in the event of...
Operation Manual
Page 17
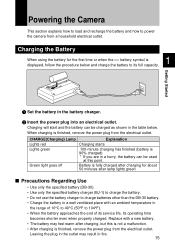
... of its service life, its full capacity. Replace with an ambient temperature in a hurry, the battery can be charged as shown in the battery charger. CHARGE(Charging) Lamp Lights red Lights green Green light goes off Explanation Charging starts 100-minute charging has finished (battery is finished, remove the power plug from the electrical outlet. Battery is fully charged after charging for the first time or when the battery symbol is finished, remove the power plug from...
... of its service life, its full capacity. Replace with an ambient temperature in a hurry, the battery can be charged as shown in the battery charger. CHARGE(Charging) Lamp Lights red Lights green Green light goes off Explanation Charging starts 100-minute charging has finished (battery is finished, remove the power plug from the electrical outlet. Battery is fully charged after charging for the first time or when the battery symbol is finished, remove the power plug from...

Operation Manual
Page 18
... of 20°C (68°F). During playback: Leave the camera continuously turned on in the middle, with the battery contact surfaces or electrical connections. C Close the battery cover. Battery Type Lithium ion battery (fully charged) Approximate Recording Time 50 minutes Approximate Playback Time 60 minutes 16 Important Note • When using the camera for the first time, be sure to operate the camera. Important Note • Do not bring metallic objects...
... of 20°C (68°F). During playback: Leave the camera continuously turned on in the middle, with the battery contact surfaces or electrical connections. C Close the battery cover. Battery Type Lithium ion battery (fully charged) Approximate Recording Time 50 minutes Approximate Playback Time 60 minutes 16 Important Note • When using the camera for the first time, be sure to operate the camera. Important Note • Do not bring metallic objects...
Operation Manual
Page 19
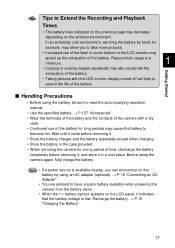
... not using the camera again, fully charge the battery. Note • If a power source is low. Tips Tips to a minimum. 1 • Copying or erasing images repeatedly may also accelerate the exhaustion of the battery. • Taking pictures with a dry cloth. • Continued use of the flash or zoom feature or the LCD monitor may speed up the exhaustion of time, discharge the battery completely before removing it indicates that the battery voltage...
... not using the camera again, fully charge the battery. Note • If a power source is low. Tips Tips to a minimum. 1 • Copying or erasing images repeatedly may also accelerate the exhaustion of the battery. • Taking pictures with a dry cloth. • Continued use of the flash or zoom feature or the LCD monitor may speed up the exhaustion of time, discharge the battery completely before removing it indicates that the battery voltage...
Operation Manual
Page 20
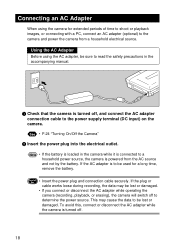
... camera is turned off to determine the power source. If the AC adapter is to be used for extended periods of time to shoot or playback images, or connecting with a PC, connect an AC adapter (optional) to the camera and power the camera from the AC source and not by the battery. Important Note • Insert the power plug and connection cable securely. If the plug or cable works loose during recording, the data...
... camera is turned off to determine the power source. If the AC adapter is to be used for extended periods of time to shoot or playback images, or connecting with a PC, connect an AC adapter (optional) to the camera and power the camera from the AC source and not by the battery. Important Note • Insert the power plug and connection cable securely. If the plug or cable works loose during recording, the data...
Operation Manual
Page 21
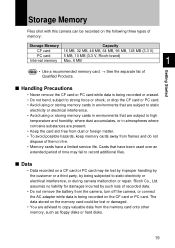
...) Internal memory Max. 6 MB 1 Note • Use a recommended memory card. → See the separate list of time may be lost by improper handling by the customer or a third party, by such loss of recorded data. • Do not remove the battery from the camera, turn off the camera, or connect the AC adapter while data is being recorded on a CF card or PC card may fail to record additional files. Storage Memory Files shot...
...) Internal memory Max. 6 MB 1 Note • Use a recommended memory card. → See the separate list of time may be lost by improper handling by the customer or a third party, by such loss of recorded data. • Do not remove the battery from the camera, turn off the camera, or connect the AC adapter while data is being recorded on a CF card or PC card may fail to record additional files. Storage Memory Files shot...
User Manual
Page 2
... record or play back images caused by taking a number of test shots. Should the product fail or malfunction while you have questions about any part of this publication without notice. This manual explains the correct handling procedures and precautions for quick future reference. If interference occurs, follow the procedures below. - Microsoft, MS and Windows are the property of Ricoh. ©2000 Ricoh...
... record or play back images caused by taking a number of test shots. Should the product fail or malfunction while you have questions about any part of this publication without notice. This manual explains the correct handling procedures and precautions for quick future reference. If interference occurs, follow the procedures below. - Microsoft, MS and Windows are the property of Ricoh. ©2000 Ricoh...
User Manual
Page 4
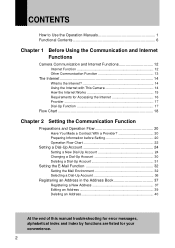
...-Up Account 24 Changing a Dial-Up Account 30 Deleting a Dial-Up Account 31 Setting the E-Mail Function 32 Setting the Mail Environment 32 Selecting a Dial-Up Account 36 Registering an Address in the Address Book 37 Registering a New Address 37 Editing an Address 39 Deleting an Address 40 At the end of this manual troubleshooting for error messages, alphabetical index and...
...-Up Account 24 Changing a Dial-Up Account 30 Deleting a Dial-Up Account 31 Setting the E-Mail Function 32 Setting the Mail Environment 32 Selecting a Dial-Up Account 36 Registering an Address in the Address Book 37 Registering a New Address 37 Editing an Address 39 Deleting an Address 40 At the end of this manual troubleshooting for error messages, alphabetical index and...

User Manual
Page 5
... 42 Deleting a Template 43 Setting Quick Send 44 Setting Operation 44 Setting Direct Upload 48 Setting the Web Page 50 Setting the Web Environment 50 Selecting a Dial-Up Account 52 Setting FTP Upload 53 Chapter 3 Connecting Communication Equipment Connecting the Camera to Communication Equipment 56 Connecting Methods 56 Connecting the Camera to an Ordinary Telephone Line 57 Removing the Communication Card 59 Checking the Modem Settings 60 Chapter 4 Sending Images After Shooting Image Upload Function 64 Upload...
... 42 Deleting a Template 43 Setting Quick Send 44 Setting Operation 44 Setting Direct Upload 48 Setting the Web Page 50 Setting the Web Environment 50 Selecting a Dial-Up Account 52 Setting FTP Upload 53 Chapter 3 Connecting Communication Equipment Connecting the Camera to Communication Equipment 56 Connecting Methods 56 Connecting the Camera to an Ordinary Telephone Line 57 Removing the Communication Card 59 Checking the Modem Settings 60 Chapter 4 Sending Images After Shooting Image Upload Function 64 Upload...

User Manual
Page 6
... Operations on the Web Browser Screen 102 Using the Tool Buttons 103 Displaying / Hiding the Tools 104 Viewing a Web Page 104 Moving a Page 107 Registering Favorites 107 Viewing a Web page Using the Bookmark or History 108 Capturing a Web Page 109 Uploading an HTML File 110 HTML Template 111 Transferring the HTML Template File from a PC to the Camera ...... 112 Creating an HTML File 114 Setting Upload...
... Operations on the Web Browser Screen 102 Using the Tool Buttons 103 Displaying / Hiding the Tools 104 Viewing a Web Page 104 Moving a Page 107 Registering Favorites 107 Viewing a Web page Using the Bookmark or History 108 Capturing a Web Page 109 Uploading an HTML File 110 HTML Template 111 Transferring the HTML Template File from a PC to the Camera ...... 112 Creating an HTML File 114 Setting Upload...

User Manual
Page 14
... take advantage of the following useful functions. This function is saved. Camera Communication and Internet Functions The camera's communication and Internet functions enable you want several people to see images. → P.110 "Uploading an HTML File" q Viewing the Web Page You can view a Web page on the Internet using the quick send function. → P.67 "Sending an Image Using Quick Send" q Uploading Images to a Homepage You can upload an HTML file to which an image...
... take advantage of the following useful functions. This function is saved. Camera Communication and Internet Functions The camera's communication and Internet functions enable you want several people to see images. → P.110 "Uploading an HTML File" q Viewing the Web Page You can view a Web page on the Internet using the quick send function. → P.67 "Sending an Image Using Quick Send" q Uploading Images to a Homepage You can upload an HTML file to which an image...

User Manual
Page 15
...; P.98 "Using Fax Upload" Office Computer (Server) FAX Send the files to the office computer one at a time Dial-up lines Send the images to the fax machine 13 You can upload images recorded in the camera directly to a folder in Text mode to a fax machine. Before Using the Communication and Internet Functions Other Communication Function q Sending Images to a Computer You can use this function, for sending images to...
...; P.98 "Using Fax Upload" Office Computer (Server) FAX Send the files to the office computer one at a time Dial-up lines Send the images to the fax machine 13 You can upload images recorded in the camera directly to a folder in Text mode to a fax machine. Before Using the Communication and Internet Functions Other Communication Function q Sending Images to a Computer You can use this function, for sending images to...


