Manuals
Page 5
... using the paper with the machine. For more information about paper weights and sizes that are supported by the machine, see the manuals supplied with the machine. Introduction This manual explains paper characteristics and methods for handling paper to get favorable print quality and consistent performance from the machine. In addition, the...
... using the paper with the machine. For more information about paper weights and sizes that are supported by the machine, see the manuals supplied with the machine. Introduction This manual explains paper characteristics and methods for handling paper to get favorable print quality and consistent performance from the machine. In addition, the...

Manuals
Page 18
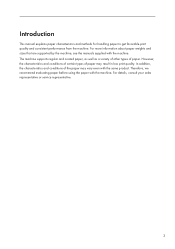
...; The paper in the paper tray may cause multiple sheet feeding or paper jams. Fan the stack of paper. By doing this setting. See the manuals supplied with your other side with the machine for details about how to the above methods, and select the easiest method for a long period, such...
...; The paper in the paper tray may cause multiple sheet feeding or paper jams. Fan the stack of paper. By doing this setting. See the manuals supplied with your other side with the machine for details about how to the above methods, and select the easiest method for a long period, such...
Manuals
Page 19
... or folded. If any paper that no paper is sticking out, remove it. 17 Make sure that is loaded correctly. Loading Paper • See the manuals supplied with the machine for the procedure to Place Paper To load paper into the tray, face the paper directly downward and slowly put paper...
... or folded. If any paper that no paper is sticking out, remove it. 17 Make sure that is loaded correctly. Loading Paper • See the manuals supplied with the machine for the procedure to Place Paper To load paper into the tray, face the paper directly downward and slowly put paper...

Manuals
Page 23
...newspapers and magazines. Also, many coated papers cannot endure the heat and pressure that may not be used with the machine, see the manuals supplied with the machine. It is very different from a mixture of feeding, and the effect on consumable parts and components without longterm...preprinted paper on the brand and manufacturer. For details about fanning coated paper, see page 8 "Paper Specifications". For details, see the manuals supplied with the machine. Coated paper may not feed correctly and the print quality may damage the machine. We recommend evaluating special types...
...newspapers and magazines. Also, many coated papers cannot endure the heat and pressure that may not be used with the machine, see the manuals supplied with the machine. It is very different from a mixture of feeding, and the effect on consumable parts and components without longterm...preprinted paper on the brand and manufacturer. For details about fanning coated paper, see page 8 "Paper Specifications". For details, see the manuals supplied with the machine. Coated paper may not feed correctly and the print quality may damage the machine. We recommend evaluating special types...
User Guide
Page 1
For safe and correct use, be sure to read the Safety Information in this manual, refer to the HTML/PDF files on the supplied CD-ROM. User Guide What You Can Do with This Machine Getting Started Copy Print Scan Document Server Web Image Monitor Adding Paper and Toner Troubleshooting For information not in "Read This First" before using the machine.
For safe and correct use, be sure to read the Safety Information in this manual, refer to the HTML/PDF files on the supplied CD-ROM. User Guide What You Can Do with This Machine Getting Started Copy Print Scan Document Server Web Image Monitor Adding Paper and Toner Troubleshooting For information not in "Read This First" before using the machine.

User Guide
Page 2
When the machine is in this manual may be different from Low Power mode or Sleep mode. The icon on when it was manufactured. 777[Login/Logout] key Press to log in ...
When the machine is in this manual may be different from Low Power mode or Sleep mode. The icon on when it was manufactured. 777[Login/Logout] key Press to log in ...

User Guide
Page 9
... of the Machine's External Options 31 Changing the Display Language...33 How to Use the [Home] Screen...34 Adding Icons to Read the Manuals...6 Symbols Used in the Manuals...6 Model-Specific Information...7 Names of Programs...41 Turning On/Off the Power...45 Turning On the Main Power...45 Turning Off the Main...
... of the Machine's External Options 31 Changing the Display Language...33 How to Use the [Home] Screen...34 Adding Icons to Read the Manuals...6 Symbols Used in the Manuals...6 Model-Specific Information...7 Names of Programs...41 Turning On/Off the Power...45 Turning On the Main Power...45 Turning Off the Main...

User Guide
Page 11
... Scan Settings...96 6. Document Server Storing Data...97 Printing Stored Documents...99 7. Scan Basic Procedure When Using Scan to the Destination Manually 88 Basic Procedure for Sending Scan Files by E-mail 89 Registering an E-mail Destination...90 Deleting an E-mail Destination...91 Entering an E-...mail Address Manually...92 Basic Procedure for Loading Paper...103 Fanning the Paper...103 Loading Paper into Tray 1...106 Loading Paper into the A3/11 &#...
... Scan Settings...96 6. Document Server Storing Data...97 Printing Stored Documents...99 7. Scan Basic Procedure When Using Scan to the Destination Manually 88 Basic Procedure for Sending Scan Files by E-mail 89 Registering an E-mail Destination...90 Deleting an E-mail Destination...91 Entering an E-...mail Address Manually...92 Basic Procedure for Loading Paper...103 Fanning the Paper...103 Loading Paper into Tray 1...106 Loading Paper into the A3/11 &#...

User Guide
Page 14
How to Read the Manuals Symbols Used in the functions of keys on resolving user errors. This symbol is located at the end of data. For details about which symbol ... A and Region B models are using . Indicates instructions stored in a file on a provided CD-ROM. (mainly Europe and Asia) (mainly North America) Differences in the Manuals This manual uses the following symbols: Indicates points to pay attention to when using the machine, and explanations of likely causes of paper misfeeds, damage to originals...
How to Read the Manuals Symbols Used in the functions of keys on resolving user errors. This symbol is located at the end of data. For details about which symbol ... A and Region B models are using . Indicates instructions stored in a file on a provided CD-ROM. (mainly Europe and Asia) (mainly North America) Differences in the Manuals This manual uses the following symbols: Indicates points to pay attention to when using the machine, and explanations of likely causes of paper misfeeds, damage to originals...
User Guide
Page 15
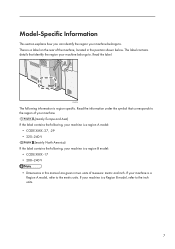
... following , your machine is a Region B model, refer to . If your machine is a region B model: • CODE XXXX -17 • 208-240 V • Dimensions in this manual are given in the position shown below. If your machine is a label on the rear of the machine, located in two units of your machine...
... following , your machine is a Region B model, refer to . If your machine is a region B model: • CODE XXXX -17 • 208-240 V • Dimensions in this manual are given in the position shown below. If your machine is a label on the rear of the machine, located in two units of your machine...

User Guide
Page 16
Names of Major Features In this manual, major features of the machine are referred to as follows: • Auto Document Feeder ADF • LCIT RT4020 Large Capacity Tray (LCT) • LCIT RT4030 Wide Large Capacity Tray (Wide LCT) • Multi-Folding Unit FD4000 Multi-folding unit • Decurler Unit DU5020 Decurler unit 8
Names of Major Features In this manual, major features of the machine are referred to as follows: • Auto Document Feeder ADF • LCIT RT4020 Large Capacity Tray (LCT) • LCIT RT4030 Wide Large Capacity Tray (Wide LCT) • Multi-Folding Unit FD4000 Multi-folding unit • Decurler Unit DU5020 Decurler unit 8
User Guide
Page 19
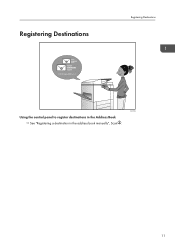
Registering Destinations Registering Destinations CAY062 Using the control panel to register destinations in the Address Book See "Registering a destination in the address book manually", Scan . 11
Registering Destinations Registering Destinations CAY062 Using the control panel to register destinations in the Address Book See "Registering a destination in the address book manually", Scan . 11

User Guide
Page 79
... restart your computer, restart it by following the instructions that is required to install the drivers. Click [Install]. 9. Quit all applications. (Do not close this manual.) 2. Click [Quick Install]. 5. If the [User Account Control] dialog box appears, and then click [Yes] or [Continue]. 11.
... restart your computer, restart it by following the instructions that is required to install the drivers. Click [Install]. 9. Quit all applications. (Do not close this manual.) 2. Click [Quick Install]. 5. If the [User Account Control] dialog box appears, and then click [Yes] or [Continue]. 11.
User Guide
Page 85
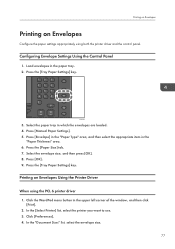
... menu button in the paper tray. 2. Press the [Tray Paper Settings] key. Click [Preferences]. 4. In the "Document Size:" list, select the envelope size. 77 Press [Manual Paper Settings]. 5. Select the paper tray in the "Paper Thickness" area. 6. Printing on Envelopes Printing on Envelopes Using the Printer Driver When using both the...
... menu button in the paper tray. 2. Press the [Tray Paper Settings] key. Click [Preferences]. 4. In the "Document Size:" list, select the envelope size. 77 Press [Manual Paper Settings]. 5. Select the paper tray in the "Paper Thickness" area. 6. Printing on Envelopes Printing on Envelopes Using the Printer Driver When using both the...
User Guide
Page 93
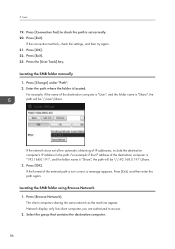
... specified in the selected title. When [Do not Specify] is selected, the SMB User Name and SMB Password that you can either enter the path manually or locate the folder by browsing the network. 85 Press [Change] under "Login User Name". 12. Info] on the right side of the destination computer...
... specified in the selected title. When [Do not Specify] is selected, the SMB User Name and SMB Password that you can either enter the path manually or locate the folder by browsing the network. 85 Press [Change] under "Login User Name". 12. Info] on the right side of the destination computer...
User Guide
Page 94
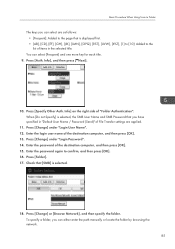
Press [OK]. 22. Press the [User Tools] key. Press [Connection Test] to access. 2. Press [Exit]. 23. Locating the SMB folder manually 1. If the network does not allow automatic obtaining of the entered path is not correct, a message appears. Press [Exit], and then enter the path again. ...
Press [OK]. 22. Press the [User Tools] key. Press [Connection Test] to access. 2. Press [Exit]. 23. Locating the SMB folder manually 1. If the network does not allow automatic obtaining of the entered path is not correct, a message appears. Press [Exit], and then enter the path again. ...

User Guide
Page 96
... in to display the soft keyboard. 7. Depending on the right side of the user name field to the computer. Press [SMB]. 3. Press [Manual Entry] on the destination setting, enter the password for logging in to the right of the path field. 4. Press [Connection Test]. Press... [Manual Entry] for the folder. A connection test is "desk01": \\desk01\user 5. Press [OK]. 6. In the following example path, the shared folder name is "user...
... in to display the soft keyboard. 7. Depending on the right side of the user name field to the computer. Press [SMB]. 3. Press [Manual Entry] on the destination setting, enter the password for logging in to the right of the path field. 4. Press [Connection Test]. Press... [Manual Entry] for the folder. A connection test is "desk01": \\desk01\user 5. Press [OK]. 6. In the following example path, the shared folder name is "user...
User Guide
Page 100
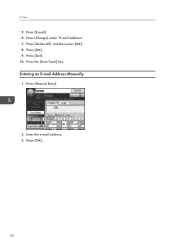
Press [E-mail]. 6. Press [Delete All], and then press [OK]. 8. Press the [User Tools] key. Press [OK]. 92 Press [OK]. 9. Scan 5. Enter the e-mail address. 3. 5. Press [Change] under "E-mail Address". 7. Entering an E-mail Address Manually 1. Press [Exit]. 10. Press [Manual Entry]. 2.
Press [E-mail]. 6. Press [Delete All], and then press [OK]. 8. Press the [User Tools] key. Press [OK]. 92 Press [OK]. 9. Scan 5. Enter the e-mail address. 3. 5. Press [Change] under "E-mail Address". 7. Entering an E-mail Address Manually 1. Press [Exit]. 10. Press [Manual Entry]. 2.

User Guide
Page 102
... the folder in which the stored files are saved. 3. Scan Press [User Name], and then select a user name. To specify an unregistered user name, press [Manual Entry], and then enter the name. If necessary, press [Scan Settings] to preview a file selected from the List This section explains how to specify scanner...
... the folder in which the stored files are saved. 3. Scan Press [User Name], and then select a user name. To specify an unregistered user name, press [Manual Entry], and then enter the name. If necessary, press [Scan Settings] to preview a file selected from the List This section explains how to specify scanner...

User Guide
Page 106
...]. 98 Press [User Name]. 6. Document Server 1. Specify the original scanning conditions. 14. The user names shown are names that were registered in the screen, press [Manual Entry], and then enter a user name. 7. 6. Press the [Home] key on the bottom left of folders will be displayed.
...]. 98 Press [User Name]. 6. Document Server 1. Specify the original scanning conditions. 14. The user names shown are names that were registered in the screen, press [Manual Entry], and then enter a user name. 7. 6. Press the [Home] key on the bottom left of folders will be displayed.


