Quick Start Guide
Page 9
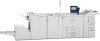
...the document Press File >print Select the Ricoh Print Driver (PCL5e/PCL6) Press Properties At Page Set up Tab Select Duplex>booklet Select Staple>2 at center Across from Duplex option select non reduction booklet>say ok to the message At Paper Setup Tab Select the tray that has the 11x17 ... staple a booklet document in portrait mode) Open the document Press File >print Select the Ricoh Print Driver (PCL5e/PCL6) Press Properties At Page Set up Tab Select Duplex>booklet Select Staple>2 at center At Paper Setup Tab Select the tray that has the 8 1/2x11 paper to print Booklet Printing - Press OK...
...the document Press File >print Select the Ricoh Print Driver (PCL5e/PCL6) Press Properties At Page Set up Tab Select Duplex>booklet Select Staple>2 at center Across from Duplex option select non reduction booklet>say ok to the message At Paper Setup Tab Select the tray that has the 11x17 ... staple a booklet document in portrait mode) Open the document Press File >print Select the Ricoh Print Driver (PCL5e/PCL6) Press Properties At Page Set up Tab Select Duplex>booklet Select Staple>2 at center At Paper Setup Tab Select the tray that has the 8 1/2x11 paper to print Booklet Printing - Press OK...
Quick Start Guide
Page 11
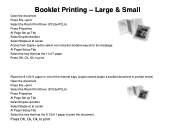
... subject heading. Set up notification when your email is opened. Add email message. Set resolution, scan size & scan type. One or two sided original. Select tabs to document i.e. Set file types between email and folder scan destinations. Add security features to switch between multi and single page PDF, TIFF and JPEG...
... subject heading. Set up notification when your email is opened. Add email message. Set resolution, scan size & scan type. One or two sided original. Select tabs to document i.e. Set file types between email and folder scan destinations. Add security features to switch between multi and single page PDF, TIFF and JPEG...

Quick Start Guide
Page 12
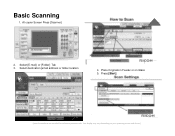
Press [Start] (Note: Screenshots are provided for reference purposes only. Your display may vary depending on Glass 5. Basic Scanning 1. Select [E-mail] or [Folder] Tab 3. Place Originals in Feeder or on your operating system and device.) Select destination [email address or folder location 4. At copier Screen Press [Scanner] 2.
Press [Start] (Note: Screenshots are provided for reference purposes only. Your display may vary depending on Glass 5. Basic Scanning 1. Select [E-mail] or [Folder] Tab 3. Place Originals in Feeder or on your operating system and device.) Select destination [email address or folder location 4. At copier Screen Press [Scanner] 2.
Quick Start Guide
Page 16
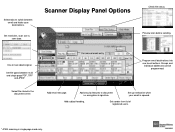
... to return to the previous menu 7. Touch the [Own Name] key 8. Enter your machine) 2. Fax Header Information Set-Up 1. Check that the [Gen. Settings/Adjust] tab is selected then touch the [Program Fax Information] key 6. Touch the [Own Name] key at the next menu then enter a name from the blue numeric...
... to return to the previous menu 7. Touch the [Own Name] key 8. Enter your machine) 2. Fax Header Information Set-Up 1. Check that the [Gen. Settings/Adjust] tab is selected then touch the [Program Fax Information] key 6. Touch the [Own Name] key at the next menu then enter a name from the blue numeric...
Quick Start Guide
Page 18
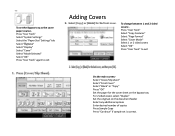
To set the Bypass tray as the cover paper source:Press "User Tools" Select "System Settings" Select the "Paper Size" Settings" tab Select "Bypass" Select "Display" Select "Cover" Select "Mode Selected" Select "OK" Press "User Tools" again to exit Adding Covers To change between 1 and 2 sided covers:...
To set the Bypass tray as the cover paper source:Press "User Tools" Select "System Settings" Select the "Paper Size" Settings" tab Select "Bypass" Select "Display" Select "Cover" Select "Mode Selected" Select "OK" Press "User Tools" again to exit Adding Covers To change between 1 and 2 sided covers:...
Quick Start Guide
Page 34
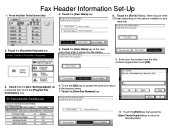
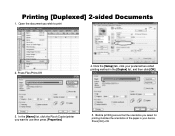
Open the document you wish to use then press [Properties] 5. Press File>Print>OK 4. Press [OK] >OK Printing [Duplexed] 2-sided Documents 1. Click the [Setup] tab, click your preferred two-sided printing method in your device. Before printing ensure that the orientation you want to print 2. In the [Name] list, click the Ricoh Copier/printer you select for printing matches the orientation of the paper in the [Duplex] list, and then click [OK]. 3.
Open the document you wish to use then press [Properties] 5. Press File>Print>OK 4. Press [OK] >OK Printing [Duplexed] 2-sided Documents 1. Click the [Setup] tab, click your preferred two-sided printing method in your device. Before printing ensure that the orientation you want to print 2. In the [Name] list, click the Ricoh Copier/printer you select for printing matches the orientation of the paper in the [Duplex] list, and then click [OK]. 3.
Quick Start Guide
Page 35
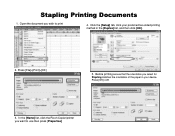
In the [Name] list, click the Ricoh Copier/printer you select for Stapling matches the orientation of the paper in your preferred two-sided printing method in the [Duplex] list, and then click [OK]. 2. Press [OK] >OK 3. Before printing ensure that the orientation you want to print 4. Press [File]>[Print]>[OK] 5. Click the [Setup] tab, click your device. Stapling Printing Documents 1. Open the document you wish to use then press [Properties]
In the [Name] list, click the Ricoh Copier/printer you select for Stapling matches the orientation of the paper in your preferred two-sided printing method in the [Duplex] list, and then click [OK]. 2. Press [OK] >OK 3. Before printing ensure that the orientation you want to print 4. Press [File]>[Print]>[OK] 5. Click the [Setup] tab, click your device. Stapling Printing Documents 1. Open the document you wish to use then press [Properties]
Quick Start Guide
Page 41
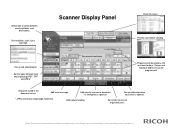
... before sending. Set resolution, scan size & scan type. Groups and individual addresses can be programmed. Set file types between email and folder scan destinations. Select tabs to document i.e. Scanner Display Panel Check file status. Set sender from list of registered users. (Note: Screenshots are provided for reference purposes only.
... before sending. Set resolution, scan size & scan type. Groups and individual addresses can be programmed. Set file types between email and folder scan destinations. Select tabs to document i.e. Scanner Display Panel Check file status. Set sender from list of registered users. (Note: Screenshots are provided for reference purposes only.
Quick Start Guide
Page 42
Select destination [email address or folder location 4. Your display may vary depending on Glass 5. Select [E-mail] or [Folder] Tab 3. Press [Start] (Note: Screenshots are provided for reference purposes only. Basic Scanning 1. Place Originals in Feeder or on your operating system and device.) At copier Screen Press [Scanner] 2.
Select destination [email address or folder location 4. Your display may vary depending on Glass 5. Select [E-mail] or [Folder] Tab 3. Press [Start] (Note: Screenshots are provided for reference purposes only. Basic Scanning 1. Place Originals in Feeder or on your operating system and device.) At copier Screen Press [Scanner] 2.

