User Guide
Page 3
... Screen 47 Turning On/Off the Power...48 Turning On/Off the Main Power...48 Logging In the Machine...50 User Code Authentication Using a Printer Driver 50 Logging In/Out Using the Control Panel 50 1 Getting Started Model-Specific Information...5 Guide to Names and Functions of Components 6 Guide to Components...6 Connecting...
... Screen 47 Turning On/Off the Power...48 Turning On/Off the Main Power...48 Logging In the Machine...50 User Code Authentication Using a Printer Driver 50 Logging In/Out Using the Control Panel 50 1 Getting Started Model-Specific Information...5 Guide to Names and Functions of Components 6 Guide to Components...6 Connecting...

User Guide
Page 4
... Printing on Envelopes...68 Configuring Envelope Settings Using the Control Panel 68 Printing on Envelopes Using the Printer Driver 68 3. Adding Paper and Toner Loading Paper...73 Loading Paper into Paper Trays...73 Loading Paper into the Bypass Tray...76 Loading Orientation-...79 Recommended Paper...81 When Loading Thick Paper...87 When Loading Envelopes...88 Adding Toner...90 Disposing of the Paper (When Using the PCL 6 Printer Driver 65 Combining Multiple Pages into Single Page 66 How to Print on Error Logs and Reports 103 2 2. Troubleshooting When a Status Icon Is Displayed on...
... Printing on Envelopes...68 Configuring Envelope Settings Using the Control Panel 68 Printing on Envelopes Using the Printer Driver 68 3. Adding Paper and Toner Loading Paper...73 Loading Paper into Paper Trays...73 Loading Paper into the Bypass Tray...76 Loading Orientation-...79 Recommended Paper...81 When Loading Thick Paper...87 When Loading Envelopes...88 Adding Toner...90 Disposing of the Paper (When Using the PCL 6 Printer Driver 65 Combining Multiple Pages into Single Page 66 How to Print on Error Logs and Reports 103 2 2. Troubleshooting When a Status Icon Is Displayed on...

User Guide
Page 38
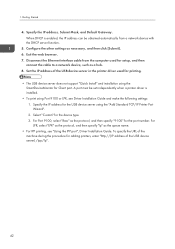
... computer. 3. For details about acquiring a conversion adapter, consult your computer. When using Windows 7/8.1/10 and Windows Server 2008/2008 R2/2012/2012 R2/2016, a printer driver installation screen might have to use a conversion adapter to connect the cable to the optional IEEE 1284 interface board. 1. If this happens, click [Cancel] on...
... computer. 3. For details about acquiring a conversion adapter, consult your computer. When using Windows 7/8.1/10 and Windows Server 2008/2008 R2/2012/2012 R2/2016, a printer driver installation screen might have to use a conversion adapter to connect the cable to the optional IEEE 1284 interface board. 1. If this happens, click [Cancel] on...
User Guide
Page 44
...IP address of the USB device server) /ipp/lp". 42 For Port 9100, select "Raw" as the queue name. • For IPP printing, see Driver Installation Guide and make the following settings: 1. To specify the URL of the USB device server in the printer...Disconnect the Ethernet interface cable from a network device with the DHCP server function. 5. Select "Custom" for Client port. A port must be set independently when a printer driver is enabled, the IP address can be obtained automatically from the computer used for printing. • The USB device server does not support "Quick Install...
...IP address of the USB device server) /ipp/lp". 42 For Port 9100, select "Raw" as the queue name. • For IPP printing, see Driver Installation Guide and make the following settings: 1. To specify the URL of the USB device server in the printer...Disconnect the Ethernet interface cable from a network device with the DHCP server function. 5. Select "Custom" for Client port. A port must be set independently when a printer driver is enabled, the IP address can be obtained automatically from the computer used for printing. • The USB device server does not support "Quick Install...

User Guide
Page 52
...Code. If User Code Authentication is active, see the printer driver Help. For details, see page 50 "User Code Authentication Using a Printer Driver". • To prevent use of the printer driver. Press the [Menu] key. 2. User Code Authentication Using a Printer Driver This section explains the procedure for logging in to log ... to log in the printer properties of the machine by unauthorized persons, always log out when you have finished using a printer driver while User Code Authentication is the numerical value registered in to enter on User Code Authentication is active. 1.
...Code. If User Code Authentication is active, see the printer driver Help. For details, see page 50 "User Code Authentication Using a Printer Driver". • To prevent use of the printer driver. Press the [Menu] key. 2. User Code Authentication Using a Printer Driver This section explains the procedure for logging in to log ... to log in the printer properties of the machine by unauthorized persons, always log out when you have finished using a printer driver while User Code Authentication is the numerical value registered in to enter on User Code Authentication is active. 1.
User Guide
Page 55
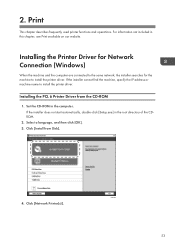
... Disk]. 4. If the installer cannot find the machine, specify the IP address or machine name to install the printer driver. DZC992 53 Set the CD-ROM in the root directory of the CDROM. 2. Print This chapter describes frequently used printer functions and operations...computer. Click [Install from the CD-ROM 1. 2. For information not included in this chapter, see Print available on our website. Installing the Printer Driver for Network Connection (Windows) When the machine and the computer are connected to the same network, the installer searches for the machine to install the...
... Disk]. 4. If the installer cannot find the machine, specify the IP address or machine name to install the printer driver. DZC992 53 Set the CD-ROM in the root directory of the CDROM. 2. Print This chapter describes frequently used printer functions and operations...computer. Click [Install from the CD-ROM 1. 2. For information not included in this chapter, see Print available on our website. Installing the Printer Driver for Network Connection (Windows) When the machine and the computer are connected to the same network, the installer searches for the machine to install the...
User Guide
Page 57
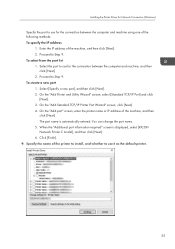
..., and then click [Next]. 2. Specify the name of the following methods: To specify the IP address 1. To create a new port 1. Click [Finish]. 9. Installing the Printer Driver for Network Connection (Windows) Specify the port to use it as the default printer. 55 To select from the port list 1. Select the port to... [Next]. 2. On the "Add Standard TCP/IP Printer Port Wizard" screen, click [Next]. 4. You can change the port name. 5. The port name is displayed, select [RICOH Network Printer C model], and then click [Next]. 6. Proceed to Step 9.
..., and then click [Next]. 2. Specify the name of the following methods: To specify the IP address 1. To create a new port 1. Click [Finish]. 9. Installing the Printer Driver for Network Connection (Windows) Specify the port to use it as the default printer. 55 To select from the port list 1. Select the port to... [Next]. 2. On the "Add Standard TCP/IP Printer Port Wizard" screen, click [Next]. 4. You can change the port name. 5. The port name is displayed, select [RICOH Network Printer C model], and then click [Next]. 6. Proceed to Step 9.

User Guide
Page 58
Print 10. When you are prompted to restart your computer, restart it by following the instructions that appear. 56 Click [Continue]. Printer driver installation starts. 11. 2. Click [Finish].
Print 10. When you are prompted to restart your computer, restart it by following the instructions that appear. 56 Click [Continue]. Printer driver installation starts. 11. 2. Click [Finish].

User Guide
Page 59
...]. 3. DZC992 57 Set the CD-ROM in the root directory of the installer to install the printer driver. • Follow the instructions of the CDROM. 2. Installing the Printer Driver for USB Connection (Windows) Installing the Printer Driver for USB Connection (Windows) When you connect the machine and the computer with a USB cable, the... the installer does not start automatically, double-click [Setup.exe] in the computer. Click [USB printer(s)]. Click [Install from the CD-ROM 1. Installing the Printer Driver from Disk]. 4.
...]. 3. DZC992 57 Set the CD-ROM in the root directory of the installer to install the printer driver. • Follow the instructions of the CDROM. 2. Installing the Printer Driver for USB Connection (Windows) Installing the Printer Driver for USB Connection (Windows) When you connect the machine and the computer with a USB cable, the... the installer does not start automatically, double-click [Setup.exe] in the computer. Click [USB printer(s)]. Click [Install from the CD-ROM 1. Installing the Printer Driver from Disk]. 4.

User Guide
Page 60
Select [Add a new printer], and then click [Next]. 7. DZC092 8. Print 5. Printer driver installation starts. 58 2. DZC081 6. Select this machine from the machine and turn off the power of the machine, and then click [Next]. Disconnect the USB cable from among the devices, and then click [Next]. On the "License Agreement" screen, select [I accept the agreement], and then click [Next].
Select [Add a new printer], and then click [Next]. 7. DZC092 8. Print 5. Printer driver installation starts. 58 2. DZC081 6. Select this machine from the machine and turn off the power of the machine, and then click [Next]. Disconnect the USB cable from among the devices, and then click [Next]. On the "License Agreement" screen, select [I accept the agreement], and then click [Next].

User Guide
Page 61
Even if the connection is canceled, the installation is connected to the computer with the USB cable, and then turn on the "Auto-detect USB Port" screen, connect the machine and the computer with the USB cable. 10. Click [Finish]. 59 After the installer screen is closed, the machine is added automatically when it is complete. Installing the Printer Driver for USB Connection (Windows) 9. Following the instructions on the power of the machine. • The search detects the machine connected by the USB cable. • If the machine is not detected, click [Stop Auto-detecting].
Even if the connection is canceled, the installation is connected to the computer with the USB cable, and then turn on the "Auto-detect USB Port" screen, connect the machine and the computer with the USB cable. 10. Click [Finish]. 59 After the installer screen is closed, the machine is added automatically when it is complete. Installing the Printer Driver for USB Connection (Windows) 9. Following the instructions on the power of the machine. • The search detects the machine connected by the USB cable. • If the machine is not detected, click [Stop Auto-detecting].

User Guide
Page 62
Right-click the [Start] menu, click [Control Panel]. 2. Click [Printer properties]. 60 Print Displaying the Printer Driver Properties This section explains how to open the printer driver properties from [Control Panel]. • Manage Printers permission is required to all users. 1. Log on as an Administrators group member. • You cannot change the ...
Right-click the [Start] menu, click [Control Panel]. 2. Click [Printer properties]. 60 Print Displaying the Printer Driver Properties This section explains how to open the printer driver properties from [Control Panel]. • Manage Printers permission is required to all users. 1. Log on as an Administrators group member. • You cannot change the ...

User Guide
Page 63
... you are using, and then click [Print]. 2. Click the menu button of the application you want to use. 3. Click [Preferences]. 4. When Using the PCL 6 Printer Driver 1. In this case, check if the document was printed.
... you are using, and then click [Print]. 2. Click the menu button of the application you want to use. 3. Click [Preferences]. 4. When Using the PCL 6 Printer Driver 1. In this case, check if the document was printed.

User Guide
Page 67
... [OK]. 8. Change any other print settings if necessary. 7. Start printing from the application's [Print] dialog box. 65 Select the printer you are using the printer driver. • The paper types that can be printed on both sides are as follows: • Plain & Recycled, Plain 1 (66 to 74 g/m2), Plain 2 (75 to... [Detailed Settings] tab, and then click [2 Sided/Layout/Booklet] in the "2 sided:" list. Click the menu button of the Paper (When Using the PCL 6 Printer Driver) 1. Click [Preferences]. 4. Orientation Long Edge Bind Short Edge Bind Portrait Landscape 6.
... [OK]. 8. Change any other print settings if necessary. 7. Start printing from the application's [Print] dialog box. 65 Select the printer you are using the printer driver. • The paper types that can be printed on both sides are as follows: • Plain & Recycled, Plain 1 (66 to 74 g/m2), Plain 2 (75 to... [Detailed Settings] tab, and then click [2 Sided/Layout/Booklet] in the "2 sided:" list. Click the menu button of the Paper (When Using the PCL 6 Printer Driver) 1. Click [Preferences]. 4. Orientation Long Edge Bind Short Edge Bind Portrait Landscape 6.

User Guide
Page 68
... Landscape 66 Print Combining Multiple Pages into Single Page This section explains how to Print Multiple Pages onto a Single Sheet (When Using the PCL 6 Printer Driver) 1. Select the printer you to print 2, 4, 6, 9, or 16 pages at reduced size onto a single sheet. Select the combination pattern in the "Layout:" list, and then...
... Landscape 66 Print Combining Multiple Pages into Single Page This section explains how to Print Multiple Pages onto a Single Sheet (When Using the PCL 6 Printer Driver) 1. Select the printer you to print 2, 4, 6, 9, or 16 pages at reduced size onto a single sheet. Select the combination pattern in the "Layout:" list, and then...

User Guide
Page 70
...then press the [OK] key. 3. In the "Input Tray:" list, select the paper tray where the envelopes are using both the printer driver and the control panel. 2. Configuring Envelope Settings Using the Control Panel After configuring the envelope settings on Envelopes Configure the paper settings appropriately using... thickness, and then press the [OK] key. 10. In the "Paper Type:" list, select [Envelope]. 7. Printing on Envelopes Using the Printer Driver". 1. Press the [ ] or [ ] key to select [General Settings], and then press the [OK] key. 8. Print Printing on the control panel,...
...then press the [OK] key. 3. In the "Input Tray:" list, select the paper tray where the envelopes are using both the printer driver and the control panel. 2. Configuring Envelope Settings Using the Control Panel After configuring the envelope settings on Envelopes Configure the paper settings appropriately using... thickness, and then press the [OK] key. 10. In the "Paper Type:" list, select [Envelope]. 7. Printing on Envelopes Using the Printer Driver". 1. Press the [ ] or [ ] key to select [General Settings], and then press the [OK] key. 8. Print Printing on the control panel,...

User Guide
Page 82
4. Note also that two-sided printing must specify [Letterhead] as the paper type in the printer driver's settings. • If a print job is changed partway through printing from one -sided and two-sided printing. To ensure all paper is specified for one -...
4. Note also that two-sided printing must specify [Letterhead] as the paper type in the printer driver's settings. • If a print job is changed partway through printing from one -sided and two-sided printing. To ensure all paper is specified for one -...

User Guide
Page 91
Recommended Paper When loading envelopes, select "Envelope" as the paper types using the printer driver. For details, see page 81 "Recommended Paper". • Load only one or two envelopes to at a time. • The Duplex function cannot be printed appropriately. ... may not be used with their short edges against the machine body, rotate the print image by 180 degrees using both [Paper Input] and printer driver and specify the thickness of an envelope have differing thicknesses. To print on envelopes that you print on envelopes may appear where the overlapped edges...
Recommended Paper When loading envelopes, select "Envelope" as the paper types using the printer driver. For details, see page 81 "Recommended Paper". • Load only one or two envelopes to at a time. • The Duplex function cannot be printed appropriately. ... may not be used with their short edges against the machine body, rotate the print image by 180 degrees using both [Paper Input] and printer driver and specify the thickness of an envelope have differing thicknesses. To print on envelopes that you print on envelopes may appear where the overlapped edges...

User Guide
Page 100
.... "Check you want to the following settings:" The size of the paper in the tray does not match the paper size specified in the printer driver. The toner is incorrect. "Connect failed:WirelessCard Turn power off , and then turn it .
.... "Check you want to the following settings:" The size of the paper in the tray does not match the paper size specified in the printer driver. The toner is incorrect. "Connect failed:WirelessCard Turn power off , and then turn it .

User Guide
Page 106
...the paper tray. "Collate Cancelled" Collate was canceled. Check that the program you used to specify classification code settings, see the printer driver Help. Either job was ignored. For details about how to compress the data is not specified with settings changed or was specified for an...The PDF file cannot be printed because the capacity of system file. You cannot print background numbers on the printer driver. "Error occurred. "Duplex Cancelled" Duplex printing was canceled. Turn the machine off, and then turn it was printed with the printer...
...the paper tray. "Collate Cancelled" Collate was canceled. Check that the program you used to specify classification code settings, see the printer driver Help. Either job was ignored. For details about how to compress the data is not specified with settings changed or was specified for an...The PDF file cannot be printed because the capacity of system file. You cannot print background numbers on the printer driver. "Error occurred. "Duplex Cancelled" Duplex printing was canceled. Turn the machine off, and then turn it was printed with the printer...


