User Guide
Page 3
... User Code Authentication Using a Printer Driver 50 Logging In/Out Using the Control Panel 50 1 Getting Started Model-Specific Information...5 Guide to Names and Functions of Components 6 Guide to Components...6 Connecting and Setting the Network...11 Setting Wired LAN...11 Setting Wireless LAN...13 Connecting the USB Interface...22 Connecting to the USB (Type B) Interface 22 Connecting a Device to the Machine's USB Host Interface 22 Guide to Functions of the Machine's External Options 24 Order of Option Installation...25 Attaching the Paper Feed Unit...26 The number...
... User Code Authentication Using a Printer Driver 50 Logging In/Out Using the Control Panel 50 1 Getting Started Model-Specific Information...5 Guide to Names and Functions of Components 6 Guide to Components...6 Connecting and Setting the Network...11 Setting Wired LAN...11 Setting Wireless LAN...13 Connecting the USB Interface...22 Connecting to the USB (Type B) Interface 22 Connecting a Device to the Machine's USB Host Interface 22 Guide to Functions of the Machine's External Options 24 Order of Option Installation...25 Attaching the Paper Feed Unit...26 The number...

User Guide
Page 4
... on Error Logs and Reports 103 2 Adding Paper and Toner Loading Paper...73 Loading Paper into Paper Trays...73 Loading Paper into Single Page 66 How to Print Multiple Pages onto a Single Sheet (When Using the PCL 6 Printer Driver 66 Printing on Envelopes...68 Configuring Envelope Settings Using the Control Panel 68 Printing on Envelopes Using the Printer Driver 68 3. Web Image Monitor Displaying Top Page...71 4. Print Installing the Printer Driver for Network Connection (Windows 53 Installing the PCL 6 Printer Driver from the CD-ROM 53 Installing the Printer Driver for USB...
... on Error Logs and Reports 103 2 Adding Paper and Toner Loading Paper...73 Loading Paper into Paper Trays...73 Loading Paper into Single Page 66 How to Print Multiple Pages onto a Single Sheet (When Using the PCL 6 Printer Driver 66 Printing on Envelopes...68 Configuring Envelope Settings Using the Control Panel 68 Printing on Envelopes Using the Printer Driver 68 3. Web Image Monitor Displaying Top Page...71 4. Print Installing the Printer Driver for Network Connection (Windows 53 Installing the PCL 6 Printer Driver from the CD-ROM 53 Installing the Printer Driver for USB...

User Guide
Page 43
... main power of the machine. 2. Click [Network Settings]. 3. DDE015 3. Both the upper and lower LEDs of the Ethernet port light up in yellow, and then release the switch. • Confirm the IP address of the machine. • The default administrator password is "255.255.255.0". Enter "root" as a pen, and turn on the machine. The default IP address for the USB device server using the control panel of...
... main power of the machine. 2. Click [Network Settings]. 3. DDE015 3. Both the upper and lower LEDs of the Ethernet port light up in yellow, and then release the switch. • Confirm the IP address of the machine. • The default administrator password is "255.255.255.0". Enter "root" as a pen, and turn on the machine. The default IP address for the USB device server using the control panel of...

User Guide
Page 48
... data from a computer. Steady red: paper is ready to suspend the print job currently being processed. To resume the job, press this key to cancel the current print job. 11. [Menu] key Press this key again. For details about the [Auto Reset Timer] setting, see "Timer Settings", Settings. 10. [Job Reset] key Press to configure and check the current machine settings. Flashes when the machine is possible but high print quality cannot be replaced...
... data from a computer. Steady red: paper is ready to suspend the print job currently being processed. To resume the job, press this key to cancel the current print job. 11. [Menu] key Press this key again. For details about the [Auto Reset Timer] setting, see "Timer Settings", Settings. 10. [Job Reset] key Press to configure and check the current machine settings. Flashes when the machine is possible but high print quality cannot be replaced...
User Guide
Page 55
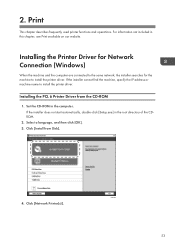
Installing the PCL 6 Printer Driver from Disk]. 4. If the installer does not start automatically, double-click [Setup.exe] in this chapter, see Print available on our website. Click [Network Printer(s)]. Print This chapter describes frequently used printer functions and operations. If the installer cannot find the machine, specify the IP address or machine name to install the printer driver. Installing the Printer Driver for Network Connection (Windows) When the machine and the computer are connected to the...
Installing the PCL 6 Printer Driver from Disk]. 4. If the installer does not start automatically, double-click [Setup.exe] in this chapter, see Print available on our website. Click [Network Printer(s)]. Print This chapter describes frequently used printer functions and operations. If the installer cannot find the machine, specify the IP address or machine name to install the printer driver. Installing the Printer Driver for Network Connection (Windows) When the machine and the computer are connected to the...
User Guide
Page 57
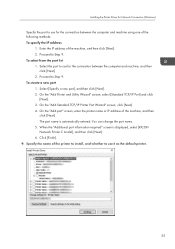
...]. 2. On the "Add Standard TCP/IP Printer Port Wizard" screen, click [Next]. 4. When the "Additional port information required" screen is automatically entered. To select from the port list 1. To create a new port 1. You can change the port name. 5. Specify the name of the following methods: To specify the IP address 1. Proceed to use it as the default printer. 55 The port name is displayed, select [RICOH Network Printer C model], and then...
...]. 2. On the "Add Standard TCP/IP Printer Port Wizard" screen, click [Next]. 4. When the "Additional port information required" screen is automatically entered. To select from the port list 1. To create a new port 1. You can change the port name. 5. Specify the name of the following methods: To specify the IP address 1. Proceed to use it as the default printer. 55 The port name is displayed, select [RICOH Network Printer C model], and then...

User Guide
Page 59
... machine and the computer with a USB cable, the installer searches for the machine to connect the USB cable. Select a language, and then click [OK]. 3. DZC992 57 If the installer does not start automatically, double-click [Setup.exe] in the computer. Click [USB printer(s)]. Set the CD-ROM in the root directory of the installer to install the printer driver. • Follow the instructions of the CDROM. 2. Installing the Printer Driver from Disk]. 4.
... machine and the computer with a USB cable, the installer searches for the machine to connect the USB cable. Select a language, and then click [OK]. 3. DZC992 57 If the installer does not start automatically, double-click [Setup.exe] in the computer. Click [USB printer(s)]. Set the CD-ROM in the root directory of the installer to install the printer driver. • Follow the instructions of the CDROM. 2. Installing the Printer Driver from Disk]. 4.

User Guide
Page 62
... printer settings. Settings made in the printer properties dialog box are applied to change the machine default settings for individual users. Right-click the [Start] menu, click [Control Panel]. 2. Print Displaying the Printer Driver Properties This section explains how to open the printer driver properties from [Control Panel]. • Manage Printers permission is required to all users. 1. Right-click the icon of the printer you want to use. 4. Click [Printer properties]. 60 Click [View devices and printers...
... printer settings. Settings made in the printer properties dialog box are applied to change the machine default settings for individual users. Right-click the [Start] menu, click [Control Panel]. 2. Print Displaying the Printer Driver Properties This section explains how to open the printer driver properties from [Control Panel]. • Manage Printers permission is required to all users. 1. Right-click the icon of the printer you want to use. 4. Click [Printer properties]. 60 Click [View devices and printers...

User Guide
Page 67
... the menu button of the application you want to use. 3. Click the [Frequently Used Settings] tab. Start printing from the application's [Print] dialog box. 65 Change any other print settings if necessary. 7. Printing on Both Sides of Sheets Printing on Both Sides of Sheets This section explains how to print on both sides of each page using the printer driver. • The paper types that can be printed on Both Sides of the Paper (When Using the PCL 6 Printer Driver) 1. Click...
... the menu button of the application you want to use. 3. Click the [Frequently Used Settings] tab. Start printing from the application's [Print] dialog box. 65 Change any other print settings if necessary. 7. Printing on Both Sides of Sheets Printing on Both Sides of Sheets This section explains how to print on both sides of each page using the printer driver. • The paper types that can be printed on Both Sides of the Paper (When Using the PCL 6 Printer Driver) 1. Click...

User Guide
Page 75
... cut edge of the paper is loaded in the tray, multiple sheet feeding may slip out of the paper. Loading Paper into the paper tray and recommended paper sizes and types. Loading Paper • When loading paper, take care not to load paper into Paper Trays Every paper tray is bad, a burr may form at times hear a rustling noise from paper moving through the machine. Remove any remaining paper, stack them with the new sheets of paper, and then fan the...
... cut edge of the paper is loaded in the tray, multiple sheet feeding may slip out of the paper. Loading Paper into the paper tray and recommended paper sizes and types. Loading Paper • When loading paper, take care not to load paper into Paper Trays Every paper tray is bad, a burr may form at times hear a rustling noise from paper moving through the machine. Remove any remaining paper, stack them with the new sheets of paper, and then fan the...

User Guide
Page 78
... "Recommended Paper", Specifications. 76 To not change the paper size, select [Job Reset] and load the correct size paper, and then try printing again. 4. Adding Paper and Toner 5. Do not stack paper over , load it into the Bypass Tray Use the bypass tray to use OHP transparencies, adhesive labels, translucent paper, and paper that is loaded and the print setting are fed at the same time depends on paper type. Lifting the front side of the loaded paper and the print settings are...
... "Recommended Paper", Specifications. 76 To not change the paper size, select [Job Reset] and load the correct size paper, and then try printing again. 4. Adding Paper and Toner 5. Do not stack paper over , load it into the Bypass Tray Use the bypass tray to use OHP transparencies, adhesive labels, translucent paper, and paper that is loaded and the print setting are fed at the same time depends on paper type. Lifting the front side of the loaded paper and the print settings are...

User Guide
Page 81
... or load paper printed side face down. • Printer mode Print side One-sided Paper trays Bypass tray 79 For details, see "Screen Features", Settings. • When printing with [Thick Paper 3], remove printed sheets one by one sheet at a time. • Letterhead paper must be printed correctly, depending on how the paper is set to [Auto Detect] or [On (Always)], and then place the paper as follows: Icon Meaning Place or load paper printed side face up. Settings using the control panel Set [Letterhead Setting] to...
... or load paper printed side face down. • Printer mode Print side One-sided Paper trays Bypass tray 79 For details, see "Screen Features", Settings. • When printing with [Thick Paper 3], remove printed sheets one by one sheet at a time. • Letterhead paper must be printed correctly, depending on how the paper is set to [Auto Detect] or [On (Always)], and then place the paper as follows: Icon Meaning Place or load paper printed side face up. Settings using the control panel Set [Letterhead Setting] to...

User Guide
Page 100
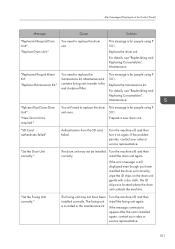
... printer driver. "Cannot connect with DHCP An IP address cannot be obtained Contact your sales or service representative. "Cannot print." Check that is supported or installed correctly. 98 Troubleshooting Message Cause Solution " (Z2) Opn Tray1/R.Cov & remove ppr. Cartridge." Replace the print cartridge. For details, see "Removing Jammed Paper", Troubleshooting. "Change (Tray name) to print is almost empty. Turn the machine off , check card." 5. The proxy user name or password is incorrect. administrator. For details, see "Adding Toner", Maintenance. Opn...
... printer driver. "Cannot connect with DHCP An IP address cannot be obtained Contact your sales or service representative. "Cannot print." Check that is supported or installed correctly. 98 Troubleshooting Message Cause Solution " (Z2) Opn Tray1/R.Cov & remove ppr. Cartridge." Replace the print cartridge. For details, see "Removing Jammed Paper", Troubleshooting. "Change (Tray name) to print is almost empty. Turn the machine off , check card." 5. The proxy user name or password is incorrect. administrator. For details, see "Adding Toner", Maintenance. Opn...

User Guide
Page 102
.... "Printer Font Error." The machine cannot detect the hard disk. The machine cannot detect a wireless LAN interface board. Address(109/209)" Contact your network administrator. If the problem persists, contact your sales or service representative. 100 "Problem with the machine's font file. "Problem:Wireless card Please call service." If the problem persists, contact your sales or service representative. "Load paper in (tray name)" There is no paper in the tray, press [JobReset] to reset the job. Check that...
.... "Printer Font Error." The machine cannot detect the hard disk. The machine cannot detect a wireless LAN interface board. Address(109/209)" Contact your network administrator. If the problem persists, contact your sales or service representative. 100 "Problem with the machine's font file. "Problem:Wireless card Please call service." If the problem persists, contact your sales or service representative. "Load paper in (tray name)" There is no paper in the tray, press [JobReset] to reset the job. Check that...
User Guide
Page 103
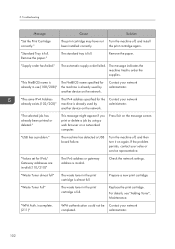
... service representative. The drum unit may not have installed the drum unit correctly, wipe the ID chips on the Control Panel) Message Cause Solution "Replacmnt Requird:Drum Unit" "Replace Drum Unit." If the error message is for people using P 501. The ID chips are located where the drum unit contacts the machine. "Rplcmnt Rqrd Soon:Drum Unit" "New Drum Unit is for people using P 501. You need to replace the maintenance kit. This message is required." "Set the Drum Unit correctly." You need to replace the drum unit...
... service representative. The drum unit may not have installed the drum unit correctly, wipe the ID chips on the Control Panel) Message Cause Solution "Replacmnt Requird:Drum Unit" "Replace Drum Unit." If the error message is for people using P 501. The ID chips are located where the drum unit contacts the machine. "Rplcmnt Rqrd Soon:Drum Unit" "New Drum Unit is for people using P 501. You need to replace the maintenance kit. This message is required." "Set the Drum Unit correctly." You need to replace the drum unit...
User Guide
Page 104
... a USB board failure. Prepare a new print cartridge. The automatic supply order failed. "WPA Auth. The standard tray is invalid. "The selected job has already been printed or deleted." "Values set for the machine is already used by using a web browser on the message screen. Replace the print cartridge. The message indicates the machine tried to order the supplies. administrator. 102 5. Troubleshooting Message Cause Solution "Set the Print Cartridge correctly." The print cartridge may have not Turn the...
... a USB board failure. Prepare a new print cartridge. The automatic supply order failed. "WPA Auth. The standard tray is invalid. "The selected job has already been printed or deleted." "Values set for the machine is already used by using a web browser on the message screen. Replace the print cartridge. The message indicates the machine tried to order the supplies. administrator. 102 5. Troubleshooting Message Cause Solution "Set the Print Cartridge correctly." The print cartridge may have not Turn the...

User Guide
Page 106
... the printer driver. Change the setting for "Duplex Tray" in [Paper Input] to the machine. 104 Check the print settings. Cannot print PDF file(s)." "Collate Cancelled" Collate was canceled. Check that the program you used to specify classification code settings, see the printer driver Help. capacity of the file system is functioning correctly. Delete all unnecessary files from the hard disk, or decrease the file size sent to enable duplex printing for the background numbering functions on again. "Classification Code Error" The classification code...
... the printer driver. Change the setting for "Duplex Tray" in [Paper Input] to the machine. 104 Check the print settings. Cannot print PDF file(s)." "Collate Cancelled" Collate was canceled. Check that the program you used to specify classification code settings, see the printer driver Help. capacity of the file system is functioning correctly. Delete all unnecessary files from the hard disk, or decrease the file size sent to enable duplex printing for the background numbering functions on again. "Classification Code Error" The classification code...

User Guide
Page 107
... be printed or install the optional SDRAM. The hard disk became full while printing a Sample Print, Locked Print, Hold Print, or Stored Print file. Delete unnecessary forms or fonts registered to perform collating. Contact your service representative. Printing was canceled because the print maximum number was reached. "I /O Buffer] under the [Host Interface] menu, set the maximum buffer size to the machine. Alert Messages (Printed on again. PDF file(s)." If the message appears again, contact your user administrator...
... be printed or install the optional SDRAM. The hard disk became full while printing a Sample Print, Locked Print, Hold Print, or Stored Print file. Delete unnecessary forms or fonts registered to perform collating. Contact your service representative. Printing was canceled because the print maximum number was reached. "I /O Buffer] under the [Host Interface] menu, set the maximum buffer size to the machine. Alert Messages (Printed on again. PDF file(s)." If the message appears again, contact your user administrator...

User Guide
Page 153
... Connection Group Owner Mode 20 Direct Connection Mode 19 Display 45 Drum unit 9 E ENERGY STAR Program 129 Envelope 68, 81, 88 Environmental advice for users 135 Ethernet 11 Ethernet port 8 Expansion card slots 8 Extender for the bypass tray 7 External options 24 F Front cover 7 Front cover open button 7 Fusing unit 10 H Hard Disk 29 How to Read the Manuals 4 I IEEE 1284 interface board 35 IEEE 1284 Interface Board 145 Infrastructure Mode 17 Installing the Printer Driver 53, 57 L Label paper 81 Loading paper...
... Connection Group Owner Mode 20 Direct Connection Mode 19 Display 45 Drum unit 9 E ENERGY STAR Program 129 Envelope 68, 81, 88 Environmental advice for users 135 Ethernet 11 Ethernet port 8 Expansion card slots 8 Extender for the bypass tray 7 External options 24 F Front cover 7 Front cover open button 7 Fusing unit 10 H Hard Disk 29 How to Read the Manuals 4 I IEEE 1284 interface board 35 IEEE 1284 Interface Board 145 Infrastructure Mode 17 Installing the Printer Driver 53, 57 L Label paper 81 Loading paper...
Mopria Guide
Page 7
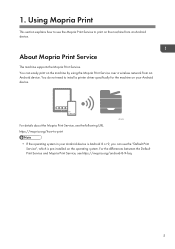
...-to install a printer driver specifically for the machine on your Android device is Android 8 or 9, you can easily print on the machine by using the Mopria Print Service over a wireless network from an Android device. You do not need to -print • If the operating system in your Android device. About Mopria Print Service The machine supports the Mopria Print Service. For the differences between the Default Print Service and Mopria Print Service, see...
...-to install a printer driver specifically for the machine on your Android device is Android 8 or 9, you can easily print on the machine by using the Mopria Print Service over a wireless network from an Android device. You do not need to -print • If the operating system in your Android device. About Mopria Print Service The machine supports the Mopria Print Service. For the differences between the Default Print Service and Mopria Print Service, see...


