Quick Use Guide
Page 3
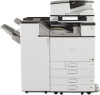
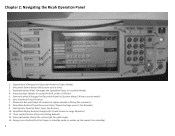
...) (Changes the Operation Panel to Copier Mode) 2. Start button (Used to Large Graphics) 11. Simplified display button (Changes the Touch Screen to Start Copy, Fax & Scan) 10. User Interface (Touch Screen) 7. Clear modes button (Clears all setting default) 12. Document Server button (Not active at this time) 3. Scanner button (Changes the...
...) (Changes the Operation Panel to Copier Mode) 2. Start button (Used to Large Graphics) 11. Simplified display button (Changes the Touch Screen to Start Copy, Fax & Scan) 10. User Interface (Touch Screen) 7. Clear modes button (Clears all setting default) 12. Document Server button (Not active at this time) 3. Scanner button (Changes the...
Quick Use Guide
Page 16
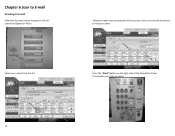
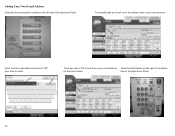
Select the letter that corresponds with your last name, next use the arrow key to find your name Select your scan to E‐mail Select the Scanner button located on the right side of the Operations Panel To complete your name from the list Press the "Start" Button on the left sideof the Operation Panel. Chapter 6 Scan to E‐mail Scanning to email. 16
Select the letter that corresponds with your last name, next use the arrow key to find your name Select your scan to E‐mail Select the Scanner button located on the right side of the Operations Panel To complete your name from the list Press the "Start" Button on the left sideof the Operation Panel. Chapter 6 Scan to E‐mail Scanning to email. 16
Quick Use Guide
Page 18
Continued Scanning to E‐Mail Select "Start Search" button Select a your scan to email. 18 Once you select "OK' you will see your e‐mail address on the main screen Press the Start Button on the right side of the Operations Panel To complete your e‐mail address on the touch panel then press "OK".
Continued Scanning to E‐Mail Select "Start Search" button Select a your scan to email. 18 Once you select "OK' you will see your e‐mail address on the main screen Press the Start Button on the right side of the Operations Panel To complete your e‐mail address on the touch panel then press "OK".
Quick Use Guide
Page 19
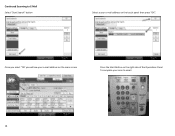
side of the Operations Panel 19 Adding Your Own E-mail Address Select the Scanner button located on the main screen. To manually add an e‐mail not in the address book, select manual entry Enter the full e‐mail address and press "OK" your e‐mail address Press the Start Button on the right To complete on the left sideof the Operation Panel. Once you select "OK' you will see your scan to email.
side of the Operations Panel 19 Adding Your Own E-mail Address Select the Scanner button located on the main screen. To manually add an e‐mail not in the address book, select manual entry Enter the full e‐mail address and press "OK" your e‐mail address Press the Start Button on the right To complete on the left sideof the Operation Panel. Once you select "OK' you will see your scan to email.
Manuals
Page 8
... logged-in user may be made beforehand. G Specify the destination(s). D Place originals. F If necessary, press [Send File Type / Name] to Folder... (Basic Procedure for Sending Scan Files by Email. How to use the scanner functions, several settings must be specified as file name and file format. E If necessary, specify the...
... logged-in user may be made beforehand. G Specify the destination(s). D Place originals. F If necessary, press [Send File Type / Name] to Folder... (Basic Procedure for Sending Scan Files by Email. How to use the scanner functions, several settings must be specified as file name and file format. E If necessary, specify the...

Manuals
Page 30
... the Internet [email protected] xxx.xxx.xxx.xxx [email protected] xxx.xxx.xxx.xxx CJQ606 E-mail Transmission and Reception This machine converts scanned document images to e-mail format, and transmits and receives the e-mail data over the Internet. • To send a document, specify ... address instead of a fax number (IP-Fax Transmission). See "Types of Reception", Fax . • Using a VoIP gateway, this machine can receive email messages via Internet Fax or from computers (Internet Fax Reception and Mail to the public switched telephone network (PSTN). 20 1. See "Specifying an Internet Fax...
... the Internet [email protected] xxx.xxx.xxx.xxx [email protected] xxx.xxx.xxx.xxx CJQ606 E-mail Transmission and Reception This machine converts scanned document images to e-mail format, and transmits and receives the e-mail data over the Internet. • To send a document, specify ... address instead of a fax number (IP-Fax Transmission). See "Types of Reception", Fax . • Using a VoIP gateway, this machine can receive email messages via Internet Fax or from computers (Internet Fax Reception and Mail to the public switched telephone network (PSTN). 20 1. See "Specifying an Internet Fax...

Manuals
Page 125
Press the [Home] key on the top left of the control panel, and press the [Scanner] icon on the [Home] screen. Press the [E-mail] tab. 4. If a previous setting remains, press the [Reset] key. 3. If necessary, specify the scan settings according to the original to be scanned. 115 Make sure that no previous settings remain. Place originals. 5. Basic Procedure for Sending Scan Files by E-mail Basic Procedure for Sending Scan Files by Email 1. CJS113 2.
Press the [Home] key on the top left of the control panel, and press the [Scanner] icon on the [Home] screen. Press the [E-mail] tab. 4. If a previous setting remains, press the [Reset] key. 3. If necessary, specify the scan settings according to the original to be scanned. 115 Make sure that no previous settings remain. Place originals. 5. Basic Procedure for Sending Scan Files by E-mail Basic Procedure for Sending Scan Files by Email 1. CJS113 2.

Manuals
Page 126
...name, and then press [OK]. 7. Notice]. Press [Change] under "Select Title". Notice], the selected e-mail sender will receive e-mail notification when the email recipient has opened the e-mail. 9. Press the [User Tools/Counter] key. 2. Press [ Next]. 8. Specify the destination. To specify the e-mail...entry display appears. 6. Press the key for the classification you want to the page that [Program / Change] is displayed first. 116 Scan Example: Scanning the document in the [Original Type] tab. • Press [Original Feed Type], and then press [2 Sided Original]. • Press...
...name, and then press [OK]. 7. Notice]. Press [Change] under "Select Title". Notice], the selected e-mail sender will receive e-mail notification when the email recipient has opened the e-mail. 9. Press the [User Tools/Counter] key. 2. Press [ Next]. 8. Specify the destination. To specify the e-mail...entry display appears. 6. Press the key for the classification you want to the page that [Program / Change] is displayed first. 116 Scan Example: Scanning the document in the [Original Type] tab. • Press [Original Feed Type], and then press [2 Sided Original]. • Press...

Manuals
Page 216
... be resent later." Check settings. To check the current status, press [Scanned Files Status]." For details about these settings, see "Send Settings", Scan . Scanning has been cancelled. Specify whether to [Yes (per Page)] or [Yes (per page has reached the maximum email size specified in the Document Server, only some of 128 or more...
... be resent later." Check settings. To check the current status, press [Scanned Files Status]." For details about these settings, see "Send Settings", Scan . Scanning has been cancelled. Specify whether to [Yes (per Page)] or [Yes (per page has reached the maximum email size specified in the Document Server, only some of 128 or more...


