Quick Use Guide
Page 3
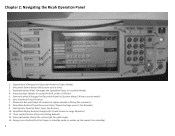
... / Off Line) 5. Printer button (Access to Copier Mode) 2. Scanner button (Changes the Operation Panel to Scanner Mode / Allows scan to Start Copy, Fax & Scan) 10. User Interface (Touch Screen) 7. Energy saver button (Put the Copier in Standby mode or wakes up the copier from standby...3 Chapter 2: Navigating the Ricoh Operation Panel 1. Numerical Key pad (Input of number of copies needed / Dialing Fax numbers) 8. Interrupt button (Pause the current job for quick copy) 13. Document Server button (Not active at this time) 3. Start button (Used to email) 6. Facsimile button (Fax...
... / Off Line) 5. Printer button (Access to Copier Mode) 2. Scanner button (Changes the Operation Panel to Scanner Mode / Allows scan to Start Copy, Fax & Scan) 10. User Interface (Touch Screen) 7. Energy saver button (Put the Copier in Standby mode or wakes up the copier from standby...3 Chapter 2: Navigating the Ricoh Operation Panel 1. Numerical Key pad (Input of number of copies needed / Dialing Fax numbers) 8. Interrupt button (Pause the current job for quick copy) 13. Document Server button (Not active at this time) 3. Start button (Used to email) 6. Facsimile button (Fax...
Quick Use Guide
Page 16
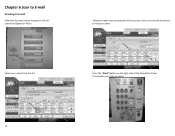
Select the letter that corresponds with your last name, next use the arrow key to email. 16 Chapter 6 Scan to E‐mail Scanning to E‐mail Select the Scanner button located on the right side of the Operations Panel To complete your scan to find your name Select your name from the list Press the "Start" Button on the left sideof the Operation Panel.
Select the letter that corresponds with your last name, next use the arrow key to email. 16 Chapter 6 Scan to E‐mail Scanning to E‐mail Select the Scanner button located on the right side of the Operations Panel To complete your scan to find your name Select your name from the list Press the "Start" Button on the left sideof the Operation Panel.
Quick Use Guide
Page 18
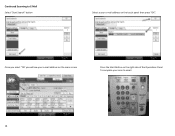
Once you select "OK' you will see your scan to E‐Mail Select "Start Search" button Select a your e‐mail address on the right side of the Operations Panel To complete your e‐mail address on the main screen Press the Start Button on the touch panel then press "OK". Continued Scanning to email. 18
Once you select "OK' you will see your scan to E‐Mail Select "Start Search" button Select a your e‐mail address on the right side of the Operations Panel To complete your e‐mail address on the main screen Press the Start Button on the touch panel then press "OK". Continued Scanning to email. 18
Quick Use Guide
Page 19
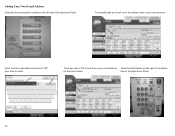
Adding Your Own E-mail Address Select the Scanner button located on the main screen. Once you select "OK' you will see your scan to email. To manually add an e‐mail not in the address book, select manual entry Enter the full e‐mail address and press "OK" your e‐mail address Press the Start Button on the right To complete on the left sideof the Operation Panel. side of the Operations Panel 19
Adding Your Own E-mail Address Select the Scanner button located on the main screen. Once you select "OK' you will see your scan to email. To manually add an e‐mail not in the address book, select manual entry Enter the full e‐mail address and press "OK" your e‐mail address Press the Start Button on the right To complete on the left sideof the Operation Panel. side of the Operations Panel 19


