Quick Use Guide
Page 3
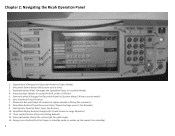
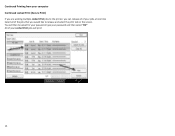
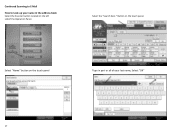
...Line) 5. Simplified display button (Changes the Touch Screen to email) 6. Document Server button (Not active at this time) 3. Numerical Key pad (Input of number of copies needed / Dialing Fax numbers) 8. Energy saver button (Put the Copier in Standby mode or wakes up the copier from standby) 3 Chapter 2: Navigating the Ricoh Operation Panel 1. Scanner button (Changes the Operation Panel to Scanner Mode / Allows scan to Large Graphics) 11. Clear/Stop button (Stops the current Job / Clears the Page count / Fax Number) 9. Facsimile button (Fax) (Changes the Operation Panel to Start...
...Line) 5. Simplified display button (Changes the Touch Screen to email) 6. Document Server button (Not active at this time) 3. Numerical Key pad (Input of number of copies needed / Dialing Fax numbers) 8. Energy saver button (Put the Copier in Standby mode or wakes up the copier from standby) 3 Chapter 2: Navigating the Ricoh Operation Panel 1. Scanner button (Changes the Operation Panel to Scanner Mode / Allows scan to Large Graphics) 11. Clear/Stop button (Stops the current Job / Clears the Page count / Fax Number) 9. Facsimile button (Fax) (Changes the Operation Panel to Start...

Quick Use Guide
Page 4
Chapter 3: Making a Copy Copies can be made from two sources: The top feeder (place originals face up) From the glass (place originals on the left side face down) Select the Copy button to switch to Copy Mode. OR In Copy Mode, you have many options 4
Chapter 3: Making a Copy Copies can be made from two sources: The top feeder (place originals face up) From the glass (place originals on the left side face down) Select the Copy button to switch to Copy Mode. OR In Copy Mode, you have many options 4
Quick Use Guide
Page 5
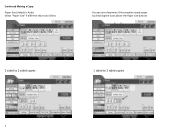
Continued Making a Copy: Paper Size (default is Auto) Select "Paper Size" if different than Auto Select You can also determine if the machine needs paper by checking the icons above the Paper size buttons 2 sided to 2 sided copies 1 sided to 2 sided copies 5
Continued Making a Copy: Paper Size (default is Auto) Select "Paper Size" if different than Auto Select You can also determine if the machine needs paper by checking the icons above the Paper size buttons 2 sided to 2 sided copies 1 sided to 2 sided copies 5

Quick Use Guide
Page 7
Continued: Making a copy Auto Reduce and Enlarge Standard Reduce and Enlarge Standard Reduce and Enlarge enables you to customize your options 7
Continued: Making a copy Auto Reduce and Enlarge Standard Reduce and Enlarge Standard Reduce and Enlarge enables you to customize your options 7
Quick Use Guide
Page 8
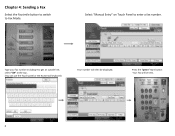
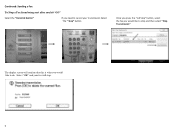
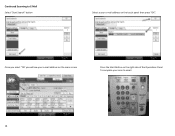
Press the "green" Start button Your Fax will then be Sent. 8 Type your fax number including 9 to get an outside line, select "OK" at the top . (You can use the Touch panel or the Numerical keyboard) Your number will be displayed. Select "Manual Entry" on Touch Panel to Fax Mode. Chapter 4: Sending a Fax Select the Facsimile button to switch to enter a fax number.
Press the "green" Start button Your Fax will then be Sent. 8 Type your fax number including 9 to get an outside line, select "OK" at the top . (You can use the Touch panel or the Numerical keyboard) Your number will be displayed. Select "Manual Entry" on Touch Panel to Fax Mode. Chapter 4: Sending a Fax Select the Facsimile button to switch to enter a fax number.
Quick Use Guide
Page 9
Select "OK" and your transmission Select The " Stop" button. Once you press the "red Stop" button, select the fax you would like to do. Continued: Sending a Fax To Stop a Fax from being sent after you hit "GO" Select the "Facsimile button" IF you need to cancel your fax will confirm that this is what you would like to stop and then select "Stop Transmission" The display screen will stop. 9
Select "OK" and your transmission Select The " Stop" button. Once you press the "red Stop" button, select the fax you would like to do. Continued: Sending a Fax To Stop a Fax from being sent after you hit "GO" Select the "Facsimile button" IF you need to cancel your fax will confirm that this is what you would like to stop and then select "Stop Transmission" The display screen will stop. 9
Quick Use Guide
Page 10
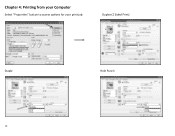
Duplex (2 Sided Print) Staple 10 Hole Punch Chapter 4: Printing from your Computer Select "Properties" button to access options for your print job.
Duplex (2 Sided Print) Staple 10 Hole Punch Chapter 4: Printing from your Computer Select "Properties" button to access options for your print job.
Quick Use Guide
Page 11
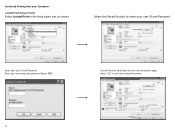
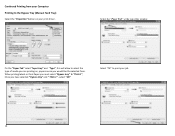
Continued Printing from your Computer Locked Print (Secure Print) Select Locked Print in the drop down box as shown Select the Details button to enter your user ID and Password Enter your user ID and Password Enter your user name and password Select "OK" You will then be taken back to print you locked document. 11 Select "OK" to your main properties page.
Continued Printing from your Computer Locked Print (Secure Print) Select Locked Print in the drop down box as shown Select the Details button to enter your user ID and Password Enter your user ID and Password Enter your user name and password Select "OK" You will then be taken back to print you locked document. 11 Select "OK" to your main properties page.
Quick Use Guide
Page 12
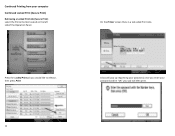
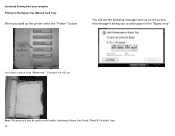
On the Printer screen there is a tab called Print Jobs Press the Locked Print job you would like to release, then press Print 12 A box will pop up requesting your password, once you enter your password and hit "OK" your computer Continued Locked Print (Secure Print) Retrieving a Locked Print Job (Secure Print) select the Printer button located on the left sideof the Operation Panel. Continued Printing from your job will then print.
On the Printer screen there is a tab called Print Jobs Press the Locked Print job you would like to release, then press Print 12 A box will pop up requesting your password, once you enter your password and hit "OK" your computer Continued Locked Print (Secure Print) Retrieving a Locked Print Job (Secure Print) select the Printer button located on the left sideof the Operation Panel. Continued Printing from your job will then print.
Quick Use Guide
Page 13
Continued Printing from your Locked Print jobs will print 13 You will then be asked for your password, type your password and then select "OK" All of the jobs that you can release all of your jobs at one time Select all of your computer Continued Locked Print (Secure Print) If you are sending mulitple Locked Print jobs to the printer, you would like to release and select the print tab on the screen.
Continued Printing from your Locked Print jobs will print 13 You will then be asked for your password, type your password and then select "OK" All of the jobs that you can release all of your jobs at one time Select all of your computer Continued Locked Print (Secure Print) If you are sending mulitple Locked Print jobs to the printer, you would like to release and select the print tab on the screen.
Quick Use Guide
Page 14
When printing labels or thick Paper you must select "Bypass tray" & "Thick 1", Once you have selected " Bypass tray" and " Thick 1" , select "OK" Select "OK" to the Bypass Tray (Manual Feed Tray) Select the "Properties" button on , paper source you are printing on your job 14 Continued Printing from . Select the "Paper Tab" at the top of the window On the "Paper Tab" select "Input tray" and "Type", this will allow to select the type of media you would like the selected from your Computer Printing to print your print driver.
When printing labels or thick Paper you must select "Bypass tray" & "Thick 1", Once you have selected " Bypass tray" and " Thick 1" , select "OK" Select "OK" to the Bypass Tray (Manual Feed Tray) Select the "Properties" button on , paper source you are printing on your job 14 Continued Printing from . Select the "Paper Tab" at the top of the window On the "Paper Tab" select "Input tray" and "Type", this will allow to select the type of media you would like the selected from your Computer Printing to print your print driver.
Quick Use Guide
Page 15
Continued Printing from your computer Printing to the Bypass Tray (Manual Feed Tray) When you walk up the printer select the "Printer" button You will see the following message come up on the screen, this message is asking you to place paper in the "Bypass tray" Your print job will start. Note: This process is placed in the "Bypass tray" Once paper is also be used to print Lables, letterhead, Heavy Card Stock (Think) & Printable Tabs 15
Continued Printing from your computer Printing to the Bypass Tray (Manual Feed Tray) When you walk up the printer select the "Printer" button You will see the following message come up on the screen, this message is asking you to place paper in the "Bypass tray" Your print job will start. Note: This process is placed in the "Bypass tray" Once paper is also be used to print Lables, letterhead, Heavy Card Stock (Think) & Printable Tabs 15
Quick Use Guide
Page 16
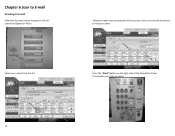
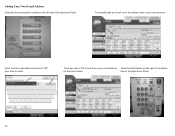
Chapter 6 Scan to E‐mail Scanning to email. 16 Select the letter that corresponds with your last name, next use the arrow key to find your name Select your name from the list Press the "Start" Button on the right side of the Operations Panel To complete your scan to E‐mail Select the Scanner button located on the left sideof the Operation Panel.
Chapter 6 Scan to E‐mail Scanning to email. 16 Select the letter that corresponds with your last name, next use the arrow key to find your name Select your name from the list Press the "Start" Button on the right side of the Operations Panel To complete your scan to E‐mail Select the Scanner button located on the left sideof the Operation Panel.
Quick Use Guide
Page 17
Select "Name" button on the touch panel Type in part or all of your name in the address book Select the Scanner button located on the touch panel. Select the "Search Dest." Continued Scanning to E‐Mail How to Look up your last name, Select "OK" 17 Button on the left sideof the Operation Panel.
Select "Name" button on the touch panel Type in part or all of your name in the address book Select the Scanner button located on the touch panel. Select the "Search Dest." Continued Scanning to E‐Mail How to Look up your last name, Select "OK" 17 Button on the left sideof the Operation Panel.
Quick Use Guide
Page 18
Continued Scanning to email. 18 Once you select "OK' you will see your scan to E‐Mail Select "Start Search" button Select a your e‐mail address on the right side of the Operations Panel To complete your e‐mail address on the main screen Press the Start Button on the touch panel then press "OK".
Continued Scanning to email. 18 Once you select "OK' you will see your scan to E‐Mail Select "Start Search" button Select a your e‐mail address on the right side of the Operations Panel To complete your e‐mail address on the main screen Press the Start Button on the touch panel then press "OK".
Quick Use Guide
Page 19
Adding Your Own E-mail Address Select the Scanner button located on the main screen. Once you select "OK' you will see your scan to email. side of the Operations Panel 19 To manually add an e‐mail not in the address book, select manual entry Enter the full e‐mail address and press "OK" your e‐mail address Press the Start Button on the right To complete on the left sideof the Operation Panel.
Adding Your Own E-mail Address Select the Scanner button located on the main screen. Once you select "OK' you will see your scan to email. side of the Operations Panel 19 To manually add an e‐mail not in the address book, select manual entry Enter the full e‐mail address and press "OK" your e‐mail address Press the Start Button on the right To complete on the left sideof the Operation Panel.
Manuals
Page 1
.... Cover/Slip Sheet • Covers: Create cover sheets. • Designate: Copies certain pages of copy paper. B Press [Reset]. How to stop a job in copy mode... Main power indicator 6. C Select the original and copy types and/or the orientation. For more functions on the Home screen 4. E Enter the number of copies. D Press [OK]. Document Server (Basic Copying) Why use in progress, such as copying, scanning, faxing, or printing. 9. [#] (Enter key) 10. [Sample Copy] 11. [Start] Press to start copying, printing, scanning, or sending. 12. [C] (Clear key) Press to make Copies...
.... Cover/Slip Sheet • Covers: Create cover sheets. • Designate: Copies certain pages of copy paper. B Press [Reset]. How to stop a job in copy mode... Main power indicator 6. C Select the original and copy types and/or the orientation. For more functions on the Home screen 4. E Enter the number of copies. D Press [OK]. Document Server (Basic Copying) Why use in progress, such as copying, scanning, faxing, or printing. 9. [#] (Enter key) 10. [Sample Copy] 11. [Start] Press to start copying, printing, scanning, or sending. 12. [C] (Clear key) Press to make Copies...


