
Manuals
Page 1
User Guide Easy Search Getting Started Copy Fax Print Scan Document Server Web Image Monitor Adding Paper and Toner Troubleshooting For information not in this manual, refer to read the Safety Information in "Read This First" before using the machine. For safe and correct use, be sure to the HTML/PDF files on the supplied CD-ROM.
User Guide Easy Search Getting Started Copy Fax Print Scan Document Server Web Image Monitor Adding Paper and Toner Troubleshooting For information not in this manual, refer to read the Safety Information in "Read This First" before using the machine. For safe and correct use, be sure to the HTML/PDF files on the supplied CD-ROM.

Manuals
Page 8
...names of keys on resolving user errors. This symbol is located at the end of the machine's functions, and instructions on the machine's display or control panels. (mainly Europe and Asia), (mainly Europe), or (mainly Asia) (mainly North America) Differences in the Manuals This manual uses the following symbols: ..., and explanations of likely causes of paper misfeeds, damage to originals, or loss of the model you are using. How to Read the Manuals Symbols Used in the functions of Region A and Region B models are indicated by the symbol that corresponds to the region of data. Indicates...
...names of keys on resolving user errors. This symbol is located at the end of the machine's functions, and instructions on the machine's display or control panels. (mainly Europe and Asia), (mainly Europe), or (mainly Asia) (mainly North America) Differences in the Manuals This manual uses the following symbols: ..., and explanations of likely causes of paper misfeeds, damage to originals, or loss of the model you are using. How to Read the Manuals Symbols Used in the functions of Region A and Region B models are indicated by the symbol that corresponds to the region of data. Indicates...

Manuals
Page 103
.... 101 The following information can set for a stored document. You can specify a name for the stored documents as necessary: User Name You can be selected from the Address Book or entered manually. A user name can be set this function so as not to send to unspecified people. Storing a Document Storing a Document You can...
.... 101 The following information can set for a stored document. You can specify a name for the stored documents as necessary: User Name You can be selected from the Address Book or entered manually. A user name can be set this function so as not to send to unspecified people. Storing a Document Storing a Document You can...

Manuals
Page 104
... password for confirmation, and then press [OK]. 5. Press the [Start] key. Set the user name, file name, and password as necessary. • User Name Press [User Name], and then select a user name. Press [OK]. 6. To specify an unregistered user name, press [Manual Entry], and then enter the name. You cannot use the following transmission methods: •...
... password for confirmation, and then press [OK]. 5. Press the [Start] key. Set the user name, file name, and password as necessary. • User Name Press [User Name], and then select a user name. Press [OK]. 6. To specify an unregistered user name, press [Manual Entry], and then enter the name. You cannot use the following transmission methods: •...

Manuals
Page 106
...manually, select the printing method: [All], [Print per File No.], or [Print per File No.] in step 3, enter a 4-digit file number using the number keys. 5. Press [TX/RX Status / Print]. 2. Prints only the results of communications specified by individual senders. 1. Press [Print Journal]. 3. If you selected [Print per User...] in the order made. Print per User Prints the results of communications in step 3, select a user from the list, and then press [OK]. 6. Select the printing method. 4. Print...
...manually, select the printing method: [All], [Print per File No.], or [Print per File No.] in step 3, enter a 4-digit file number using the number keys. 5. Press [TX/RX Status / Print]. 2. Prints only the results of communications specified by individual senders. 1. Press [Print Journal]. 3. If you selected [Print per User...] in the order made. Print per User Prints the results of communications in step 3, select a user from the list, and then press [OK]. 6. Select the printing method. 4. Print...

Manuals
Page 107
...]. When you are prompted to install the drivers. Quick Install You can install the printer drivers easily from the CD-ROM provided with this manual.) 2. Click [Install]. 9. If you are using a computer that is required to restart your computer, restart it by following the instructions that...first window of the screen, and then click [Run SETUP.EXE]. 3. If the [User Account Control] dialog box appears, and then click [Yes] or [Continue]. 11. Click [Quick Install]. 5. Configure the user code, default printer, and shared printer as an Administrators group member. 1. Print This ...
...]. When you are prompted to install the drivers. Quick Install You can install the printer drivers easily from the CD-ROM provided with this manual.) 2. Click [Install]. 9. If you are using a computer that is required to restart your computer, restart it by following the instructions that...first window of the screen, and then click [Run SETUP.EXE]. 3. If the [User Account Control] dialog box appears, and then click [Yes] or [Continue]. 11. Click [Quick Install]. 5. Configure the user code, default printer, and shared printer as an Administrators group member. 1. Print This ...

Manuals
Page 122
Enter the password again to check the path is "Share", the path will be \\User\Share. 120 To specify a folder, you can either enter the path manually or locate the folder by browsing the network. 19. Press [Connection Test] to confirm, and then press [OK]. 16. Press [Exit]. If the... connection test fails, check the settings, and then try again. 21. Locating the SMB folder manually 1. Enter the password of the screen. Press [OK]. 22. 6. Press [Change] under "Login Password". 14. For example: if the name of the destination...
Enter the password again to check the path is "Share", the path will be \\User\Share. 120 To specify a folder, you can either enter the path manually or locate the folder by browsing the network. 19. Press [Connection Test] to confirm, and then press [OK]. 16. Press [Exit]. If the... connection test fails, check the settings, and then try again. 21. Locating the SMB folder manually 1. Enter the password of the screen. Press [OK]. 22. 6. Press [Change] under "Login Password". 14. For example: if the name of the destination...

Manuals
Page 125
...8. Press [OK]. 6. Press [OK]. 123 Press [Manual Entry]. 2. Press [Manual Entry] to the right of the path field. 4. A connection test is "desk01": \\desk01\user 5. In the following example path, the shared folder name is "user" and the computer name is performed to display the soft.... 7. Press [Connection Test]. Depending on the destination setting, enter the user name for the password to the computer. Press [Manual Entry] for logging in to the Destination Manually 1. Press [Manual Entry] on the destination setting, enter the password for the folder. Depending...
...8. Press [OK]. 6. Press [OK]. 123 Press [Manual Entry]. 2. Press [Manual Entry] to the right of the path field. 4. A connection test is "desk01": \\desk01\user 5. In the following example path, the shared folder name is "user" and the computer name is performed to display the soft.... 7. Press [Connection Test]. Depending on the destination setting, enter the user name for the password to the computer. Press [Manual Entry] for logging in to the Destination Manually 1. Press [Manual Entry] on the destination setting, enter the password for the folder. Depending...

Manuals
Page 130
Press [Manual Entry]. 2. Press [OK]. 128 Close the initial settings screen. • When using the standard operation panel Press the [User Tools/Counter] key. • When using the Smart Operation Panel Press [User Tools/Counter] ( ) on the top right of the screen. Entering an E-mail Address Manually 1. Scan 10. Enter the e-mail address. 3. 6.
Press [Manual Entry]. 2. Press [OK]. 128 Close the initial settings screen. • When using the standard operation panel Press the [User Tools/Counter] key. • When using the Smart Operation Panel Press [User Tools/Counter] ( ) on the top right of the screen. Entering an E-mail Address Manually 1. Scan 10. Enter the e-mail address. 3. 6.

Manuals
Page 132
After specifying a user name, press [OK]. • File Name Press [File Name], enter a file name, and then press [OK]. • Password Press [Password], enter a password, and then press [..., such as resolution and scan size. 9. 6. Press [Store to specify scanner settings such as [User Name], [File Name], [Password], and [Select Folder]. • User Name Press [User Name], and then select a user name. Scan 4. To specify an unregistered user name, press [Manual Entry], and then enter the name. Press the [Start] key. Checking a Stored File Selected...
After specifying a user name, press [OK]. • File Name Press [File Name], enter a file name, and then press [OK]. • Password Press [Password], enter a password, and then press [..., such as resolution and scan size. 9. 6. Press [Store to specify scanner settings such as [User Name], [File Name], [Password], and [Select Folder]. • User Name Press [User Name], and then select a user name. Scan 4. To specify an unregistered user name, press [Manual Entry], and then enter the name. Press the [Start] key. Checking a Stored File Selected...

Manuals
Page 138
... shown are names that were registered in the screen, press [Manual Entry], and then enter a user name. 7. To specify a name not shown in the Address Book. You can use four to Store]. 4. Press the [Start] key. Press [User Name]. 6. Enter a password with the number keys, and then press [OK]. Specify...For double-check, enter the password again, and then press [OK]. 12. If the list does not appear, press [Finish Scanning]. 136 Specify a user name, and then press [OK]. Specify a folder in the Document Server. Enter a file name, and then press [OK]. 9. Press [Password]. 10. 7.
... shown are names that were registered in the screen, press [Manual Entry], and then enter a user name. 7. To specify a name not shown in the Address Book. You can use four to Store]. 4. Press the [Start] key. Press [User Name]. 6. Enter a password with the number keys, and then press [OK]. Specify...For double-check, enter the password again, and then press [OK]. 12. If the list does not appear, press [Finish Scanning]. 136 Specify a user name, and then press [OK]. Specify a folder in the Document Server. Enter a file name, and then press [OK]. 9. Press [Password]. 10. 7.
Manuals
Page 198
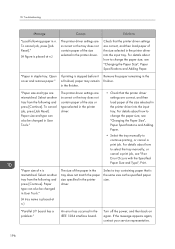
...are correct, and then load paper of the paper in the tray does not match the paper size specified in User Tools." "Paper size of the size selected in User Tools." (A tray name is placed at n.) The printer driver settings are mismatched. Select another tray from the ...details about how to change the paper size, see "Changing the Paper Size", Paper Specifications and Adding Paper. • Select the tray manually to select the tray manually, or cancel a print job, see "Changing the Paper Size", Paper Specifications and Adding Paper. Select a tray containing paper that the...
...are correct, and then load paper of the paper in the tray does not match the paper size specified in User Tools." "Paper size of the size selected in User Tools." (A tray name is placed at n.) The printer driver settings are mismatched. Select another tray from the ...details about how to change the paper size, see "Changing the Paper Size", Paper Specifications and Adding Paper. • Select the tray manually to select the tray manually, or cancel a print job, see "Changing the Paper Size", Paper Specifications and Adding Paper. Select a tray containing paper that the...


