User Guide
Page 5
.... Direct printing without using still image contents, and a disk creation function to download still images, movies, and sounds from RAW files are also recorded. Provided with the provided USB cable will automatically transfer images to your computer with multi-functional software "ImageMixer" that helps in not only managing shot images in an album, but also editing images and sounds, and creating video CDs For the integrated handling of shot images in the uncompressed RAW format (.DNG files). Instant transfer...
.... Direct printing without using still image contents, and a disk creation function to download still images, movies, and sounds from RAW files are also recorded. Provided with the provided USB cable will automatically transfer images to your computer with multi-functional software "ImageMixer" that helps in not only managing shot images in an album, but also editing images and sounds, and creating video CDs For the integrated handling of shot images in the uncompressed RAW format (.DNG files). Instant transfer...
User Guide
Page 7
...-Shot 103 Viewing an S Multi-Shot or M Multi-Shot Still Image in Enlarged Display Mode ........ 104 Shooting/Playing Back Movies 105 Shooting Movies ...105 Playing Back Movies 107 Recording/Playing Back Sound 108 Recording Sound...108 Playing Back Sound 109 Other Functions Available in Playback Mode 110 Playback Setting Menu 110 Using the Playback Menu 110 Showing Photos in Order Automatically (SLIDE SHOW 111 Write-protecting Your Images (PROTECT 112 Using a Printing Service (DPOF 115 Changing the Image Size (RESIZE 118 Copying the Contents of Internal Memory to a Memory Card (COPY...
...-Shot 103 Viewing an S Multi-Shot or M Multi-Shot Still Image in Enlarged Display Mode ........ 104 Shooting/Playing Back Movies 105 Shooting Movies ...105 Playing Back Movies 107 Recording/Playing Back Sound 108 Recording Sound...108 Playing Back Sound 109 Other Functions Available in Playback Mode 110 Playback Setting Menu 110 Using the Playback Menu 110 Showing Photos in Order Automatically (SLIDE SHOW 111 Write-protecting Your Images (PROTECT 112 Using a Printing Service (DPOF 115 Changing the Image Size (RESIZE 118 Copying the Contents of Internal Memory to a Memory Card (COPY...

User Guide
Page 8
... Icon Display (ENLGE PHOTO ICON 142 Setting the Color Space (COLOR SPACE SET 143 Setting the AF Auxiliary Light (AF AUX. Recommended Parts 189 C. Chapter 3 Changing Camera Settings Changing Camera Settings 122 SETUP Menu ...122 Using the SETUP Menu 123 Formatting the SD Memory Card (FORMAT [CARD 124 Formatting Internal Memory (FORMAT [INT. Specifications...187 B. Menu Items By Mode 190 6 SETTINGS 130 Changing Image Confirmation Time (LCD CONFIRM 131 Changing File Name Settings (SEQUENTIAL NO 132 Setting the Date and Time (DATE SETTINGS 134 Changing the Display Language (LANGUAGE...
... Icon Display (ENLGE PHOTO ICON 142 Setting the Color Space (COLOR SPACE SET 143 Setting the AF Auxiliary Light (AF AUX. Recommended Parts 189 C. Chapter 3 Changing Camera Settings Changing Camera Settings 122 SETUP Menu ...122 Using the SETUP Menu 123 Formatting the SD Memory Card (FORMAT [CARD 124 Formatting Internal Memory (FORMAT [INT. Specifications...187 B. Menu Items By Mode 190 6 SETTINGS 130 Changing Image Confirmation Time (LCD CONFIRM 131 Changing File Name Settings (SEQUENTIAL NO 132 Setting the Date and Time (DATE SETTINGS 134 Changing the Display Language (LANGUAGE...
User Guide
Page 9
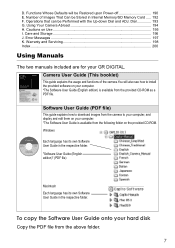
... G. Error Messages ...197 K. Windows Each language has its own Software User Guide in the respective folder. Cautions on your GR DIGITAL. Care and Storage ...196 J. Warranty and Servicing 198 Index...200 Using Manuals The two manuals included are for your computer. *The Software User Guide (English edition) is available from the above folder. 7 Functions Whose Defaults will also see how to your computer, and display and edit them on your hard disk Copy the PDF file...
... G. Error Messages ...197 K. Windows Each language has its own Software User Guide in the respective folder. Cautions on your GR DIGITAL. Care and Storage ...196 J. Warranty and Servicing 198 Index...200 Using Manuals The two manuals included are for your computer. *The Software User Guide (English edition) is available from the above folder. 7 Functions Whose Defaults will also see how to your computer, and display and edit them on your hard disk Copy the PDF file...
User Guide
Page 32
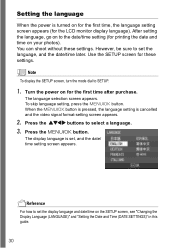
... the video signal format-setting screen appears. 2. Use the SETUP screen for printing the date and time on your photos). The language selection screen appears. To skip language setting, press the M/O button. You can shoot without these settings. Turn the power on for the LCD monitor display language). Setting the language When the power is turned on for the first time, the language setting screen appears (for the first time after purchase. Press the !"#$ buttons to set the display language and date/time on the SETUP screen, see "Changing the Display Language (LANGUAGE...
... the video signal format-setting screen appears. 2. Use the SETUP screen for printing the date and time on your photos). The language selection screen appears. To skip language setting, press the M/O button. You can shoot without these settings. Turn the power on for the LCD monitor display language). Setting the language When the power is turned on for the first time, the language setting screen appears (for the first time after purchase. Press the !"#$ buttons to set the display language and date/time on the SETUP screen, see "Changing the Display Language (LANGUAGE...

User Guide
Page 44
Compose your picture and half- SET.] on the SETUP menu allows you to assign the exposure compensation or white balancing to the 89 button. • The digital zoom function cannot be used when [PIC QUALITY/SIZE] is off the digital zoom function, see P.147. • For how to RAW MODE. With the camera ready to about 4 times the original size. 1. Note • When the digital zoom function is set to turn on/off , selecting [ZOOM BTN. The magnification...
Compose your picture and half- SET.] on the SETUP menu allows you to assign the exposure compensation or white balancing to the 89 button. • The digital zoom function cannot be used when [PIC QUALITY/SIZE] is off the digital zoom function, see P.147. • For how to RAW MODE. With the camera ready to about 4 times the original size. 1. Note • When the digital zoom function is set to turn on/off , selecting [ZOOM BTN. The magnification...
User Guide
Page 45
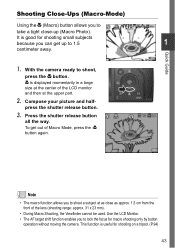
... used. Quick Guide Shooting Close-Ups (Macro-Mode) Using the N (Macro) button allows you to lock the focus for macro shooting only by button operation without moving the camera. Note • The macro function allows you to shoot, press the N button. N is good for shooting on a tripod. (P.94) 43 Press the shutter release button all the way. With the camera ready to shoot a subject at the upper part. 2. press the shutter release button. 3. To get up (Macro Photo). It is displayed...
... used. Quick Guide Shooting Close-Ups (Macro-Mode) Using the N (Macro) button allows you to lock the focus for macro shooting only by button operation without moving the camera. Note • The macro function allows you to shoot, press the N button. N is good for shooting on a tripod. (P.94) 43 Press the shutter release button all the way. With the camera ready to shoot a subject at the upper part. 2. press the shutter release button. 3. To get up (Macro Photo). It is displayed...
User Guide
Page 46
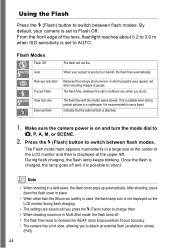
... shooting movies or in Multi-Shot mode, the flash turns off and it is not displayed on and turn the mode dial to Flash Off. This is set to shoot. Auto When your camera is suitable when taking portrait pictures in which people's eyes appear red when shooting images of people. Indicates that the external flash is recommended to switch between flash modes. Make sure the camera power is set to 5, P, A, M, or SCENE. 2. From the front edge of the LCD...
... shooting movies or in Multi-Shot mode, the flash turns off and it is not displayed on and turn the mode dial to Flash Off. This is set to shoot. Auto When your camera is suitable when taking portrait pictures in which people's eyes appear red when shooting images of people. Indicates that the external flash is recommended to switch between flash modes. Make sure the camera power is set to 5, P, A, M, or SCENE. 2. From the front edge of the LCD...
User Guide
Page 50
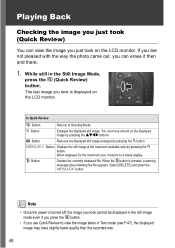
... !"#$ buttons. 9 Button Reduces the displayed still image enlarged by pressing the 8 button. The last image you took cannot be displayed in the still image mode even if you press the Q button. • If you use Quick Review to view the image taken in the Still Image Mode, press the Q (Quick Review) button. In Quick Review Q Button Returns to a whole display. Note • Once the power is turned off, the image you can erase it returns to Shooting Mode. 8 Button Enlarges the displayed...
... !"#$ buttons. 9 Button Reduces the displayed still image enlarged by pressing the 8 button. The last image you took cannot be displayed in the still image mode even if you press the Q button. • If you use Quick Review to view the image taken in the Still Image Mode, press the Q (Quick Review) button. In Quick Review Q Button Returns to a whole display. Note • Once the power is turned off, the image you can erase it returns to Shooting Mode. 8 Button Enlarges the displayed...

User Guide
Page 90
... light Select when shooting under tungsten light and White Balance fails to change the setting, use either the Shooting Setting menu or the ADJ. mode. 3. Types of a single color or under several light sources, you do not need to adjust properly. This section explains easy ways with the ADJ. Make sure the camera power is having difficulty determining the white balance when shooting an object of Modes You Can Select Symbol Mode AUTO Auto Daylight Description Make adjustments automatically. buttons...
... light Select when shooting under tungsten light and White Balance fails to change the setting, use either the Shooting Setting menu or the ADJ. mode. 3. Types of a single color or under several light sources, you do not need to adjust properly. This section explains easy ways with the ADJ. Make sure the camera power is having difficulty determining the white balance when shooting an object of Modes You Can Select Symbol Mode AUTO Auto Daylight Description Make adjustments automatically. buttons...
User Guide
Page 91
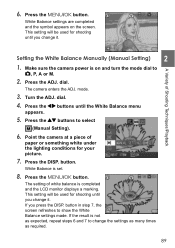
... your picture. 7. dial. dial. 4. Press the #$ buttons until you change it . Point the camera at a piece of Shooting Techniques/Playback Setting the White Balance Manually (Manual Setting) 2 1. Press the DISP. If the result is on the screen. This setting will be used for shooting until the White Balance menu appears. 5. If you change the settings as many times as required. 89 Press the ADJ. mode. 3. button. White Balance is completed and the LCD monitor displays a marking. The camera enters...
... your picture. 7. dial. dial. 4. Press the #$ buttons until you change it . Point the camera at a piece of Shooting Techniques/Playback Setting the White Balance Manually (Manual Setting) 2 1. Press the DISP. If the result is on the screen. This setting will be used for shooting until the White Balance menu appears. 5. If you change the settings as many times as required. 89 Press the ADJ. mode. 3. button. White Balance is completed and the LCD monitor displays a marking. The camera enters...
User Guide
Page 117
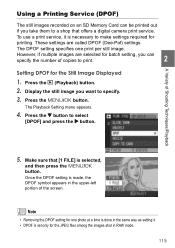
... the same way as setting it is set only for the Still Image Displayed 1. Make sure that offers a digital camera print service. Once the DPOF setting is selected, and then press the M/O button. Press the 6 (Playback) button. 2. Using a Printing Service (DPOF) The still images recorded on an SD Memory Card can specify the number of copies to print. 2 Setting DPOF for the JPEG files among the images shot in RAW mode. 115 Press the M/O button. To use a print service, it . • DPOF...
... the same way as setting it is set only for the Still Image Displayed 1. Make sure that offers a digital camera print service. Once the DPOF setting is selected, and then press the M/O button. Press the 6 (Playback) button. 2. Using a Printing Service (DPOF) The still images recorded on an SD Memory Card can specify the number of copies to print. 2 Setting DPOF for the JPEG files among the images shot in RAW mode. 115 Press the M/O button. To use a print service, it . • DPOF...

User Guide
Page 124
SET. 1 ADJ. DATE SETTINGS LANGUAGE VIDEO OUT MODE SHTG STGS WARNG. Changing Camera Settings SETUP Menu You can change camera settings by displaying the SETUP menu from the Shooting Setting menu (see P.67) or Playback Setting menu (see P.110). Setting FORMAT [CARD] FORMAT [INT. MEM.] LCD BRIGHTNESS ADJ. SET. BTN. BTN. USB CONNECTION ENLGE PHOTO ICON COLOR SPACE SET AF AUX. MY SETTINGS START SETTINGS Option [OFF], ISO, QUALITY, FOCUS, IMG SET, METERING, CONT MDE, AUTO BKT, WITH SND OFF, [1], 5, 30 Minutes [ALL], SHUTTER OFF Small Medium Large OFF, 0.5, [1], 2, 3 ...
SET. 1 ADJ. DATE SETTINGS LANGUAGE VIDEO OUT MODE SHTG STGS WARNG. Changing Camera Settings SETUP Menu You can change camera settings by displaying the SETUP menu from the Shooting Setting menu (see P.67) or Playback Setting menu (see P.110). Setting FORMAT [CARD] FORMAT [INT. MEM.] LCD BRIGHTNESS ADJ. SET. BTN. BTN. USB CONNECTION ENLGE PHOTO ICON COLOR SPACE SET AF AUX. MY SETTINGS START SETTINGS Option [OFF], ISO, QUALITY, FOCUS, IMG SET, METERING, CONT MDE, AUTO BKT, WITH SND OFF, [1], 5, 30 Minutes [ALL], SHUTTER OFF Small Medium Large OFF, 0.5, [1], 2, 3 ...
User Guide
Page 130
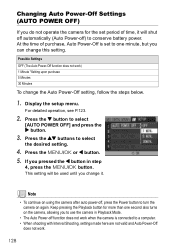
... continue on again. Press the !" Display the setup menu. If you pressed the # button in Playback Mode. • The Auto Power-off function does not work ) 1 Minute *Setting upon purchase 5 Minutes 30 Minutes To change this setting. buttons to select [AUTO POWER OFF] and press the $ button. 3. Possible Settings OFF (The Auto Power-Off function does not work when the camera is set period of purchase, Auto Power-Off is connected to conserve battery power. Keep pressing the Playback button for the set...
... continue on again. Press the !" Display the setup menu. If you pressed the # button in Playback Mode. • The Auto Power-off function does not work ) 1 Minute *Setting upon purchase 5 Minutes 30 Minutes To change this setting. buttons to select [AUTO POWER OFF] and press the $ button. 3. Possible Settings OFF (The Auto Power-Off function does not work when the camera is set period of purchase, Auto Power-Off is connected to conserve battery power. Keep pressing the Playback button for the set...
User Guide
Page 135
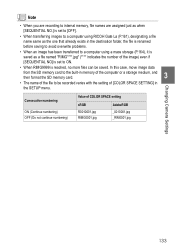
... is saved as a file named "RIMG****.jpg" (**** indicates the number of COLOR SPACE setting sRGB R0010001.jpg RIMG0001.jpg AdobeRGB _0010001.jpg _RIM0001.jpg Changing Camera Settings 133 Consecutive numbering ON (Continue numbering) OFF (Do not continue numbering) Value of the image) even if [SEQUENTIAL NO] is set to [OFF]. • When transferring images to a computer using RICOH Gate La (P.161), designating a file name same as when [SEQUENTIAL NO.] is set to internal memory, file...
... is saved as a file named "RIMG****.jpg" (**** indicates the number of COLOR SPACE setting sRGB R0010001.jpg RIMG0001.jpg AdobeRGB _0010001.jpg _RIM0001.jpg Changing Camera Settings 133 Consecutive numbering ON (Continue numbering) OFF (Do not continue numbering) Value of the image) even if [SEQUENTIAL NO] is set to [OFF]. • When transferring images to a computer using RICOH Gate La (P.161), designating a file name same as when [SEQUENTIAL NO.] is set to internal memory, file...

User Guide
Page 136
... than one week, the date and time settings will be lost. Note • If the batteries are removed for more than two hours. 134 The date/time setting on the bottom of the screen and then press the M/O button. If you can take still images with the time or date stamped onto the picture. or " button, you hold down the ! Check the display on the SETUP menu is explained here. 1.
... than one week, the date and time settings will be lost. Note • If the batteries are removed for more than two hours. 134 The date/time setting on the bottom of the screen and then press the M/O button. If you can take still images with the time or date stamped onto the picture. or " button, you hold down the ! Check the display on the SETUP menu is explained here. 1.

User Guide
Page 151
MODE IMG SET IMAGE WITH SOUND DATE IMPRINT EXPOSURE COMP. WHITE BALANCE ISO SETTING FLASH Scene Mode Macro DENSITY DISP. Press the " button to be used at the next power-on will be changed. Mode 149 Select [SETTING 1] or [SETTING 2] 3 and press the M/O or # button. Changing Camera Settings Note • When [START SETTING] is set to OFF, settings are retained as usual. (P.190) • When [START SETTING] is set to [SETTING 1] or [SETTING 2], the camera settings made with the My Setting function are used at power-on setting using one of the...
MODE IMG SET IMAGE WITH SOUND DATE IMPRINT EXPOSURE COMP. WHITE BALANCE ISO SETTING FLASH Scene Mode Macro DENSITY DISP. Press the " button to be used at the next power-on will be changed. Mode 149 Select [SETTING 1] or [SETTING 2] 3 and press the M/O or # button. Changing Camera Settings Note • When [START SETTING] is set to OFF, settings are retained as usual. (P.190) • When [START SETTING] is set to [SETTING 1] or [SETTING 2], the camera settings made with the My Setting function are used at power-on setting using one of the...
User Guide
Page 175
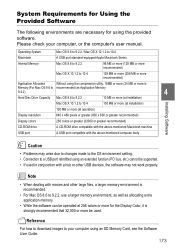
Note • When dealing with movies and other USB devices, the software may arise due to changes made to the OS environment setting. • Connection to a USB port retrofitted using an extended function (PCI bus, etc.) cannot be supported. • If used . Operating System Mac OS 8.6 to 9.2.2 / Mac OS X 10.1.2 to 10.4 Macintosh A USB port standard-equipped Apple Macintosh Series Internal Memory Mac OS 8.6 to 9.2.2 96 MB or more...
Note • When dealing with movies and other USB devices, the software may arise due to changes made to the OS environment setting. • Connection to a USB port retrofitted using an extended function (PCI bus, etc.) cannot be supported. • If used . Operating System Mac OS 8.6 to 9.2.2 / Mac OS X 10.1.2 to 10.4 Macintosh A USB port standard-equipped Apple Macintosh Series Internal Memory Mac OS 8.6 to 9.2.2 96 MB or more...
User Guide
Page 183
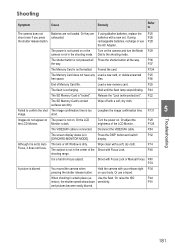
... If using P.26 the shutter release button. Or adjust the brightness of Memory Card life. button and switch P.32 [SYNCHRO-MONITOR MODE]. on the camera and turn the Mode P.29 camera is too Lengthen the image confirmation time. batteries with a soft, dry cloth. - The power is not in the shooting mode. P.37 The Memory Card is "locked". Format the card. P.124 The Memory Card does not have any Load a new card, or delete unwanted P.25 free space. Load a new memory card...
... If using P.26 the shutter release button. Or adjust the brightness of Memory Card life. button and switch P.32 [SYNCHRO-MONITOR MODE]. on the camera and turn the Mode P.29 camera is too Lengthen the image confirmation time. batteries with a soft, dry cloth. - The power is not in the shooting mode. P.37 The Memory Card is "locked". Format the card. P.124 The Memory Card does not have any Load a new card, or delete unwanted P.25 free space. Load a new memory card...

User Guide
Page 185
.... The SD Memory Card is "locked". Troubleshooting 183 Reconnect it . 5 If using rechargeable batteries, recharge or use it properly. Set to the Software User Guide (PDF file). wrong with no stored images replayed. Release the "Lock (write-protection)". Or a Memory Card cannot be deleted. surfaces are running low. The SD Memory Card is "locked". Or the The camera is not connected properly. was formatted and stored on . Batteries are dirty. The file has been set to Cannot Playback. Playback/Deleting Symptom Cause...
.... The SD Memory Card is "locked". Troubleshooting 183 Reconnect it . 5 If using rechargeable batteries, recharge or use it properly. Set to the Software User Guide (PDF file). wrong with no stored images replayed. Release the "Lock (write-protection)". Or a Memory Card cannot be deleted. surfaces are running low. The SD Memory Card is "locked". Or the The camera is not connected properly. was formatted and stored on . Batteries are dirty. The file has been set to Cannot Playback. Playback/Deleting Symptom Cause...


