Service Manual
Page 25
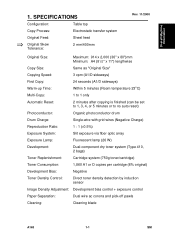
...1 to 1 only Automatic Reset: 2 minutes after copying is finished (can be set to 1, 3, 4, or 5 minutes or to no auto reset) Photoconductor: Organic photoconductor drum Drum Charge: Single-wire with grid wires (Negative Charge) Reproduction Ratio: 1 : 1 (±0.5%) Exposure System: Slit exposure via fiber optic array Exposure Lamp: Fluorescent lamp (26 W)... by induction sensor Image Density Adjustment: Development bias control + exposure control Paper Separation: Dual wire ac corona and pick-off pawls Cleaning: Cleaning blade A163 1-1 SM Overall Machine Information 1.
...1 to 1 only Automatic Reset: 2 minutes after copying is finished (can be set to 1, 3, 4, or 5 minutes or to no auto reset) Photoconductor: Organic photoconductor drum Drum Charge: Single-wire with grid wires (Negative Charge) Reproduction Ratio: 1 : 1 (±0.5%) Exposure System: Slit exposure via fiber optic array Exposure Lamp: Fluorescent lamp (26 W)... by induction sensor Image Density Adjustment: Development bias control + exposure control Paper Separation: Dual wire ac corona and pick-off pawls Cleaning: Cleaning blade A163 1-1 SM Overall Machine Information 1.
Service Manual
Page 29
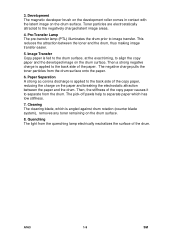
... to separate from the drum. Then a strong negative charge is angled against drum rotation (counter blade system), removes any toner remaining on the drum surface. The negative charge pulls the toner particles from the quenching lamp electrically neutralizes the surface of the copy paper causes it to image transfer. Cleaning The cleaning blade, which has low stiffness...
... to separate from the drum. Then a strong negative charge is angled against drum rotation (counter blade system), removes any toner remaining on the drum surface. The negative charge pulls the toner particles from the quenching lamp electrically neutralizes the surface of the copy paper causes it to image transfer. Cleaning The cleaning blade, which has low stiffness...
Service Manual
Page 30
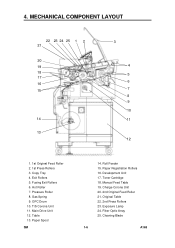
... 17 16 15 14 13 3 4 5 6 7 8 9 10 11 12 1. 1st Original Feed Roller 2. 1st Press Rollers 3. Cleaning Blade 1-6 A163 4. Fusing Exit Rollers 6. Table 13. Copy Tray 4. Main Drive Unit 12. Paper Registration Rollers 16. Toner Cartridge 18. OPC Drum 10. Exposure Lamp 24. Pressure Roller 8. Paper Spool SM 14. Development Unit 17. Exit Rollers...
... 17 16 15 14 13 3 4 5 6 7 8 9 10 11 12 1. 1st Original Feed Roller 2. 1st Press Rollers 3. Cleaning Blade 1-6 A163 4. Fusing Exit Rollers 6. Table 13. Copy Tray 4. Main Drive Unit 12. Paper Registration Rollers 16. Toner Cartridge 18. OPC Drum 10. Exposure Lamp 24. Pressure Roller 8. Paper Spool SM 14. Development Unit 17. Exit Rollers...

Service Manual
Page 60
... transferred to the copy paper. Blade pressure is angled against the drum rotation. The blade [A] is applied constantly. CLEANING 6.1 OVERVIEW [A] [C] [B] This copier uses the counter blade system for drum cleaning. The cleaning blade pressure spring [C] applies pressure to the toner collection bottle. SM 2-24 A163 This counter blade system has the advantage of the cleaning blade. The cleaning blade removes any toner remaining on...
... transferred to the copy paper. Blade pressure is angled against the drum rotation. The blade [A] is applied constantly. CLEANING 6.1 OVERVIEW [A] [C] [B] This copier uses the counter blade system for drum cleaning. The cleaning blade pressure spring [C] applies pressure to the toner collection bottle. SM 2-24 A163 This counter blade system has the advantage of the cleaning blade. The cleaning blade removes any toner remaining on...

Service Manual
Page 62
The main board turns on the quenching lamp LEDs by the cleaning blade, light from the quenching lamp [B] neutralizes any charge remaining on and off at the same time as the main motor. SM 2-26 A163 QUENCHING [B] [A] After the drum [A] is cleaned by dropping CN104-B26 to 0 volt. The quenching lamp turns on the drum. Rev. 5/95 7.
The main board turns on the quenching lamp LEDs by the cleaning blade, light from the quenching lamp [B] neutralizes any charge remaining on and off at the same time as the main motor. SM 2-26 A163 QUENCHING [B] [A] After the drum [A] is cleaned by dropping CN104-B26 to 0 volt. The quenching lamp turns on the drum. Rev. 5/95 7.

Service Manual
Page 80
Remove the drum protection sheet [D], and remove the screw [E] to apply cleaning blade pressure to the drum. Close the paper path section. Open the paper path section [A] and remove two strips of shipping tape [B]. 4. Remove the right upper cover [C] (2 screws). 5. Remove paper from transport section. A163 3-6 SM Rev. 5/95 [A] [C] [B] [D] [E] 3.
Remove the drum protection sheet [D], and remove the screw [E] to apply cleaning blade pressure to the drum. Close the paper path section. Open the paper path section [A] and remove two strips of shipping tape [B]. 4. Remove the right upper cover [C] (2 screws). 5. Remove paper from transport section. A163 3-6 SM Rev. 5/95 [A] [C] [B] [D] [E] 3.

Service Manual
Page 97
... damaged. Development Unit (every 3.6K) 1. Replace the developer. Inspect the cleaning seal. Clean the entrance seal using a dry cloth if it is dirty. Around Drum (every 7.2K) Clean the charge corona end blocks and casing. Inspect the cleaning blade. Replace it, if it is damaged. 2. Clean the cartridge holder using a dry cloth if it is dirty. Development...
... damaged. Development Unit (every 3.6K) 1. Replace the developer. Inspect the cleaning seal. Clean the entrance seal using a dry cloth if it is dirty. Around Drum (every 7.2K) Clean the charge corona end blocks and casing. Inspect the cleaning blade. Replace it, if it is damaged. 2. Clean the cartridge holder using a dry cloth if it is dirty. Development...

Service Manual
Page 129
... not become stretched. 2. If the wires are cleaned with a blower brush. Do not use the drum current measuring drum. 3. Do not press the cleaning blade too hard. Make sure that the cleaning blade contacts the drum. Otherwise, cleaning failure may deform. 4. When adjusting the corona...cause uneven charge on the edge of the cleaning blade. 6. Otherwise, the drum unit may occur. 5. Do not perform SP#53 without emptying the toner collection bottle. When replacing the cleaning blade, apply setting powder on the drum. 6.6 CLEANING UNIT 1. 6.5 TRANSFER AND SEPARATION 1. Do ...
... not become stretched. 2. If the wires are cleaned with a blower brush. Do not use the drum current measuring drum. 3. Do not press the cleaning blade too hard. Make sure that the cleaning blade contacts the drum. Otherwise, cleaning failure may deform. 4. When adjusting the corona...cause uneven charge on the edge of the cleaning blade. 6. Otherwise, the drum unit may occur. 5. Do not perform SP#53 without emptying the toner collection bottle. When replacing the cleaning blade, apply setting powder on the drum. 6.6 CLEANING UNIT 1. 6.5 TRANSFER AND SEPARATION 1. Do ...

Service Manual
Page 149
... is removed (follow steps 1 to ensure that the cleaning blade contacts the drum. Remove the pressure spring [B] and bushing [C]. 5. When replacing the cleaning blade, apply setting powder on the edge of the ozone filter replacement). 3. Remove the drum unit. 2. Do not press the cleaning blade too strongly. NOTE: 1. Even if the drum is installed already, this action [F] can be...
... is removed (follow steps 1 to ensure that the cleaning blade contacts the drum. Remove the pressure spring [B] and bushing [C]. 5. When replacing the cleaning blade, apply setting powder on the edge of the ozone filter replacement). 3. Remove the drum unit. 2. Do not press the cleaning blade too strongly. NOTE: 1. Even if the drum is installed already, this action [F] can be...

Service Manual
Page 181
Is the background still dirty? Yes No Check the cleaning blade. Yes No Adjust the grid voltage and/or the charge corona current. Yes No Adjust the bias voltage. No Yes Check the toner sensor. Make ...? No good Is the bias voltage correct? Is the toner sensor voltage much lower than the threshold between level 0 and 1? (Check using SP#--6. Replace the drum. 1.3 DIRTY BACKGROUND Clean the optics and check the copy image.
Is the background still dirty? Yes No Check the cleaning blade. Yes No Adjust the grid voltage and/or the charge corona current. Yes No Adjust the bias voltage. No Yes Check the toner sensor. Make ...? No good Is the bias voltage correct? Is the toner sensor voltage much lower than the threshold between level 0 and 1? (Check using SP#--6. Replace the drum. 1.3 DIRTY BACKGROUND Clean the optics and check the copy image.

Service Manual
Page 182
A163 6-4 SM No Yes Clean or replace the drum. If a black band appears 250 mm from the leading edge, turn on . If the separation corona does not turn the main switch off and on , a ... the vertical line or band. • Charge corona wire • Grid wires • Light path (Exposure lamp, fiber optics array, exposure glass) • Cleaning blade • Development unit • Drum NOTE: If the separation corona leakage is detected, the separation corona will not be turned off and on. This condition will be reset...
A163 6-4 SM No Yes Clean or replace the drum. If a black band appears 250 mm from the leading edge, turn on . If the separation corona does not turn the main switch off and on , a ... the vertical line or band. • Charge corona wire • Grid wires • Light path (Exposure lamp, fiber optics array, exposure glass) • Cleaning blade • Development unit • Drum NOTE: If the separation corona leakage is detected, the separation corona will not be turned off and on. This condition will be reset...
Service Manual
Page 227
...(A252 copier) 2 minutes after copying is finished (can be set to 1, 3, 4, or 5 minutes or to no auto reset) Organic photoconductor drum Single-wire with grid plate (Negative Charge) 1 : 1 (±0.5%) Slit exposure via fiber optic array Fluorescent lamp (26 W) Dual-component dry toner... (6% original) Negative Direct toner density detection by induction sensor Development bias control + exposure control Dual wire ac corona and pick-off pawls Cleaning blade Manual feed (roll feeder optional) Heat and pressure type, teflon (upper) and silicone rubber (lower) rollers Nichrome wire lamp (115 V:...
...(A252 copier) 2 minutes after copying is finished (can be set to 1, 3, 4, or 5 minutes or to no auto reset) Organic photoconductor drum Single-wire with grid plate (Negative Charge) 1 : 1 (±0.5%) Slit exposure via fiber optic array Fluorescent lamp (26 W) Dual-component dry toner... (6% original) Negative Direct toner density detection by induction sensor Development bias control + exposure control Dual wire ac corona and pick-off pawls Cleaning blade Manual feed (roll feeder optional) Heat and pressure type, teflon (upper) and silicone rubber (lower) rollers Nichrome wire lamp (115 V:...

Service Manual
Page 230
... Cartridge 18. Gas Spring 9. OPC Drum 10. Exposure Lamp 24. MECHANICAL COMPONENT 1.4 MECHANICAL COMPONENT 3 21 22 23 24 25 1 2 20 19 4 18 17 5 16 6 15 7 8 9 10 14 11 13 12 1. 1st Original Feed Roller 2. 1st Press Rollers 3. Copy Tray 4. Original Table 22. 2nd Original Press Roller 23. Cleaning Blade 1-4 SM Hot Roller 7. T/S Corona...
... Cartridge 18. Gas Spring 9. OPC Drum 10. Exposure Lamp 24. MECHANICAL COMPONENT 1.4 MECHANICAL COMPONENT 3 21 22 23 24 25 1 2 20 19 4 18 17 5 16 6 15 7 8 9 10 14 11 13 12 1. 1st Original Feed Roller 2. 1st Press Rollers 3. Copy Tray 4. Original Table 22. 2nd Original Press Roller 23. Cleaning Blade 1-4 SM Hot Roller 7. T/S Corona...

Service Manual
Page 250
Remove the right upper cover [B] (2 screws). 5. Remove the drum protection sheet [C] and remove the screw [D] to apply cleaning blade pressure to the drum. 6. Remove the two strips of shipping tape [G]. (Close the paper path section and fusing exit section.) A251/A252 3-6 SM Open the fusing exit section. Remove two strips of shipping tape [E] and protection sheet [F]. 7. Open the paper path section [A]. 4. INSTALLATION PROCEDURE [A] [B] [G] A252I501.WMF [C] [E] A252I510.WMF [D] [F] [E] A252I502.WMF 3.
Remove the right upper cover [B] (2 screws). 5. Remove the drum protection sheet [C] and remove the screw [D] to apply cleaning blade pressure to the drum. 6. Remove the two strips of shipping tape [G]. (Close the paper path section and fusing exit section.) A251/A252 3-6 SM Open the fusing exit section. Remove two strips of shipping tape [E] and protection sheet [F]. 7. Open the paper path section [A]. 4. INSTALLATION PROCEDURE [A] [B] [G] A252I501.WMF [C] [E] A252I510.WMF [D] [F] [E] A252I502.WMF 3.

Service Manual
Page 312
... 5. 4.6.9 PAPER FEED 4.6.10 ROLL FEEDER 4.6.11 OTHERS 4.6.12 AC DRIVE BOARD 4-29 Service Remark for 220 ~ 240 V Version 4-29 Service Remarks for Non-image Area 5.4 DRUM UNIT 5-1 5.4.1 DRUM UNIT REMOVAL 5.4.2 DRUM REPLACEMENT 5-1 5.4.3 CLEANING BLADE REPLACEMENT 5.4.4 CHARGE CORONA UNIT REMOVAL 5.4.5 CHARGE CORONA WIRE REPLACEMENT 5.4.6 PICK-OFF PAWL UNIT REMOVAL 5.4.7 GRID VOLTAGE ADJUSTMENT...
... 5. 4.6.9 PAPER FEED 4.6.10 ROLL FEEDER 4.6.11 OTHERS 4.6.12 AC DRIVE BOARD 4-29 Service Remark for 220 ~ 240 V Version 4-29 Service Remarks for Non-image Area 5.4 DRUM UNIT 5-1 5.4.1 DRUM UNIT REMOVAL 5.4.2 DRUM REPLACEMENT 5-1 5.4.3 CLEANING BLADE REPLACEMENT 5.4.4 CHARGE CORONA UNIT REMOVAL 5.4.5 CHARGE CORONA WIRE REPLACEMENT 5.4.6 PICK-OFF PAWL UNIT REMOVAL 5.4.7 GRID VOLTAGE ADJUSTMENT...

Service Manual
Page 323
... 10 copies 2 minutes after copying has finished (can be set to 1, 3, 4, or 5 minutes or to no auto reset) Organic photoconductor drum Scorotron corona wire and grid (Negative Charge) 1 : 1 (±0.5%) Slit exposure via fiber optic array Fluorescent lamp (26 W) Dual-component dry... (6% original) Negative Direct toner density detection using an induction sensor Development bias control + exposure control Dual wire AC corona and pick-off pawls Cleaning blade Manual feed (roll feeder optional) Teflon heat roller (upper) and a silicone rubber pressure roller (lower) Halogen lamp (115 V: 1,200 W,...
... 10 copies 2 minutes after copying has finished (can be set to 1, 3, 4, or 5 minutes or to no auto reset) Organic photoconductor drum Scorotron corona wire and grid (Negative Charge) 1 : 1 (±0.5%) Slit exposure via fiber optic array Fluorescent lamp (26 W) Dual-component dry... (6% original) Negative Direct toner density detection using an induction sensor Development bias control + exposure control Dual wire AC corona and pick-off pawls Cleaning blade Manual feed (roll feeder optional) Teflon heat roller (upper) and a silicone rubber pressure roller (lower) Halogen lamp (115 V: 1,200 W,...

Service Manual
Page 351
... tape strips [A] as shown. 4. Remove the right upper cover [F] (2 screws). 8. Remove the drum protection sheet [G] and remove the screw [H]. NOTE: Be sure to the drum. Open the original feed unit [B]. 5. Otherwise, the cleaning blade will clamp the sheet to the drum, and the drum may be damaged. 9. [A] B047I001.WMF INSTALLATION PROCEDURE [B] [C] [D] [J] [A] [L] [K] [I ]. Open the fusing exit section...
... tape strips [A] as shown. 4. Remove the right upper cover [F] (2 screws). 8. Remove the drum protection sheet [G] and remove the screw [H]. NOTE: Be sure to the drum. Open the original feed unit [B]. 5. Otherwise, the cleaning blade will clamp the sheet to the drum, and the drum may be damaged. 9. [A] B047I001.WMF INSTALLATION PROCEDURE [B] [C] [D] [J] [A] [L] [K] [I ]. Open the fusing exit section...

Service Manual
Page 467
...1 to 1 only Automatic Reset: 2 minutes after copying is finished (can be set to 1, 3, 4, or 5 minutes or to no auto reset) Photoconductor: Organic photoconductor drum Drum Charge: Single-wire with grid wires (Negative Charge) Reproduction Ratio: 1 : 1 (±0.5%) Exposure System: Slit exposure via fiber optic array Exposure Lamp: Fluorescent lamp (26 W)... by induction sensor Image Density Adjustment: Development bias control + exposure control Paper Separation: Dual wire ac corona and pick-off pawls Cleaning: Cleaning blade A163 1-1 STM Overall Machine Information 1.
...1 to 1 only Automatic Reset: 2 minutes after copying is finished (can be set to 1, 3, 4, or 5 minutes or to no auto reset) Photoconductor: Organic photoconductor drum Drum Charge: Single-wire with grid wires (Negative Charge) Reproduction Ratio: 1 : 1 (±0.5%) Exposure System: Slit exposure via fiber optic array Exposure Lamp: Fluorescent lamp (26 W)... by induction sensor Image Density Adjustment: Development bias control + exposure control Paper Separation: Dual wire ac corona and pick-off pawls Cleaning: Cleaning blade A163 1-1 STM Overall Machine Information 1.

Service Manual
Page 468
...: 1 to 1 only Automatic Reset: 2 minutes after copying is finished (can be set to 1, 3, 4, or 5 minutes or to no auto reset) Photoconductor: Organic photoconductor drum Drum Charge: Single-wire with grid plate (Negative Charge) Reproduction Ratio: 1 : 1 (±0.5%) Exposure System: Slit exposure via fiber optic array Exposure Lamp: Fluorescent lamp (26 W) Development... density detection by induction sensor Image Density Adjustment: Development bias control + exposure control Paper Separation: Dual wire ac corona and pick-off pawls Cleaning: Cleaning blade FSM 1-1 A163
...: 1 to 1 only Automatic Reset: 2 minutes after copying is finished (can be set to 1, 3, 4, or 5 minutes or to no auto reset) Photoconductor: Organic photoconductor drum Drum Charge: Single-wire with grid plate (Negative Charge) Reproduction Ratio: 1 : 1 (±0.5%) Exposure System: Slit exposure via fiber optic array Exposure Lamp: Fluorescent lamp (26 W) Development... density detection by induction sensor Image Density Adjustment: Development bias control + exposure control Paper Separation: Dual wire ac corona and pick-off pawls Cleaning: Cleaning blade FSM 1-1 A163
