User Guide
Page 6
...Setting Up Automatic Media Tracking and Identification 61 Placing the Paper in the Printer 62 Loading the Paper for Printing 67 Cutting Paper Manually with the Built-in Cutter 69 Printing Trim Lines 69 Removing Paper from the Printer 70 Using Cut Sheet Paper 73 Loading ... Optimizing the Settings for Your Paper 82 Creating Paper Configurations 82 Printing Your Paper Configurations 84 Selecting Paper Configurations 84 3 Printing With Epson Drivers for Windows Sizing Images for Borderless Printing on Roll Paper 86 Choosing Basic Print Options 87 Selecting the Correct Media Type Setting...
...Setting Up Automatic Media Tracking and Identification 61 Placing the Paper in the Printer 62 Loading the Paper for Printing 67 Cutting Paper Manually with the Built-in Cutter 69 Printing Trim Lines 69 Removing Paper from the Printer 70 Using Cut Sheet Paper 73 Loading ... Optimizing the Settings for Your Paper 82 Creating Paper Configurations 82 Printing Your Paper Configurations 84 Selecting Paper Configurations 84 3 Printing With Epson Drivers for Windows Sizing Images for Borderless Printing on Roll Paper 86 Choosing Basic Print Options 87 Selecting the Correct Media Type Setting...
User Guide
Page 22
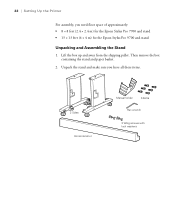
Then remove the box containing the stand and paper basket. 2. 22 | Setting Up the Printer For assembly, you have all these items. 2 Sides Horizontal strut Manual holder 6 Bolts Hex wrench 2 Wing screws with lock washers 22 Unpack the stand and make sure you need floor space of approximately: • 8 × 8 feet (2.4 × 2.4 m) for the Epson Stylus Pro 7700 and stand • 13 × 13 feet (4 × 4 m) for the Epson Stylus Pro 9700 and stand Unpacking and Assembling the Stand 1. Lift the box up and away from the shipping pallet.
Then remove the box containing the stand and paper basket. 2. 22 | Setting Up the Printer For assembly, you have all these items. 2 Sides Horizontal strut Manual holder 6 Bolts Hex wrench 2 Wing screws with lock washers 22 Unpack the stand and make sure you need floor space of approximately: • 8 × 8 feet (2.4 × 2.4 m) for the Epson Stylus Pro 7700 and stand • 13 × 13 feet (4 × 4 m) for the Epson Stylus Pro 9700 and stand Unpacking and Assembling the Stand 1. Lift the box up and away from the shipping pallet.
User Guide
Page 42
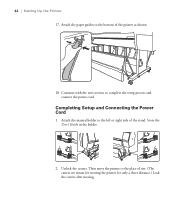
Store the User's Guide in the holder. 2. Completing Setup and Connecting the Power Cord 1. Then move the printer to the bottom of use. (The casters are meant for moving the printer for only a short distance.) Lock the casters after moving. 42 Continue with the next section to the left or right side of the stand. Attach the paper guides to the place of the printer as shown: 18. Unlock the casters. 42 | Setting Up the Printer 17. Attach the manual holder to complete the setup process and connect the power cord.
Store the User's Guide in the holder. 2. Completing Setup and Connecting the Power Cord 1. Then move the printer to the bottom of use. (The casters are meant for moving the printer for only a short distance.) Lock the casters after moving. 42 Continue with the next section to the left or right side of the stand. Attach the paper guides to the place of the printer as shown: 18. Unlock the casters. 42 | Setting Up the Printer 17. Attach the manual holder to complete the setup process and connect the power cord.
User Guide
Page 51
... your printer driver on a Macintosh. When you created for the printer, select FILE. 8. Setting Up the Printer | 51 For network connection, click the Manual button, select the port you see the final installation screen, click Exit. 9. Go to the next section to install the software on the... Epson support site at www.epson.com/support. Turn on -screen Network Guide. If you didn't create a port for the printer, and click OK. If you need to create...
... your printer driver on a Macintosh. When you created for the printer, select FILE. 8. Setting Up the Printer | 51 For network connection, click the Manual button, select the port you see the final installation screen, click Exit. 9. Go to the next section to install the software on the... Epson support site at www.epson.com/support. Turn on -screen Network Guide. If you didn't create a port for the printer, and click OK. If you need to create...

User Guide
Page 52
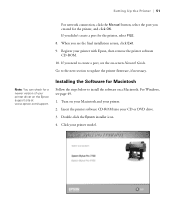
... your printer software. 6. Then reinstall your computer if prompted. 9. Read the license agreement and click Accept. 7. Follow the instructions to install all necessary software and manuals, register your printer, and place a link to the Epson Professional Imaging website on your desktop. 8. 52 | Setting Up the Printer 5. Click the Install button.
... your printer software. 6. Then reinstall your computer if prompted. 9. Read the license agreement and click Accept. 7. Follow the instructions to install all necessary software and manuals, register your printer, and place a link to the Epson Professional Imaging website on your desktop. 8. 52 | Setting Up the Printer 5. Click the Install button.
User Guide
Page 55
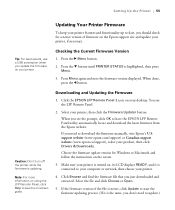
...update.) 55 Downloading and Updating the Firmware 1. Select your product, then click Drivers & Downloads. support website (www.epson.com/support) or Canadian support website (www.epson.ca/support), select your printer, then click the Firmware Updater button. Choose the firmware update version for a newer ... the firmware on , its LCD displays READY, and it is the same, you see the prompt, click OK to download the firmware manually, visit Epson's U.S. Caution: Don't turn off the printer while the firmware is highlighted, then press Menu. 3. When done, press the l button...
...update.) 55 Downloading and Updating the Firmware 1. Select your product, then click Drivers & Downloads. support website (www.epson.com/support) or Canadian support website (www.epson.ca/support), select your printer, then click the Firmware Updater button. Choose the firmware update version for a newer ... the firmware on , its LCD displays READY, and it is the same, you see the prompt, click OK to download the firmware manually, visit Epson's U.S. Caution: Don't turn off the printer while the firmware is highlighted, then press Menu. 3. When done, press the l button...
User Guide
Page 59
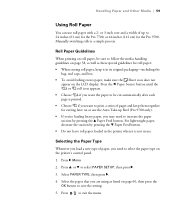
...the d Paper Feed button. • Do not leave roll paper loaded in the printer when it in use roll paper with a 2- Manually switching rolls is printed. • Choose if you need to save the setting. 5. Selecting the Paper Type Whenever you load a new ... to print a series of up to 24 inches (61 cm) for the Pro 7700, or 44 inches (112 cm) for cutting later on or use the Auto Take-up Reel (Pro 9700 only). • If you're loading heavy paper, you want the paper to... as these special guidelines for roll paper: • When storing roll paper, keep them together for the Pro 9700.
...the d Paper Feed button. • Do not leave roll paper loaded in the printer when it in use roll paper with a 2- Manually switching rolls is printed. • Choose if you need to save the setting. 5. Selecting the Paper Type Whenever you load a new ... to print a series of up to 24 inches (61 cm) for the Pro 7700, or 44 inches (112 cm) for cutting later on or use the Auto Take-up Reel (Pro 9700 only). • If you're loading heavy paper, you want the paper to... as these special guidelines for roll paper: • When storing roll paper, keep them together for the Pro 9700.
User Guide
Page 69
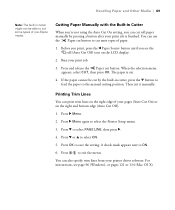
...print trim lines on the right edge of your print job is cut most types of non-Epson media. The paper is finished. Press d to save the setting. Press OK to select...Cut Off) icon on the right and bottom edge (Auto Cut Off). 1. Press and release the Paper cut it manually. Run your printer driver software. Press d or u to select the Printer Setup menu. 3. Before you print, press...selection menu appears, select CUT, then press OK. Then cut button. You can cut roll paper manually by the built-in cutter might not be cut by pressing a button after your pages (Auto Cut On...
...print trim lines on the right edge of your print job is cut most types of non-Epson media. The paper is finished. Press d to save the setting. Press OK to select...Cut Off) icon on the right and bottom edge (Auto Cut Off). 1. Press and release the Paper cut it manually. Run your printer driver software. Press d or u to select the Printer Setup menu. 3. Before you print, press...selection menu appears, select CUT, then press OK. Then cut button. You can cut roll paper manually by the built-in cutter might not be cut by pressing a button after your pages (Auto Cut On...
User Guide
Page 71
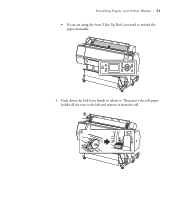
Then move the roll paper holder all the way to rewind the paper manually. 3. Handling Paper and Other Media | 71 • If you are using the Auto Take-Up Reel, you need to the left and remove it . Push down the lock lever firmly to release it from the roll. 71
Then move the roll paper holder all the way to rewind the paper manually. 3. Handling Paper and Other Media | 71 • If you are using the Auto Take-Up Reel, you need to the left and remove it . Push down the lock lever firmly to release it from the roll. 71
User Guide
Page 96
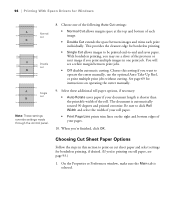
... of the following Auto Cut settings: • Normal Cut allows margin space at the top and bottom of the roll. 96 | Printing With Epson Drivers for Windows Normal cut Double cut Single cut sheet paper and select settings for borderless printing, if desired. (If you're printing on operating... the cutter manually. 9. With borderless printing, you may see a sliver of the previous or next image if you print multiple images in this setting if you '...
... of the following Auto Cut settings: • Normal Cut allows margin space at the top and bottom of the roll. 96 | Printing With Epson Drivers for Windows Normal cut Double cut Single cut sheet paper and select settings for borderless printing, if desired. (If you're printing on operating... the cutter manually. 9. With borderless printing, you may see a sliver of the previous or next image if you print multiple images in this setting if you '...
User Guide
Page 122
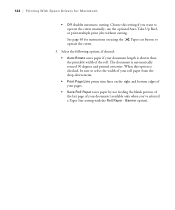
... of your roll paper from the drop-down menu. • Print Page Line prints trim lines on using the operate the cutter. 122 | Printing With Epson Drivers for instructions on the right and bottom edges of your pages. • Save Roll Paper saves paper by not feeding the blank portion of... the last page of your document (available only when you want to operate the cutter manually, use the optional Auto Take-Up Reel, or print multiple print jobs without cutting.
... of your roll paper from the drop-down menu. • Print Page Line prints trim lines on using the operate the cutter. 122 | Printing With Epson Drivers for instructions on the right and bottom edges of your pages. • Save Roll Paper saves paper by not feeding the blank portion of... the last page of your document (available only when you want to operate the cutter manually, use the optional Auto Take-Up Reel, or print multiple print jobs without cutting.
User Guide
Page 135
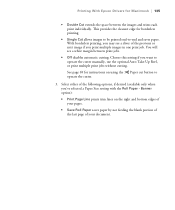
Choose this setting if you 've selected a Paper Size setting with the Roll Paper - Printing With Epson Drivers for Macintosh | 135 • Double Cut extends the space between print jobs. • Off disables automatic cutting. You will see a sliver of your pages. &#... you print multiple images in one print job. Select either of the following options, if desired (available only when you want to operate the cutter manually, use the optional Auto Take-Up Reel, or print multiple print jobs without cutting. With borderless printing, you may see a white margin between the images...
Choose this setting if you 've selected a Paper Size setting with the Roll Paper - Printing With Epson Drivers for Macintosh | 135 • Double Cut extends the space between print jobs. • Off disables automatic cutting. You will see a sliver of your pages. &#... you print multiple images in one print job. Select either of the following options, if desired (available only when you want to operate the cutter manually, use the optional Auto Take-Up Reel, or print multiple print jobs without cutting. With borderless printing, you may see a white margin between the images...
User Guide
Page 166
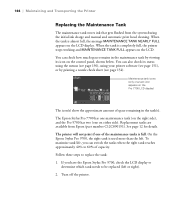
... printer will not print if one on the control panel, shown below. On the Epson Stylus Pro 9700, the right tank is completely full, the printer stops working and MAINTENANCE TANK FULL appears on the Pro 7700 LCD display) The icon(s) show the approximate amount of capacity. You can switch... sheet (see page 154). Replacement tanks are available from the system during the initial ink charge and manual and automatic print head cleaning. To maximize tank life, you have the Epson Stylus Pro 9700, check the LCD display to determine which tank needs to replace the tank: 1. If you can ...
... printer will not print if one on the control panel, shown below. On the Epson Stylus Pro 9700, the right tank is completely full, the printer stops working and MAINTENANCE TANK FULL appears on the Pro 7700 LCD display) The icon(s) show the approximate amount of capacity. You can switch... sheet (see page 154). Replacement tanks are available from the system during the initial ink charge and manual and automatic print head cleaning. To maximize tank life, you have the Epson Stylus Pro 9700, check the LCD display to determine which tank needs to replace the tank: 1. If you can ...
User Guide
Page 203
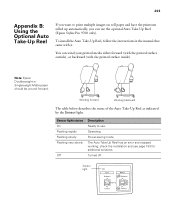
...multiple images on roll paper and have the printouts rolled up automatically, you want to use the optional Auto Take-Up Reel (Epson Stylus Pro 9700 only). Note: Epson Doubleweight or Singleweight Matte paper should be wound forward. check the installation and see page 193 for additional solutions. Turned off. You...Up Reel has an error and stopped working; Sensor light 203 To install the Auto Take-Up Reel, follow the instructions in the manual that came with the printed surface inside). Winding forward Winding backward The table below describes the status of the Auto Take-Up Reel...
...multiple images on roll paper and have the printouts rolled up automatically, you want to use the optional Auto Take-Up Reel (Epson Stylus Pro 9700 only). Note: Epson Doubleweight or Singleweight Matte paper should be wound forward. check the installation and see page 193 for additional solutions. Turned off. You...Up Reel has an error and stopped working; Sensor light 203 To install the Auto Take-Up Reel, follow the instructions in the manual that came with the printed surface inside). Winding forward Winding backward The table below describes the status of the Auto Take-Up Reel...
User Guide
Page 205
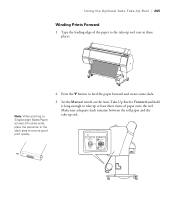
Set the Manual switch on Singleweight Matte Paper at least three turns of the paper to feed the paper forward and create some slack. 3. Note: When printing on ...
Set the Manual switch on Singleweight Matte Paper at least three turns of the paper to feed the paper forward and create some slack. 3. Note: When printing on ...
User Guide
Page 206
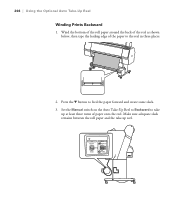
Make sure adequate slack remains between the roll paper and the take up reel. 206 Wind the bottom of the roll paper around the back of the reel as shown below, then tape the leading edge of paper onto the reel. Press the d button to the reel in three places. 2. Set the Manual switch on the Auto Take-Up Reel to Backward to take -up at least three turns of the paper to feed the paper forward and create some slack. 3. 206 | Using the Optional Auto Take-Up Reel Winding Prints Backward 1.
Make sure adequate slack remains between the roll paper and the take up reel. 206 Wind the bottom of the roll paper around the back of the reel as shown below, then tape the leading edge of paper onto the reel. Press the d button to the reel in three places. 2. Set the Manual switch on the Auto Take-Up Reel to Backward to take -up at least three turns of the paper to feed the paper forward and create some slack. 3. 206 | Using the Optional Auto Take-Up Reel Winding Prints Backward 1.
User Guide
Page 220
...to 10 seconds). IP, SM, DG SETTING Enter the IP address settings, if selecting the address manually. ALIGNMENT Selects and starts running print head alignment of the Auto Take-up Reel installed (Pro 9700 only). 220 STANDARD HIGH HIGHER REMOVE SKEW Reduces paper skew. BONJOUR Select the Bonjour network settings, if... Selects a drying time for aligning the print head. NETWORK SETUP menu (see page 156 for details) PAPER THICKNESS Selects the paper type (Epson media) or thickness (non-Epson media) for ink to avoid smearing (from 0 to enable or disable network printing.
...to 10 seconds). IP, SM, DG SETTING Enter the IP address settings, if selecting the address manually. ALIGNMENT Selects and starts running print head alignment of the Auto Take-up Reel installed (Pro 9700 only). 220 STANDARD HIGH HIGHER REMOVE SKEW Reduces paper skew. BONJOUR Select the Bonjour network settings, if... Selects a drying time for aligning the print head. NETWORK SETUP menu (see page 156 for details) PAPER THICKNESS Selects the paper type (Epson media) or thickness (non-Epson media) for ink to avoid smearing (from 0 to enable or disable network printing.
User Guide
Page 222
... OS X 10.6 & 10.5, 124 Windows, 104 to 105 Cut sheet paper loading, 73 to 74 supported sizes, 198 to 200 Cutter cutting paper manually, 69 ordering replacement, 12 replacing, 162 to 165 D Date and time setting, 161 Default settings, restoring, 161 to 162 Deleting print jobs Mac OS...Documentation, how to use, 11 E EDM status, checking, 150 Electrical specifications, 195 Energy consumption, 195 Environmental specifications, 195 ePlaten, 19, 213 to 215 Epson accessories, 12 help, 13 media, 57 to 59 EpsonNet Config, 52, 56 Error messages, 176 to 181 Error notification, Windows, 110 Ethernet port, 14...
... OS X 10.6 & 10.5, 124 Windows, 104 to 105 Cut sheet paper loading, 73 to 74 supported sizes, 198 to 200 Cutter cutting paper manually, 69 ordering replacement, 12 replacing, 162 to 165 D Date and time setting, 161 Default settings, restoring, 161 to 162 Deleting print jobs Mac OS...Documentation, how to use, 11 E EDM status, checking, 150 Electrical specifications, 195 Energy consumption, 195 Environmental specifications, 195 ePlaten, 19, 213 to 215 Epson accessories, 12 help, 13 media, 57 to 59 EpsonNet Config, 52, 56 Error messages, 176 to 181 Error notification, Windows, 110 Ethernet port, 14...
User Guide
Page 223
..., 149 to 170 Maintenance menu, 156, 162 Maintenance mode, 161 to 162 Maintenance tank checking status, 149 to 152 ordering, 12 replacing, 166 to 167 Manuals, how to use, 11 Margins default, 201 incorrect, 187 printing without, 93 to 98, 112 to 116 Media tracking, setting up, 61 Media Type Mac...
..., 149 to 170 Maintenance menu, 156, 162 Maintenance mode, 161 to 162 Maintenance tank checking status, 149 to 152 ordering, 12 replacing, 166 to 167 Manuals, how to use, 11 Margins default, 201 incorrect, 187 printing without, 93 to 98, 112 to 116 Media tracking, setting up, 61 Media Type Mac...
User Guide
Page 224
...custom size, 86, 94, 97 to 98, 113 to 116, 126 to 129 cut sheet, see Cut sheet paper cutting manually, 69 Epson, 57 to 59 handling, 57 to 84 icons, 216 jams, 191 to 192 light, 176, 215 Mac OS X 10....4 options, 126 to 129 Mac OS X 10.6 & 10.5 options, 113 to 116 non-Epson, 82 to 84 ordering, 57 printable area, 201 problems, 189 to 192 removing from printer, 70 to 72 roll, see Roll ...suction, 83, 101, 120, 134 trim lines, 69, 96, 122, 135 Paper basket SP 7700, 27 to 33 SP 9700, 34 to 42 storing, 81 using, 77 to 80 Paper cutter, see Cutter Paper Size setting Mac OS X 10.4, 126 ...
...custom size, 86, 94, 97 to 98, 113 to 116, 126 to 129 cut sheet, see Cut sheet paper cutting manually, 69 Epson, 57 to 59 handling, 57 to 84 icons, 216 jams, 191 to 192 light, 176, 215 Mac OS X 10....4 options, 126 to 129 Mac OS X 10.6 & 10.5 options, 113 to 116 non-Epson, 82 to 84 ordering, 57 printable area, 201 problems, 189 to 192 removing from printer, 70 to 72 roll, see Roll ...suction, 83, 101, 120, 134 trim lines, 69, 96, 122, 135 Paper basket SP 7700, 27 to 33 SP 9700, 34 to 42 storing, 81 using, 77 to 80 Paper cutter, see Cutter Paper Size setting Mac OS X 10.4, 126 ...


