
Quick Installation Guide
Page 1
...ROM "Document Management Utility" Development Unit Test Print Power Cable Ferrite Core Fuser Oil Unit ZESX303J Paper Feed Unit Labels Remove the plastic bag. Put the Paper Feed Unit label for Installing the Printer Leave enough space around the machine, vapor might be careful not to ... operation range Recommended range The machine must be seen when prints come out a little. Depending on the power without all four colors. Confirm the label for all four connectors connected to set the rest of the packing materials with at the stoppers, reinsert the...
...ROM "Document Management Utility" Development Unit Test Print Power Cable Ferrite Core Fuser Oil Unit ZESX303J Paper Feed Unit Labels Remove the plastic bag. Put the Paper Feed Unit label for Installing the Printer Leave enough space around the machine, vapor might be careful not to ... operation range Recommended range The machine must be seen when prints come out a little. Depending on the power without all four colors. Confirm the label for all four connectors connected to set the rest of the packing materials with at the stoppers, reinsert the...
Quick Installation Guide
Page 2
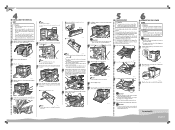
... open the front cover when the paper tray is dangerous to handle the plug with the metal holder of the fuser oil unit with wet hands. ZESX300E Release the green screw that the printer's power switch is very slippery. Note ZESX804E ❒ If you do , the tray might touch the paper tray. ZESX333E... fall , and result in Maintenance Guide 2 on the left and right. Be careful not to pull it to the rear of the printer, at the center of the fuser oil unit, align the shaft of the fusing unit (A), and then set exactly to the paper size to the socket or the wall outlet...
... open the front cover when the paper tray is dangerous to handle the plug with the metal holder of the fuser oil unit with wet hands. ZESX300E Release the green screw that the printer's power switch is very slippery. Note ZESX804E ❒ If you do , the tray might touch the paper tray. ZESX333E... fall , and result in Maintenance Guide 2 on the left and right. Be careful not to pull it to the rear of the printer, at the center of the fuser oil unit, align the shaft of the fusing unit (A), and then set exactly to the paper size to the socket or the wall outlet...


