Manual
Page 2
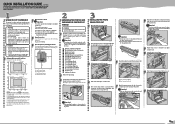
... Guide Option Setup Guide CD-ROM "Printer Drivers and Utilities" CD-ROM "Operating Instructions" CD-ROM "DeskTopBinder V2 Lite" Power Cable Toner Cartridge (Black) Toner Cartridge (Yellow) Toner Cartridge (Cyan) Toner Cartridge (Magenta) Photo Conductor Unit (Black) Photo Conductor Unit (Color) Ferrite Core (2) Additional Documents Remove the...or bend it clicks. ZHBH410E Push the green lever to install the color photo conductor unit. Do not place heavy objects on or severe cold might damage sensitive components inside the printer. See "Appendix" in event of an emergency, it downward, and...
... Guide Option Setup Guide CD-ROM "Printer Drivers and Utilities" CD-ROM "Operating Instructions" CD-ROM "DeskTopBinder V2 Lite" Power Cable Toner Cartridge (Black) Toner Cartridge (Yellow) Toner Cartridge (Cyan) Toner Cartridge (Magenta) Photo Conductor Unit (Black) Photo Conductor Unit (Color) Ferrite Core (2) Additional Documents Remove the...or bend it clicks. ZHBH410E Push the green lever to install the color photo conductor unit. Do not place heavy objects on or severe cold might damage sensitive components inside the printer. See "Appendix" in event of an emergency, it downward, and...

Manual
Page 3
...} key. Ready ZHBH910E ZHBY060E ZHBH030E Plug the other color toner cartridges. INSTALLING THE TONER CARTRIDGE Open the upper left cover of the printer. ZHBH441E Hold the toner cartridge horizontally as an example. Remove the adhesive tapes. ZHBH470E Check the toner color and location are correct, and then insert the toner cartridge vertically and slowly. You can select one...
...} key. Ready ZHBH910E ZHBY060E ZHBH030E Plug the other color toner cartridges. INSTALLING THE TONER CARTRIDGE Open the upper left cover of the printer. ZHBH441E Hold the toner cartridge horizontally as an example. Remove the adhesive tapes. ZHBH470E Check the toner color and location are correct, and then insert the toner cartridge vertically and slowly. You can select one...
Manual
Page 7
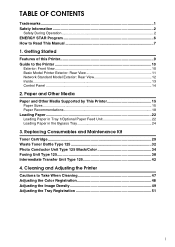
...Introduction This manual contains detailed instructions on the back of the printer. Please keep this manual. The printer contains 7 milliwat, 645 - 660 nanometer wavelength, AlGaInP Laser Diode. Direct (or indirect reflected) eye contact with the laser beam might result in this machine. The following label is.... Customer engineers are therefore directed to prevent any damage or expense that might result from the use genuine toner from this machine all chassis and laser subsystems to change without prior notice. The supplier shall not be repaired in a handy place near the machine...
...Introduction This manual contains detailed instructions on the back of the printer. Please keep this manual. The printer contains 7 milliwat, 645 - 660 nanometer wavelength, AlGaInP Laser Diode. Direct (or indirect reflected) eye contact with the laser beam might result in this machine. The following label is.... Customer engineers are therefore directed to prevent any damage or expense that might result from the use genuine toner from this machine all chassis and laser subsystems to change without prior notice. The supplier shall not be repaired in a handy place near the machine...
Manual
Page 8
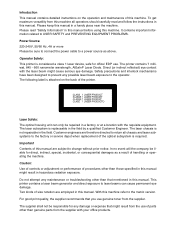
... Operation 2 ENERGY STAR Program 6 How to Read This Manual 7 1. Replacing Consumables and Maintenance Kit Toner Cartridge ...29 Waste Toner Bottle Type 125 32 Photo Conductor Unit Type 125 Black/Color 34 Fusing Unit Type 125 38 Intermediate Transfer Unit Type 125 42 4. Paper and Other Media Paper and... Other Media Supported by This Printer 15 Paper Sizes...15 Paper Recommendations 18 Loading Paper ......
... Operation 2 ENERGY STAR Program 6 How to Read This Manual 7 1. Replacing Consumables and Maintenance Kit Toner Cartridge ...29 Waste Toner Bottle Type 125 32 Photo Conductor Unit Type 125 Black/Color 34 Fusing Unit Type 125 38 Intermediate Transfer Unit Type 125 42 4. Paper and Other Media Paper and... Other Media Supported by This Printer 15 Paper Sizes...15 Paper Recommendations 18 Loading Paper ......
Manual
Page 12
... other than necessary. These actions could cause an electric shock or fire. • To avoid hazardous electric shock or laser radiation exposure, do not remove any of the used toner. Replace the User Account Enhance Unit only with the local regulation. • Do not take place at our authorized ...and cause a burn. • The User Account Enhance Unit installed on it, pull it hard or bend it can explode if replaced incorrectly. Toner dust might ignite when exposed to an open flame. • Disposal should take apart or attempt any modifications to handle the plug with wet ...
... other than necessary. These actions could cause an electric shock or fire. • To avoid hazardous electric shock or laser radiation exposure, do not remove any of the used toner. Replace the User Account Enhance Unit only with the local regulation. • Do not take place at our authorized ...and cause a burn. • The User Account Enhance Unit installed on it, pull it hard or bend it can explode if replaced incorrectly. Toner dust might ignite when exposed to an open flame. • Disposal should take apart or attempt any modifications to handle the plug with wet ...
Manual
Page 13
Touching a part with a "v" label (means hot surface). R CAUTION: • Do not eat or swallow toner. • Keep toner (used or unused) and toner cartridge out of reach of the machine becomes very hot. Disposal can result in a burn. • Do not pull out the fusing unit ... authorized dealer or at household waste collection points. While moving the equipment, you move the equipment. When installing the new fusing unit, turn off the printer and wait about 30 minutes. Do not touch the parts with a "v" label (means hot surface) could result in an injury. • When touching...
Touching a part with a "v" label (means hot surface). R CAUTION: • Do not eat or swallow toner. • Keep toner (used or unused) and toner cartridge out of reach of the machine becomes very hot. Disposal can result in a burn. • Do not pull out the fusing unit ... authorized dealer or at household waste collection points. While moving the equipment, you move the equipment. When installing the new fusing unit, turn off the printer and wait about 30 minutes. Do not touch the parts with a "v" label (means hot surface) could result in an injury. • When touching...

Manual
Page 19
... 6. Bypass Tray Use to print onto thick paper, OHP transparencies, custom size paper, and envelopes as well as it may cause a printer malfunction due to the Printer 1 Exterior: Front View 1 2 4 3 5 6 7 1. ZHBH020E 5. Ventilator The ventilator helps to 530 sheets of plain paper... can be loaded. 10 Front Cover Open this cover when replacing toner cartridges. 3. Tray 1 Up to keep the components inside the printer from overheating. Standard Tray Output is stacked here with the print side down. 2. When printing on custom size ...
... 6. Bypass Tray Use to print onto thick paper, OHP transparencies, custom size paper, and envelopes as well as it may cause a printer malfunction due to the Printer 1 Exterior: Front View 1 2 4 3 5 6 7 1. ZHBH020E 5. Ventilator The ventilator helps to 530 sheets of plain paper... can be loaded. 10 Front Cover Open this cover when replacing toner cartridges. 3. Tray 1 Up to keep the components inside the printer from overheating. Standard Tray Output is stacked here with the print side down. 2. When printing on custom size ...
Manual
Page 20
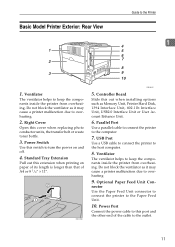
...host computer. 8. ZHBH700E ZHBH031E 5. Power Port Connect the power cable to this out when installing options such as it may cause a printer malfunction due to the Printer Basic Model Printer Exterior: Rear View 1 4 1 5 6 2 7 8 3 9 10 1. Ventilator The ventilator helps to the outlet. 11...Tray Extension Pull out this cover when replacing photo conductor units, the transfer belt or waste toner bottle. 3. Guide to overheating. 2. Do not block the ventilator as Memory Unit, Printer Hard Disk, 1394 Interface Unit, 802.11b Interface Unit, USB2.0 Interface Unit or User...
...host computer. 8. ZHBH700E ZHBH031E 5. Power Port Connect the power cable to this out when installing options such as it may cause a printer malfunction due to the Printer Basic Model Printer Exterior: Rear View 1 4 1 5 6 2 7 8 3 9 10 1. Ventilator The ventilator helps to the outlet. 11...Tray Extension Pull out this cover when replacing photo conductor units, the transfer belt or waste toner bottle. 3. Guide to overheating. 2. Do not block the ventilator as Memory Unit, Printer Hard Disk, 1394 Interface Unit, 802.11b Interface Unit, USB2.0 Interface Unit or User...
Manual
Page 21
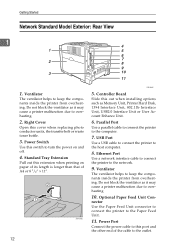
...Power Switch Use this cover when replacing photo conductor units, the transfer belt or waste toner bottle. 3. Standard Tray Extension Pull out this out when installing options such as Memory Unit, Printer Hard Disk, 1394 Interface Unit, 802.11b Interface Unit, USB2.0 Interface Unit or User... Account Enhance Unit. 6. nector Use the Paper Feed Unit connector to connect the printer to the host computer. 8. Do not block the ventilator as it may cause a printer malfunction due to the outlet. Getting Started Network Standard Model Exterior: Rear View 1 1 2 3 1....
...Power Switch Use this cover when replacing photo conductor units, the transfer belt or waste toner bottle. 3. Standard Tray Extension Pull out this out when installing options such as Memory Unit, Printer Hard Disk, 1394 Interface Unit, 802.11b Interface Unit, USB2.0 Interface Unit or User... Account Enhance Unit. 6. nector Use the Paper Feed Unit connector to connect the printer to the host computer. 8. Do not block the ventilator as it may cause a printer malfunction due to the outlet. Getting Started Network Standard Model Exterior: Rear View 1 1 2 3 1....

Manual
Page 22
Toner Cartridges When "Add Toner (color)" appears on the panel display, replace the indicated Photo Conductor Unit. 6. Photo Conductor Unit Color/Black When "Replace Color PCU" or "Replace Black PCU" appears on the panel display, replace the indicated color of paper. 4. Inside 1 2 3 Guide to print on the ... roller. 3. When "Replace Fusing Unit" appears on the panel display, replace this bottle. 13 Waste Toner Bottle Collects waste toner. When "Replace Waste Toner" appears on both sides of the toner cartridge. Duplex Unit (optional for Basic Model Printer) Use to the...
Toner Cartridges When "Add Toner (color)" appears on the panel display, replace the indicated Photo Conductor Unit. 6. Photo Conductor Unit Color/Black When "Replace Color PCU" or "Replace Black PCU" appears on the panel display, replace the indicated color of paper. 4. Inside 1 2 3 Guide to print on the ... roller. 3. When "Replace Fusing Unit" appears on the panel display, replace this bottle. 13 Waste Toner Bottle Collects waste toner. When "Replace Waste Toner" appears on both sides of the toner cartridge. Duplex Unit (optional for Basic Model Printer) Use to the...
Manual
Page 38
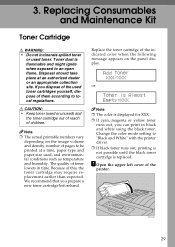
... out, you can print in time. If you prepare a new toner cartridge beforehand. Because of the printer. Add Toner XXX/XXX or Toner is Almost Empty:XXX Note ❒ The color is replaced. ZHBH440E 29 Replace the toner cartridge of the indicated color when the following message appears on the image volume and density, number of children...
... out, you can print in time. If you prepare a new toner cartridge beforehand. Because of the printer. Add Toner XXX/XXX or Toner is Almost Empty:XXX Note ❒ The color is replaced. ZHBH440E 29 Replace the toner cartridge of the indicated color when the following message appears on the image volume and density, number of children...
Manual
Page 39
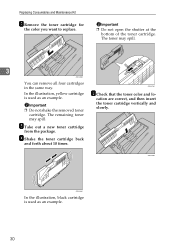
...correct, and then insert the toner cartridge vertically and slowly. Important ❒ Do not open the shutter at the bottom of the toner cartridge. Important ❒ Do not shake the removed toner cartridge. ZHBH470E E Check that the toner color and lo- The remaining toner may spill. 3 ZHBH900E ...You can remove all four cartridges in the same way. D Shake the toner cartridge back and forth ...
...correct, and then insert the toner cartridge vertically and slowly. Important ❒ Do not open the shutter at the bottom of the toner cartridge. Important ❒ Do not shake the removed toner cartridge. ZHBH470E E Check that the toner color and lo- The remaining toner may spill. 3 ZHBH900E ...You can remove all four cartridges in the same way. D Shake the toner cartridge back and forth ...

Manual
Page 40
This could result in - ZHBH500E Note ❒ If the toner cartridge is not in a toner leak. G Close the upper left cover of the printer. Toner Cartridge 3 31 You can install all four cartridges in the direction of the arrow. stalled properly, you cannot close the upper left cover of the printer. F Insert the toner cartridge in the same way. ZHBH490E Important ❒ Do not repeatedly install and re- move the toner cartridges.
This could result in - ZHBH500E Note ❒ If the toner cartridge is not in a toner leak. G Close the upper left cover of the printer. Toner Cartridge 3 31 You can install all four cartridges in the direction of the arrow. stalled properly, you cannot close the upper left cover of the printer. F Insert the toner cartridge in the same way. ZHBH490E Important ❒ Do not repeatedly install and re- move the toner cartridges.
Manual
Page 41
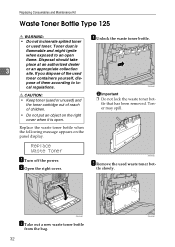
... flammable and might ignite when exposed to lo- ZHBH640E E Remove the used toner. or used waste toner bot- Replace Waste Toner A Turn off the power. Replacing Consumables and Maintenance Kit Waste Toner Bottle Type 125 R WARNING: • Do not incinerate spilled toner D Unlock the waste toner bottle. B Open the right cover. ZHBH290E C Take out a new waste...
... flammable and might ignite when exposed to lo- ZHBH640E E Remove the used toner. or used waste toner bot- Replace Waste Toner A Turn off the power. Replacing Consumables and Maintenance Kit Waste Toner Bottle Type 125 R WARNING: • Do not incinerate spilled toner D Unlock the waste toner bottle. B Open the right cover. ZHBH290E C Take out a new waste...
Manual
Page 42
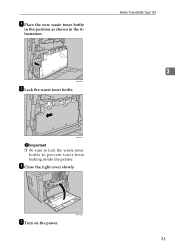
ZHBH430E 33 H Close the right cover slowly. I Turn on the power. ZHBH660E G Lock the waste toner bottle. Waste Toner Bottle Type 125 3 ZHBH670E Important ❒ Be sure to lock the waste toner bottle to prevent toner from leaking inside the printer. F Place the new waste toner bottle in the position as shown in the illustration.
ZHBH430E 33 H Close the right cover slowly. I Turn on the power. ZHBH660E G Lock the waste toner bottle. Waste Toner Bottle Type 125 3 ZHBH670E Important ❒ Be sure to lock the waste toner bottle to prevent toner from leaking inside the printer. F Place the new waste toner bottle in the position as shown in the illustration.

Manual
Page 43
Replacing Consumables and Maintenance Kit Photo Conductor Unit Type 125 Black/Color R WARNING: ❖ Photo Conductor Unit Type 125 Black • Do not incinerate spilled toner or used toner containers yourself, dis- Toner dust is open flame. pose of children. • Do not put an object on the ... R CAUTION: ❖ Photo Conductor Unit Type 125 Color • Keep toner (used or unused) and the toner cartridge out of reach of them according to an open . Replace Color PCU Check the contents of the used toner. If you dispose of the box for the following message...
Replacing Consumables and Maintenance Kit Photo Conductor Unit Type 125 Black/Color R WARNING: ❖ Photo Conductor Unit Type 125 Black • Do not incinerate spilled toner or used toner containers yourself, dis- Toner dust is open flame. pose of children. • Do not put an object on the ... R CAUTION: ❖ Photo Conductor Unit Type 125 Color • Keep toner (used or unused) and the toner cartridge out of reach of them according to an open . Replace Color PCU Check the contents of the used toner. If you dispose of the box for the following message...
Manual
Page 51
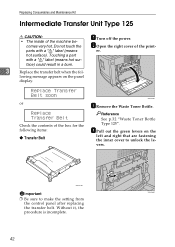
... ❒ Be sure to unlock the levers. B Open the right cover of the box for the following items: ❖ Transfer Belt ZHBH290E C Remove the Waste Toner Bottle. Do not touch the parts with a "v" label (means hot surface) could result in a burn. Reference See p.32 "Waste... Toner Bottle Type 125". Replacing Consumables and Maintenance Kit Intermediate Transfer Unit Type 125 R CAUTION: • The inside of the machine be- er. 3 Replace the transfer...
... ❒ Be sure to unlock the levers. B Open the right cover of the box for the following items: ❖ Transfer Belt ZHBH290E C Remove the Waste Toner Bottle. Do not touch the parts with a "v" label (means hot surface) could result in a burn. Reference See p.32 "Waste... Toner Bottle Type 125". Replacing Consumables and Maintenance Kit Intermediate Transfer Unit Type 125 R CAUTION: • The inside of the machine be- er. 3 Replace the transfer...
Manual
Page 52
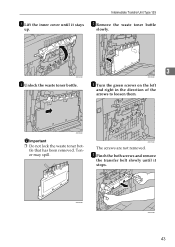
I Pinch the both screws and remove the transfer belt slowly until it stops. tle that has been removed. ZHBH640E ZHBH530E 43 H Turn the green screws on the left and right in the direction of the arrows to loosen them. ZHBH520E The screws are not removed. Toner may spill. ZHBH630E Important ❒ Do not lock the waste toner bot- G Remove the waste toner bottle slowly. 3 ZHBH310E ZHBH650E F Unlock the waste toner bottle. Intermediate Transfer Unit Type 125 E Lift the inner cover until it stays up.
I Pinch the both screws and remove the transfer belt slowly until it stops. tle that has been removed. ZHBH640E ZHBH530E 43 H Turn the green screws on the left and right in the direction of the arrows to loosen them. ZHBH520E The screws are not removed. Toner may spill. ZHBH630E Important ❒ Do not lock the waste toner bot- G Remove the waste toner bottle slowly. 3 ZHBH310E ZHBH650E F Unlock the waste toner bottle. Intermediate Transfer Unit Type 125 E Lift the inner cover until it stays up.
Manual
Page 53
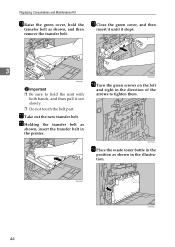
...direction of the arrows to hold the transfer belt as shown in the illustration. N Turn the green screws on the left and right in the printer. ZHBH560E ZHBH660E 44 Replacing Consumables and Maintenance Kit J Raise the green cover, hold the unit with both hands, and then pull it stops.... 3 ZHBH920E ZHBH540E Important ❒ Be sure to tighten them. ❒ Do not touch the belt part. ZHBH580E O Place the waste toner bottle in the position as shown, and then remove the transfer belt. M Close the green cover, and then insert it until it out slowly. K ...
...direction of the arrows to hold the transfer belt as shown in the illustration. N Turn the green screws on the left and right in the printer. ZHBH560E ZHBH660E 44 Replacing Consumables and Maintenance Kit J Raise the green cover, hold the unit with both hands, and then pull it stops.... 3 ZHBH920E ZHBH540E Important ❒ Be sure to tighten them. ❒ Do not touch the belt part. ZHBH580E O Place the waste toner bottle in the position as shown, and then remove the transfer belt. M Close the green cover, and then insert it until it out slowly. K ...
Manual
Page 54
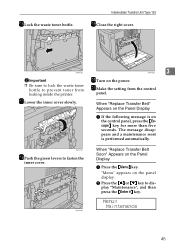
.... ZHBH420E When "Replace Transfer Belt Soon" Appears on the power. Menu: Maintenance 45 Q Lower the inner cover slowly. U Make the setting from leaking inside the printer. T Turn on the Panel Display A Press the {Menu} key. "Menu" appears on the Panel Display A If the following message is performed automatically. When "Replace ...on the panel display. B Press the {U} or {T} key to fasten the inner cover. Intermediate Transfer Unit Type 125 S Close the right cover. P Lock the waste toner bottle. ZHBH670E ZHBH430E 3 Important ❒ Be sure to lock the waste...
.... ZHBH420E When "Replace Transfer Belt Soon" Appears on the power. Menu: Maintenance 45 Q Lower the inner cover slowly. U Make the setting from leaking inside the printer. T Turn on the Panel Display A Press the {Menu} key. "Menu" appears on the Panel Display A If the following message is performed automatically. When "Replace ...on the panel display. B Press the {U} or {T} key to fasten the inner cover. Intermediate Transfer Unit Type 125 S Close the right cover. P Lock the waste toner bottle. ZHBH670E ZHBH430E 3 Important ❒ Be sure to lock the waste...


