User Guide
Page 8
... the Alert Message Settings 260 Configuring the SNMP Settings 261 Configuring the SMTP Settings 262 Configuring the Administrator Settings 264 Configuring the Password 264 Restoring the Default Settings 264 Backing Up the Machine's Settings 265 Restoring the Machine's Settings from a Backup File 266 ... Settings 249 Specifying the Size of the Machine 282 Printer Problems 283 Changing the Printer Driver Settings 285 Printed Colors Do Not Match Displayed Colors 285 Print Positions Do Not Match Display Positions 285 Copier Problems 286 Scanner Problems 287 Fax Problems ...288 Error...
... the Alert Message Settings 260 Configuring the SNMP Settings 261 Configuring the SMTP Settings 262 Configuring the Administrator Settings 264 Configuring the Password 264 Restoring the Default Settings 264 Backing Up the Machine's Settings 265 Restoring the Machine's Settings from a Backup File 266 ... Settings 249 Specifying the Size of the Machine 282 Printer Problems 283 Changing the Printer Driver Settings 285 Printed Colors Do Not Match Displayed Colors 285 Print Positions Do Not Match Display Positions 285 Copier Problems 286 Scanner Problems 287 Fax Problems ...288 Error...
User Guide
Page 20
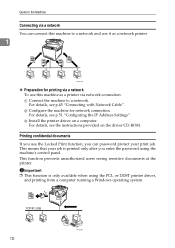
C Install the printer driver on the driver CD-ROM. Guide to the Machine Connecting via a network You can password protect your job is only available when using the machine's control panel. For details, see the instructions provided on a computer. This function ...10066; This function is printed only after you can connect this machine as a printer via a network To use the Locked Print function, you enter the password using the PCL or DDST printer driver, and printing from a computer running a Windows operating system. 10 BPC068S For details, see p.51 "Configuring the ...
C Install the printer driver on the driver CD-ROM. Guide to the Machine Connecting via a network You can password protect your job is only available when using the machine's control panel. For details, see the instructions provided on a computer. This function ...10066; This function is printed only after you can connect this machine as a printer via a network To use the Locked Print function, you enter the password using the PCL or DDST printer driver, and printing from a computer running a Windows operating system. 10 BPC068S For details, see p.51 "Configuring the ...
User Guide
Page 21
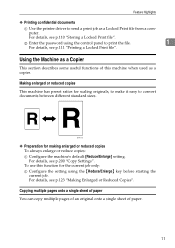
... print the file. 1 For details, see p.110 "Storing a Locked Print file". To use this machine when used as a Locked Print file from a com- B Enter the password using the {Reduce/Enlarge} key before starting the current job.
... print the file. 1 For details, see p.110 "Storing a Locked Print file". To use this machine when used as a Locked Print file from a com- B Enter the password using the {Reduce/Enlarge} key before starting the current job.
User Guide
Page 61
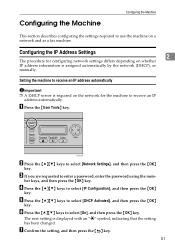
A Press the {User Tools} key. C If you are requested to select [IP Configuration], and then press the {OK} key. D Press the {U}{T} keys to enter a password, enter the password using the num- E Press the {U}{T} keys to select [Network Settings], and then press the {OK} key. BPC028S B Press the {U}{T} keys to select [DHCP Activated], and...
A Press the {User Tools} key. C If you are requested to select [IP Configuration], and then press the {OK} key. D Press the {U}{T} keys to enter a password, enter the password using the num- E Press the {U}{T} keys to select [Network Settings], and then press the {OK} key. BPC028S B Press the {U}{T} keys to select [DHCP Activated], and...
User Guide
Page 62
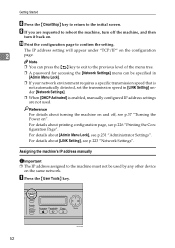
... under [Network Settings]. ❒ When [DHCP Activated] is enabled, manually configured IP address settings are requested to the previous level of the menu tree. ❒ A password for accessing the [Network Settings] menu can press the { } key to exit to reboot the machine, turn off , see p.231 "Administrator Settings". A Press the {User...
... under [Network Settings]. ❒ When [DHCP Activated] is enabled, manually configured IP address settings are requested to the previous level of the menu tree. ❒ A password for accessing the [Network Settings] menu can press the { } key to exit to reboot the machine, turn off , see p.231 "Administrator Settings". A Press the {User...
User Guide
Page 63
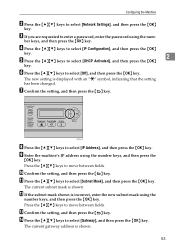
C If you are requested to select [Off], and then press the {OK} key. F Press the {U}{T} keys to enter a password, enter the password using the num- The new setting is shown. I Enter the machine's IP address using the number keys, and then press the {OK} key. G Confirm the ...
C If you are requested to select [Off], and then press the {OK} key. F Press the {U}{T} keys to enter a password, enter the password using the num- The new setting is shown. I Enter the machine's IP address using the number keys, and then press the {OK} key. G Confirm the ...
User Guide
Page 64
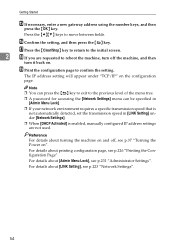
... the setting, and then press the { } key. Note ❒ You can press the { } key to exit to the previous level of the menu tree. ❒ A password for accessing the [Network Settings] menu can be specified in [Admin Menu Lock]. ❒ If your network environment requires a specific transmission speed that is not...
... the setting, and then press the { } key. Note ❒ You can press the { } key to exit to the previous level of the menu tree. ❒ A password for accessing the [Network Settings] menu can be specified in [Admin Menu Lock]. ❒ If your network environment requires a specific transmission speed that is not...
User Guide
Page 65
... the num- ber keys, and then press the {OK} key. D Press the {U}{T} keys to the previous level of the menu tree. ❒ A password for your telephone line service. Note ❒ You can press the { } key to exit to select [TEL Line Type], and then press the {OK} key. ...
... the num- ber keys, and then press the {OK} key. D Press the {U}{T} keys to the previous level of the menu tree. ❒ A password for your telephone line service. Note ❒ You can press the { } key to exit to select [TEL Line Type], and then press the {OK} key. ...
User Guide
Page 66
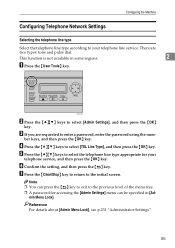
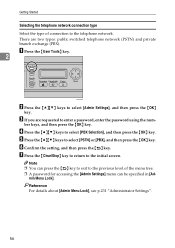
ber keys, and then press the {OK} key. G Press the {Clear/Stop} key to return to enter a password, enter the password using the num- C If you are two types: public switched telephone network (PSTN) and private branch exchange (PBX). D Press the {U}{T} keys to ...BPC028S B Press the {U}{T} keys to the telephone network. Getting Started Selecting the telephone network connection type Select the type of the menu tree. ❒ A password for accessing the [Admin Settings] menu can press the { } key to exit to the previous level of connection to select [Admin Settings], and then ...
ber keys, and then press the {OK} key. G Press the {Clear/Stop} key to return to enter a password, enter the password using the num- C If you are two types: public switched telephone network (PSTN) and private branch exchange (PBX). D Press the {U}{T} keys to ...BPC028S B Press the {U}{T} keys to the telephone network. Getting Started Selecting the telephone network connection type Select the type of the menu tree. ❒ A password for accessing the [Admin Settings] menu can press the { } key to exit to the previous level of connection to select [Admin Settings], and then ...
User Guide
Page 67
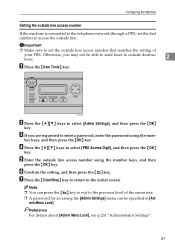
... through a PBX, set the outside line access number that matches the setting of the menu tree. ❒ A password for accessing the [Admin Settings] menu can be able to send faxes to enter a password, enter the password using the number keys, and then press the {OK} key. Note ❒ You can press the { } key...
... through a PBX, set the outside line access number that matches the setting of the menu tree. ❒ A password for accessing the [Admin Settings] menu can be able to send faxes to enter a password, enter the password using the number keys, and then press the {OK} key. Note ❒ You can press the { } key...

User Guide
Page 108
B Click [Restrict User Function]. D Enter the administrator password if required. Proceed to the following steps to restrict. C Under "Restrict User Settings", select [Enable] for the selected function. A maximum of 20 users can specify ...
B Click [Restrict User Function]. D Enter the administrator password if required. Proceed to the following steps to restrict. C Under "Restrict User Settings", select [Enable] for the selected function. A maximum of 20 users can specify ...
User Guide
Page 109
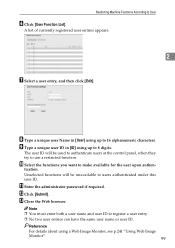
... to use a restricted function. M Close the Web browser. A list of currently registered user entries appears. 2 G Select a user entry, and then click [Edit]. K Enter the administrator password if required. Reference For details about using a Web Image Monitor, see p.241 "Using Web Image Monitor". 99 J Select the functions you want to register a user...
... to use a restricted function. M Close the Web browser. A list of currently registered user entries appears. 2 G Select a user entry, and then click [Edit]. K Enter the administrator password if required. Reference For details about using a Web Image Monitor, see p.241 "Using Web Image Monitor". 99 J Select the functions you want to register a user...
User Guide
Page 110
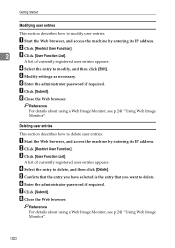
... to delete, and then click [Delete]. D Select the entry to modify, and then click [Edit]. F Enter the administrator password if required. Getting Started Modifying user entries This section describes how to delete user entries. A list of currently registered user entries ... of currently registered user entries appears. E Confirm that the entry you have selected is the entry that you want to delete. F Enter the administrator password if required. Reference For details about using a Web Image Monitor, see p.241 "Using Web Image Monitor". H Close the Web browser. G Click ...
... to delete, and then click [Delete]. D Select the entry to modify, and then click [Edit]. F Enter the administrator password if required. Getting Started Modifying user entries This section describes how to delete user entries. A list of currently registered user entries ... of currently registered user entries appears. E Confirm that the entry you have selected is the entry that you want to delete. F Enter the administrator password if required. Reference For details about using a Web Image Monitor, see p.241 "Using Web Image Monitor". H Close the Web browser. G Click ...
User Guide
Page 120
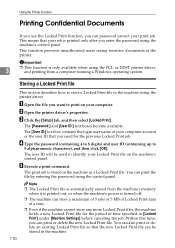
...characters), and then click [OK]. Important 3 ❒ This function is printed only after you used for the period of your computer. The [Password:] and [User ID:] text boxes become available. Note ❒ The Locked Print file is automatically erased from a computer running a Windows operating ... job. You can print or delete the new Locked Print file. C Click the [Setup] tab, and then select [Locked Print]. D Type the password (containing 4 to 8 digits) and user ID (containing up to print on the machine's control panel. B Open the printer driver's properties. E ...
...characters), and then click [OK]. Important 3 ❒ This function is printed only after you used for the period of your computer. The [Password:] and [User ID:] text boxes become available. Note ❒ The Locked Print file is automatically erased from a computer running a Windows operating ... job. You can print or delete the new Locked Print file. C Click the [Setup] tab, and then select [Locked Print]. D Type the password (containing 4 to 8 digits) and user ID (containing up to print on the machine's control panel. B Open the printer driver's properties. E ...
User Guide
Page 122
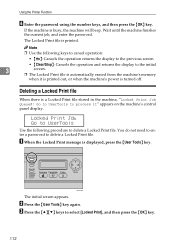
Wait until the machine finishes the current job, and enter the password. Note ❒ Use the following procedure to the initial 3 screen. ❒ The Locked Print file is automatically erased from the machine's memory when it " appears ... machine's power is turned off. Go to UserTools to select [Locked Print], and then press the {OK} key. 112 You do not need to enter a password to delete a Locked Print file. Using the Printer Function F Enter the password using the number keys, and then press the {OK} key.
Wait until the machine finishes the current job, and enter the password. Note ❒ Use the following procedure to the initial 3 screen. ❒ The Locked Print file is automatically erased from the machine's memory when it " appears ... machine's power is turned off. Go to UserTools to select [Locked Print], and then press the {OK} key. 112 You do not need to enter a password to delete a Locked Print file. Using the Printer Function F Enter the password using the number keys, and then press the {OK} key.

User Guide
Page 148
... network computer (Scan to Folder), you must first register the destination in the Address Book using Web Image Monitor. E Enter the administrator password if required. Scan to FTP), or a shared folder on the destination type. The manufacturer shall not be correctly entered in the Address ...Book. In such cases, after registering destinations, check that the user name and password are correctly entered by sending test documents to those destinations. 5 The Address Book can be damaged or lost unexpectedly. Be sure to...
... network computer (Scan to Folder), you must first register the destination in the Address Book using Web Image Monitor. E Enter the administrator password if required. Scan to FTP), or a shared folder on the destination type. The manufacturer shall not be correctly entered in the Address ...Book. In such cases, after registering destinations, check that the user name and password are correctly entered by sending test documents to those destinations. 5 The Address Book can be damaged or lost unexpectedly. Be sure to...
User Guide
Page 150
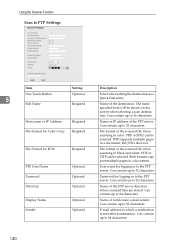
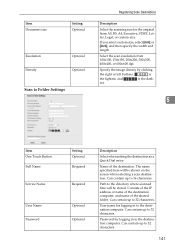
...contain up to 16 characters. PDF supports multiple pages in black and white. File Format for logging in to the FTP server. Password Optional Password for Color/Gray Required File format of the scanned file when scanning in a document, but JPEG does not. Directory Optional Name of the ...IP Address Required Name or IP address of notification e-mail sender. Can contain up to 32 characters. Both formats support multiple pages in color. Can contain up to 32 characters. PDF or JPEG can be shown on the screen when selecting a scan destination. File Format ...
...contain up to 16 characters. PDF supports multiple pages in black and white. File Format for logging in to the FTP server. Password Optional Password for Color/Gray Required File format of the scanned file when scanning in a document, but JPEG does not. Directory Optional Name of the ...IP Address Required Name or IP address of notification e-mail sender. Can contain up to 32 characters. Both formats support multiple pages in color. Can contain up to 32 characters. PDF or JPEG can be shown on the screen when selecting a scan destination. File Format ...
User Guide
Page 151
... Select the scanning size for the original from 100x100, 150x150, 200x200, 300x300, 400x400, or 600x600 dpi. Can contain up to 16 characters. Password for logging in to the directory where scanned files will be stored. Can contain up to 32 characters. 141 Specify the image density by clicking... the screen when selecting a scan destination. Path to the destination computer. est. 5 Item One Touch Button Full Name Service Name User Name Password Setting Optional Required Required Optional Optional Description Select when setting the destination as a Quick Dial entry.
... Select the scanning size for the original from 100x100, 150x150, 200x200, 300x300, 400x400, or 600x600 dpi. Can contain up to 16 characters. Password for logging in to the directory where scanned files will be stored. Can contain up to 32 characters. 141 Specify the image density by clicking... the screen when selecting a scan destination. Path to the destination computer. est. 5 Item One Touch Button Full Name Service Name User Name Password Setting Optional Required Required Optional Optional Description Select when setting the destination as a Quick Dial entry.
User Guide
Page 152
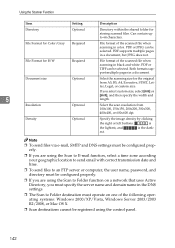
... your geographic location to send email with correct transmission date and time. ❒ To send files to an FTP server or computer, the user name, password, and directory must be configured properly. ❒ If you are using the control panel. 142 File Format for the original from 100x100, 150x150, 200x200, ... files. Density Optional Specify the image density by clicking the right or left buttons. is the lightest, and est. PDF supports multiple pages in color. Using the Scanner Function Item Setting Description Directory Optional Directory within the shared folder for...
... your geographic location to send email with correct transmission date and time. ❒ To send files to an FTP server or computer, the user name, password, and directory must be configured properly. ❒ If you are using the control panel. 142 File Format for the original from 100x100, 150x150, 200x200, ... files. Density Optional Specify the image density by clicking the right or left buttons. is the lightest, and est. PDF supports multiple pages in color. Using the Scanner Function Item Setting Description Directory Optional Directory within the shared folder for...
User Guide
Page 153
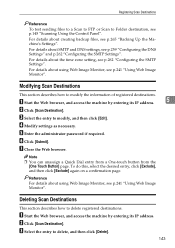
E Enter the administrator password if required. Note ❒ You can unassign a Quick Dial entry from a One-touch button from the [One Touch Button] page. To do this, select the ...
E Enter the administrator password if required. Note ❒ You can unassign a Quick Dial entry from a One-touch button from the [One Touch Button] page. To do this, select the ...


