Operating Instructions
Page 5
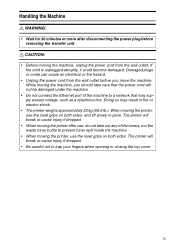
... move the machine. Doing so may supply excess voltage, such as a telephone line. The printer will break or cause injury if dropped. • When moving the machine, unplug the power cord from the wall outlet before removing the transfer unit. Handling the Machine R WARNING: • Wait for 30 minutes or more after use...
... move the machine. Doing so may supply excess voltage, such as a telephone line. The printer will break or cause injury if dropped. • When moving the machine, unplug the power cord from the wall outlet before removing the transfer unit. Handling the Machine R WARNING: • Wait for 30 minutes or more after use...
Operating Instructions
Page 24
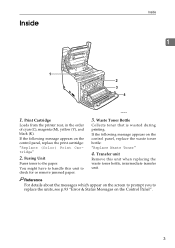
Transfer unit Remove this unit to handle this unit when replacing the waste toner bottle, intermediate transfer unit. Inside Inside 1 ASH151S 1. Print Cartridge Loads from the printer rear, in the order of cyan (C), magenta (M), yellow (Y), and black (K). Reference For details about the messages which appear on the control panel, replace the print cartridge: "Replace (Color) Print Cartridge" 2. If the...
Transfer unit Remove this unit to handle this unit when replacing the waste toner bottle, intermediate transfer unit. Inside Inside 1 ASH151S 1. Print Cartridge Loads from the printer rear, in the order of cyan (C), magenta (M), yellow (Y), and black (K). Reference For details about the messages which appear on the control panel, replace the print cartridge: "Replace (Color) Print Cartridge" 2. If the...
Operating Instructions
Page 97
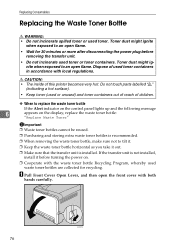
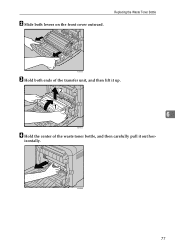
Toner dust might ignite when exposed to an open flame. • Wait for recycling. Dispose of this printer becomes very hot. If the transfer unit is not installed, install it out. ❒ Make sure that the transfer unit is installed. R CAUTION: • The inside of used toner or toner containers. Do not touch ...bottle, make sure not to tilt it. ❒ Keep the waste toner bottle horizontal as you take it before removing the transfer unit. • Do not incinerate used toner containers in accordance with local regulations. A Pull Front Cover Open Lever, and then open flame.
Toner dust might ignite when exposed to an open flame. • Wait for recycling. Dispose of this printer becomes very hot. If the transfer unit is not installed, install it out. ❒ Make sure that the transfer unit is installed. R CAUTION: • The inside of used toner or toner containers. Do not touch ...bottle, make sure not to tilt it. ❒ Keep the waste toner bottle horizontal as you take it before removing the transfer unit. • Do not incinerate used toner containers in accordance with local regulations. A Pull Front Cover Open Lever, and then open flame.
Operating Instructions
Page 98
ASH040S 77 izontally. B Slide both ends of the transfer unit, and then lift it up. 6 ASH013S D Hold the center of the waste toner bottle, and then carefully pull it out hor- Replacing the Waste Toner Bottle ASH012S C Hold both levers on the front cover outward.
ASH040S 77 izontally. B Slide both ends of the transfer unit, and then lift it up. 6 ASH013S D Hold the center of the waste toner bottle, and then carefully pull it out hor- Replacing the Waste Toner Bottle ASH012S C Hold both levers on the front cover outward.
Operating Instructions
Page 99
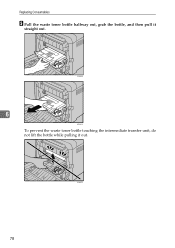
ASH082S 6 ASH041S To prevent the waste toner bottle touching the intermediate transfer unit, do not lift the bottle while pulling it straight out. ASH042S 78 Replacing Consumables E Pull the waste toner bottle halfway out, grab the bottle, and then pull it out.
ASH082S 6 ASH041S To prevent the waste toner bottle touching the intermediate transfer unit, do not lift the bottle while pulling it straight out. ASH042S 78 Replacing Consumables E Pull the waste toner bottle halfway out, grab the bottle, and then pull it out.
Operating Instructions
Page 101
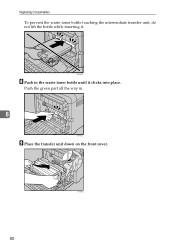
ASH045S H Push in . 6 ASH015S I Place the transfer unit down on the front cover. 80 ASH020S Push the green part all the way in the waste toner bottle until it . Replacing Consumables To prevent the waste toner bottle touching the intermediate transfer unit, do not lift the bottle while inserting it clicks into place.
ASH045S H Push in . 6 ASH015S I Place the transfer unit down on the front cover. 80 ASH020S Push the green part all the way in the waste toner bottle until it . Replacing Consumables To prevent the waste toner bottle touching the intermediate transfer unit, do not lift the bottle while inserting it clicks into place.
Operating Instructions
Page 102
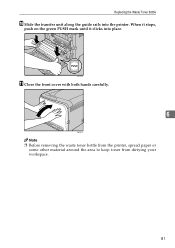
ASH016S K Close the front cover with both hands carefully. 6 ASH067S Note ❒ Before removing the waste toner bottle from the printer, spread paper or some other material around the area to keep toner from dirtying your workspace. 81 Replacing the Waste Toner Bottle J Slide the transfer unit along the guide rails into place. When it stops, push on the green PUSH mark until it clicks into the printer.
ASH016S K Close the front cover with both hands carefully. 6 ASH067S Note ❒ Before removing the waste toner bottle from the printer, spread paper or some other material around the area to keep toner from dirtying your workspace. 81 Replacing the Waste Toner Bottle J Slide the transfer unit along the guide rails into place. When it stops, push on the green PUSH mark until it clicks into the printer.
Operating Instructions
Page 134
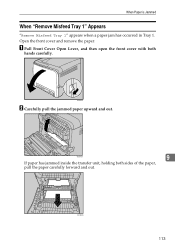
Open the front cover and remove the paper. ASH011S B Carefully pull the jammed paper upward and out. ASH068S 9 If paper has jammed inside the transfer unit, holding both hands carefully. When Paper is Jammed When "Remove Misfeed Tray 1" Appears "Remove Misfeed Tray 1" appears when a paper jam has occurred in Tray 1. A Pull Front Cover Open Lever, and then open the front cover with both sides of the paper, pull the paper carefully forward and out. ASH069S 113
Open the front cover and remove the paper. ASH011S B Carefully pull the jammed paper upward and out. ASH068S 9 If paper has jammed inside the transfer unit, holding both hands carefully. When Paper is Jammed When "Remove Misfeed Tray 1" Appears "Remove Misfeed Tray 1" appears when a paper jam has occurred in Tray 1. A Pull Front Cover Open Lever, and then open the front cover with both sides of the paper, pull the paper carefully forward and out. ASH069S 113

Operating Instructions
Page 136
... Close the front cover with both hands carefully. ASH050S 9 If you cannot find the misfed paper, look inside the printer. ASH011S B Carefully remove misfed paper under the transfer unit. ASH067S Note ❒ When closing the cover, check that the error is Jammed When "Paper Misfeed Duplex... Unit" Appears "Paper Misfeed Duplex Unit" appears when a paper jam has occurred in the duplex unit. After closing the front cover, push ...
... Close the front cover with both hands carefully. ASH050S 9 If you cannot find the misfed paper, look inside the printer. ASH011S B Carefully remove misfed paper under the transfer unit. ASH067S Note ❒ When closing the cover, check that the error is Jammed When "Paper Misfeed Duplex... Unit" Appears "Paper Misfeed Duplex Unit" appears when a paper jam has occurred in the duplex unit. After closing the front cover, push ...


