
Operating Instructions
Page 5
...CAUTION: • Before moving the machine, unplug the power cord from the wall outlet before removing the transfer unit. The printer will break or cause injury if dropped. • When moving the printer after disconnecting the power plug before you should take out any of the machine to a network that may ...not connect the Ethernet port of the toners, nor the waste toner bottle to prevent toner spill inside the machine. • When moving the printer, use the inset grips on both sides. Damaged plugs or cords can cause an electrical or fire hazard. • Unplug the power cord ...
...CAUTION: • Before moving the machine, unplug the power cord from the wall outlet before removing the transfer unit. The printer will break or cause injury if dropped. • When moving the printer after disconnecting the power plug before you should take out any of the machine to a network that may ...not connect the Ethernet port of the toners, nor the waste toner bottle to prevent toner spill inside the machine. • When moving the printer, use the inset grips on both sides. Damaged plugs or cords can cause an electrical or fire hazard. • Unplug the power cord ...
Operating Instructions
Page 24
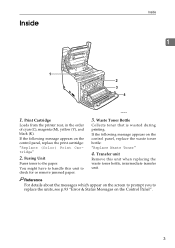
... Print Cartridge Loads from the printer rear, in the order of cyan (C), magenta (M), yellow (Y), and black (K). Fusing Unit Fuses toner to replace the units, see p.93 "Error & Status Messages on the screen to prompt you to the paper. Transfer unit Remove this unit to handle... this unit when replacing the waste toner bottle, intermediate transfer unit. If the following message appears on the control panel, replace the print cartridge: "Replace (Color) Print Cartridge" 2. Waste Toner Bottle Collects toner that is wasted during printing. Inside Inside ...
... Print Cartridge Loads from the printer rear, in the order of cyan (C), magenta (M), yellow (Y), and black (K). Fusing Unit Fuses toner to replace the units, see p.93 "Error & Status Messages on the screen to prompt you to the paper. Transfer unit Remove this unit to handle... this unit when replacing the waste toner bottle, intermediate transfer unit. If the following message appears on the control panel, replace the print cartridge: "Replace (Color) Print Cartridge" 2. Waste Toner Bottle Collects toner that is wasted during printing. Inside Inside ...
Operating Instructions
Page 97
...waste toner bottle Recycling Program, whereby used waste toner bottles are collected for 30 minutes or more after disconnecting the power plug before removing the transfer unit. • Do not incinerate used toner or toner containers. Dispose of used toner. Do not touch parts labelled "v" (indicating a...• Keep toner (used or unused) and toner containers out of reach of this printer becomes very hot. If the transfer unit is not installed, install it out. ❒ Make sure that the transfer unit is recommended. ❒ When removing the waste toner bottle, make sure not to ...
...waste toner bottle Recycling Program, whereby used waste toner bottles are collected for 30 minutes or more after disconnecting the power plug before removing the transfer unit. • Do not incinerate used toner or toner containers. Dispose of used toner. Do not touch parts labelled "v" (indicating a...• Keep toner (used or unused) and toner containers out of reach of this printer becomes very hot. If the transfer unit is not installed, install it out. ❒ Make sure that the transfer unit is recommended. ❒ When removing the waste toner bottle, make sure not to ...
Operating Instructions
Page 98
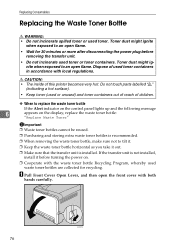
Replacing the Waste Toner Bottle ASH012S C Hold both levers on the front cover outward. izontally. ASH040S 77 B Slide both ends of the transfer unit, and then lift it up. 6 ASH013S D Hold the center of the waste toner bottle, and then carefully pull it out hor-
Replacing the Waste Toner Bottle ASH012S C Hold both levers on the front cover outward. izontally. ASH040S 77 B Slide both ends of the transfer unit, and then lift it up. 6 ASH013S D Hold the center of the waste toner bottle, and then carefully pull it out hor-
Operating Instructions
Page 99
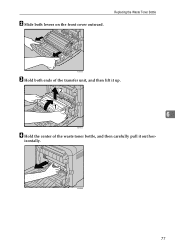
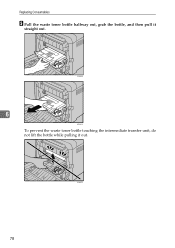
ASH042S 78 Replacing Consumables E Pull the waste toner bottle halfway out, grab the bottle, and then pull it out. ASH082S 6 ASH041S To prevent the waste toner bottle touching the intermediate transfer unit, do not lift the bottle while pulling it straight out.
ASH042S 78 Replacing Consumables E Pull the waste toner bottle halfway out, grab the bottle, and then pull it out. ASH082S 6 ASH041S To prevent the waste toner bottle touching the intermediate transfer unit, do not lift the bottle while pulling it straight out.
Operating Instructions
Page 101
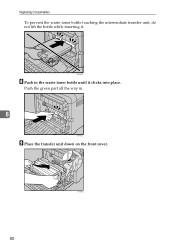
Push the green part all the way in the waste toner bottle until it . ASH045S H Push in . 6 ASH015S I Place the transfer unit down on the front cover. 80 ASH020S Replacing Consumables To prevent the waste toner bottle touching the intermediate transfer unit, do not lift the bottle while inserting it clicks into place.
Push the green part all the way in the waste toner bottle until it . ASH045S H Push in . 6 ASH015S I Place the transfer unit down on the front cover. 80 ASH020S Replacing Consumables To prevent the waste toner bottle touching the intermediate transfer unit, do not lift the bottle while inserting it clicks into place.
Operating Instructions
Page 102
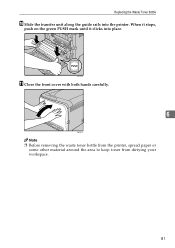
ASH016S K Close the front cover with both hands carefully. 6 ASH067S Note ❒ Before removing the waste toner bottle from the printer, spread paper or some other material around the area to keep toner from dirtying your workspace. 81 Replacing the Waste Toner Bottle J Slide the transfer unit along the guide rails into place. When it stops, push on the green PUSH mark until it clicks into the printer.
ASH016S K Close the front cover with both hands carefully. 6 ASH067S Note ❒ Before removing the waste toner bottle from the printer, spread paper or some other material around the area to keep toner from dirtying your workspace. 81 Replacing the Waste Toner Bottle J Slide the transfer unit along the guide rails into place. When it stops, push on the green PUSH mark until it clicks into the printer.

Operating Instructions
Page 110
... paper tray forcefully. Important ❒ Do not use chemical cleaner or organic solvent such as thinner or benzine. ❒ Do not touch the transfer roller. 7 ASH098S A Turn off the power switch. Cleaning the Registration Roller and the Paper Tray Cleaning the Registration Roller and the Paper Tray ...The surrounding registration roller or paper tray might fall and cause an injury. • Do not put your hands inside of this printer becomes very hot. Some internal parts become hot and are a burn hazard. R CAUTION: • Unplug the power cord from the wall ...
... paper tray forcefully. Important ❒ Do not use chemical cleaner or organic solvent such as thinner or benzine. ❒ Do not touch the transfer roller. 7 ASH098S A Turn off the power switch. Cleaning the Registration Roller and the Paper Tray Cleaning the Registration Roller and the Paper Tray ...The surrounding registration roller or paper tray might fall and cause an injury. • Do not put your hands inside of this printer becomes very hot. Some internal parts become hot and are a burn hazard. R CAUTION: • Unplug the power cord from the wall ...
Operating Instructions
Page 124
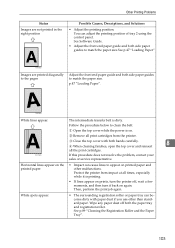
...8226; The surrounding registration roller or paper tray can adjust the printing position of tray 2 using the control panel. ASH104S The intermediate transfer belt is printing. • If lines appear on prints, turn it is dirty. Close the top cover with paper dust if you...perform the print job again. If this procedure does not resolve the problem, contact your sales or service representative. Protect the printer from the printer. ASH103S White lines appear. Other Printing Problems Status Images are printed diagonally to the pages Adjust the front end paper guide...
...8226; The surrounding registration roller or paper tray can adjust the printing position of tray 2 using the control panel. ASH104S The intermediate transfer belt is printing. • If lines appear on prints, turn it is dirty. Close the top cover with paper dust if you...perform the print job again. If this procedure does not resolve the problem, contact your sales or service representative. Protect the printer from the printer. ASH103S White lines appear. Other Printing Problems Status Images are printed diagonally to the pages Adjust the front end paper guide...
Operating Instructions
Page 134
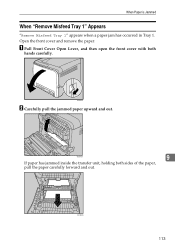
ASH011S B Carefully pull the jammed paper upward and out. A Pull Front Cover Open Lever, and then open the front cover with both sides of the paper, pull the paper carefully forward and out. ASH069S 113 Open the front cover and remove the paper. ASH068S 9 If paper has jammed inside the transfer unit, holding both hands carefully. When Paper is Jammed When "Remove Misfeed Tray 1" Appears "Remove Misfeed Tray 1" appears when a paper jam has occurred in Tray 1.
ASH011S B Carefully pull the jammed paper upward and out. A Pull Front Cover Open Lever, and then open the front cover with both sides of the paper, pull the paper carefully forward and out. ASH069S 113 Open the front cover and remove the paper. ASH068S 9 If paper has jammed inside the transfer unit, holding both hands carefully. When Paper is Jammed When "Remove Misfeed Tray 1" Appears "Remove Misfeed Tray 1" appears when a paper jam has occurred in Tray 1.

Operating Instructions
Page 136
ASH011S B Carefully remove misfed paper under the transfer unit. ASH067S Note ❒ When closing the cover, check that the error is Jammed When "Paper Misfeed Duplex Unit" Appears "Paper Misfeed Duplex Unit" appears ... Front Cover Open Lever, and then open the front cover with both hands carefully. ASH050S 9 If you cannot find the misfed paper, look inside the printer. C Close the front cover with both hands carefully. Open the front cover and remove the paper. When Paper is cleared. 115
ASH011S B Carefully remove misfed paper under the transfer unit. ASH067S Note ❒ When closing the cover, check that the error is Jammed When "Paper Misfeed Duplex Unit" Appears "Paper Misfeed Duplex Unit" appears ... Front Cover Open Lever, and then open the front cover with both hands carefully. ASH050S 9 If you cannot find the misfed paper, look inside the printer. C Close the front cover with both hands carefully. Open the front cover and remove the paper. When Paper is cleared. 115
Operating Instructions
Page 195
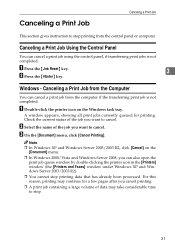
...Reset} key. 3 B Press the {#Enter} key. Check the current status of the job you want to stop printing from the computer if the transferring print job is not completed. B Select the name of data may continue for printing. Canceling a Print Job Using the Control Panel You can also... open the print job queue window by double-clicking the printer icon in the [Printers] window (the [Printers and Faxes] window under Windows XP and Windows Server 2003/2003 R2). ❒ You cannot stop printing data that has already...
...Reset} key. 3 B Press the {#Enter} key. Check the current status of the job you want to stop printing from the computer if the transferring print job is not completed. B Select the name of data may continue for printing. Canceling a Print Job Using the Control Panel You can also... open the print job queue window by double-clicking the printer icon in the [Printers] window (the [Printers and Faxes] window under Windows XP and Windows Server 2003/2003 R2). ❒ You cannot stop printing data that has already...
Operating Instructions
Page 280
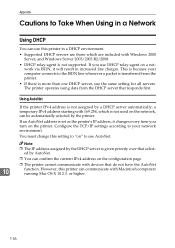
... using data from the printer. • If there is transferred from the DHCP server that responds first. Configure the TCP/IP settings according to your computer connects to the ISDN line whenever a packet is more ... Mac OS X 10.2.3. Appendix Cautions to Take When Using in a Network Using DHCP You can use this setting to "on" to use AutoNet. However, this printer can communicate with Windows 2000 Server, and Windows Server 2003/2003 R2/2008. • DHCP relay-agent is because your network environment.
... using data from the printer. • If there is transferred from the DHCP server that responds first. Configure the TCP/IP settings according to your computer connects to the ISDN line whenever a packet is more ... Mac OS X 10.2.3. Appendix Cautions to Take When Using in a Network Using DHCP You can use this setting to "on" to use AutoNet. However, this printer can communicate with Windows 2000 Server, and Windows Server 2003/2003 R2/2008. • DHCP relay-agent is because your network environment.
Operating Instructions
Page 283
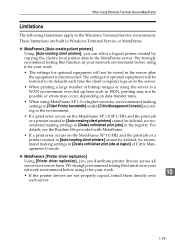
...file provided with MetaFrame. • If a print error occurs on the MetaFrame XP 1.0 FR2 and the print job or a printer created in [Auto-creating client printers] cannot be stored in a server farm. We strongly recommend testing this function in your network environment before using it for your ...over dial-up lines such as ISDN, printing may not be possible or errors may occur, depending on data transfer rates. • When using it for your work . 10 • If the printer drivers are built in Windows Terminal Service or MetaFrame. ❖ MetaFrame's [Auto-creating client...
...file provided with MetaFrame. • If a print error occurs on the MetaFrame XP 1.0 FR2 and the print job or a printer created in [Auto-creating client printers] cannot be stored in a server farm. We strongly recommend testing this function in your network environment before using it for your ...over dial-up lines such as ISDN, printing may not be possible or errors may occur, depending on data transfer rates. • When using it for your work . 10 • If the printer drivers are built in Windows Terminal Service or MetaFrame. ❖ MetaFrame's [Auto-creating client...


