
Quick Guide
Page 1
For safe and correct use, please be sure to read "Safety Information" before you use the product and keep it handy for future reference. SP C221SF/C222SF Quick Guide Names and Locations Using the Copier Function Using the Scanner Function Using the Fax Function Error Messages Removing Paper Jams Troubleshooting Replacing Print Cartridges Read this manual carefully before using the machine.
For safe and correct use, please be sure to read "Safety Information" before you use the product and keep it handy for future reference. SP C221SF/C222SF Quick Guide Names and Locations Using the Copier Function Using the Scanner Function Using the Fax Function Error Messages Removing Paper Jams Troubleshooting Replacing Print Cartridges Read this manual carefully before using the machine.
Quick Guide
Page 7
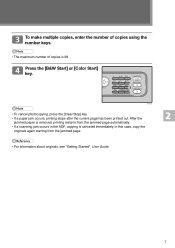
Press the [B&W Start] or [Color Start] key. BAA354S • To cancel photocopying, press the [Clear/Stop] key. • If a paper jam occurs, printing stops after the current page has been printed out. To make multiple copies, enter the number of copies ...of copies is canceled immediately. In this case, copy the originals again starting from the jammed page automatically. • If a scanning jam occurs in the ADF, copying is 99. After the jammed paper is removed, printing restarts from the jammed page. • For information about originals, see "Getting Started", User Guide. 7...
Press the [B&W Start] or [Color Start] key. BAA354S • To cancel photocopying, press the [Clear/Stop] key. • If a paper jam occurs, printing stops after the current page has been printed out. To make multiple copies, enter the number of copies ...of copies is canceled immediately. In this case, copy the originals again starting from the jammed page automatically. • If a scanning jam occurs in the ADF, copying is 99. After the jammed paper is removed, printing restarts from the jammed page. • For information about originals, see "Getting Started", User Guide. 7...
Quick Guide
Page 12
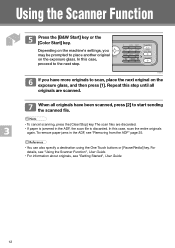
... all originals have more originals to place another original on the exposure glass, and then press [1]. When all originals are discarded. • If paper is jammed in the ADF, see "Getting Started", User Guide. 12 In this case, proceed to start sending the scanned file. • To cancel ... to scan, place the next original on the exposure glass. Using the Scanner Function Press the [B&W Start] key or the [Color Start] key. Depending on the machine's settings, you have been scanned, press [2] to the next step. To remove paper jams in the ADF, the scan file is discarded.
... all originals have more originals to place another original on the exposure glass, and then press [1]. When all originals are discarded. • If paper is jammed in the ADF, see "Getting Started", User Guide. 12 In this case, proceed to start sending the scanned file. • To cancel ... to scan, place the next original on the exposure glass. Using the Scanner Function Press the [B&W Start] key or the [Color Start] key. Depending on the machine's settings, you have been scanned, press [2] to the next step. To remove paper jams in the ADF, the scan file is discarded.
Quick Guide
Page 18
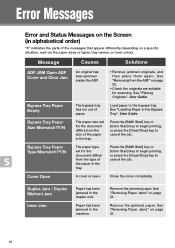
.../Stop] key to cancel the job. See "Removing Paper Jams" on page 25. • Check the originals are suitable for scanning. See "Loading Paper in the duplex unit. Remove the jammed paper. See "Removing Paper Jams" on a specific situation, such as the paper sizes or types, tray names, or toner colors. Error Messages Error and Status Messages on the...
.../Stop] key to cancel the job. See "Removing Paper Jams" on page 25. • Check the originals are suitable for scanning. See "Loading Paper in the duplex unit. Remove the jammed paper. See "Removing Paper Jams" on a specific situation, such as the paper sizes or types, tray names, or toner colors. Error Messages Error and Status Messages on the...
Quick Guide
Page 19
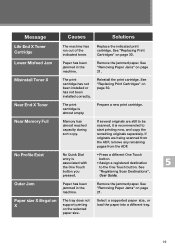
...or has not been installed correctly. Message Causes Solutions Life End X Toner Cartridge Lower Misfeed Jam The machine has run out of the indicated toner. See "Removing Paper Jams" on page 30. Reinstall the print cartridge. If originals are still to be scanned,...copy the remaining originals separately. Remove the jammed paper. See "Replacing Print Cartridges" on the selected paper size. Prepare a new print cartridge. Paper size X illegal on X The tray does not support printing on page 30. See "Removing Paper Jams" on page 21. If several originals ...
...or has not been installed correctly. Message Causes Solutions Life End X Toner Cartridge Lower Misfeed Jam The machine has run out of the indicated toner. See "Removing Paper Jams" on page 30. Reinstall the print cartridge. If originals are still to be scanned,...copy the remaining originals separately. Remove the jammed paper. See "Replacing Print Cartridges" on the selected paper size. Prepare a new print cartridge. Paper size X illegal on X The tray does not support printing on page 30. See "Removing Paper Jams" on page 21. If several originals ...
Quick Guide
Page 20
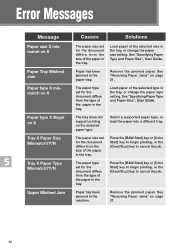
... for the document differs from the type of the paper in the tray. Remove the jammed paper. Remove the jammed paper. Select a supported paper type, or load the paper into a different tray. See "Removing Paper Jams" on page 21. See "Specifying Paper Type and Paper Size", User Guide. Press the [B&W Start] key or [Color Start] key to begin printing, or the [Clear...
... for the document differs from the type of the paper in the tray. Remove the jammed paper. Remove the jammed paper. Select a supported paper type, or load the paper into a different tray. See "Removing Paper Jams" on page 21. See "Specifying Paper Type and Paper Size", User Guide. Press the [B&W Start] key or [Color Start] key to begin printing, or the [Clear...

Quick Guide
Page 21
... the following positions, in the indicated order, to get toner on your hands or clothes. • Toner on page 23. 3. Removing Paper Jams Removing Jammed Paper • Jammed paper may be jammed inside the machine or in the ADF. ADF If paper is jammed in the ADF, see "Removing from the ADF" on page 24. 21 Transfer Unit If...
... the following positions, in the indicated order, to get toner on your hands or clothes. • Toner on page 23. 3. Removing Paper Jams Removing Jammed Paper • Jammed paper may be jammed inside the machine or in the ADF. ADF If paper is jammed in the ADF, see "Removing from the ADF" on page 24. 21 Transfer Unit If...

Quick Guide
Page 22
... lever on the front cover, and then carefully lower the front cover. Lower the blue fusing unit lever, and pull out the jammed paper carefully. Do not touch the parts labelled " " (indicating a hot surface). • The fusing section of this machine might be taken when removing... jammed paper. • Since the temperature around the guide is high, wait for it to cool before checking for it by pulling down the guide. 22 BAA306S Removing Paper Jams Removing from the Fusing Unit CAUTION • The inside of this...
... lever on the front cover, and then carefully lower the front cover. Lower the blue fusing unit lever, and pull out the jammed paper carefully. Do not touch the parts labelled " " (indicating a hot surface). • The fusing section of this machine might be taken when removing... jammed paper. • Since the temperature around the guide is high, wait for it to cool before checking for it by pulling down the guide. 22 BAA306S Removing Paper Jams Removing from the Fusing Unit CAUTION • The inside of this...

Quick Guide
Page 24
After closing the cover, check that the error is cleared. 24 After closing the cover, check that is jammed under the transfer unit. Removing Paper Jams Using both hands, carefully push up the front cover until it closes. • When closing the front cover, push the upper area of...Transfer Unit Pull the opening lever on the front cover, and then carefully lower the front cover. Carefully remove any paper that the error is cleared. If you cannot find the jammed paper, look inside the machine BAA311S Using both hands, carefully push up the front cover until it closes. •...
After closing the cover, check that the error is cleared. 24 After closing the cover, check that is jammed under the transfer unit. Removing Paper Jams Using both hands, carefully push up the front cover until it closes. • When closing the front cover, push the upper area of...Transfer Unit Pull the opening lever on the front cover, and then carefully lower the front cover. Carefully remove any paper that the error is cleared. If you cannot find the jammed paper, look inside the machine BAA311S Using both hands, carefully push up the front cover until it closes. •...

Quick Guide
Page 26
BAA381S If you cannot pull out the jammed original easily, raise the input tray to see if the original is jammed in with the roller part facing downwards. BAA382S 26 BAA386S Put the paper feed roller back in the output area. Removing Paper Jams Gently pull the jammed original to remove it . BAA385S Gently pull the jammed original to remove it .
BAA381S If you cannot pull out the jammed original easily, raise the input tray to see if the original is jammed in with the roller part facing downwards. BAA382S 26 BAA386S Put the paper feed roller back in the output area. Removing Paper Jams Gently pull the jammed original to remove it . BAA385S Gently pull the jammed original to remove it .

Quick Guide
Page 30
...into contact with toner, wash the affected area thoroughly with soap and water. • If toner gets on your clothes or skin when removing a paper jam or replacing toner. Consult a doctor if necessary. • Store print cartridges in a cool dark place. • The actual number of printed ...Early replacement of print cartridges might be responsible for any damage or expense that might ignite and cause burns of pages printed at a time, paper type and size, and environmental conditions such as temperature and humidity. Consult a doctor if necessary. • If toner or used toner gets ...
...into contact with toner, wash the affected area thoroughly with soap and water. • If toner gets on your clothes or skin when removing a paper jam or replacing toner. Consult a doctor if necessary. • Store print cartridges in a cool dark place. • The actual number of printed ...Early replacement of print cartridges might be responsible for any damage or expense that might ignite and cause burns of pages printed at a time, paper type and size, and environmental conditions such as temperature and humidity. Consult a doctor if necessary. • If toner or used toner gets ...
Quick Guide
Page 36
SP C221SF/C222SF Quick Guide Names and Locations Using the Copier Function Using the Scanner Function Using the Fax Function Error Messages Removing Paper Jams Troubleshooting Replacing Print Cartridges GB GB EN USA G184-8508
SP C221SF/C222SF Quick Guide Names and Locations Using the Copier Function Using the Scanner Function Using the Fax Function Error Messages Removing Paper Jams Troubleshooting Replacing Print Cartridges GB GB EN USA G184-8508

Support Guide
Page 45
... G184 45 CTL FW Ver. MCTL FW Ver. Displays only 1: SP C220N 2: SP C221N Product Support Guide Revision 1.1 (01/08) Menu List Display Info Model Name FW Ver. PDL FW Ver Printer Counter Scanner Counter Jam Counter Coverage Displays the Model Name, Depends on after you execute "...the printer engine. Total/ ADF/ Printer Output Bin/ Internal/ Tray1 / Tray2 Displays the number of paper jams at each mode. FAX FW Ver. When you change this setting. Total Page/ Color Image/ Black Image Displays the sum total of the latest communication is initialized. Coverage1 (Tray 1)/ ...
... G184 45 CTL FW Ver. MCTL FW Ver. Displays only 1: SP C220N 2: SP C221N Product Support Guide Revision 1.1 (01/08) Menu List Display Info Model Name FW Ver. PDL FW Ver Printer Counter Scanner Counter Jam Counter Coverage Displays the Model Name, Depends on after you execute "...the printer engine. Total/ ADF/ Printer Output Bin/ Internal/ Tray1 / Tray2 Displays the number of paper jams at each mode. FAX FW Ver. When you change this setting. Total Page/ Color Image/ Black Image Displays the sum total of the latest communication is initialized. Coverage1 (Tray 1)/ ...

User Guide
Page 7
Troubleshooting Overview ...221 Common Problems 222 Paper Feed Problems 223 Removing Printing Jams 224 If paper jams inside the fusing unit 225 If paper jams inside a tray 227 If paper jams inside the transfer unit 229 Removing Scanning Jams 230 Print Quality Problems 234 Checking the Condition of Report...191 Administrator Settings 192 Changing Administrator Settings 192 Administrator Setting Parameters...
Troubleshooting Overview ...221 Common Problems 222 Paper Feed Problems 223 Removing Printing Jams 224 If paper jams inside the fusing unit 225 If paper jams inside a tray 227 If paper jams inside the transfer unit 229 Removing Scanning Jams 230 Print Quality Problems 234 Checking the Condition of Report...191 Administrator Settings 192 Changing Administrator Settings 192 Administrator Setting Parameters...
User Guide
Page 11
...computer. ❖ User Guide Provides information about general operation and covers the topics listed below. • Installing options • Suitable paper types • Procedures to read this machine. To avoid injury and prevent damage to the machine, be sure to use the printer,... copier, scanner, and fax functions • Configuring the machine • Troubleshooting problems and fixing paper jams • Replacing consumables • Checking the status of this . ❖ Quick Installation Guide Contains procedures for making photocopies, scanning, and ...
...computer. ❖ User Guide Provides information about general operation and covers the topics listed below. • Installing options • Suitable paper types • Procedures to read this machine. To avoid injury and prevent damage to the machine, be sure to use the printer,... copier, scanner, and fax functions • Configuring the machine • Troubleshooting problems and fixing paper jams • Replacing consumables • Checking the status of this . ❖ Quick Installation Guide Contains procedures for making photocopies, scanning, and ...

User Guide
Page 72
...Do not use ink-jet printer paper because it was created. 64 Improperly stored paper might result in its original packaging. Be sure to the fusing unit and cause a paper jam. • Do not load OHP transparencies. Paper Storage Precautions Paper should always be stored properly. ...Printable Area The diagrams that follow show the areas of paper may cause paper jams or malfunctions if the 2 paper is not in which it may...
...Do not use ink-jet printer paper because it was created. 64 Improperly stored paper might result in its original packaging. Be sure to the fusing unit and cause a paper jam. • Do not load OHP transparencies. Paper Storage Precautions Paper should always be stored properly. ...Printable Area The diagrams that follow show the areas of paper may cause paper jams or malfunctions if the 2 paper is not in which it may...

User Guide
Page 78
... forcefully. A Remove the rear cover using a coin. 70 BAA037S Loading Legal size paper This section explains how to load Legal size paper into the machine. 2 BAA036S To avoid paper jams, make sure it at a slant can damage the machine. The same procedure applies to confirm the upper limit. Getting Started G Carefully push Tray 1 straight...
... forcefully. A Remove the rear cover using a coin. 70 BAA037S Loading Legal size paper This section explains how to load Legal size paper into the machine. 2 BAA036S To avoid paper jams, make sure it at a slant can damage the machine. The same procedure applies to confirm the upper limit. Getting Started G Carefully push Tray 1 straight...

User Guide
Page 83
Note ❒ To reinsert the extender, you might have differ- B Take out paper from Tray 1. 75 For details about paper types supported by running a pencil or ruler across them. ❒ Some kinds of envelope might be uneven if parts of envelope at a time. ❒ Before ... Tray 1 carefully, then pull it with both hands. proper printing quality. Place the tray on envelopes may be output creased or im- Loading Paper 2 BAA036S To avoid paper jams, make sure the tray is no air in the envelopes before loading. ❒ Load only one or two envelopes to push it out with...
Note ❒ To reinsert the extender, you might have differ- B Take out paper from Tray 1. 75 For details about paper types supported by running a pencil or ruler across them. ❒ Some kinds of envelope might be uneven if parts of envelope at a time. ❒ Before ... Tray 1 carefully, then pull it with both hands. proper printing quality. Place the tray on envelopes may be output creased or im- Loading Paper 2 BAA036S To avoid paper jams, make sure the tray is no air in the envelopes before loading. ❒ Load only one or two envelopes to push it out with...

User Guide
Page 85
...and then rotate the print object by 180 degrees using the printer driver before printing. For details, see the printer driver Help. 77 To avoid paper jams, make sure the tray is securely inserted. BAA147S Note ❒ Be sure to load envelopes so that their flaps are not stacked higher than ...the upper limit (lower line) mark inside the tray. 2 BAA174S G Carefully slide the paper tray back in the op- If you do not, the envelopes will become creased. ❒ If printed envelopes come out badly creased, load the ...
...and then rotate the print object by 180 degrees using the printer driver before printing. For details, see the printer driver Help. 77 To avoid paper jams, make sure the tray is securely inserted. BAA147S Note ❒ Be sure to load envelopes so that their flaps are not stacked higher than ...the upper limit (lower line) mark inside the tray. 2 BAA174S G Carefully slide the paper tray back in the op- If you do not, the envelopes will become creased. ❒ If printed envelopes come out badly creased, load the ...

User Guide
Page 87
ASH080S F Lift and slide the tray, then push it all the way in. BAA046S 79 Loading Paper D Pinch the clip on the end paper guide and align the arrow with the paper size. 2 ASH097S E Load the new paper stack print side up. Make sure paper is not stacked higher than the upper limit (upper line) marked inside the tray. Push the tray firmly to avoid a paper jam.
ASH080S F Lift and slide the tray, then push it all the way in. BAA046S 79 Loading Paper D Pinch the clip on the end paper guide and align the arrow with the paper size. 2 ASH097S E Load the new paper stack print side up. Make sure paper is not stacked higher than the upper limit (upper line) marked inside the tray. Push the tray firmly to avoid a paper jam.


