User Guide
Page 3
... 1.7 Chapter 2: SETTING UP YOUR PRINTER Unpacking 2.2 Selecting a Location 2.3 Installing the Toner Cartridge 2.4 Loading Paper 2.7 Changing the Paper Size in the Paper Tray ......... 2.9 Connecting a Printer Cable 2.11 For Local Printing 2.11 For Network Printing 2.13 Turning the Printer On 2.14 Printing a Demo Page 2.15 Installing Printer Software 2.16 Printer Driver Features 2.17 Installing Printer Software in Windows 2.18...
... 1.7 Chapter 2: SETTING UP YOUR PRINTER Unpacking 2.2 Selecting a Location 2.3 Installing the Toner Cartridge 2.4 Loading Paper 2.7 Changing the Paper Size in the Paper Tray ......... 2.9 Connecting a Printer Cable 2.11 For Local Printing 2.11 For Network Printing 2.13 Turning the Printer On 2.14 Printing a Demo Page 2.15 Installing Printer Software 2.16 Printer Driver Features 2.17 Installing Printer Software in Windows 2.18...
User Guide
Page 4
Using the Set IP (BP20N only 2.32 Installing Set IP 2.32 Reinstalling Set IP 2.33 Removing Set IP 2.33 To Use Set IP 2.34 Chapter 3: USING PRINT MATERIALS Choosing Paper ... 3.21 Printing on Preprinted Paper 3.23 Chapter 4: PRINTING TASKS Printing a Document in Windows 4.2 Cancelling a Print Job 4.3 Printer Settings 4.4 Layout Tab 4.5 Paper Tab 4.6 Graphics Tab 4.8 Using the Toner Save Mode 4.11 Extras Tab 4.12 About Tab 4.13 Printer Tab 4.13 Using a Favorite Setting 4.14 Using Help 4.14 Printing Multiple Pages on One Sheet of...
Using the Set IP (BP20N only 2.32 Installing Set IP 2.32 Reinstalling Set IP 2.33 Removing Set IP 2.33 To Use Set IP 2.34 Chapter 3: USING PRINT MATERIALS Choosing Paper ... 3.21 Printing on Preprinted Paper 3.23 Chapter 4: PRINTING TASKS Printing a Document in Windows 4.2 Cancelling a Print Job 4.3 Printer Settings 4.4 Layout Tab 4.5 Paper Tab 4.6 Graphics Tab 4.8 Using the Toner Save Mode 4.11 Extras Tab 4.12 About Tab 4.13 Printer Tab 4.13 Using a Favorite Setting 4.14 Using Help 4.14 Printing Multiple Pages on One Sheet of...

User Guide
Page 5
... Guide 4.31 Changing the Status Monitor Program Setting .... 4.31 Setting Up a Locally Shared Printer 4.32 In Windows 9x/Me 4.32 In Windows NT 4.0/2000/XP 4.33 Chapter 5: MAINTAINING YOUR PRINTER Maintaining the Toner Cartridge 5.2 Redistributing Toner 5.3 Replacing the Toner Cartridge 5.5 Cleaning the Printer 5.5 Cleaning the Outside 5.5 Cleaning the Inside 5.5 Printing Configuration Pages 5.8 Chapter 6: SOLVING PROBLEMS Troubleshooting...
... Guide 4.31 Changing the Status Monitor Program Setting .... 4.31 Setting Up a Locally Shared Printer 4.32 In Windows 9x/Me 4.32 In Windows NT 4.0/2000/XP 4.33 Chapter 5: MAINTAINING YOUR PRINTER Maintaining the Toner Cartridge 5.2 Redistributing Toner 5.3 Replacing the Toner Cartridge 5.5 Cleaning the Printer 5.5 Cleaning the Outside 5.5 Cleaning the Inside 5.5 Printing Configuration Pages 5.8 Chapter 6: SOLVING PROBLEMS Troubleshooting...
User Guide
Page 6
... Network Printing Problems 6.6 General Problems 6.6 Windows Problems 6.7 Clearing Paper Jams 6.8 In the Paper Feed Area 6.8 Around the Toner Cartridge 6.12 In the Paper Exit Area 6.13 Tips for Avoiding Paper Jams When Printing on the A5-sized Paper 6.14... Panel A.3 Removing Remote Control Panel A.3 Selecting Print Settings A.4 Starting the Remote Control Panel A.4 Using the Remote Control Panel Tabs A.5 Appendix B: INSTALLING PRINTER OPTIONS Precautions When Installing Printer Options B.2 Installing Memory B.3 Removing the Memory B.6 Installing an Optional Paper Tray B.7 v
... Network Printing Problems 6.6 General Problems 6.6 Windows Problems 6.7 Clearing Paper Jams 6.8 In the Paper Feed Area 6.8 Around the Toner Cartridge 6.12 In the Paper Exit Area 6.13 Tips for Avoiding Paper Jams When Printing on the A5-sized Paper 6.14... Panel A.3 Removing Remote Control Panel A.3 Selecting Print Settings A.4 Starting the Remote Control Panel A.4 Using the Remote Control Panel Tabs A.5 Appendix B: INSTALLING PRINTER OPTIONS Precautions When Installing Printer Options B.2 Installing Memory B.3 Removing the Memory B.6 Installing an Optional Paper Tray B.7 v

User Guide
Page 8
...suspect that your machine needs service or repair. •The external housing of your machine has been damaged. • Do not incinerate spilled toner or used toner bottle in death or serious injury. Safety Information When using this manual. • Turn off the power and disconnect the power plug (by... the plug, not the cable) if the power cable or plug becomes frayed or otherwise damaged. • To avoid hazardous electric shock or laser radiation exposure, do not remove any covers or screws other than those specified in minor or moderate injury or damage to an open flame. &#...
...suspect that your machine needs service or repair. •The external housing of your machine has been damaged. • Do not incinerate spilled toner or used toner bottle in death or serious injury. Safety Information When using this manual. • Turn off the power and disconnect the power plug (by... the plug, not the cable) if the power cable or plug becomes frayed or otherwise damaged. • To avoid hazardous electric shock or laser radiation exposure, do not remove any covers or screws other than those specified in minor or moderate injury or damage to an open flame. &#...

User Guide
Page 9
...an injury might result in hazardous radiation exposure. Normally, the ozone level is considered a class 1 laser device. This equipment contains a 5 milliwatt, 770-795 nanometer wavelength, AlGaAs laser diode. For North America Laser Safety: This equipment complies with a label indicating the " ". This equipment contains a 5 milliwatt,... of the machine or expended supply waste at an authorized dealer. • The inside the machine. • Keep toner (used or unused) and toner bottle out of the reach of children. • Be careful not to fall inside of the machine could be easily...
...an injury might result in hazardous radiation exposure. Normally, the ozone level is considered a class 1 laser device. This equipment contains a 5 milliwatt, 770-795 nanometer wavelength, AlGaAs laser diode. For North America Laser Safety: This equipment complies with a label indicating the " ". This equipment contains a 5 milliwatt,... of the machine or expended supply waste at an authorized dealer. • The inside the machine. • Keep toner (used or unused) and toner bottle out of the reach of children. • Be careful not to fall inside of the machine could be easily...
User Guide
Page 14
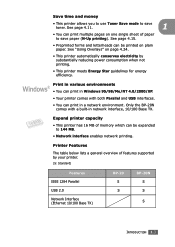
...page 4.11. 1 • You can print in network interface, 10/100 Base TX. Save time and money • This printer allows you to use Toner Save mode to save paper (N-Up printing). Only the BP-20N comes with both Parallel and USB interfaces. • You can print... pages on one single sheet of memory which can be expanded to save toner. See page 4.15. • Preprinted forms and letterheads can be printed on page 4.24. • This printer automatically conserves electricity by your printer. (S: Standard) Features IEEE 1284 Parallel USB 2.0 Network Interface (Ethernet 10...
...page 4.11. 1 • You can print in network interface, 10/100 Base TX. Save time and money • This printer allows you to use Toner Save mode to save paper (N-Up printing). Only the BP-20N comes with both Parallel and USB interfaces. • You can print... pages on one single sheet of memory which can be expanded to save toner. See page 4.15. • Preprinted forms and letterheads can be printed on page 4.24. • This printer automatically conserves electricity by your printer. (S: Standard) Features IEEE 1284 Parallel USB 2.0 Network Interface (Ethernet 10...
User Guide
Page 15
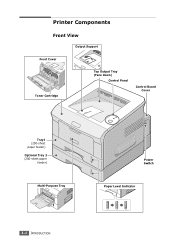
Printer Components Front View Output Support Front Cover Toner Cartridge Top Output Tray (Face down) Control Panel Control Board Cover Tray1 (250-sheet paper feeder) Optional Tray 2 (250-sheet paper feeder) Multi-Purpose Tray Power Switch Paper Level Indicator 1.4 INTRODUCTION
Printer Components Front View Output Support Front Cover Toner Cartridge Top Output Tray (Face down) Control Panel Control Board Cover Tray1 (250-sheet paper feeder) Optional Tray 2 (250-sheet paper feeder) Multi-Purpose Tray Power Switch Paper Level Indicator 1.4 INTRODUCTION
User Guide
Page 17
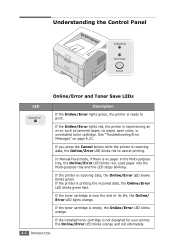
...data, the Online/Error LED blinks green fast. In Manual Feed mode, if there is no paper, open cover, or uninstalled toner cartridge. If the printer is receiving data, the Online/Error LED slowly blinks green. See "Troubleshooting Error Messages" on page 6.21. Understanding the Control... Panel Online/Error and Toner Save LEDs LED Description If the Online/Error lights green, the printer is experiencing an error, such as jammed paper, no paper in the Multi-purpose tray, the ...
...data, the Online/Error LED blinks green fast. In Manual Feed mode, if there is no paper, open cover, or uninstalled toner cartridge. If the printer is receiving data, the Online/Error LED slowly blinks green. See "Troubleshooting Error Messages" on page 6.21. Understanding the Control... Panel Online/Error and Toner Save LEDs LED Description If the Online/Error lights green, the printer is experiencing an error, such as jammed paper, no paper in the Multi-purpose tray, the ...
User Guide
Page 18
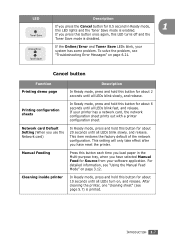
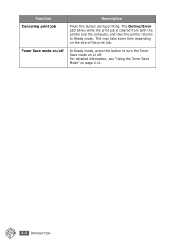
... button Function Description Printing demo page In Ready mode, press and hold this LED lights and the Toner Save mode is enabled. INTRODUCTION 1.7 If your system has some problem. After cleaning the printer, one "cleaning sheet" (see "Using the Manual Feed Mode" on page 6.21. Manual Feeding... printed. LED Description If you press the Cancel button for 0.5 second in the Multi-purpose tray, when you have reset the printer. If you have selected Manual Feed for Source from your software application. This item restores the factory default of the network configuration....
... button Function Description Printing demo page In Ready mode, press and hold this LED lights and the Toner Save mode is enabled. INTRODUCTION 1.7 If your system has some problem. After cleaning the printer, one "cleaning sheet" (see "Using the Manual Feed Mode" on page 6.21. Manual Feeding... printed. LED Description If you press the Cancel button for 0.5 second in the Multi-purpose tray, when you have reset the printer. If you have selected Manual Feed for Source from your software application. This item restores the factory default of the network configuration....
User Guide
Page 19
In Ready mode, press this button during printing. This may take some time depending on page 4.11. 1.8 INTRODUCTION For detailed information, see "Using the Toner Save Mode" on the size of the print job. The Online/Error LED blinks while the print job is cleared from both the printer and the computer, and then the printer returns to turn the Toner Save mode on or off Description Press this button to Ready mode. Function Canceling print job Toner Save mode on/off .
In Ready mode, press this button during printing. This may take some time depending on page 4.11. 1.8 INTRODUCTION For detailed information, see "Using the Toner Save Mode" on the size of the print job. The Online/Error LED blinks while the print job is cleared from both the printer and the computer, and then the printer returns to turn the Toner Save mode on or off Description Press this button to Ready mode. Function Canceling print job Toner Save mode on/off .
User Guide
Page 20
2 Setting Up Your Printer This chapter provides step by step information on setting up your printer. This chapter includes: • Unpacking • Installing the Toner Cartridge • Loading Paper • Connecting a Printer Cable • Turning the Printer On • Printing a Demo Page • Installing Printer Software • Reinstalling Printer Software • Removing Printer Software • Using the Set IP (BP20N only)
2 Setting Up Your Printer This chapter provides step by step information on setting up your printer. This chapter includes: • Unpacking • Installing the Toner Cartridge • Loading Paper • Connecting a Printer Cable • Turning the Printer On • Printing a Demo Page • Installing Printer Software • Reinstalling Printer Software • Removing Printer Software • Using the Set IP (BP20N only)

User Guide
Page 21
Make sure that the printer has been packed with the following items: Toner Cartridge Power Cord CD-ROM Safety Information Quick Install Guide NOTES: • If any items are missing or damaged, notify your dealer immediately. • Components may differ from one country to another. • The CD-ROM contains the printer driver, the User's Guide, and the Adobe Acrobat Reader programme. 2 Carefully remove all accessories from the printer. 2.2 SETTING UP YOUR PRINTER Unpacking 1 Remove the Printer and all of the packing tape from the packing carton.
Make sure that the printer has been packed with the following items: Toner Cartridge Power Cord CD-ROM Safety Information Quick Install Guide NOTES: • If any items are missing or damaged, notify your dealer immediately. • Components may differ from one country to another. • The CD-ROM contains the printer driver, the User's Guide, and the Adobe Acrobat Reader programme. 2 Carefully remove all accessories from the printer. 2.2 SETTING UP YOUR PRINTER Unpacking 1 Remove the Printer and all of the packing tape from the packing carton.

User Guide
Page 23
for example, when opening/closing the tray or installing/ removing the toner cartridge. Don't use it; Installing the Toner Cartridge 1 Grasp the front cover and pull it toward you use a knife or other sharp object as it might scratch the drum of the cartridge. 2.4 SETTING UP YOUR PRINTER NOTE: Because the printer is very light, it may move the printer. 2 Remove the toner cartridge from its bag and remove the paper covering the cartridge. Be careful not to move when you to open.
for example, when opening/closing the tray or installing/ removing the toner cartridge. Don't use it; Installing the Toner Cartridge 1 Grasp the front cover and pull it toward you use a knife or other sharp object as it might scratch the drum of the cartridge. 2.4 SETTING UP YOUR PRINTER NOTE: Because the printer is very light, it may move the printer. 2 Remove the toner cartridge from its bag and remove the paper covering the cartridge. Be careful not to move when you to open.

User Guide
Page 24
3 Gently shake the cartridge from side to side to light for more than a few minutes. SETTING UP YOUR PRINTER 2.5 Cover it off with a piece of paper if left exposed for more than a few minutes and keep it in a flat and clean place. • If toner gets on each side. Hot water sets toner into fabric. 4 Locate the cartridge slots inside the cartridge. 2 NOTES: • To prevent damage, do not expose the toner cartridge to distribute the toner evenly inside the printer, one on your clothing, wipe it with a dry cloth and wash clothing in cold water.
3 Gently shake the cartridge from side to side to light for more than a few minutes. SETTING UP YOUR PRINTER 2.5 Cover it off with a piece of paper if left exposed for more than a few minutes and keep it in a flat and clean place. • If toner gets on each side. Hot water sets toner into fabric. 4 Locate the cartridge slots inside the cartridge. 2 NOTES: • To prevent damage, do not expose the toner cartridge to distribute the toner evenly inside the printer, one on your clothing, wipe it with a dry cloth and wash clothing in cold water.

User Guide
Page 25
NOTE: When printing text at 5% coverage, you can expect a toner cartridge life of approximately 5,000 pages.(3,500 pages for the toner cartridge that the cover is shipped with the machine) 2.6 SETTING UP YOUR PRINTER 5 Grasp the handle and insert the cartridge into the printer until it snaps into place. 6 Close the front cover. Make sure that is securely closed.
NOTE: When printing text at 5% coverage, you can expect a toner cartridge life of approximately 5,000 pages.(3,500 pages for the toner cartridge that the cover is shipped with the machine) 2.6 SETTING UP YOUR PRINTER 5 Grasp the handle and insert the cartridge into the printer until it snaps into place. 6 Close the front cover. Make sure that is securely closed.

User Guide
Page 36
Driver Feature Toner Save Print quality option Poster printing Multiple pages per sheet (N-up) Scale printing Fit to page printing Different source for first page Watermark Overlay Print order PCL6 driver Win 2000/XP Win 9x Win NT4.0 Y Y Y Y Y Y Y Y Y Y Y Y Y Y Y Y Y Y Y Y Y Y Y Y Y Y Y Y Y Y SETTING UP YOUR PRINTER 2.17 Printer Driver Features Your printer drivers will support the following standard features...
Driver Feature Toner Save Print quality option Poster printing Multiple pages per sheet (N-up) Scale printing Fit to page printing Different source for first page Watermark Overlay Print order PCL6 driver Win 2000/XP Win 9x Win NT4.0 Y Y Y Y Y Y Y Y Y Y Y Y Y Y Y Y Y Y Y Y Y Y Y Y Y Y Y Y Y Y SETTING UP YOUR PRINTER 2.17 Printer Driver Features Your printer drivers will support the following standard features...

User Guide
Page 78
4 Printing Tasks This chapter explains how to print your documents in Windows • Printer Settings • Using the Toner Save Mode • Printing Multiple Pages on One Sheet of Paper • Printing Posters • Fitting Your Document to use the print settings. This chapter includes: • Printing a Document in Windows and how to a Selected Paper Size • Printing a Reduced or Enlarged Document • Using Watermarks • Using Overlays • Using the Status Monitor • Setting Up a Locally Shared Printer
4 Printing Tasks This chapter explains how to print your documents in Windows • Printer Settings • Using the Toner Save Mode • Printing Multiple Pages on One Sheet of Paper • Printing Posters • Fitting Your Document to use the print settings. This chapter includes: • Printing a Document in Windows and how to a Selected Paper Size • Printing a Reduced or Enlarged Document • Using Watermarks • Using Overlays • Using the Status Monitor • Setting Up a Locally Shared Printer

User Guide
Page 86
.... PRINTING TASKS 4.9 Property Description 3 Toner Save Mode Selecting this option extends the life of your toner cartridge and reduces your cost per page without a significant reduction in the print quality. • Printer Setting: When you select this option, the Toner Save feature is determined by the setting... you've made on each page. • Off: When you do not need to save toner to image the text in your document.
.... PRINTING TASKS 4.9 Property Description 3 Toner Save Mode Selecting this option extends the life of your toner cartridge and reduces your cost per page without a significant reduction in the print quality. • Printer Setting: When you select this option, the Toner Save feature is determined by the setting... you've made on each page. • Off: When you do not need to save toner to image the text in your document.

User Guide
Page 88
... PRINTING TASKS 4.11 There are two ways to print a page. • If the Toner Save LED is off, the mode is disabled and the printer prints in Ready mode(Toner Save green LED is on) 4 • If the Toner Save LED is on, the mode is not available with the 1200 dpi setting.... The printer must be in the normal mode. Using the Toner Save Mode Toner Save mode allows the printer to use less toner on the control panel for 0.5 second. This setting is enabled and the printer uses less toner to enable the Toner Save mode: From the Control Panel Press ...
... PRINTING TASKS 4.11 There are two ways to print a page. • If the Toner Save LED is off, the mode is disabled and the printer prints in Ready mode(Toner Save green LED is on) 4 • If the Toner Save LED is on, the mode is not available with the 1200 dpi setting.... The printer must be in the normal mode. Using the Toner Save Mode Toner Save mode allows the printer to use less toner on the control panel for 0.5 second. This setting is enabled and the printer uses less toner to enable the Toner Save mode: From the Control Panel Press ...


