
User Guide
Page 5
... Monitor Program Setting .... 4.31 Setting Up a Locally Shared Printer 4.32 In Windows 9x/Me 4.32 In Windows NT 4.0/2000/XP 4.33 Chapter 5: MAINTAINING YOUR PRINTER Maintaining the Toner Cartridge 5.2 Redistributing Toner 5.3 Replacing the Toner Cartridge 5.5 Cleaning the Printer 5.5 Cleaning the Outside 5.5 Cleaning the Inside 5.5 Printing Configuration Pages 5.8 Chapter 6: SOLVING PROBLEMS Troubleshooting Checklist 6.2 Solving General...
... Monitor Program Setting .... 4.31 Setting Up a Locally Shared Printer 4.32 In Windows 9x/Me 4.32 In Windows NT 4.0/2000/XP 4.33 Chapter 5: MAINTAINING YOUR PRINTER Maintaining the Toner Cartridge 5.2 Redistributing Toner 5.3 Replacing the Toner Cartridge 5.5 Cleaning the Printer 5.5 Cleaning the Outside 5.5 Cleaning the Inside 5.5 Printing Configuration Pages 5.8 Chapter 6: SOLVING PROBLEMS Troubleshooting Checklist 6.2 Solving General...
User Guide
Page 18
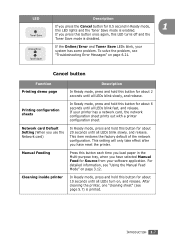
...If the Online/Error and Toner Save LEDs blink, your printer has a network card, the network configuration sheet prints out with a printer configuration sheet. This setting will only take effect after you have reset the printer. Cleaning inside printer In Ready mode, press and hold this button for about ...mode, 1 this button for about 6 seconds until all LEDs blink slowly, and release. After cleaning the printer, one "cleaning sheet" (see page 5.7) is enabled. Printing configuration sheets In Ready mode, press and hold this LED lights and the Toner Save mode is printed. For...
...If the Online/Error and Toner Save LEDs blink, your printer has a network card, the network configuration sheet prints out with a printer configuration sheet. This setting will only take effect after you have reset the printer. Cleaning inside printer In Ready mode, press and hold this button for about ...mode, 1 this button for about 6 seconds until all LEDs blink slowly, and release. After cleaning the printer, one "cleaning sheet" (see page 5.7) is enabled. Printing configuration sheets In Ready mode, press and hold this LED lights and the Toner Save mode is printed. For...

User Guide
Page 32
... Server Requirements 10/100 Base-TX (standard for BP20N) • Windows 95/98/Me/NT 4.0/2000/XP • TCP/IP • DHCP, BOOTP • TCP/IP: Transmission Control Protocol/Internet Protocol • DHCP: Dynamic Host Configuration Protocol • BOOTP: Bootstrap Protocol SETTING UP YOUR PRINTER 2.13 For Network Printing You can attach your...
... Server Requirements 10/100 Base-TX (standard for BP20N) • Windows 95/98/Me/NT 4.0/2000/XP • TCP/IP • DHCP, BOOTP • TCP/IP: Transmission Control Protocol/Internet Protocol • DHCP: Dynamic Host Configuration Protocol • BOOTP: Bootstrap Protocol SETTING UP YOUR PRINTER 2.13 For Network Printing You can attach your...

User Guide
Page 43
Installing Software for Network Printing When you connect your printer to a network, you must first configure the TCP/IP settings for most users. Typical Installation This is connected to view the User's Guide and Administrator Guide. The CD-ROM should automatically ... details about connecting to install the software on each computer on . All components necessary for you. 2.24 SETTING UP YOUR PRINTER If the installation window does not appear, click Start and then Run. If your drive and click OK. 3 Click Next. • If necessary, select a language ...
Installing Software for Network Printing When you connect your printer to a network, you must first configure the TCP/IP settings for most users. Typical Installation This is connected to view the User's Guide and Administrator Guide. The CD-ROM should automatically ... details about connecting to install the software on each computer on . All components necessary for you. 2.24 SETTING UP YOUR PRINTER If the installation window does not appear, click Start and then Run. If your drive and click OK. 3 Click Next. • If necessary, select a language ...
User Guide
Page 45
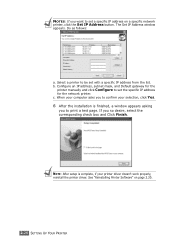
... specific IP address for the printer manually and click Configure to set a specific IP address on page 2.30. 2.26 SETTING UP YOUR PRINTER The Set IP Address window appears. Configure an IP address, subnet mask, and Default gateway for the network printer. If you to print a... test page. See "Reinstalling Printer Software" on a specific network printer, click the Set IP Address button. c....
... specific IP address for the printer manually and click Configure to set a specific IP address on page 2.30. 2.26 SETTING UP YOUR PRINTER The Set IP Address window appears. Configure an IP address, subnet mask, and Default gateway for the network printer. If you to print a... test page. See "Reinstalling Printer Software" on a specific network printer, click the Set IP Address button. c....

User Guide
Page 47
... IP address, subnet mask, and Default gateway for the printer manually and click Configure to the network, enter the port name and the IP address for the network printer. Do as follows: a.Select a printer to the network. Select the printer you want to confirm your printer to be set with a specific IP address from the list...
... IP address, subnet mask, and Default gateway for the printer manually and click Configure to the network, enter the port name and the IP address for the network printer. Do as follows: a.Select a printer to the network. Select the printer you want to confirm your printer to be set with a specific IP address from the list...

User Guide
Page 51
Using the Set IP (BP20N only) The Set IP can configure the network information of the printer that has own network interface card. The CD-ROM should automatically run and a maintenance window appears. Installing Set IP 1 Insert the supplied CD-ROM into your printer and click Next. If the maintenance ... Start and then Run. Then the installation will start and a test page will appear. • After connecting the printer, click Next. • If you don't want to connect the printer at the end of your drive and click OK. 2 Click Next. 3 Select Custom installation or Typical installation for ...
Using the Set IP (BP20N only) The Set IP can configure the network information of the printer that has own network interface card. The CD-ROM should automatically run and a maintenance window appears. Installing Set IP 1 Insert the supplied CD-ROM into your printer and click Next. If the maintenance ... Start and then Run. Then the installation will start and a test page will appear. • After connecting the printer, click Next. • If you don't want to connect the printer at the end of your drive and click OK. 2 Click Next. 3 Select Custom installation or Typical installation for ...

User Guide
Page 53
...Start menu, select Aficio BP20 Series in Programs, and click Set IP. 2 Click to "Printing Configuration Pages" on the local network, or click and type the printer's MAC address. NOTE: To confirm the MAC address, see the NETWORK PRINTER CARD TEST PAGE. The NETWORK PRINTER CARD TEST PAGE will... be printed after the Configuration Page. To Print the Configuration Page, refer to find printer on page 5.8. 3 Type IP address...
...Start menu, select Aficio BP20 Series in Programs, and click Set IP. 2 Click to "Printing Configuration Pages" on the local network, or click and type the printer's MAC address. NOTE: To confirm the MAC address, see the NETWORK PRINTER CARD TEST PAGE. The NETWORK PRINTER CARD TEST PAGE will... be printed after the Configuration Page. To Print the Configuration Page, refer to find printer on page 5.8. 3 Type IP address...

User Guide
Page 94
down list. 4 NOTE: This feature is automatically stretched to cover 4 physical pages. 2 x 2 3 x 3 If you select Custom, you select Fit to Page or Reduce/Enlarge from the Paper tab. 3 Configure the poster option: You can manually set the scale rate of the image in the Scale Factor input box. If you select 2x2, the image is not available when you can select the page layout from 2x2, 3x3, 4x4, or Custom. PRINTING TASKS 4.17 2 From the Layout tab, select Poster on the Type drop-
down list. 4 NOTE: This feature is automatically stretched to cover 4 physical pages. 2 x 2 3 x 3 If you select Custom, you select Fit to Page or Reduce/Enlarge from the Paper tab. 3 Configure the poster option: You can manually set the scale rate of the image in the Scale Factor input box. If you select 2x2, the image is not available when you can select the page layout from 2x2, 3x3, 4x4, or Custom. PRINTING TASKS 4.17 2 From the Layout tab, select Poster on the Type drop-

User Guide
Page 112
5 Maintaining Your printer This chapter provides suggestions for high-quality and economical printing and information for maintaining the toner cartridge and the printer. This chapter includes: • Maintaining the Toner Cartridge • Cleaning the Printer • Printing Configuration Pages
5 Maintaining Your printer This chapter provides suggestions for high-quality and economical printing and information for maintaining the toner cartridge and the printer. This chapter includes: • Maintaining the Toner Cartridge • Cleaning the Printer • Printing Configuration Pages

User Guide
Page 119
... picks up a sheet of optional accessories, such as memory, optional tray, and printer languages. To print configuration pages: 1 Ensure that the printer is turned on and in the Ready mode with a printer configuration sheet. If your printer has a network card, the network configuration sheet prints out with paper loaded in the tray. 2 Press and hold down the...
... picks up a sheet of optional accessories, such as memory, optional tray, and printer languages. To print configuration pages: 1 Ensure that the printer is turned on and in the Ready mode with a printer configuration sheet. If your printer has a network card, the network configuration sheet prints out with paper loaded in the tray. 2 Press and hold down the...
User Guide
Page 122
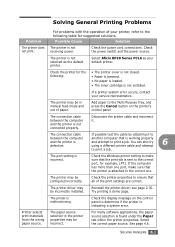
... the Cancel button on the control panel to determine if the printer is indicating a system error. The printer may be configured incorrectly. Reinstall the printer driver; SOLVING PROBLEMS 6.3 The port setting is not not print. Check the printer properties to ensure that the print job is sent to the ... feed mode and out of paper. receiving power. Select Aficio BP20 Series PCL6 as the default printer. Add paper to print a job. see page 2.30. Check the power switch and the power source. Check the Windows printer setting to make sure that is working properly and attempt ...
... the Cancel button on the control panel to determine if the printer is indicating a system error. The printer may be configured incorrectly. Reinstall the printer driver; SOLVING PROBLEMS 6.3 The port setting is not not print. Check the printer properties to ensure that the print job is sent to the ... feed mode and out of paper. receiving power. Select Aficio BP20 Series PCL6 as the default printer. Add paper to print a job. see page 2.30. Check the power switch and the power source. Check the Windows printer setting to make sure that is working properly and attempt ...

User Guide
Page 125
...does not succeed, there must be a problem with some wrong values entered by using TCP/IP protocol. 1. adding a port and the printer doesn't function. 6.6 SOLVING PROBLEMS Solving Network Printing Problems General Problems Problem Solution System does not function with network connectivity between the manager and...using Set IP. You cannot see any of printer is on the same network with sufficient permissions have been used. Possibly the parameters in your PC is displayed empty while Assign IP Address by mistake while configuring. Restart the system and set IP address, ...
...does not succeed, there must be a problem with some wrong values entered by using TCP/IP protocol. 1. adding a port and the printer doesn't function. 6.6 SOLVING PROBLEMS Solving Network Printing Problems General Problems Problem Solution System does not function with network connectivity between the manager and...using Set IP. You cannot see any of printer is on the same network with sufficient permissions have been used. Possibly the parameters in your PC is displayed empty while Assign IP Address by mistake while configuring. Restart the system and set IP address, ...
User Guide
Page 146
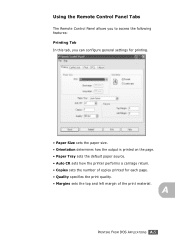
...A.5 Using the Remote Control Panel Tabs The Remote Control Panel allows you to access the following features: Printing Tab In this tab, you can configure general settings for printing. • Paper Size sets the paper size. • Orientation determines how the output is printed on the page. &#...8226; Paper Tray sets the default paper source. • Auto CR sets how the printer performs a carriage return. • Copies sets the number of copies printed for each page. • Quality specifies the print quality. • Margins...
...A.5 Using the Remote Control Panel Tabs The Remote Control Panel allows you to access the following features: Printing Tab In this tab, you can configure general settings for printing. • Paper Size sets the paper size. • Orientation determines how the output is printed on the page. &#...8226; Paper Tray sets the default paper source. • Auto CR sets how the printer performs a carriage return. • Copies sets the number of copies printed for each page. • Quality specifies the print quality. • Margins...

User Guide
Page 147
...; Power Save determines the length of time the printer waits after fifteen seconds. The factory default is sent to a reduced power state. If it is checked, the printer conserves toner when printing. Config Tab You can configure various printer features. • Emulation selects the emulation for ...a printed page until the printer signals that has jammed. This uses more power to keep the printer warm and ready to print with...
...; Power Save determines the length of time the printer waits after fifteen seconds. The factory default is sent to a reduced power state. If it is checked, the printer conserves toner when printing. Config Tab You can configure various printer features. • Emulation selects the emulation for ...a printed page until the printer signals that has jammed. This uses more power to keep the printer warm and ready to print with...

User Guide
Page 149
It shows the printer features and specifications. A list of the user default settings and the amount of printer memory available prints. • Demo Page prints a demonstration page. A.8 PRINTING FROM DOS APPLICATIONS Test Tab This tab allows you to print a resident page to test your printer's performance. • Self Test prints a configuration sheet.
It shows the printer features and specifications. A list of the user default settings and the amount of printer memory available prints. • Demo Page prints a demonstration page. A.8 PRINTING FROM DOS APPLICATIONS Test Tab This tab allows you to print a resident page to test your printer's performance. • Self Test prints a configuration sheet.

User Guide
Page 150
... point size (only if you have selected a scalable monospaced font). Point size refers to select the desired typeface. PCL Tab In this tab, you can configure various settings for A PCL emulation. You can select point sizes from 5 to the number of fixed-space characters in increments of 0.25 points. • Lines...
... point size (only if you have selected a scalable monospaced font). Point size refers to select the desired typeface. PCL Tab In this tab, you can configure various settings for A PCL emulation. You can select point sizes from 5 to the number of fixed-space characters in increments of 0.25 points. • Lines...

User Guide
Page 159
..., see page 2.7. 7 Reconnect the power cord and cables and then turn the printer on the back of the printer. 6 Load paper in Tray2. B.8 INSTALLING PRINTER OPTIONS For information about loading paper in place. NOTES: • When you are printing using the optional Tray 2. Use the optional ...it into place on the tabs. 5 Plug the cable into the connector on . 4 Align the printer with Tray 1 in the tray, see page 4.2. • Do not remove Tray 1 from the printer while you print a document, configure the printer driver from your application. If you do this, a paper jam may occur.
..., see page 2.7. 7 Reconnect the power cord and cables and then turn the printer on the back of the printer. 6 Load paper in Tray2. B.8 INSTALLING PRINTER OPTIONS For information about loading paper in place. NOTES: • When you are printing using the optional Tray 2. Use the optional ...it into place on the tabs. 5 Plug the cable into the connector on . 4 Align the printer with Tray 1 in the tray, see page 4.2. • Do not remove Tray 1 from the printer while you print a document, configure the printer driver from your application. If you do this, a paper jam may occur.
User Guide
Page 170
...configuration page, print 5.8 connect parallel 2.11 power cord 2.14 USB 2.12 control panel,use 1.6 custom-sized materials, print 3.21 D demo page, print 2.15 E envelopes, print 3.14 error, solve 6.21 F face down output tray 3.5 face up output tray 3.6 Favorite setting, use 4.14 features printer 1.2 printer... memory DIMM, install B.3 Multiple pages per sheet printing 4.15 Multi-Purpose Tray, use 3.8 N network printing cable, connect 2.13 locally shared printer, set 4.32 O option, install memory DIMM B.3 paper tray 2 B.7 optional tray, install B.7 orientation, print 4.5 output location, select 3.5...
...configuration page, print 5.8 connect parallel 2.11 power cord 2.14 USB 2.12 control panel,use 1.6 custom-sized materials, print 3.21 D demo page, print 2.15 E envelopes, print 3.14 error, solve 6.21 F face down output tray 3.5 face up output tray 3.6 Favorite setting, use 4.14 features printer 1.2 printer... memory DIMM, install B.3 Multiple pages per sheet printing 4.15 Multi-Purpose Tray, use 3.8 N network printing cable, connect 2.13 locally shared printer, set 4.32 O option, install memory DIMM B.3 paper tray 2 B.7 optional tray, install B.7 orientation, print 4.5 output location, select 3.5...

User Guide
Page 171
... 4.13 print quality problems 6.16 print quality problems, solve 6.16 print resolution 4.8 printer properties Windows 4.4 printer software install in Windows 2.18 uninstall Windows 2.31 printing configuration page 5.8 demo page 2.15 fitting to a selected paper size 4.19 from Windows... start A.4 tabs A.5 resolution printing 4.8 S software overview 2.16 reinstall Windows 2.30 system requirements 2.18 uninstall Windows 2.31 specification paper C.3 printer C.2 status monitor, use 4.29 system requirements for Windows 2.18 T toner install 2.4 life 5.2 redistribute 5.3 replace 5.5 top output tray, use...
... 4.13 print quality problems 6.16 print quality problems, solve 6.16 print resolution 4.8 printer properties Windows 4.4 printer software install in Windows 2.18 uninstall Windows 2.31 printing configuration page 5.8 demo page 2.15 fitting to a selected paper size 4.19 from Windows... start A.4 tabs A.5 resolution printing 4.8 S software overview 2.16 reinstall Windows 2.30 system requirements 2.18 uninstall Windows 2.31 specification paper C.3 printer C.2 status monitor, use 4.29 system requirements for Windows 2.18 T toner install 2.4 life 5.2 redistribute 5.3 replace 5.5 top output tray, use...


